►
From YouTube: Intro to Vue Test Utils
Description
No description was provided for this meeting.
If this is YOUR meeting, an easy way to fix this is to add a description to your video, wherever mtngs.io found it (probably YouTube).
A
Hello,
my
name
is
lena
and
I'm
senior
front-end
developer
at
gitlab,
and
today
I
want
to
introduce
you
to
view
test
details
and
we'll
do
it
by
testing
a
small
view.
Application
that
I
have
prepared,
for
you
view
is
a
front-end
framework,
and
that
is
why
we
are
talking
about
front-end
testing
today.
So
what
is
it?
In
general
testing
refers
to
the
automated
tool.
That
is,
that
will
check
that
your
application
works.
A
So
why
do
we
write
specs,
the
first
and
the
most
obvious
reason
is
to
avoid
bugs
and
regressions
another
one.
That
is
not.
That
obvious
is
that
from
the
specs.
You
can
quickly
figure
out
what
other
edge
cases
and
what
is
the
desired
output
of
the
code,
so
specs
can
serve
as
a
code,
documentation
and
the
last
but
not
least,
is
these
spikes.
You
can
do
a
confident
refactoring,
meaning
that
if
you
change
the
code
and
your
specs
did
not
break
most
likely,
your
application
did
not
break.
A
There
are
different
levels
of
testing,
but
you
need
specs
are
focused
on
testing
isolated
pieces
of
functionality
like
test
test
and
separate
function.
Integration
specs.
I
check
that
parts
of
the
app
interact
well
with
it
answer,
and
there
is
many
more,
but
vrfo
will
be
focusing
only
on
those
first
two
today,
if
you
go
to
the
vtu
website,
you
will
see
that
it
is
the
official
unit
testing
library
for
view
js.
A
It
says
unit,
but
a
in
a
component
heavy
world
like
view
app
as
the
line
between
unit
and
integration.
Specs
can
be
a
quite
blurry
because
we
really
care
about
something
in
isolation,
but
we
care
much
more
about
how
components
interact
with
each
other.
So
today
we
are
writing
component
specs
and
we
are
doing
it
using
a
vtu
utility
library.
Of
course,
let's
see
the
app
we
are
going
to
be
testing
today.
First
of
all,
you
will
need
to
navigate
to
the
projects
page
in
gitlab
and
clone
it.
A
You
will
also
need
a
git,
a
node
and
yarn
installed
on
your
local
machine.
I
have
provided
the
install
instructions
when
you
navigate
to
the
projects
page
in
gitlab
and
press
the
clone
button,
you'll
see
the
drop
down
and
in
the
dropdown
you
can
copy
the
link
to
the
repository,
then
in
a
terminal
run,
a
git
clone
with
the
link
and
after
yarn,
install
and
yarn
serve
to
run
the
project
locally.
A
A
Now,
let's
take
a
quick
look
on
how
this
app
is
implemented.
So
if
you
have
worked
this
view
before
this
might
look
a
bit
familiar
so
here
is:
we
are
mounting
our
app
and
the
fvu
renders
two
components:
header
and
form.
If
you
go
to
the
header,
header
and
just
navigation
bar
and
logo-
and
it
doesn't
have
any
logic,
you
might
have
noticed
that
I
used
gel
css
classes
and
they
are
provided
by
the
lab
ui
utility
library
that
is
developed
and
supported
by
the
club
team.
A
So
here
we
have
the
input,
and
there
is
also
a
validation
message
and
validation.
Message
has
the
css
class
and
it
will
be
rendered
when
there
is
a
message
and
message
is
invalid
and
the
submit
button
submit
button
has
disabled
property
and
this
property.
It
will
change
its
value
based
on
the
validness
of
the
message
and
when
you
go
and
submit
the
form,
the
submit
request
function
from
the
api
will
be
called,
which
will
make
the
request
to
the
backend
to
run
android
specs
today,
we'll
be
using
a
delightful
javascript
test
and
framework
named
edges.
A
You
already
have
the
lecture
on
js,
so
I
won't
talk
about
it
more,
but
we'll
be
using
just
api
today
so,
and
it's
described
test
expect
before
each
and
essence.
This
is
it.
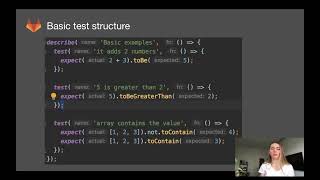
Let
me
walk
you
quickly
through
the
basic
test
structure.
Every
test
file
will
contain
one
contain
one
or
couple
describe
blocks.
I
describe
block
groups
together
a
couple
of
specs
that
collectively
test
some
related
functionality.
A
A
Finally,
the
first
component
we
are
going
to
test
is
header
review
component,
so
we
go
to
the
test
folder
and
create
header
spec
js,
and
note
that
spec
js
ending
is
important
because
just
is
configured
to
write
to
run
specific
files,
those
that
are
located
on
the
test
folder
and
that
have
spike
js
ending
so
we'll
go
to
the
header,
spec.js
and
we'll
start
writing
spec
to
test
the
view
component.
We
need
to
create
as
a
test
instance.
A
A
A
A
The
read-only
instance
of
the
mounted
and
rendered
component
sits
on
the
wrapper's
vm
property,
so
we
check
that
rapper.
Vm
is
instance
of
a
view
component.
Let's
run
the
specs
and
we
run
them
with
yarn
test
and
provide
the
watch
argument
so
suggests
it
keeps
watching
for
the
changes
in
this
test
files.
A
Please
note
that
checking
that
the
wrapper
vm
is
instance
of
your
component
is
done
only
for
the
sake
of
demonstration.
There
is
no
point
in
testing
as
a
library
when
we
want
to
test
our
component
so
to
test
the
component
is
mounted
and
exist.
We
will
call
repress
exists,
a
message
and
it
does
exist.
Now
we
can
move
to
child
components.
A
Vtu
allows
us
to
find
child
view,
components
and
child
html
elements
inside
our
test
component.
So
we
can
look
for
the
header
or
gel
navigation
bar,
for
instance,
to
find
view,
components
and
html
elements
inside
the
mounted
component
view
test.
Utils
provides
us
with
two
methods
find
and
find
component.
Both
of
them
will
return.
A
The
dtu
wrapper
over
the
first
matching
download
or
view
component,
so
we
will
call
so,
for
instance,
to
find
the
header
we
call
wrapper
find
and
we
find
it
pass.
The
selector
to
the
find
and
the
selector
is
the
same
as
the
dom's
api
selector
and
to
find
the
navigation
bar.
We
use
wrapper,
find
component
and
we
pass
through
it.
The
gel
nav
bar
component.
A
A
Let's
admit
that
our
header
view
component
doesn't
have
much
logic
and
in
fact
it
doesn't
have
any
logic
at
all.
It
just
renders
two
other
components
so
to
test
components
that
are
not
heavy
with
logic,
but
are
heavy
with
markup.
I
want
to
introduce
you
to
a
very
interesting
technique
and
this
technique
is
the
combination
of
avt
use,
wrapper,
html
method
and
just
too
much
snapshot.
A
A
A
A
A
A
We
would
call
rape,
refine,
select
and
on
the
returned
wrapper
we
would
call
find
all
method
and
we
would
provide
the
option
selector
to
it,
find
all
works
pretty
much
as
find,
but
it
returns
all
the
instances
of
the
component
will
find
returns
only
the
first
one.
So,
let's
write
the
expectation
we
want
our
options
to
have
the
same
length
as
the
mock
request
types
length
and
to
have
length
is
suggest.
A
A
There
is
an
alternative
way
to
update
the
properties
on
the
parent
on
the
test
component.
For
that
we
would
call
wrapper,
set
props
and
to
the
set
props.
You
would
provide
an
object
of
properties.
You
want
to
update
on
the
test
component,
so
we
want
to
update
request
again,
but
this
time
we
will
set
them
to
the
empty
array,
and
the
expectation
would
be
the
same.
But
this
time
options
length
is
zero
set.
Props
is
asynchronous.
That
is
why
we
need
to
await
for
it
and
make
our
test
asic.
A
So
we
run
the
spike
again
and
it's
still
passing
the
next
step
would
be
to
test
valid
and
invalid
states
of
the
form.
Let
me
remind
you
that
anything,
but
letters
and
spaces
is
considered
invalid.
So
when
there
is
invalid
input,
we
get
the
red
validation
message
and
the
button
is
disabled.
On
the
other
hand,
when
there
is
valid
input,
the
button
is
enabled,
and
it
is
reasonable
validation
message
in
the
code.
It's
reflected
like
that
threshold
button
component.
A
So
we'll
start
with
testing
a
validation
message.
We
find
it
by
css
class
selector.
So
we
expect
that
our
validation
message
and
we'll
call
a
text
message
on
the
return.
Trapper
and
text
returns
the
render
text
and
we
want
a
text
to
be
equal
to
the
value
stored
in
the
constant.
As
it
holds
the
validation
message
now,
we
will
run
the
spec.
A
Our
spike
has
failed
because
the
rendered
component
does
not
contain
this.
The
element
with
this
selector
and
that's
because
we
missed
one
very
important
step.
So
we
need
to
set
the
invalid
value
on
the
input.
So
we
find
the
input
and
call
a
set
value
on
it,
and
we
will
provide
something
invalid
to
set
value
and
set
value
is
asynchronous.
A
And
now
we
have
our
validation
message
rendered
now.
Let's
write
the
next
test,
I
will
focus
this
test
and
we
do
the
same.
We
set
the
invalid
input
and
we
need
to
find
the
submit
button
and
we
find
it
by
calling
rep
refine
component
gel
button,
and
we
want
this
submit
button
to
here
property
and
to
check
the
property.
We
will
call
props
method
and
we
will
provide
the
name
of
the
property.
A
A
A
It
means
that
whenever
the
submit
event
is
triggered
on
the
form,
this
submit
request
function
will
be
called
with
the
input
value
and
the
submit
request
comes
from
the
api
model.
So
we
move
to
our
spec
here
I
have
submit
request,
imported
and
mocked
with
just
a
mock.
Knocking
a
function
means
that
we
can
track
a
call
street
and
as
arguments
it
was
called
twist,
but
we
never
actually
execute
the
function.