►
From YouTube: ONNX Tools: Polygraphy and ONNX-GraphSurgeon
Description
Over the years, NVIDIA's TensorRT team has developed tooling that makes it easy to generate, transform, and debug ONNX models. Among other things, this includes a sanitizer that can simplify your models, and an automated bisector for debugging ('git bisect' for ONNX!). In this talk, I'll cover some of these tools and how you can effectively leverage them in your workflow.
Pranav has worked as part of the TensorRT team at NVIDIA since 2018, developing, among other things, ONNX tooling like Polygraphy and ONNX-GraphSurgeon.
A
Hello,
everyone
and
welcome
to
my
lightning
talk
on
polygraphy
and
onyxcraft
surgeon.
So
a
little
bit
of
background
on
me.
I
work
on
the
tensority
team
at
nvidia
and
onyx
is
our
primary
import
path.
So,
as
you
can
imagine,
we've
developed
quite
a
bit
of
tooling
for
it
over
the
years
and
this
talk
will
cover
two
of
those
tools.
A
The
first
is
onyxcraft
surgeon,
which
is
a
python
library
that
lets
you,
create
and
modify
onyx
models,
and
the
second
is
polygraphy,
which
does
many
different
things,
but
for
the
purposes
of
this
talk
I'll
cover
the
onyx
related
aspects
of
it.
So
we'll
start
with
onyxcraft
surgeon
and
at
the
heart
of
it,
is
a
python
based
intermediate
representation
for
bipartite
graphs
that
consist
of
nodes
and
tensors
and
we'll
see
exactly
what
this
means
on
the
next
slide.
A
But
you
can
essentially
do
any
kind
of
modification
on
this
intermediate
representation
using
a
simple
python
api
and
in
addition
to
that,
it
provides
some
conveniences
like
constant
folding
topo,
starting
and
dead
layer,
removal
and
I've
linked
the
source
code
and
examples
on
this
slide.
So
here's
a
very
small
example
of
the
ir.
A
The
basic
idea
here
is
that
nodes
produce
and
consume
tensors,
and
so,
if
you
look
in
the
center
here,
nodes
have
ops
names
and
various
different
attributes
and
tensors
all
have
names.
Data
types
and
shapes
in
addition
to
the
fields
shown
above
inputs
and
outputs
are
also
tracked
for
tensors
inputs
and
outputs
are
the
nodes
which
consume
and
produce
them
and
for
nodes.
There
are
the
tensors
which
they
take
as
inputs
and
outputs.
A
A
A
So
here
we're
constructing
a
graph
with
a
particular
input,
and
then
we
give
that
to
leaky
relu,
which
gives
us
an
output
tensor,
and
then
we
mark
that
as
a
graph
output
and
finally
export
the
model
to
onyx
next
we'll
dive
into
polygraphy
calligraphy
is
essentially
a
toolkit
for
debugging
deep
learning
models.
So
it
includes
a
python
api
as
well
as
various
different
command
line
tools.
A
There's
lots
of
functionality
included,
but
for
this
stock
I'll
focus
just
on
the
onyx
tooling,
and
I've
linked
the
source
code
and
examples
on
this
slide
before
we
get
to
the
onyx
specific
tools.
I
just
wanted
to
mention
calligraphyrun
quickly.
So
this
is
a
tool
that
lets
you
run
inference
with
various
different
backends
like
onyx,
runtime
and
tensort,
and
then
compare
results.
A
A
So
here's
a
small
example
we're
doing
polygraphy
inspect
model,
giving
it
model.onyx
and
we've
configured
it
to
show
layers,
attributes
and
weights.
So,
as
you
can
see,
it
tells
us
the
name
of
the
model,
the
the
onyx
offset
we're
using
the
inputs
and
outputs
and
you
can
see
at
the
bottom
all
the
nodes.
A
So
this
is
a
nice
alternative
to
tools
like
netron,
if
you're
limited
to
the
command
line,
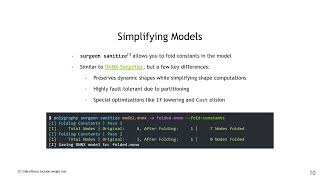
maxwell
cover
tooling,
that
can
modify
onyx
models
on
the
command
line,
so
the
surgeon,
sanitized
sub
tool
lets
you
simplify
and
fold
constants
in
the
model.
This
is
a
lot
like
onyx
simplifier,
but
it
has
a
few
key
improvements.
A
A
You'll
also
notice
that
the
leading
dimension
is
dynamic,
but
the
last
three
dimensions
are
all
static,
so
this
should
be
able
to
be
done
in
a
single
reshape
and
once
we
run
it
through
surge
and
sanitize,
that's
exactly
what
we
get.
The
dynamic
dimension
is
still
dynamic,
but
the
entire
shape
subgraph
is
gone.
A
You
can
use
inspect
model
or
netron
to
figure
out
the
input
and
output
tensors
that
you're
interested
in
for
inputs.
You
also
need
to
provide
the
shapes
and
data
types
and
for
outputs.
You
just
need
the
data
types,
so
this
is
the
format
that
the
tool
takes
for
the
inputs
and
outputs.
It's
tensor
name,
colon
shape
colon
data
type,
here's
a
quick
example-
and
if
you
don't
know
the
shapes
or
data
types
you
can
use
auto
to
indicate
that
these
should
be
automatically
determined
by
the
tool.
A
We
can
see
the
names
from
the
netron
view,
which
are
identity
out,
zero
and
leaky
reality
out,
one
we'll
use
those
names
and
we'll
fill
the
shapes
and
data
types
with
auto
so
that
polygraphy
will
decide
them
for
us.
So
here's
the
command.
We
do
polygraphy
surgeon
extract,
we
give
it
the
input
model
model.onyx,
we
tell
it
the
output
path,
which
is
subgraph
dynamics,
and
then
we
set
the
inputs
which
are
identity
out,
zero,
auto
auto
for
shapes
and
data
types.
A
A
So
I'm
using
fail
and
pass
here
very
generally,
because
bisection
works
for
any
type
of
failure,
so
anything
where
an
onyx
model
is
involved.
Bisection
can
be
useful.
That
can
be
things
from
onyx
runtime
accuracy
bugs
to
issues
with
metron
display
to
even
bugs
in
the
model
itself.
So
to
better
understand
this,
let's
see
it
in
action.
A
A
Reducing
the
model
to
something
smaller
can
make
it
a
lot
easier
to
debug.
Of
course,
in
this
case
it's
already
pretty
small
to
begin
with,
but
for
the
sake
of
example,
we'll
start
off
with
the
interactive
mode,
so
in
this
mode,
debug
reduce,
will
generate
models
successfully
and
then
prompt
us
to
report
whether
each
one
passes
or
fails
and
we'll
run
each
of
these
models
manually
using
run
and
then
report
back.
A
A
I
have
two
terminals
open
here,
so
on
the
left
side,
I'm
going
to
run
polygraphy,
debug,
reduce
and
on
the
right
side,
I'm
going
to
check
each
intermediate
model.
So
if
it
passes
I'll
go
back
to
the
left
terminal
and
enter
p
for
pass,
if
it
fails
I'll
enter
f
and
move
on
to
the
next
iteration,
so
let's
see
it
so
I've
started
debug
reduce
run
the
model,
it
fails,
so
report
failure
run
the
next
model
report,
failure
again
and
then
we're
left
with
the
final
reduced
model
and
here's
what
it
looks
like.
A
So
we
can
pretty
clearly
see
that
the
reshape
is
invalid,
since
the
volume
of
the
input
and
output
dimensions
does
not
match.
That
was
pretty
easy,
but
we
can
actually
make
this
process
easier
by
doing
it
in
an
automated
fashion.
So,
instead
of
running
the
command
manually
ourselves,
we
simply
tell
debug
reduce
which
command
to
run.
So
here's
what
that
looks
like
we
do.
Polygraphy
debug
reduce,
give
it
the
model.onyx.
A
We
give
it
the
output
model,
which
is
reduced.onyx
and
we
give
it
the
check
command,
which
is
exactly
what
we
were
doing
manually
before
essentially
running
the
intermediate
model
with
onyx
runtime
and
the
resulting
model
is
exactly
the
same
as
what
we
got
in
interactive
mode.
And
that
concludes
my
talk.
If
you
have
any
questions,
feel
free
to
email
me
at
the
email
that
I've
posted
on
this
slide
and
thanks
everyone
for
attending.