►
From YouTube: 120 Design Lessons - Seed Eco-Home Carport
Description
Notes and FreeCAD @SweetHome3D files linked from notes at
https://docs.google.com/presentation/d/1GonvGbnjLBkM-X7_4GA8D_dp_B2fmrBVM0HOLU1zd68/edit#slide=id.ge7e6c85165_1_231
-----------------
What you see here at Open Source Ecology is an ambitious open source project for the common good. Join our development team:
http://opensourceecology.org/wiki/OSE_Developers
We run One Day Extreme Build workshops in many locations. Please put yourself on our map if you'd like us to host a workshop near you:
https://microfactory.opensourceecology.org/request-a-workshop/
Take a minute to subscribe to our email newsletter (updates, workshops, etc): http://bit.ly/1LtcM44
A
C
A
Three
monitors
here
so
I
can,
I
can
manipulate,
but
it's
kind
of
hard
to
keep
hold
track
of
all
the
windows,
so
so
as
a
priority
open
up
the
open
up,
the
the
freecad
files-
or
you
can
just
take
a
look
at
my
screen
because
I
want
to
describe
what
this
carport
is
about
and
what
the
concept
is
so
take
a
look
at
my
screen,
also
in
free
cat
in
a
sweet
home
just
for
perspective.
So
that's
that's
the
actual.
A
A
A
A
Structure
and
actually
do
the
remainder
of
the
work,
that's
needed,
but
it's
a
good
access
point
to
get
to
the
roof
in
an
easy
way.
It's
going
to
be
below
the
door
a
little
bit
because
you
want
drain.
You
want
water
to
be
going
inside
your
door,
so
the
only
consideration
is.
This
has
got
to
be
like
a
little
bit
below
the
door,
and
here
it's
actually
not
super
correct,
because
it
looks
like
it's
even
with
the
door.
So
if
you
actually
look
at
this
here,
this
is
more
I'm
going
to
open
up
another
file.
A
B
A
B
A
E
A
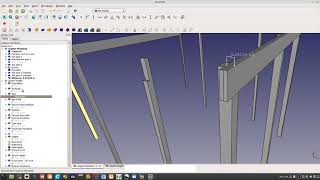
Which
I
went
and-
and
I
slanted
this
by
remember-
the
number
1.2
degrees
yeah-
I
slanted
at
1.2
degrees
for
four
inch
rise
against
16
feet,
and
then
you
got
this
post
on
the
other
side
and
that's
basically
what
the
what
the
shape
was
so
from
there
I
went,
and
this
is
going
to
be
sunk,
like
the
frost
line
here
is
30
inches.
So
this
is
sunk,
30,
inches.
A
The
house
too,
and
then
there's
going
to
be
more
insulation,
which
is
the
shell
frost,
protected
footer,
which
means
that
this
is
as
effective
as
if
you
had
the
distance
going
down
into
the
side
is
equal
to
how
much
you're,
as
if
you
sent
this
insulation
down
but
you're,
not
digging.
So
this
is
an
effective
way
to
do
insulation
without
digging
too
much.
If
you
want
to
say,
if
I'm
digging
and
that's
easy,
because
otherwise,
you
have
to
have
a
backhoe
to
dig
a
deeper,
much
deeper
three
foot,
whatever
trench.
A
F
A
E
A
D
A
A
A
A
I
A
A
A
A
A
D
D
A
C
A
E
D
A
A
D
A
E
H
A
A
D
A
I
D
D
E
D
E
A
E
A
D
E
A
A
I
E
E
I
A
A
C
D
D
D
J
E
A
F
A
D
D
A
A
H
A
A
D
D
F
A
I
F
F
F
A
D
D
B
C
A
A
D
C
C
G
I
A
D
J
H
E
E
A
A
A
A
C
E
B
J
A
A
A
D
A
A
H
E
D
A
E
A
D
E
E
I
A
A
A
E
A
H
A
A
D
D
D
I
A
D
E
F
A
I
H
D
G
A
A
A
A
A
A
I
H
I
A
C
I
A
A
G
A
A
E
A
A
A
G
A
F
A
D
D
B
E
D
F
H
F
D
H
E
H
E
A
D
G
A
I
A
A
A
F
D
A
A
C
D
F
D
C
D
E
D
A
E
A
H
H
H
A
A
E
C
A
A
A
D
A
D
A
I
A
A
H
A
A
A
A
A
A
G
D
A
A
D
D
A
A
J
A
D
A
D
H
A
H
D
A
F
C
A
E
A
A
A
E
A
A
D
G
D
A
D
D
C
D
A
E
D
F
C
I
C
A
A
A
A
H
A
H
D
A
A
A
A
H
A
H
A
H
H
H
J
E
A
A
E
E
A
E
E
A
A
E
A
A
F
A
F
J
F
A
A
A
G
H
A
A
I
E
E
A
So
you
see
this
very
simple
procedure
of
where
the
pulse
go.
It's
actually
got
a
quite
a
bit
of
detail
that
you
really
need
to
keep
track
of,
and
that's
why
we
would
have
been
there
like
doing
things
10
times.
If
we
didn't
go
through
this
here,
because
the
pen
is
mightier
than
the
sword,
it's
quicker
to
just
draw
it
out
and
then
10
times
do
it
in
the
field
because
we'd
be
like
oh
wait,
we
gotta
do
it
different,
oh
wait.
We
gotta
do
it,
except
we
actually
are
doing
it.
I
G
A
A
I
A
A
A
F
C
E
A
A
A
F
A
E
I
A
A
A
A
D
A
A
I
E
I
F
H
I
A
H
H
A
D
D
E
E
D
D
D
I
D
A
D
A
A
A
F
A
A
E
A
A
A
D
D
D
A
C
A
A
A
A
A
A
A
Take
the
since
24
and
a
quarter
and
24.
that's
pretty
similar
this
gap
here
that
we
have,
we
can
make
that
slightly
bigger.
That's
perfectly
fine!
So
if
we
make
this,
therefore
we
can
make
this
here
actually
24
inches,
so
it's
you're
not
wasting
any
any
material,
so
cut
four
strips
of
24
inch
for
the
siding
that
we
have.
A
A
D
A
F
A
A
A
A
F
A
A
We
could
do
it,
it
shouldn't
be
too
too
long.
We
if
we
can
work
exactly
off
this
diagram.
You
know
the
question
is:
how
long
does
it
take
so
altogether?
How
many
holes
do
we
have?
We
have
three
four
five,
six
seven,
but
we
are
doing
doubles
for
three
of
them,
so
you
got
four
plus
six.
It's
ten
holes
and
each
hole
is
only
a
few
minutes,
so
that
can
go
very
quickly.
A
G
A
A
A
A
Get
all
the
materials-
and
it's
probably
easiest
to
do
the
let's
see
where
to
do
the
cutting
right
where
the
materials
are
so
that
yeah,
I
think,
probably
where
the
materials
are.
As
far
as
the
joists,
that's
a
sliding
sliding
miter
saw
and
we've
got
two
of
those
there.
So
we
should
set
up
at
the
site.
A
F
D
A
A
A
A
A
E
F
A
A
F
A
There
and
then
we
could
put
the
concrete
into
the
holes
and
fix
those
those
holes
up,
and
that
defines
the
slope
here.
But
this
also
here,
you
just
take
a
level
to
make
sure
that
this
is
level
across
that's
not
dropping
into
any
corner.
So
once
we
put
one
one
joist
in,
we
pretty
much
define
the
entire
geometry
here
and
which
will
locate
the
holes
here
and
then.
A
H
H
I
A
A
I
I
G
A
All
the
measuring
and
pre-cutting
and
whole
whole
drilling
that'll
get
us
to
within
a
few
inches,
so
it
almost
will
be
there
and
we
have
to
kind
of
like
shimmy
it
around
to
get
it
to
exactly
that.
Four
inch
drop
like
plus
minus
one
inch.
I
mean
something
like
that:
that'll
be
fine.
You
have
to
be
super
super
precise,
but
the
thing
with
with
levels
just
using
a
bubble
level,
we
can
get
that
plumbed
relatively
easily.