►
From YouTube: Shredder Development
Description
-----------------
What you see here at Open Source Ecology is an ambitious open source project for the common good. Join our development team:
http://opensourceecology.org/wiki/OSE_Developers
We run One Day Extreme Build workshops in many locations. Please put yourself on our map if you'd like us to host a workshop near you:
https://microfactory.opensourceecology.org/request-a-workshop/
Take a minute to subscribe to our email newsletter (updates, workshops, etc): http://bit.ly/1LtcM44
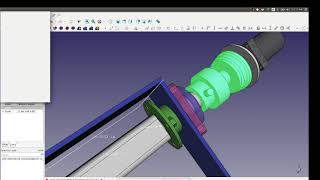
A
Okay,
so
let's
check
in
on
the
progress,
torch
table,
filament
maker
and
shredder
okay.
So,
let's
start
with
a
shredder
did
a
bunch
of
work
on
it
in
terms
of
cad
yesterday.
So
if
you
take
a
look
at,
you
can
go
through
my
log
or,
let's
see
shredder,
but
here's
the
page.
It
looks
like
a
nice
little
picture.
A
A
This
is
pretty
technically
correct
in
terms
of
dimensions
and
all
that
so
that's
kind
of
like
the
idea
right
now,
showing
one
motor
coupled
to
the
whole
system
and
what
are
some
of
the
details,
so
the
lens
actually
are
pretty
decent
in
this
in
this
system,
can
somebody
actually
go
down
and
download
I'm
having
file
caching
issues?
What
happens
when
you
click
on
this,
because
I'm
actually
not
using
the
latest
file?
A
A
With
the
green
yeah,
that
is
the
latest,
so
what's
going
on
here,
trying
to
fit
this
is
the
shaft
that
we
have.
Actually
you
can
see,
you
can
see
it's
it's
there.
It's
exactly.
36
inches
sticks
out
about
32
inches
from
the
double
chain
coupler,
so
that
here
represents
the
double
chain.
Coupler,
there's
the
collar.
B
A
A
Within
the
cad,
that's
what
it
looks
like.
So
that's
a
double
chain:
coupler
represented
there,
there's
the
the
bolt
through
with
the
it's
it's
a
simple
bolt
through
the
shaft
three-quarter
bolt,
but
this
length
sticking
out
is
about
32
inches.
So
if
you
look
at
all
the
dimensions
as
they
are,
this
is
kind
of
what
it
ends
up
being
with
the
box.
So
so
we
can
actually
read
the
dimensions
of
everything
here
like
say
the
box,
which
is
right
now
currently
26
inches,
and
then
we
have
to
analyze
it
and
see.
A
A
Probably
what
we
want
to
do
here
is
extend
this
side
with
probably
half
by
eight
all
the
way
out
to
here
and
mount
the
two
motors
like
as
if
this
were
an
extension
of
the
box.
Otherwise
you'd
be
relying
on
a
table,
so
you
have
to
like
use
and
make
another
structure
that
would
be
mounting.
But
here
we
already
have
this
rather
stiff
box
that
we're
gonna
have.
We
can
extend
it
back,
simply
just
run
it
back
and
then
mount
the
motors.
How
do
you
mount
them?
A
There's
that
four
four
bolt
flange
there
if
I
switch
to
that
four
bolt
flange,
it's
like
four
and
an
eighth
inch
spacing,
but
that's
half
inch
bolts
there,
but
that's
how
we
would
mount
it
to
go
all
the
way
back
there
for
the
mounting
it's
it's
kind
of
inconvenient,
because
you
got
all
the
the
shredder
starts
like
right
here,
so
you
got
to
go
all
the
way
back
there
to
actually
mount
it.
I
mean
this
is
not
ideal.
A
This
is
just
basically
taking
off
the
shelf
parts
and
these
kind
of
motor
configurations
in
an
ideal
case,
you'd
have
here
in
this
motor
configuration.
We've
got
this
this
plate
cup,
this
kind
of
weird
coupler,
because
this
motor
came
off
some
wheel,
motor
application
and
the
only
way
you
can
couple
properly
to
it.
They
don't
really
have
couplers
for
it,
but
they
do
have
these
wheel
mounting
plates.
So
we
have
to.
A
I
mean
the
first
story
here
is
that
we
have
to
make
up
this
whole
contraption
here,
where,
like
a
wheel,
we're
back
we're
mounting
this
double
chain,
coupler,
as
if
it
were
kind
of
like
a
wheel
structure
with
like
these
five
lug,
bolts
and
so
forth,
but
it's
a
half
inch
plate
with
the
lug
bolts.
Then
there's
like
two
inch
shaft
goes
through
that,
and
this
is
actually
a
coupler.
That's
got
play
like
in
between
the
chain
there's
a
little
bit
of
play.
This
is
not
a
stiff
coupler.
A
It's
just
like
on
the
well
it's
comparable
to
the
tractor,
but
we
don't
have
double
chain
coupler
in
the
tractor,
but
here
it's
like
that's
a
really
good
coupler.
Like
it's
super
strong,
I
mean
many
thousands
of
pounds
of
hold
while
allowing
for
quite
a
bit
of
adjustment.
It's
it's
that
the
space
where
the
sprockets
go
into
the
chain.
There's
a
little
play
there
that,
while
it's
tough
to
it's
tight
when
you
drive
it
actually
like
it
can
bend
back
and
forth
a
little
bit.
A
So
you
got
like
any
tension
of
this
huge,
the
huge
forces
that
are
involved
here.
They
get
you
don't
wear
things
out,
it
just
play
there.
So
it's
a
good
idea.
I
mean
you
could
do
something
like
a
stiff
coupler,
but
then
everything
is
super
tight
and
all
that
it's
it's
nice
idea
in
general
to
have
flexible
couplers.
So
you
can
allow
for
misalignments
and
that
way,
when
you're
spinning
some
heavy
duty
element
you're
not
putting
a
lot
of
wear
on
whatever
you're
spinning.
So
then,
then
you've
got
so.
A
The
bearings
are
in
this
configuration
here
we're
on
the
outside.
Yesterday
we
were
talking
about
possibly
putting
the
bearings
on
inside,
but
the
way
it
is
right
now
the
tube
is
20
inches
and
it's
kind
of
like
20
inches
or
so
here
we
measure
that
yep
and
then
there's
those
tensioners
like
we
said
we're.
Gonna
punch
the
blades
together,
clamp
them
together,
so
they're
tight
against
each
other.
So
those
would
be
one
one
of
these
green
structures
at
one
end
and
what's
happening
there.
A
A
So
that
this
coupler
here
not
this
couple
man,
what
do
we
call
it?
It's
a
it's
a
tensioner
or
like?
What
do
you
call?
It
provides,
provides
tension.
So
so
how
does
it
work?
So
you
put
the
blade
on
onto
the
the
square
shaft
first
blade,
there's
bolts
that
are
going
to
go
through
these,
these
welded
nuts.
So
this
is
basically
a
three
inch
piece
of
precision,
tubing,
welded
to
a
ring
and
then
bolts
go
through.
So
it's
that's.
Nuts
like
this
would
be
three
quarter.
A
I
drew
up
three
quarter,
but
these
three
quarter
nuts
would
accept
bolts
and
you
screw
the
bolts
in
and
and
as
you
screw
in
the
bolts,
they
would
completely
tension
or
press
down
on
the
blades.
So
you're
punching
the
blades
together
with
a
lot
of
force.
How
much
force
do
you
have
there?
The
thing
that's
missing
here
is
this
ring
here
will
have
to
have
another
bolt
welded
to
it,
so
you
can
put
a
set
screw
into
the
shaft,
so
you're
holding
actually
against
the
shaft
and
a
standard
procedure
for
like
set
screws.
A
We
can
use
a
regular
like
a
three
and
three-quarter
inch
bolt.
Typically,
you
want
to
get
them
at
an
angle
of
like,
like
60
degrees
or
so
so
they
they
kind
of
press
down
from
two
sides,
and
that
makes
for
a
much
stronger
hold,
but
that's
not
drawn
in
here.
So
you've
got
this
tight
against
the
shaft.
This
would
be
spinning.
The
entire
assembly
is
spinning,
so
this
clamp
down,
it's
called
the
blade
clamp
down.
A
A
A
So
I
think
what
we
have
to
do.
We
have
to
pull
the
shaft
out
well,
but
you
can't
with
this
square
tube
on
it.
So
what
you'd
have
to
do
is
make
this
plate
boltable
on
and
off.
So
we
want
to
extend
this
plate
and
put
like
two
like
one
inch
bolts
into
like
a
flange.
That
would
be
so
right
here.
We'd
have
to
do
something
like
a
flange
where
we
come
off
this.
A
Do
something
like
this,
where
you
we'll
bolt
through
these
together
and
then
take
off
that
front
plate,
because
it's
it'll
be
otherwise
really
hard
to
take
off
the
shaft.
I
mean
you
can't,
because
the
square
is
welded,
you
can't
just
pull
it
out
so
somewhere,
like
one
side
of
the
box,
has
to
come
off.
A
A
A
Now
that
all
the
blades
on
the
square
tube
will
be
just
a
loose
fit
they're
just
there.
You
can
replace
them
like
if
we
want
to
try,
say
we're
doing
the
half
inch
blades
for
heavy
duty.
We
can
maybe
try
like
if
you
actually
want
you
know,
you're
doing
smaller
plastic.
You
can
get
away
with
say
like
quarter
inch
blades
and
you
have
so
many
more
bites
per
like
it'll,
be
the
rate
should
probably
like
double
for
the
kind
of
throughput
you're
getting.
A
So
you
can
do
different
interchangeable
blades
here,
but
you
just
slide
them
on
now,
for
which
reason
this
collar
here.
So
that's
that's,
going
to
be
the
equivalent
to
this
green
one
here,
another
collar
just
like
that.
That
will
come
off
through
a
screw
through
a
set
bolt
on
the
shaft,
so
that
you
can
pull
that
out
and
then
slip
on
all
your
blades
as
we
load
all
the
blades
up.
You
have
one
of
the
these
collars.
This
collar
will
be
off
we're
slipping
on
all
the
blades
when
all
the
blades
are
slipped
on.
A
We
will
tighten
down
those
bolts
that
are
in
the
four
bolts
that
are,
in
the
blade,
clamp
downs,
only
other
option
that
I
could
think
of
here
like
actually
this.
This
you
to
use
this
whole
shaft
right
now.
So
another
way
to
do
this
here
would
be
instead
of
clamping
against
the
actual
shaft,
which
is
right
there.
A
A
But
if
you
wanted
to
make
this
assembly
the
blade
clamped
down
and
mounted
on
the
square
tube
you'd
have
to
cut
out.
You'd
have
to
basically
do
a
whole
weldment
where
you
do
a
tube.
Basically
a
square
tube
around
this
square
tube
here
doable,
yeah
yeah
exactly
so,
but
then
you
can.
You
can
basically
slide
that.
A
To
accommodate
as
many
blades
as
you
like,
and
it's
probably
preferable,
because
we
probably
don't
want
to
make
like
all
the
blades
and
then
then
run
and
maybe
make
a
few
blades,
so
that's
a
consideration
to
decide
on
like.
What's
do
you
want
to
like
go
around
this
shaft
both
are
doable
the
the
around
the
square
shaft,
it's
a
little
more
fabrication,
but
it's
got
more
utility
because
you
can
then
vary,
vary
the
thickness,
basically
the
overall
zone
of
your
blades,
which
is
a
good
convenient
feature.
A
I
mean
that
is
nice,
and
with
this
here
you
it's
easier
to
make,
but
in
terms
of
prototyping
it's
kind
of
like
they'll,
be
maybe
more
like
the
final
design.
Where
you
know
you've
got
all
these
blades
already
ready,
so
yeah
either
either
is
good
and
just
looking
at
next
say
we
were
to
build
this
like
want
to
start
cutting
steel
and
getting
cut
lists
like
well.
Is
this
good,
like?
Are
things
fitting?
Well,
the
lens
should
be
actually
quite
accurate
here.
A
The
shaft
goes
all
the
way
and
the
bearing
should
be
pretty
much
to
maybe
like
within
an
eighth
of
the
actual
height
of
the
bearing,
so
that
that
shaft
goes
almost
right
up
to
the
end
of
it,
which
is
good
now.
How
does
is
there
any
provision
here
for
how
actually
one
thing
we
haven't
said
is:
how
do
you
set
the
shaft
fix
it
within
the
bearings
themselves?
A
Well,
we
actually
haven't
done
that
we
would
need
a
set
screw
or
collar
like
we
have.
We
have
two
types
of
bearings
there,
the
four
that
we
have
one
has
these
eccentric
collars
that
you
lock
on
to
lock
onto
the
shaft
another
one
style
has
just
a
set
screw,
so
you've
got
both
of
those,
but
actually
thinking
about
that
point,
that
shaft
needs
to
stick
out
just
a
little
more
in
order
for
the
set
screw
to
grab
or
for
the
collar
to
be
put
on,
because
it's
just
ending
a
little
too
early.
A
A
So
that's
so
we
might
need
to
actually
we
need
to
close
this
the
dimensions
of
the
box
and
to
make
the
stat
the
shaft
stick
out.
I
just
moved
it
like
1.3
inches
there,
so
maybe
we
just
need
to
clean
up
a
couple
of
dimensions
here
now,
as
far
as,
if
we
use
these
kinds
of
collars
here,
the
consideration
there
is,
you
gotta
be
able
to
get
your
bolts
in
there.
A
Not
even
it's
like
an
inch
of
space
there
that
so
it's
getting
a
little
tight
this
we
might
want
to
just
put
that
in
the
system
we
have
here,
maybe
shorten
up
the
two.
We
got
20
inches
right
now.
We
should
probably
just
go
to
16
or
something
give
us
like
two
more
inches
on
each
side.
So
it's
easy
to
get
those
bolts
in
and
out
we're
just
shortening
the
overall
length,
but
that's
fine
16
inches,
I
mean
that's
still
quite
a
bit
so
probably
probably
make
this
like
16..
A
Now,
if
we
put
the
the
blade
clamp
down
on
actual
square
tube,
we
could
actually
use
the
20
inches
here,
because
that's
that's!
This
distance
here
is
two
inches,
so
the
the
clamp
down
that
will
be
mounted
on
the
square
tube
would
actually
work
without
having
to
shorten
this
tube
here.
So
that's
just
another
consideration.
There.
A
E
C
F
A
Yeah
yeah,
you
have
to
do
a
bunch
of
spacers
or
if
we've
got
these
same
clamp
down
on
this
side
here
we
can
actually
use
threaded
rod
and
have
like
these
long
very
long
push
rods,
clamping,
everything
down,
still
doable
so
yeah.
We
could
actually
do
that.
I
mean
we've
got
plenty
of
threaded
rod
like
that
so
yeah
yeah.
This
is
this,
is
easier
and
more
elegant
to
be
easier
to
fabricate
and
all
that
yeah
and
do
give
it
like
extra
two
inches.
C
D
D
A
That
that
draws
it
shortened
by
two
inches
exactly
so.
If
we
took
that
dimension
before
it
was
26
that
would
actually
make
the
box
exactly
24
long
and
you'd
have
enough
space
for
the
collar
here
and
all
that,
so
probably
there's
something
of
this
effect
yeah
and
then
the
second
rotor
pretty
much
just
identical
to
this
and
there's
the
blades
that
aren't
drawn.
A
E
A
Yeah
the
set
screws
I
mean
set
screws
the
easy
way
to
do
them
unless
you're
threading,
like
a
three-quarter,
inch
hole
through
steel.
The
easy
way
to
do
is
just
weld
on
nuts
we're
not
really
set
up
to.
We
can't
really
do
three
quarter
inch
threaded
holes
right
now,
but
yeah
just
welding.
The
nuts
would
would
do
it.
So
that's
a
nice
weldment.
A
A
A
E
A
A
This
is
the
torque
on
this
motor.
It's
it's
like
300
kilogram
meters.
That's
a
lot!
That's
like
one
meter,
it's
like
300
kilograms!
So,
like
a
few
inches,
it's
15
000
inch
pounds
per
motor,
so
you
got
quite
a
torque
on
this
thing
in
fact
yeah.
So
this
kind
of
box
here
yeah
I
mean
there's,
there's
a
lot
of
force
on
you.
You
need
to
enclose
this
pretty
solid
like
this
at
least
so
this
doesn't
torque
up.
A
A
A
Yeah
or
even
like
a
like
a
flat
sheet
across
the
whole
top,
but
you
want
to
keep
this
exposed.
You
can
service
this
and
be
like
a
openable
latch
there,
and
and
how
does
the
motor
mount
then
so
you've
got.
You
got
the
motor
yeah,
so
there's
a
procedure
there
like
before
we
get
now
what's
going
on
there.
What
is
that?
Oh?
Okay,
that's
that's!
That's
the
original
okay!
So
the
motor!
It's
got!
This
thick
part.
A
So
we
mount
the
motor
like
take
off
the
string
and
then
mount
this
ring,
then
basically
a
double
chain
coupler.
So
then,
then
this
whole
assembly,
this
plus
the
motor,
is
in
and
then
we'll
stick
in
the
shaft
from
the
other
side
so
put
the
bearing
on
sticking
the
shaft
through
that
kind
of
have
to
thread.
First,
like
this
thread,
I
mean
put
this
on
first,
oh
yeah
yeah.
So
so
this
tube
is
welded
to
the
shaft.
A
So
that's
that's
pretty
much
that
so
I
guess
the
only
change
here
if
we
use
the
system
here
we
get
ourselves
two
extra
inches
by
reducing
this
tube
four
inches
and
therefore
we
have
enough
space
for
the
collar
or
set
screws
on
the
bearing
here.
So
this
side,
instead
of
26,
would
be
24
or
so
and
then
the
blades
are
it's
like,
like
an
inch
of
space
around
the
outside.
So
I
think
this
is
17
on
the
inside
there.
E
F
A
A
A
But
that's
as
far
as
the
structure,
I
think
this
is
good.
The
only
thing
that
there's
details
about
the
spacing
of
exactly
where
how
how
tight
the
two
shafts
are
gonna
be
together.
The
limit
is
the
bearings
you
put
the
bearings
right
next
to
each
other
or
we
can
actually
trim
the
bearings,
like
literally
cut
them
off
so
yeah.
So
if
you
look
at
this
angle,
actually,
let's
let's
play
with
this
bearing
here
like-
can
we
actually
rotate
this
and
get
it
better?
A
E
A
Yeah
possibly
like
if
we
wanted
to
get
because
the
consideration
there
was
we're
working
with
the
eight
inch
stock
steel
for
the
the
blades,
but
but,
as
we
said,
the
eight
inch
squares
have
the
corners
are
actually
further
out.
They're,
like
eight
times
diagonally
across
you've,
got
how
much
it's
one
about
1.4
times
times.
Eight
I
mean
you
got
actually
11
across
it's
like
5.5
inches,
so
there
is
significant
overlap
if
you
take
the
square
blade
and
and
design
it
such
that
okay.
So
here
we
go
to
blade
design,
101.
A
D
E
A
A
We
could
do
something
like
that.
I
mean
that's
because,
because,
if
you
get
more
teeth
in
here,
you
want
more
teeth
for
more
bites
per
circle
per
cycle.
So
if
you
draw
in
another
teeth
that
those
teeth
will
be
like
still
you
could
they
could
catch
plastic
like
whatever
falls
in
there
too.
So
it's
like
you
can
get
like
an
eight
tooth
blade
out
of
this
kind
of
system
where
the
outer
blades
are
like
sticking
out
more.
The
inner
blades
are
a
little.
A
E
So
the
only
thing
that
worried
me
about
that-
and
I
think
when
I
was
playing
yesterday,
it
does
seem
like
we
could
fix
it
in
the
g-code.
But
you
know
because
of
the
I
guess,
the
the
z-axis
leveling
effect,
the
the
3-d
printer
tends
to
jump
from
position
position
instead
of
just
doing
a
straight
outline.
So
I'd
be
worried
that
if
it
was
coaching
it
would
jump
to
a
different
position
in
the
perimeter
and
just
like
leave
like
a
horizontal
line
across.
E
E
F
E
Right
and
if
it
jumps
back
and
trying
to
to
make
sure
that
everything
is
level
doesn't
bring,
go
down
right
and
if
we're
just
working
with
something,
that's
planar.
Maybe
we
won't
have
that
issue.
But
I'm
worried
that
if
we
had
sort
of
a
long
strip
of
metal-
and
we
had
a
number
of
different
blades
that
were
trying
to
cut
out
all
next
to
each
other-
that
at
some
point
the
torch
would
jump
from
one
position
to
another,
with
the
cutting
still
on
and
just
wind
up
with,
like
a
slicer
and
indentation
across
the
surface.
A
D
A
Yeah,
that's
that's
kind
of
like
the
sequencing
of
like
we'd
want
to
start
like
when
we
do
this.
We
just
want
to
start
with
a
little
plate
and
see
if
we
can
do
that.
First,
that's
so
that
means
we
get
like
all
the
end
stops
correct
and
like
this
piece
of
metal
like
registered
against,
you
know
we
have
markings
on
the
table
for
what
zero
is
and
stuff
like
that.
So
we
know
that
we're
hitting
it
and
yeah
just
a
bunch
of
alignment
issues
to
make
sure
we
shake
that
down.
A
A
So
that
kind
of
blade
is
something
that's
possible
well,
with
more
more
teeth
on
the
side
here
too
yeah
we
can
play
with
this,
but
I
think
yeah.
I
think
the
we
definitely
want
to
do.
Some
simple,
I
I'd
say
from
the
eight
inch
stock
definitely
saves
us
like
carrying
the
big
metal
and
like
cutting
it.
We
have
to
cut
it.
You
know
the
torch
first
to
make
it
usable,
so
so,
regarding
what's
possible
for
us
to
act
on
right
now,.
A
A
Plenty
of
stuff
here
like
okay,
so
there's
the
the
structure,
yeah
there's
the
tube,
so
you
can
get
a
cut
list
so
there's
tube.
There's
these
blade
clamp
downs
as
far
as
all
these
plates,
and
then
you
gotta
do
the
holes
through
them.
With
the
bolt
pattern
of
the
of
the
bearings,
I
noticed
that
actually
the
bearings
we
got
to
be
a
little
careful
on
that
one.
We
should
take
the
bearings
and
actually
like
transfer
punch
holes
through
them.
A
The
three
bearings
are
identical:
there's,
there's
ones
that
have
the
collars
and
the
ones
that
have
the
set
screw
and
actually
their
whole
pattern
is
like
slightly
off.
It's
like
a
quarter
inch
off,
so
you
actually
got
to
pay
attention
to
that
that,
because
the
bearings
are
not
completely
uniform
with
their
spacing,
they
are
both
like
eight
inches,
but
the
bolt
spacing
so
just
maybe
transfer
punch
that
to
to
get
the
right
spacing
and
then
the
inner
hole
that
could
be
pretty
pretty
large.
A
It's
for
three
inch,
shaft
make
it
like
four
inches
or
whatever
yeah.
So
this
whole
assembly
from
the
the
motor
to
I
mean
up
to
the
shaft.
I
mean
we,
actually
I
mean
we
have
all
of
that
already.
So
it's
it's
about
getting
the
box
getting
the
tube,
getting
the
the
blade,
clamp,
downs
and
all
the
holes
on
that
and
then
getting
the
the
pieces
that
support
the
motor.
A
E
A
A
A
Box
for,
like
a
table
structure
this
where
it
sits
on
here,
the
blades,
the
blade
edges,
are
sticking
out
well
the
profile
of
the
screen
that
goes
underneath
it
we
didn't
draw
that
in
here,
but
that
that's
something
we
would
retrofit
the
thing
that
I
guess
this
would
sit
on
as
far
as
the
little
mesh
structure
yeah,
we
didn't
draw
that
detail,
but
that's
I
don't
think
we
need
to
do
that
at
this
point.
It'll
be
it's
probably
like
another
small
box
underneath
that
holds
the
screen
so
be.
A
A
D
A
A
A
A
Oh
just
bend
the
screen
around,
so
it
might
have
to
have
like
like
as
far
as
these
parts,
these
curves,
like
maybe
four
of
them
like
every
you
know
every
eight
inches,
every
nine
inches
like
put
one
of
those
holders
so
that
the
screen
fits
around
that
and
it's
held
securely,
because
if
you
got
plastic
pushing
against
it,
you
want
to
hold
that
screen.
So
it
doesn't
just
like
like
bend
out
of
the
way
so
so
that
screen
will
probably
be
welded
to
this.
A
A
A
A
F
G
G
A
A
A
A
F
A
Mean
I
mean
yeah,
I
mean
we
might
have
to
look
at
the
connection
I
mean
that's,
you
know
that's
these
two
points
of
connection
you
want
to
have
it
separated
as
far
as
you
can,
by
the
six
inches
that
you
have
available,
you
want
it
to
be
tight
as
far
as
whatever
is
bolting
in
there
that's
pretty
tight
and
that
one
side
is
tight,
it
wants
to
be,
it
should
be
pretty
good,
then
other
things
we
can
play
with
is
yeah.
I
mean.
A
I
don't
know
what
the
only
thing
is.
We
can
make
these
plates
larger,
like
in
terms
of
height,
so
you
stabilize
the
z-more
but
yeah.
Let's
take
a
look
at
it
see
what
we've
got
there,
but
yeah
I
mean
we
got
to
work
out
the
good
details
of
how
you
make
everything
really
tight
against
each
other
and
because
the
other
thing
you
could
do
is
I
mean
you
can
put
a
plate
on
the
second
side
of
this
z.
You
can
make
this
whole
sandwich
just
just
more
meat,
more
maybe
more
metal,
more.
C
A
G
F
A
B
C
A
Yeah
yeah,
okay,
the
thing
is
there,
so
I
mean
it's
a
consideration
of
speed
like
if
you're
going
slowly
on
the
torch
like
cutting
it
half
inch
or
one
inch
steel,
it's
probably
not
a
problem,
but
if
you're
cutting
like
eighth
inch
or
quarter
inch
or
you
want
to
go
much
faster
you're
going
to
get
your
quality
control
issues
upon
any
kind
of
turn
if
you're
wobbling
the
head.
So
this
wants
to
be
really
stiff.
Yeah
yeah.
A
Take
a
look
at
that
but
like
we
should
get
some
figures
of
merit
like
like,
for
example,
like
say,
20
inches
per
minute,
which
is
speed
for
half
inch
steel,
then
maybe
quadruple
that,
to
like
say,
80
or
100
inches
per
minute.
For
like
say
the
eighth
inch
steel.
I
could
just
take
a
data
point
like
okay,
how
much
visible
wobble
do
we
see
they'll.
F
A
We
can
we
can
quantify
some
of
these
things
if
you
want
to,
we
should
in
a
full
product
release
that
is
forthcoming,
asap
yeah,
I
mean
you
know
all
this.
The
data
points,
including
the
backlash
and
forces,
and
all
that
that
that
would
be
in
our
specs
of
the
table.
Okay,
this
is
the
performance
it
could
get.
Yeah.
C
A
A
A
A
F
D
H
I
A
slight
difference
in
the
quality
of
the
filament
coming
out,
but
by
no
means
perfect,
but
I
don't,
I
don't
think
it's
possible
to
use
in
the
current
configuration
so
that
the
horizontal
positioning
just
makes
it
ooze
out
so
say:
I'm
I'm
feeding
filament
out
of
it.
I'm
taking
that
piece,
I'm
trying
to
put
it
to
the
spool.
In
that
meantime,
I
got
like
three
meters
on
the
floor.
Just
oozing
out
with
no
rover.
I
And
I
ran
it,
the
temperature
was
really
uneven
yesterday,
I'll
actually
get
it
to
like
245
or
260
on
the
lower,
which
should
be
like
a
good
workout,
but
it's
just
so
hard
like
there's
the
integrate
of
the
auger.
That's
the
feed
rate
affected
by
the
temperature
of
the
plastic,
there's
the
feed
rate
of
the
this
whole
winder
and
to
make
all
that
match.
It's
just.
I
I
I
I
A
I
I
made
sure
I
just
had
the
square
chamber
where
the
motors
attached
and
the
plastics
didn't
fed
forget
that
piece
saw
off
the
sides,
the
wings
of
the
chain
of
the
continually
get
that
amount
to
90
degrees
or
whatever
angle,
will
work,
and
then
I
would
just
need
some
sort
of
canister
to
put
above
to
feed
it
down.
The
auger
sticks
out
enough,
so
it
should
be
possible,
I
believe,
probably
3d
print
some
funnels
or
something.
A
I
F
C
I
C
A
A
Like
one
way
to
implement
what
we
have
with,
what
we
have
is
you
take
a
half
inch
coupler,
so
drill
a
hole
through
it
weld
the
nut,
and
then
you
put
a
set
like
a
half
inch
half
inch
nut.
Then
the
set
screw
is
like
a
half
inch
set
screw
and
you
can
screw
it
in
all
the
way
and
has
to
be
all
wrapped
up
in
the
insulation.
I
I'm
just
wondering,
like
I
mean
the
main
constrictor
is
the
size
of
the
pole,
so
we
get
a
bolt
and
it
sort
of
matches
the
I
mean
half
inch
chamber
inside
of
it
inside
of
it.
What
yeah?
I
wonder,
what
will
it
really
affect
because
say
I
constricted
75
percent
just
pretty
far
in
it
will
still
be
able
to
push
enough
material
to
the
nozzle
full
of
earth
more
material
to
the
nozzle
than
the
nozzle
of
already
oozing
out.
A
A
So
I
mean
I
can't
can't
really
predict
exactly
what's
going
to
happen,
but
if
you're
stopping
like
there's
this
torrent
and
you're,
stopping
that
torrent,
it
probably
will
affect
how
much
is
actually
oozing
out,
because
it's
the
pressure
like
above
that's,
you
know
and
I'm
making
it
go
down.
So
if
you
block
off
that
pressure
a
bit,
it
might
might
do
something.
But
I.
A
Other
thing
that
the
precious
plastic
guys
did
they
put
a
little
screen.
They
put
a
little
mesh
like
within
a
tube,
so
it
breaks.
It
weakens
the
force
of
the
thing
just
falling
down,
just
basically
a
block.
It's
like
a
pressure,
reducer
yeah,
just
going
through
material.
I
mean
that's,
that's
it
gets
tricky
because
you
have
to
get
that
in
there.
A
A
E
A
A
C
I
Ideally,
I
would
like
to
have
like
one
uniform
little
tube
that
fits
the
heating
elements
perfectly
above
on
top
of
them,
so
whatever
he
goes
into
it
disperses
immediately
and
then
maybe
make
like
a
an
indentation
into
the
metal
rod.
I
can
place
the
thermometer
and
set
it
because
I
think
that
stage
one
is
to
have
absolute
control
of
the
amount
of
power.
I
A
I
B
I
E
A
C
E
Yeah,
given
the
ambient
temperature,
your
insulation
is
only
going
to
be
so
much
from
that
when
it's
getting
this
cool
down
fast.
That's
part
of
you
know
so,
if
you're,
if
you're
losing
heat
really
quickly,
you
know
you're
not
controlling
that
ramp.
How
fast
it's
cooling
up
or
cooling
down,
but
the
ambient
temperature
that
you're
operating
in
is
controlling
that
right.
So
as
it
gets
colder,
it's
going
to
get
some
position
to
form
real
quickly
and
the.
I
And
and
and
the
system
started
asking
oh
yeah,
the
system
starts
acting
really
really
weird,
because
I
don't
know
if
the
psu
took
a
hit
or
something.
But
the
whole
system
started
creaking
and
I
couldn't
figure
out
where
that
came
from
what
was
trying
to
move
and
the
auger
was
turned
off
absolutely
still
the
whole
board
and
everything
was
creaking
as
if
he
was
trying
to
adjust
and.
I
I
Whenever
I
switched
on
the
motor
for
the
auger,
the
fan
speed
that
I
have
mounted
under
the
nozzle
started
running
at
a
higher
rpm
when
I
turned
on
the
switch
to
feed
more
than
just
the
motor,
which
is
coming
out
of
24
volt,
not
even
the
same
output
as
the
heating
front.
Although
the
cooling
fan
starts.
E
I
E
This
is
honestly
what
I'm
worried
about,
because
we
found
pretty
much
every
machine.
We've
done
so
far
right,
3d
printers
when
we
get
them
built
a
significant
amount
of
time
to
fine
tune
and
adjust
the
operation
before
we
can
get
following
friends
right,
fulfillment
maker,
even
when
we've
seen
this
built
significant
amount
of
time
in
initializing
and
fine-tuning
the
system
before
we
get
followed
each
other
right,
cnc
torch
table.
E
I
E
They
have
to
warm
up
when
you
turn
them
off.
They
have
to
pull
down.
Both
of
those
processes
are
not
needed
right
when
they
get
to
a
stable
operation.
You
put
a
certain
amount
of
electricity
in
them
all
right.
They
had
like
a
linear
range
of
operation.
Those
things
it's
a
little
non-linear
when
you
start
it
up.
It
goes
into
a
linear
range.
E
E
E
Effects
right,
you
have
to
worry
about
how
quickly
the
heating
element
itself
is
cooling
down
when
it
turns
off
and
how
much
residual
heat
is
still
in
it.
The
next
time
it
turns
back
on
right,
so
you're
not
getting
this
precise
control,
as
you
think,
if
the
heating
element
keeps
turning
on
and
turning
off.
But
if
it's
on
and
it's
operating
at
a
steady
state,
it's
easier
to
move
it
up
a
degree
down
the
ground,
precisely
because
it's
in
a
linear
moment.
E
I
They're
controlled
by
the
same
setting,
there's
only
one
temperature
setting.
I
think
the
board
switches
the
amount
off
independently
whether
or
not
they're
up
to
that
temperature,
and
that's,
I
guess
the
way
you
would
like
to
have
it
since
otherwise,
you
risk
having
too
much
of
a
different
temperature
between
each.
I
E
I
I
I
A
How
about
two-stage
heating,
like
where
we
start
with,
say
much
lower
than
whatever
we
got
like
240,
like
maybe
180,
and
wait
for
it
to
stabilize,
and
then,
when
that
stabilizes
take
it
up
yeah
gradually
like
okay,
so
take
it
down
to
200.
Do
we
get
stabilized,
and
you
know
you
can
walk
away
and
watch
it?
It
should
stay
there
like
yeah.
If
we
can't
get
to
that,
I
mean,
then
we
don't
have
control
over
the
systems.
We
got
to
get
to
that
level.
I
I
A
Because
there's
so
much
thermal
mass
there,
you
got
all
this
tube.
You
got
that
plate
connected
to
it,
it
kind
of
ramps
all
up
and
then
once
it's
nice
and
warm
yeah.
The
heat
just
keeps
going.
There's
just
a
lot
of
thermal
inertia,
because
this
is
much
bigger
than
before,
like
before
we
did
with
a
half
inch
tubing.
A
You
saw
how
tiny
those
things
were
and
we
were
using
well
different
heater
elements
but
much
much
less
volume
involved
than
that
so
yeah
you
could
be
building
it
up
and
then
it's
just
it's
a
big
big
amount
of
mass,
including
that
plate
the
whole
metal
plate.
It's
all
that
bottom
plate
is
metal
and
that's
all
directly
connected
to
the
one
inch
tube.
So
it's
got
a
lot
of
mass
there
yeah
quite
a
bit
of
mass.