►
From YouTube: Summer X Day 12 Class - Modular Utility Channel
Description
-----------------
What you see here at Open Source Ecology is an ambitious open source project for the common good. Join our development team:
http://opensourceecology.org/wiki/OSE_Developers
We run One Day Extreme Build workshops in many locations. Please put yourself on our map if you'd like us to host a workshop near you:
https://microfactory.opensourceecology.org/request-a-workshop/
Take a minute to subscribe to our email newsletter (updates, workshops, etc): http://bit.ly/1LtcM44
A
So
one
just
one
last
comment
on
the
on
the
3d
printer
stuff.
One
way
to
do
it
is
a
3d
printer
right
now
immediate
product.
The
other
way
that
I
think
is
a
very
robust
business.
That's
that
completely
rides
our
value
proposition
of
constructions,
and
that
is
here's
the
different
axes
that
can
do
a
lot
of
different
functionality.
So
here
we've
got
3d
printer
is
one
application
cedar
for
aquaponics
is
another.
A
Here's
a
three-inch
universal
axis
version
drilling
one
inch,
holes
and
steel,
and
we
show
little
elements
of
this.
So
here
we've
got
scalable
frames,
scalable
axes,
interchangeable
tool,
heads
and
with
that
you
can
say:
oh
wow,
we're
providing
a
construction
set
for
tooling
general
automation
for
anybody.
There's
this
thing
keeps
popping
up.
For
example,
there's
have
you?
Have
you
ever
seen
this
construction
set
for
cnc
that
pops
up
on
ads
like
build
your
cnc
machine
in
hours?
Like?
Did
you
see
that
thing.
A
We're
like
that,
but
it's
like
we
actually
eat
that
up
too,
because
they're,
like
okay
they've,
got
the
standard
one
size
thing.
It
doesn't
feature
the
scalability.
They
might
have
probably
the
equivalent
of
our
like
three-quarter
inch
axis
in
terms
of
strength,
but
we're
talking
about
two
inch
and
up
to
three
inch
where
you're
talking
industrial
yeah.
So.
C
A
That
from
the
3d
printer,
here's
your
little
pen
plotter
this
and
then
just
show
little
blips.
Okay,
you
can
do
this.
You
can
do
that
and
we're
spanning
the
entire
realm
of
of
cnc,
including
crazy,
like
as
many
ax
axes
all
together,
so
just
to
show
the
one
axis:
that's
one
product
and
all
kinds
of
mashups
just
going
to
total
craziness,
and
if
we
could
capture
that
in
a
website
which
gets
your
head
around
like
wow,
that
is
part
of
the
system.
A
That's
a
that's
like
a
killer,
app
that
that
turns
it
from
the
3d
printer
to
a
very
scalable
business
like
if
we
talk
about
you
know
creating
a
training
program
for
people
to
build
that,
but
we'd
have
to
like
what
I
see
that
would
take
is
pretty
much
spending
the
time
to
implement
to
do
the
simple
examples
of
each
like
here's.
The
two
inch
working
axis
single
one
on
this
fat
frame
show
this
show
this
this
whole
diversity.
A
D
A
One
week
per
head
or
per
instance,
okay,
here's
this
frame
and
the
last
ones
could
be
even
the
the
rebar
truss
based
frames
where
you
can
still
ride
these
kinds
of
axes.
You
can
do
crazy
stuff,
like
you're,
putting
a
router
head
or
a
hydraulic
motor,
with
a
saw
blade
like
cnc
sawmill,
like
that
level,
that
that
just
blows
it
out,
and
that
would
be
a
longer
investment.
But
it's
worth
it.
A
So
that
means
you
put
a
big
log
on
on
the
saw
and
it
will
cut
it.
It'll
just
do
the
motion
of
doing
the
two
by
fours,
whatever
you're
cutting
out
of
it,
one
pass
returns,
you
don't
have
to
you're,
not
the
guy
moving
it.
It's
actually
doing
that
for
you,
that's
that's
the
most
advanced
version
of
what
exists
out
there.
E
A
For
example,
the
saw
that's
sitting
back
there.
We
do
the
rebar
truss
put
that
on
a
thing,
that's
one
of
your
offering
boots
is
okay.
Now
you
can
put
this
hydraulic
saw
on
top
of
this
large,
much
larger
universal
axis
and
show
crazy
stuff
like
that.
So
that's
that's
where
it
really
hits
its
impact
in
terms
of
interest.
A
D
A
D
D
E
E
Or
don't
even
know
what
any
of
this
is
and
like
maybe
can
only
handle
so
much
of
the
future
vision
and
really
just
need
to
know
just
need
to
be
introduced
to
the
idea
of
what
the
three
3d
printers
exist
you
know
and
that
like,
oh,
they
could
replace
a
part
in
my
broken
tractor
and
then
maybe
just
a
couple
of
examples
that
are
real
key
big
ones
to
get
people.
I
think
that.
A
A
E
F
B
F
E
A
I
would
say
on
my
side
because
the
wiki
is
so
accessible.
You
do
a
well
edited
stuff
on
the
wiki
like
this
could
be
the
outside
of
the
sidebar
and
the
top
I
mean
this
is
all
presentable.
This
is
this
is
the
same
wiki
except
it's
organized.
So,
for
example
like
this
is
what
our
wiki
could
look
like
and
stuff
like
that.
I
mean
it
does
in
some
places.
A
D
A
A
You
already
have
some
of
what
I
was
talking
about.
Here's
the
different
implementations
which
you
can
do
so
here's
this
thing.
So
the
good
website
is
basically
the
universal
cnc
access,
page
souped
up
and
really
pretty
so
you
start
with
that.
You
start
with
this.
That's
simple
enough!
You
go
to
larger
things.
You
go
to
divert
vertical
things.
You
go
to
one
inch
scale
where
that's
one
inch
and
eight
millimeter
combined
together.
You
go
to
two
inch,
which
is
the
biggest
we've
prototyped,
but
we
did
it
at
like
this
here.
A
We
we
didn't
really
even
build
a
complete
axis,
but
that's
that's
the
carriage
pieces
with
two
inch
for
two
inch
rods.
So
that's
the
machine.
We
were
building
right
there.
That
was
the
equivalent
of
the
like
that.
You
know.
Look
at
that.
That's
that's
a
serious
machine!
So
so,
basically
like
even
taking
some
of
these
pictures
and
showing
oh
wow,
that's
still
the
same
universal
access.
A
It
looks
a
little
it's
a
little
different,
it's
a
little
redesign,
but
this
is
the
two
inch
and
now,
if
you
were
to
put
on
say
like
a
hydraulic
motor
like
a
one
inch
drill
or
mill
head
on
it,
this
would
already
be
like
holy.
This
is
this
is
crazy
and
it
is
because
we're
using
the
same
building
blocks
and
just
in
different
variations,
simple
3d,
prints,
simple
design,
etc.
A
E
A
C
A
A
F
F
B
A
Get
to
the
level
so
say
10k
would
be
a
good
thing.
10K
level,
that's
30
printers!
That's
like
that's
a
good
business.
That's
it
30
one
a
day:
that's
a
part-time
job
for
a
dedicated
person.
Who's
set
up.
That's
like
a
quarter
time
job.
So
this
stuff
works.
It's
it's
real.
The
numbers
add
up
just
need
to
do
it
and
the
value
for
osu
would
be
that.
Okay,
here's
ken
he
did
it.
Yes,
now
get
trained
to
do
this
and
we
spread
this
all
over.
A
A
D
E
D
E
D
E
E
E
A
E
A
A
B
A
A
E
A
A
A
Yeah
yeah
3d
printed
part
boxer,
app
app,
adding
packaging
to
prints
for
3d
space
printing
for
production
purposes.
So
you
don't
do
just
one
layer
but
like
add
little
connections
to
the
next
layer,
so
you
can
actually
print
multiple
layers
of
prints
in
one
print.
This
would
save
you
a
little
bit
of
time.
So,
for
example,
you
can
even
print
the
packaging
around
that
and
you
ship
that
at
the
usps.
B
A
Okay,
like,
for
example,
if
we
do
the
aquaponics,
the
biodigester
or
like
fittings,
we
can
right
now
connect.
If
the
fitting
like
say
the
macerator
pump
does
not
fit
your
two
inch.
Pvc,
we
can
put
print
a
little
sleeve
out
of
rubber
to
make
a
watertight
connection.
That's
kind
of
stuff
is
cool
or
make
ball
valves
with
like
rubber,
rubber
gaskets
and
then
other
plastic
around
that
so
you're,
actually
making
a
functional
ball
valve
that
otherwise
cost
you
like
20
bucks
or
something,
and
it's
like
a
few
cents
in
materials
printed.
A
A
No,
that's
a
plastic
extruder,
it
melts
the
melts
the
plastic
and
it
goes
through
through
this
little
nozzle
and
it
makes
the
filament.
This
is
low-hanging
fruit.
This
is
what
we're
doing
next
month
with
mold
like
actually
getting
this
to
work
like
this.
This
is
just
experimenting
yeah.
It
works
great.
A
E
A
D
B
E
B
B
If
there's
any
inner
detail
work
it's
hard
to
get
that
decision
like
even
if
you've
got
like
a
hole
that
doesn't
go
all
the
way
through
the
scanner
might
be
able
to
define
that
outer
edge
of
the
hole
but
inside
it
may
just
well.
I
think
it's
like
this
rounded
off
thing,
because
that's
as
far
as
you
can
see
in
there
so
really
with.
D
E
A
Hey,
we
actually
did
a
website
two
years
ago
about
workshops,
so
this
was
like
this
kind
of
deal
upcoming
events
3d
printer
builds.
These
were
our
guys,
sarah
and
alex.
We
were
working
on
a
3d
printer
business
and
then
we
couldn't
it
was
like
three
months
immersion
in
the
summer
and
the
end
of
it.
It
was
too
short.
They
they
basically
like.
We
didn't
get
that,
get
it
up
and
running.
C
A
B
A
See
it
like,
I
see
it
when
it,
I
can
see
it
now,
but
I
think
you
can
get
a
little
bit
of
higher
quality
when
the
steps
are
smaller
and
you
don't
get
any
of
that
very
tiny
vibration,
and
so
that's
trinamic
stepper
drivers.
That's
like
almost
plug
and
play
easy,
but
we
have
to
develop
because
it's
like
you
got
to
rewire
the
control
just
very
very
slightly.
You
got
to
know
what
you're
doing
there,
so
we
haven't
done
it.
A
A
A
A
that's
how
this
this
thing
is
going
to
be
lifetime
design,
and
it's
going
to
it
has
potential.
I
mean
I'm
still
saying
that
this
is
going
to
take
over
the
world
if
enough
people
contribute
to
it.
It's
just
bigger,
faster,
stronger
kind
of
deal,
just
open
source,
the
design
to
make
it
simple.
You
know
replaceable
like
like
what
anthony
said
about
design
that
you
keep
upgrading
for
life.
That's
that's
the
kind
of
idea.
So
up
to
this
universal
axis,
one
inch.
A
A
A
Yeah,
that's
a
big
two
inch
that
those
rods
are
that
big.
So
now
you
take
a
look
at
the
d30cnc
torch
table
that
was
a
torch
table
prototype
and
then
the
latest
one
was
was
well.
This
is
the
the
one
we're
working
on
right
now
we
were
revisiting,
so
that
was
the
very
very
first
one
that
made
it
into
make
magazine
and
then
19.10
was
this
one
where
we
still
have
that
frame
up
there
and
that's
like
all
auto
gas
control
and
full
stuff
for
cnc
cutting
cnc
torch.
A
A
A
A
A
Cb
can
run
this.
We
have
a
dedicated
cb
controller
but
but
yeah.
I
want
to
just
use
this
because
then
we
can
use
one
and
forget
about
it.
You
don't
have
to
worry
about
custom
parts
and
all
that
so
but
that's
that's
the
idea,
but
let's
return
to
the
house
because
that's
gonna
be
that's
gonna,
be
that's
bigger
than
the
3d
printer.
A
Oh
yeah,
oh
yeah,
yeah,
you
do
that's,
takes
support,
so
we
can
convert
from
going
up
the
mechanically
it's.
You
can
do
that
with
one
inch
axis
for
a
four
by
four
by
eight
vertical.
If
you
go
eight
horizontal
it
sags
too
much
so
you
couldn't
do
it
with
one
inch
you
have
to
go
to
larger
axis.
For
that,
so
to
go
up
is
cheaper
for
the
structure.
A
A
A
Like
these
panels,
here,
let's,
let's
review
what
we
we've
done
yesterday,
we
cut
up
some
stuff
cut
up
some
lumber,
so
you
can
think
of
those
two
by
fours
think
about
that
bed.
Just
you
just
popped
up.
You
know,
50
of
them
think
about
a
multiple
print
head
printer,
like
10
heads
and
10
heads
times,
20,
like
20
pounds
per
day
per
head,
is
200
pounds
per
day,
so
you
can
get
a
production
printer
that
is
doable
all
with
open
source
technology
components
that
exist
today.
A
You
don't
have
to
you
know
like
our
extruder
plus
the
super
volcano
nozzle
kind
of
thing,
the
other
heater
blocks
that
are
a
little
larger
super
volcano.
They
are
80
watt
heater
blocks
for
each
heater
block
for
each
nozzle,
but
yeah.
I
think
about
printing
up
a
bunch
of
these
two
by
fours
and
that
is
gonna
sell
itself.
A
If
you
put
that
in
a
video
on
that
website-
and
hopefully
we
can
do
exactly
that
in
three
weeks,
so
we
should
be
thinking
about
that
when
we,
when
we
do
the
workshop,
we
should
be
thinking
okay.
How
do
we
capture
some
good
video
for
that?
This
website
and
take
some
photo
shoots
and
stuff
like
that,
like
that
that
would
go
to
the
bigger
website
of
here's
now:
industrial
productivity
on
a
small
scale.
A
A
E
A
Like
if
you
have
complicated
plumbing
like
under
the
the
mask
the
separating
toilet,
like
all
that
you
can
print
as
one
piece
you
have
to
worry
about
getting
a
bunch
of
fittings,
you
can
all
print
that
including
the
ball
valve
in
there.
If
you
have
a
rubber
and
regular
plastic
printer,
multiple
heads
stuff
like
that,
so
it's
it's
all
doable.
What's.
B
A
Plastic
urethane:
that's
it's
pretty
the
rubber,
that's
what
they
use
for.
Snowmobile
tracks,
bumpers,
other
things,
it's
not
as
common
as
as
regular
rubber
plantation
rubber,
but
it's
recyclable,
so
I
think
it
might
come
in.
It
allows
you
to
do
airless
tires
because
you
can
print
the
airless
geometry,
which
you
cannot
do
using
extrusion
the
standard
processes
that
you
cannot
do
and
close
pockets
with
standard
procedures.
This
is
this
is
a
great
point
of
advantage.
A
A
Yeah,
like
look
at
these
things,
airless
tires
it's
like
a
round
mattress.
Let's
see
like
this
one
here,
you
know
you
can
do
that
kind
of
stuff
or
fill
that
close
that
so
it's
actually
air
filled
so
you're
actually
getting
pressure.
You
can
even
inject,
you
know,
put
a
little
needle
in
there
and
then
take
it
out.
So
it's
self
sealing
you
know,
needle
it
and
fill
it
with
pressure
and
you've
got
like
air
filled
tires
that
have
both
the
like
the
rub:
rubberiness
and
pneumatics,
the
air
pressure
that
keeps
it
stiffer.
A
A
No,
it's
more
more
the
material
property,
whatever
you're
going
to
be
printing
with
you're,
just
melting
it
to
extrude
it.
So
the
properties
remain
whatever
you
have
there
and
the
only
disadvantage.
There
is
like,
for
example,
for
like
abs
or
other,
maybe
like
pla
or
whichever
ones,
but
I've
heard
that
you
can
only
recycle
like
5x
five
times
you
have
to
put
in
20
percent
new
material
every
time,
because
the
properties
degrade
over
time.
You
don't
get
good
properties
anymore.
That's
kind
of
details.
What.
A
B
B
A
A
I
A
H
H
H
A
H
D
H
A
So
next
on
this,
do
any
people
want
to
start
laying
up
more
panels
because
because
so
the
stairs
I
mean,
do
we
all
want
to
kind
of
work
on
the
stairs
and
and
that's
kind
of
a
bit
of
a
bottleneck
there
there's
two
saws
sliding
miters
that
we
can
be
measuring
and
cutting
the
marking
is
going
to
be
the
the
bottleneck.
I
guess
at
first
so
yeah
maybe
do
a
team
on
that.
Maybe
another
team
on
maybe
more
panels
on
the
inside
into
your
panels.
B
A
A
H
H
A
A
I
wonder
how
that
I
did
that.
I
think
I
used
the
level
for
that.
Is
it
possible
that
the
house
shifted
or
something
oh
yeah?
The
only
thing
I
could
see
is
outside
of
not
getting
the
measurement
right
is
if
we
move
the
joists,
and
maybe
we
like
shifted
the
whole
thing,
but
that's
impossible,
because
that
thing
was
attached
to
that.
So
probably
I
didn't
use
a.
D
A
A
B
B
B
A
A
A
A
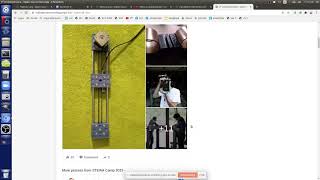
So,
let's
take
a
look
at
the
utility
channel.
We
talked
about
a
little
bit
before,
but
here
you
see
what's
going
on
is
that
whatever
the
electrical
is
inside
the
the
walls
like,
for
example,
if
you've
got
a
switch,
we're
actually
building
that
in
before
we
put
the
sheeting
on
so
the
utility
channel
is
where
all
the
wires
run.
So
you
can
connect
them
from
the
electrical
breaker
box
to
individual
wall
panels,
so
the
concept
here
being
whatever
you've
got
in
a
panel,
all
your
wires.
You
just
keep
feeding
them
through
the
bottom
channel.
A
A
A
Therefore,
we
cannot
put
the
panels
in
yet,
which
means
that
we
have
to
attach
all
the
things
like
light,
light
outlets
or
just
switches
to
the
framing
prior
to
closing
up
now
in
order
to
facilitate
cutting
out
those
holes
for
the
whatever
the
receptacles
and
switches
and
appliances.
You
have
we
talked
about
this
before,
but
you
want
to
use
the
concept
of
old
work
boxes
versus
new
work
boxes.
All
work
boxes
are
ones
that
you
actually
snap
into
a
finished
surface.
A
In
other
words,
you
don't
have
to
be
super
precise
on
the
cutout,
because
that
cutout
has
to
be
quite
precise
for
a
little
receptacle
to
avoid
that
precision
requirement
so
design
for
tolerancing,
as
we
call
it,
you
design
it
to
avoid
accuracy
requirements
because
you're
building
that
in
building
in
the
accuracy
by
design.
So
one
way
to
do
that
is,
if
you
have
the
panel,
you
know
you
can't
have
the
outlet
on
a
stud,
but
beyond
that
anywhere
between
the
stud
is
game.
A
A
So
you
insert
this
into
the
wall
and
when
you
screw
in
this
screw
that
tab
pushes
in
and
actually
it's
in
order
to
get
it
into
a
smaller
hole
that
tab
is
folded
down
upon
screwing
in
that
screw
the
tab
pulls
up
and
folds
up,
so
it
goes
pulls
in
and
it
goes
up
and
it
locks
in
that's
the
concept
there.
So
you
don't
have
to
have
the
super
precision.
Okay,
there.
It
is
on
a
stud,
and
you
have
to
then
be
very
careful
about
where
you
measure
the
panel
very
careful.
A
So
that
saves
you
a
lot
of
time
use
the
old
work
boxes,
which
means
that
for
the
inspector
we
probably
put
in
the
work
boxes
there
temporarily
and
then
cut
out
your
panels
feed
that
wire.
Just
all
you
need
to
do
is
feed
that
wire
through
that
hole.
So
you
attach
the
panel
feed
that
wire
through
the
hole,
and
then
you
locate
the
box
wherever
it
needs
to
go.
Does
that
kind
of
make
sense
not
really
yeah.
A
H
A
G
G
G
C
G
G
G
G
This
is
what
the
box
looks
like
inside
the
wall.
Not
a
lot
of
people
get
to
see
the
way
this
actually
goes
together.
It's
important
you
understand
that
these
wings
are
pressed
tight
against
and
your
hole
is
not
actually
too
big.
If
your
hole's,
too
big
your
box
will
fall
through
and
if
that's
the
case
now,
you're
gonna
have
to
pass
sheetrock
now.
A
G
A
lot
of
times
you
can
do
this
with
a
screwdriver,
but
I'm
telling
you
you're
going
to
definitely
want
to
do
it
with
a
drill.
You
just
want
to
make
sure
your
wings
don't
get
flipped
over,
because
what
you'll
end
up
doing
is
you'll
run
the
screw
through
the
plastic,
you'll
open
up
that
plastic
wing,
and
it
will
never.
A
A
I
think
I
think
that's
the
proper
procedure,
for
whoever
does
all
the
work
boxes
on
new
construction.
There's
nothing
that
says
you
can't
use
old
work
boxes
and
new
construction.
We
haven't
seen
that
so
you
kind
of
have
to
hack
it
a
little
bit.
It's.
I
don't
think,
there's
a
big
deal
to
this.
This
is
just
like
a
small
detail
of
how
this
actually
goes
mechanically.
A
A
F
A
When
we,
the
mechanics
of
how
we
we
go
through
inspection,
is
we
have
no
interior,
siding
interior
plywood
on
we
attach
the
boxes
to
a
stud
like
that
one
we
just
attached
to
the
stud
when
we're
ready
to
put
in
the
panel.
We
have
a
panel
with
the
hole
already
we
put
it
up
there
as
we
put
it
up,
take
off
that
box,
feed
the
wire
through
the
hole
and
insert
the
box
back
in
that's
what
you
would
do.
A
D
A
A
F
F
A
Yeah,
that's
actually
decent,
so
so,
okay,
so
let's
hack
this
one,
so
new
slide
or
or
duplicate
slide.
So
what
would
look
like
with
a
wireless
switch
because
we
actually
consider
that
for
ease
because
we're
trying
to
say
okay?
How
do
we
make
it
simple?
So
the
build
is
seamless,
so
slide,
duplicate
slide.
A
Right,
that's
one
issue
and
for
fire
codes
you
would
probably
need
to
put
that
switch.
So
it
looks
like
it's
a
regular
switch
because
say
in
an
emergency
where
there's
a
fireman
coming
in,
they
need
to
have
the
lights
and
that's
required
by
code,
so
you'd
have
to
mount
it
somewhere.
So
you
kind
of
hack
in
the
system,
but
would
it
work
at
least
mechanically.
A
A
H
A
Okay,
wireless
switch
so
say
that's
connected
to
this
one.
Then
you
can
get
rid
of
that
one
actually
and
can
keep
keep
that
wire
running,
but
you
still
have
to
have
that
light
there.
Right
so
say:
that's!
That's!
Like
your
receiver,
this
one
down
here!
Well
I'll,
say
you
have
like
a
receiver,
let's
color
them
green,
so
that
will
have
some
wires
going
to
it,
and
this
is
your
where
you're
shooting
from
so
you
hit
this
wireless
switch.
It
hits
this
receiver,
that's
wired
up
and
it
activates
this
light.
Yeah,
it's
doable.
A
A
If,
if
say
you
move
this
from
there
and
it's
not
accessible
in
an
emergency
or
something
like
that,
so
those
are
some
considerations
but
yeah.
If
you
just
keep
it
there
and
you
don't
mind
having
batteries,
you
know
replacing
a
battery
every
year
or
something
it's
doable,
but
I
guess
for
long
long
term,
life,
it's
like
you,
come
back
and
it's
bad
and
yeah
yeah
wire.
It
wire.
I
I
A
That
on
the
3d
printer,
we
do
like
we,
we
high
side
switch
because
it's
safer
because
yeah
that
there's
a
safety
issue,
because
you
want
to
turn
off,
even
though
you
don't
have
something
on
you,
don't
want
a
wire
to
be
hot,
so
you
typically
want
to
switch
on
a
hot
wire,
not
on
a
low
wire.
Is
that
something
that
makes
sense
correct.
B
Yeah
something
like
that,
I
think
it's
more
done
when
you're
doing
all
the
work
and
you
need
to
throw
something
in
with
existing
wire.
What
I
was
going
to
ask
is:
how
do
they
do
the
electrical
inspections
for
existing
modular
house
designs,
because
you've
shown
us
the
ones
where
it's
a
whole
wall
of
the
building
lifted
in
place
by
a
crane.
I
B
A
A
It
makes
it
easier
in
the
utility
channel
we're
just
making
connections.
So
the
utility
channel
cover
is
just
a
piece
of
wood,
very
simple:
you
don't
like
put
a
box
on
it
with
wires
attached
to
it.
If
you're
going
to
take
that
off,
you
put
the
actual
receptacle,
say
it's
a
power
outlet
on
the
wall.
Put
that
above
that,
so
when
you
say
you're
servicing
this
or
modifying
it
like
we,
we
do
quite
a
we
do
that
at
our
house.
A
A
A
A
A
Outlet
would
be
like
on
top
of
that,
above
that,
whatever
else
you
got
in
the
panel
interior
exterior
outlets,
they
could
all
be
in
there
and
the
junction
box.
It's
it's
within
the
wall
panel
itself,
and
then
you
got
the
bunch
of
wires
running
through
it
and
that
cavity
there
is
like
seven
inches
tall.
So
you
can
fit
as
many
wires
as
you
like,
so
there's
a
one
by
two
and
a
one
by
four
there
and
we
have
that
sticking
sticking
down
because
there's
the
sill
plate
there.
A
A
F
A
H
A
A
Yeah
we
designed
this,
so
you
can
eliminate
all
drilling
of
holes
here
in
that
wall.
That's
that's
your
interior
wall,
okay,
you're!
Actually,
right!
You
don't
have
a
hole
going
unless
you're.
On
the
second
floor,
where
you
don't
have
the
blocking
the
blocking
no
yeah,
you
do
oh
you're
right.
So
there's
yeah.
There
is
an
issue
there.
You
have
to
drill
that,
but
that's
only
like
through
one,
as
opposed
to,
like
typically
electricity
is
run
by
drilling
holes
through
all
the
studs
like
entire
house.
That's
cold.
H
A
F
A
H
A
A
I
G
H
A
So
as
far
as
the
what
walls
have
electrical
in
them,
so
that's
kind
of
this
is
like
a
simple,
simple
layout
here,
but
all
right
so
starting
with
the
that's
the
second
floor.
But
starting
with
this
first
floor,
that's
what
we
have
right
now.
So
that's
our
wall
that
we're
working
on
right
now
and
actually
that's
two
and
a
half
panels
there,
so
that
should
actually
be
two
and
a
half
a.
A
A
A
A
Yeah
yeah
well
yeah
from
this
panel
from
from
the
back
of
it,
so
we're
good
there
and
there's
nothing
back
there.
So
we're
good.
We
we
ended
up
so
there's
gonna
be
an
outlet
there
and
then
there's
your
your
landing.
So
we'll
put
the
wires
under
the
landing
and
then
go
into
the
utility
channel,
because
there's
space.
A
A
We
have
that
little
bit
of
we
have
that
blocking
it
towards
the
back
so
like,
which
is
one
and
a
half
or
up
to
three
so
probably
want
to
keep
it
from
the
bottom
edge
of
the
interior,
siding
probably
put
up
like
three
inches
or
so
that
will
be
about
15
inches
from
the
ground
for
the
power
outlets,
so
we
run
run
wires
so
yeah.
Some
of
these
have
outlets
say
we
start
on
that
corner
like
that,
would
be
a
convenient
corner
to
while
there's
windows
in
here.
A
So
we
do
have
to
cut
out
around
the
windows.
That's
that's
the
tricky
part
you
have
to
you
do
have
to
measure
for
the
windows,
because
you
can
just
pop
them
in
later
they're
already
there,
but
we
we
do
have
trim.
I
mean
we're
gonna
use
one
by
two
or
one
by
four
trim,
so
you
can
be
off
a
little
bit.
At
least
you
know
like
half
inch
it'll
be
fine
because
I'll
trim
it
all
up,
but
we
have
to
cut
out
here.
So
another
team
wanted
to
do
the
the
panels.
A
Well,
this
one
has
it
this
one:
has
it
so
yeah
we'd
have
to
pretty
much
cut
out
a
little
square
for
the
box
and
then
continue
there,
so
so
the
paneling.
I
think
this
this
is
where
kind
of,
like
all
this
efficiency
has
to
come
in.
We've
got
to
really
learn
it,
and
we
haven't
really
done
a
lot
of
this
in
this
way.
So
I
think
right
now,
it'll
be
kind
of
slow,
but
we
can
get
a
team
up
there
cut
out
the
outlet
box
and
then
do
the
first
panel.
A
I
I
D
G
A
You
know
you,
you
could
actually
put
in
the
whole
panel
and
kind
of
mark
it
just
about
right,
but
just
drill
little
holes
and
you
can
see
through
the
other
side
of
the
window
you
can
just
take
a
circular
saw
with
a
you
know,
get
your
blade
that
way
and
just
cut
it
out
in
place
too.
I
think
that
would
be
actually.
I
A
G
I
I
I
B
A
J
D
A
A
J
A
J
A
J
That's
what
right?
That's
what
it's
normally
done,
but
I
am
thinking
I
think
a
circular
saw
is,
is
difficult
because
if
people
don't
stop
they're
going
to
cut
the
frame,
a
circular
saw
cut
the
frame
very
easily,
but
jeff
has
a
small
reciprocating
saw
a
small
skill
saw.
That
is
not
the
size
of
yours.
Yours
are
very
powerful
too.
We
need
a
tool
that
is
like
a
little
powerful,
but
not
enough.
That
will
cut
right
through
the
frame.
A
B
A
D
A
A
Yeah
there's
two
windows
here
and
then
four
windows
on
the
second
floor
and
stuff
like
that.
So
if
you
want
like
we
can
so
we
definitely
have
a
team
on
the
stairs
so
we're
we're
cutting
treads
and
cut
and
measuring
there.
We
can
have
a
team
on
the
bottom
left
corner
here,
in
which
case
we
do
cut
out
that
electrical
outlet
box
to
fit
it
in
on
the
panel
itself
and
that
panel
there,
if
we
put
them
in
the
right
place,.
A
J
Can
I
can
I
interrupt?
Maybe
your
guys
is
what
you're
saying,
but
I
just
saw
like
one
of
the
issues
with
ship
like
material
is
that
you
very
easily
get
the
measurements
wrong
for
the
holes
for
the
windows,
so
one
possibility,
I
don't
know
how
practical
this
would
be
would
be
to
just
push
the
panel
against
the
window
as
it
is,
and
then
from
the
outside
just
trace
the
contour.
G
D
A
D
J
I
I
A
Yeah,
but
we're
not
getting
to
running
the
lines
yet
all
the
lines
that
all
those
outlets
are
already
actually
in
the
walls,
so
they
got
little
stubs
of
wires
coming
out
of
them.
So
at
the
end
of
the
day
we
run
the
long
wires
from
the
electrical
box
to
the
through
the
channel,
but
there's
no
no
drilling
at
all
there.
It's
just
in
front
of
the
walls.
B
A
A
There
so
the
panel
is
here,
there's
a
space
in
front
of
it
in
front
of
all
the
studs,
and
then
you
got
the
spacers,
which
are
three
one
bys,
which
are
three
quarter
by
one
point:
five
inch,
so
you
got
three
quarter
space
you
can
put
in
a
bunch
of
wires
there
that's
kind
of
accurate
and
can
fit
like
that.
Many
wires
in
there.
A
A
H
B
B
B
I've
routed
electric
wires
and
I've
had
to
route
them
along
like
a
rim
joist,
and
it's
just
dizzy
as
well,
because
it's
coming
out
of
the
bridge
box,
so
you
just
run
a
strand
and
you
tack
it
in
place,
and
then
you
run
a
strand
below
it
back
in
place.
You
keep
them
all
separate
nice
and
tight,
but
there's
a
lot
of
deep
height
there.
You
can
kind
of
run.