►
From YouTube: Crowbar v2.1 OpenStack via PackStack
Description
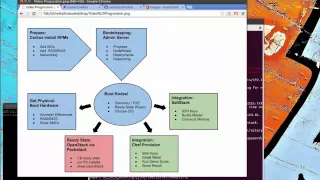
From Ready State, install OpenStack on Cenos 7 using the PackStack installer
A
Hello
and
welcome
to
the
readystate
OpenStack
install
via
pack
stack
component
of
the
getting
to
know
crowbar
two
dot,
one
install
videos,
I'm
your
host,
Rob
hirschfeld,
and
today
we're
going
to
jump
down
directly
into
the
OpenStack
piece,
we're
assuming
that
you've
already
walked
through
these
other
steps,
and
we
suggest
you
go
back
through
the
videos.
If
you
haven't
we're
going
to
take
you
through
some
of
the
steps,
hopefully
and
explain
things
as
we
go.
The
crowbar
capability
in
the
readystate
wizard
combines
a
whole
bunch
of
other
operational
steps
into
a
single
piece.
A
Basically
we're
going
to
build
a
network
attached
it
to
the
second
interface.
Second,
one
gig
interface
on
there
on
our
system
and
give
it
a
network
range
you'll
see
how
all
this
plays
out.
I've
got
three
servers
in
here
and
we're
going
to
install
sense
7
on
them.
So
these
are
the
the
wizard.
It's
going
to
set
this
system
up.
It's
all
virtualized
and
at
this
point
we've
created
a
subset
of
our
overall
environment
for
the
purpose
of
installing
OpenStack
and
I
can
come
in
and
make
changes
like
the
OS
and
things
like
that.
A
Once
again,
we'll
talk
about
these
terms
in
earlier
videos,
and
then
so
I
want
to
add
OpenStack
I'm
going
to
choose
my
first
node
I
want
to
make
sure
it's
my
81
address
just
to
make
things
easy.
Those
addresses
haven't
been
allocated
yet
but
have
been
assigned
by
crowbar
out
of
that
house
network
pool.
A
A
You
could
also
go
back
and
do
ice
house
going
back
into
the
pilot
to
now
I've
done
that
I've
chosen
my
base
I've
identified
that
this
is
a
pack
stack
node,
which
does
all
of
the
readystate
configuration
the
keys,
making
sure
that
the
environment
is
prepped
to
run
pack
stack
in
this
demo.
We
don't
run
pack
stack.
The
code
here
is
provided
by
racking,
which
is
the
company
founded
by
the
open,
crowbar
founders
and
we're
following
basically
these
steps
on
how
to
do
the
install.
A
Once
again,
we've
expected
you
to
have
already
walked
through
the
whole
OpenStack
install
and
we're
really
going
to
it's
very
simple.
To
do
this,
we're
just
going
to
install
pack
stack
crowbars,
doing
all
the
lifting
of
building
the
environment,
attaching
the
network's
building
the
necks
and
things
like
that.
So
at
this
point,
I've
said:
I
want
these
three
nodes
to
be
pack
stack
nodes.
One
of
them
has
been
identified
as
the
base
node
and
that's
where
we'll
be
launching
the
pack
stack
install
from
and
at
that.
A
That's
discovered,
install
sent
seven
on
it,
lay
down
the
pack
stack
RPM
packages
and
all
the
componentry
that's
needed,
make
sure
that
the
keys
are
distributed
and
it's
going
to
take
a
little
while
so
we're
going
to
literally
go
back
through
a
reboot
environment
and
the
system,
and
you
will
see
all
of
these,
these
nodes,
reboot
change
and
things
like
that,
we'll
pick
back
up
after
that
step
is
completed
in
all.
Our
check
marks
are
green,
okay,
so
now
we
are
set.
A
Our
environment
has
progressed
to
the
point
where
all
of
the
nodes
are
already
packed.
Stack
pieces
have
been
installed
and
good,
and
at
this
point
we're
ready
to
follow
these
directions.
So
rack
and
pack
stack
in
github
from
here.
It's
going
to
take
you
through
these
same
these
same
basics.
There
is
a
way
to
download
the
install
scripts,
so
this
is
really
going
to
just
bring
in
the
pieces,
so
you
should
have
followed
these
steps
in
installing
pack
stack.
We've
already
passed
this
point.
This
is
this
is
reemphasize
us.
A
So,
from
this
admin
note
it's
time
to
run
the
packsack
install
so,
to
recap,
ready
stated
three
machines
with
pack
stack
and
then
added
the
pack
stacked
pieces
following
these
directions
in
the
rack
and
pack
stacked
repo
and
then
from
here.
What
I
need
to
do
is
ssh
into
one
of
the
into
that
pack:
stacked
master
node.
A
So
in
that
case
I
need
to
be
the
crowbar
user
in
my
environment,
so
instead
of
root,
I'm,
not
crowbar
I'm
still
on
my
crowbar
admin
net
so
that
first
machine
and
from
here
I'm,
going
to
SSH
into
my
first
machine,
192
168
1
24
about
81
I
could
use
the
DNS
names
to
their
mac
addresses.
So
their
actual
a
little
bit
harder
me
to
remember
it's
important
to
understand.
A
One
of
the
things
rubber
does
is
distribute
keys
to
the
system,
so
you
can
ssh
and
access
them
and
they
can
ssh
into
each
other,
which
is
how
pack
stack
manages
the
puppet
install.
So
once
I
am
on
the
node
here,
I'm
following
these
steps,
I
need
to
be
the
pack
stack
user,
so
pack
stack
installs
as
packs
vac
user,
crowbar
preps.
That
environment
creates
that
user.
For
us
to
do
that,
and
then
I
need
to
actually
run
the
packs
pack
install.
So
let
me
grab
this
script.
A
This
is
convenient
here
because
we're
actually
using
the
exact
same
IP
addresses
so
inside
this
documentation.
If
you
use
the
crowbar
defaults,
it's
going
to
set
up
host
network
with
starting
it
dot
81
then
editing,
82
and
83.
So
we
did
exactly
that.
One
thing
to
note
is
for
speed
and
performance
reasons.
We
don't
include
the
first
I
so
that
OpenStack
needs
sorry,
the
first
VM
image,
so
you
would
have
to
upload
that
post
the
install
in
this
case
and
I'm
going
to
kick
that
off
and
it'll
start
doing
the
packs
back
installed.
A
That's
going
to
drag
in
a
whole
bunch
of
things
from
the
internet,
so
it
takes
a
bit
of
time
to
do
this.
Install
it's
very
important
to
understand
what
we've
done
here
is
not
create
a
crowbar
installer.
We're
using
pack
stack
as
the
install
all
we've
done
is
set
up
an
environment
that
makes
it
really
easy
and
repeatable
to
do
pack
stack
installs,
then
optimizing
customizing,
changing
tweaking
setting
up
Software,
Defined
Networking.
All
of
those
actions
are
OpenStack,
install
actions
and
would
be
done
subsequently.
A
Our
goal
has
been
to
make
it
so
that
when
you
do
those
steps
you
can
learn
from
them
and
prove
clean
your
whole
environment
repeat,
and
that
repetition
is
what
brings
you
to
good
operations
practice,
and
then
we
can
layer
devs
instead
of
scripting
DevOps
scripting,
on
top
of
this
type
of
install
I'm
going
to
pause
and
let
this
go
because
it
takes
a
while
and
then
I'll
show
you
how
to
login
to
OpenStack,
so
we're
not
quite
complete.
Yet
it's
been
a
couple
of
minutes.
A
We've
done
a
whole
bunch
of
work
and
the
system
slows
down.
While
it's
doing
some
tests,
you
can
watch
those
go.
It's
just
normal
for
this
this
to
happen.
It's
also
normal
for
some
of
the
finishing
steps
to
fail,
but
the
system
itself
to
have
come
up
sufficiently
and
I'll
show
you
what
that
looks
like
as
we
take
as
we
complete
the
script.
A
So
we've
had
a
chance
for
the
system
to
run
like
I
expected.
We
had
an
error
down
in
one
of
the
horizon
puppet
pieces.
In
some
cases
that
work
has
already
been
done
and
there's
extra
configuration
is
being
added
once
again.
Our
goal
here
is
not
to
walk
you
through
the
whole
OpenStack
install
using
pack
stack,
that's
be
a
future
topic,
one
best
done
in
the
OpenStack
community.
Our
goal
here
is
to
give
you
a
ready
state
so
that
you
can
do
this
work
and
then
apply
rinse
repeat
the
work
again
at
this
point.
A
It's
important
to
be
able
to
now
log
into
the
system
and
we're
going
to
walk
you
through
that
to
do
that,
I
have
to
stop
being
the
packs
back
user
and
then
what
I
need
to
do
is
get
the
password
that
I
need
from
the
password
file.
So
you'll
notice
in
these
closing
comments
that
we
have.
This
file
has
been
installed
with
the
configuration
information.
A
So
this
is
my
basically
a
my
RC
file
with
the
key
information
that
you
would
use
to
log
into
the
OpenStack
api's
and
you
and
run
the
API
instructions
so,
and
we
just
took
all
the
defaults
everything's
very
basic.
You
can
see
the
URLs
right
here
for
the
API
I
need
this
password.
So
let
me
copy
the
password
and
then
I'll
open
up.
A
My
admin
server,
one
thing-
that's
important-
is
when
you're
doing
this
work,
especially
if
you're
using
VMs
that
you
make
sure
you
create
the
routes
between
these
different
networks.
In
this
case,
our
instructions
include
how
to
attach
this
network
route.
So
I
have
my
admin
system,
I
have
to
paste
in
the
new
password
and
then
I
can
login
to
OpenStack.
So,
as
part
of
this
pack
stock
install,
we
were
able
to
get
the
the
basic
install
up
and
running,
and
then
you
can
navigate
the
you.
A
It's
just
the
pack
stack
installer,
it's
nothing
particularly
esoteric,
and
then
it
would
be
possible
to
extend
the
crowbar
pieces
just
so
slightly
to
run
that
last
one
line
command
as
part
of
the
overall
deployment
and
have
that
be
a
configuration.
We
chose
to
stop
there
and
see
if
there's
community
interest
in
moving
that
forward
and
participating
at
this
time.
The
rack
and
pack
stacked
repos
are
open,
they're
available.
They
are
not
licensed
in
an
Apache
License.
They
are
the
rack
and
has
retained
the
right
a
little
bit
of
code.
A
That's
in
this,
but
we,
if
there's
community
interest,
we
are
very
open
to
making
this
code
extendable
and
shareable
in
broadway's.
The
reason
we
have
not-
and
it's
worth
mentioning
is
because
racking
is
not
an
OpenStack
install
our
company.
We
are
really
looking
for
partners
or
customers
or
people
who
want
to
work.
A
Take
this
work
on
from
the
readystate
above
and
and
promote
that
and
do
that
themselves,
and
we
felt
that
by
keeping
the
licenses
as
they
were,
it
would
enable
people
to
to
build
their
own
OpenStack
products
if
they
want
it
on
top
without
having
a
crowbar
competitor.
So
maybe
more
business
information
that
you
were
hoping
in
the
demo
but
worth
explaining
very
clearly
up
front
I
hope
this
has
been
helpful,
that
you
can
sort
of
follow
through
this
progression.
A
Of
course,
you
need
to
go
all
the
way
down
through
these
other
three
steps
in
order
to
do
this
work.
This
is
just
sort
of
the
tail
end
and
then,
if
you
want
from
the
same
environment,
you
can
reset
and
then
explore.
Some
of
the
other
integrations
that
we've
done
with
salt
chef
or
physical
provisioning.
Thank
you
very
much.
A
A
So
after
we've
looked
at
the
networks
and
bus
interfaces
on
the
deployments
showing
you
the
deployment
side,
there's
a
new
install
by
the
way
I
slipped
one
in
between
I
pause.
After
networking,
you
can
take
a
look
at
all
the
roles.
It's
important
when
you
look
at
roles
to
understand
that
each
roll
is
implemented
by
a
different
jig.
Jig
is
our
abstraction
interface,
so
when
each
roll
is
executed
can
be
done
by
a
different
implementation
mechanism.
That's
in
case
that's
a
script.
So
that's
actually
a
bash
shell
action,
no
op
is
does
nothing.
A
Is
we
use
that
for
checkpoints
and
milestones
and
something
a
very
important
part
of
the
orchestration
system?
So
you
can
have
other
roles
that
depend
on
a
milestone
and
then
basically
create
a
series
of
gates
for
your
deployment,
then
extend
the
orchestration
around
those
gate.
Points
ends
up
being
a
critical
architectural
design
component.
We
didn't
realize
how
important
it
would
be
until
after
we
put
it
in
test.
Jigs
are
used
for
our
offline
tests,
so
we
can
test
without
having
to
deploy
physical
infrastructure
chef
solo
as
an
older
jig.
A
It
is
functionally
equivalent
to
the
chef
jig,
except
that
you
can't
use
encrypted
data
bags
that
pop
the
standalone
very
similar
concept.
If
you
have
puppet
modules
that
you
want
to
execute
role
provided
jig
is
a
new
concept
that
we're
using
for
some
of
the
burn-in
and
valid
system,
validation
and
then
a
lot
of
the
core
work.
We
have
a
chef
because
that's
historically
what
we've
used
a
crowbar,
so
we
were
able
to
reuse
significant
amounts
of
code
from
crowbar
one
by
reusing
the
chef
jayke.
A
A
System
overview,
the
annealer:
when
systems
operating
it's
going
to
show
you
what
work
is
in
different
states,
convenient
way
to
track
what's
happening
with
the
system
system
overview
here
is
designed
to
help
sort
of
see
the
system
at
the
high
level.
It's
really
useful
when
there
are
a
lot
of
notes
and
in
and
what
it
does
is
I'll
show
you
what
type
of
work
is
going
on
within
the
system
in
a
functional
sort
of
way,
so
you
can
see
operating
systems
being
deployed
knows
being
brought
up.
A
I
call
this
the
CIO
view
it's
useful
to
sort
of
see
how
busy
your
infrastructure
is,
and
then
under
utilities
we
have
a
series
of
things.
Bootstrapping
is
used.
If
you
don't
provide
the
defaults,
you
can
use
the
bootstrapping
screen
to
populate
all
the
critical
data.
If
you
were
using
our
production,
SH
script,
export
items
is
used
to
retrieve
log
files.
Install
jigs
will
show
you
all
the
different
chicks
that
are
in
operation,
there's
quite
a
number
of
them
for
roles.
The
test
one's
not
activated.
A
If
you
ran
a
development
about
a
lot
of
these
jigs
wouldn't
be
installed.
Bar
clamps
are
legacy
concept
from
crowbar
one
really
there
they're
groupings
of
roles,
then
that
those
are
then
bundled
into
workloads.
It
used
to
be
that
you
had
to
have
a
github
repo
for
every
bar
clamp.
We
did
away
with
that,
and
so
something
like
OpenStack,
which
to
incur
bar
one,
would
have
10
or
15
different
bar
clamp
and
github
repos.
A
Those
would
still
be
bar
clamps,
but
they
would
be
managed
as
a
single
workload,
and
then
we
have
some
user
management,
so
there
is
password
and
user
identities
with
admin
and
non
admin
credentials
and
if
you're
going
to
do
API
work,
you
have
to
these
have
to
be
set
as
API
enabled
that's
what
the
Machine
installing
clip
are
both
operate
as
API
enabled
users
and
there's
also
a
user
settings.
So
your
user
can
actually
decide
if
it
wants
to
show
additional
information
or
hide
additional
information
and
change.
A
If
you
were
going
into
the
github,
you
actually
should
get
with
jump
I
that
the
page
on
github
takes
you
right
to
the
get
out
page,
and
this
has
been
really
important
for
us,
because
it
allows
people
to
maintain
and
retrieve
the
latest
documentation,
even
if
their
installers
and
we've
been
talking
about,
removing
that
whole
component
and
just
using
online
documentation
more
detail
than
you
probably
wanted.
But
that's
a
complete
tour
of
the
UI
so
that
you
can
see
how
things
operate
and
hopefully
get
a
better
sense.