►
From YouTube: VMware Cloud PKS Overview - Getting Started
Description
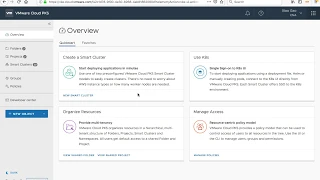
Watch this video for a quick overview of VMware Cloud PKS, a Kubernetes-as-a-Service offering from VMware.
To learn more, visit https://cloud.vmware.com/vmware-cloud-pks
A
Welcome
to
the
VMware
cloud
paas
demo
in
this
video
we're
going
to
show
how
you
can
bring
up
a
enterprise
grade,
production,
quality,
kubernetes
cluster
and
start
deploying
complex
multi-tier
application
in
minutes
to
start
consuming
cloud
pickets.
You
first
log
into
the
VMware
cloud.
Pga's
portal,
Weimar
cloud,
pk's
portal
leverages
open
ID
connect
for
authentication
once
logged
in
you
will
have
the
option
to
create
a
cloud
pikas
smart
cluster
cloud
peak
is
smart.
Cluster
comes
in
multiple
form
factors.
We
will
review
those
form
factors
in
detail.
A
You
can
also
have
the
option
to
access
existing
cluster
that
has
already
been
deployed
using
your
single
sign-on
credential
cloud.
Pks
offered
the
ability
to
organize
resources
through
the
use
of
folders
projects,
small
clusters
and
namespaces,
and
also
you
have
the
ability
to
manage
access
policy
by
assigning
users
and
groups
to
existing
folders
and
projects
so
to
deploy
a
cluster
super,
easy,
simply,
click
on
the
new
cluster
icon.
We
have
two
type
of
cluster
to
choose
from
you.
Have
the
we
support
the
deployment
cluster,
where
it's
best
suited
for
a
testing
type
of
activity?
A
You
have
the
ability
to
select
the
version
of
the
kubernetes
you
want
to
deploy,
and
you
also
have
the
ability
to
look
at
the
networking
resources
that
would
be.
You
know,
recreate
it
to
support
the
underlying
cluster
infrastructure.
So,
in
the
case
of
development
cluster
the
addresses
are
fairly
fixed.
You
don't
have
the
ability
to
update
those,
but
for
the
production
cluster
you
can
actually,
you
know,
customize
the
addresses
based
on
your
based
on
organizational
policies.
A
So
you
can
change
the
subnets,
but
you
need
to
make
sure
that
you're
doing
the
overlap,
the
IP
subnets,
with
existing
resources
in
have
in
your
V
PC.
Now
we
have
the
ability
to
default
cluster
across
multiple
geographic
regions.
You
have
uswest,
you
have
Europe,
or
you
have
US
east
of
this
Virginia
and
I'm
gonna,
select
US
East
for
my
cluster
here
and
and
then
also
I'm,
going
to
enable
privilege
mode.
A
Basically
privilege
mode
allows
you
to
deploy
pods
with
escalator
permission
example
what
that
would
be
for
1d
and
that's
by
by
using
the
provincial
cluster.
You
should
be
able
to
deploy
those
just
be
aware.
There
are
some.
You
know
when
you
are
making
the
cluster
privilege.
There
are
some
risks
associated
with
it
security
perspective
and
then
I'm
gonna
assign
a
name
to
my
cluster
and
and
then
I
can
go
ahead
and
create
the
cluster.
A
Smart
cluster
with
food
chain
takes
roughly
five
to
ten
minutes
to
create
by
default.
We
only
provision
proven
any
worker
node
based
on
application
demand.
So
if
there
are
no
application,
we
were
not
creating
a
worker
node.
A
newly
created
cluster
will
always
have
zero
gigabyte
memory
as
zero
CPU
provisioned.
We
create
four
default
names
places
the
view
ke
system
namespace
is
where
the
smart
cluster
control
plane
resides.
A
You
can
also
create
new
namespaces
directly
from
the
UI
here
I'm,
creating
a
new
namespace
called
demo
and
assign
a
description
and
the
new
namespace
is
now
created.
I
could
also
launch
the
kubernetes
UI
to
the
new
cluster
directly
from
the
dashboard
as
well.
We
leverage
your
single
sign-on
credentials
to
access
the
kubernetes
ey
and
once
you
are
in
the
Couvillion
UI,
you
could
start
to
manage
the
new
namespaces
you
have
created
or
making
a
view
on
your
workload.
A
Now
we're
going
to
demo
how
you
can
manage
the
newly
create
a
cluster
using
the
cloud,
PKS,
API
and
CLI
to
enable
cloud
pikia,
COI
access,
you
first
log
into
your
org,
using
your
org
ID
and
the
refresh
token
specify.
Then
you
specify
the
location
of
your
small
cluster
by
specified
the
folder
and
the
project,
and
you
know
once
you
specify
the
folder
in
the
project,
then
you
can
list
the
available
clusters
within
that
project.
A
After
that,
you
will
set
up
the
authentication
information
of
our
newly
created
cluster
by
using
the
cluster
off
setup
command,
the
cluster
setup
of
command
effectively
simply
BOM
updates
your
cube,
CTL
configuration
file
with
your
DC
token
and
sets
the
cluster
context
to
the
cluster
is
specified
once
that
is
done
once
the
cube
CT
are
configured
generate
a
using
the
auth
command.
Now
you
can
leverage
the
native
kubernetes
command
to
manage
your
cluster
for
I
demo,
the
cloud
PKS
COI.
A
Let
me
first
show
you
where
to
obtain
the
organization
ID
and
refresh
token,
you
can
obtain
the
organization,
unity,
but
click,
the
ork
name
and
the
organization
ID
field
from
the
UI
to
obtain
the
refresh
token
click
on
my
accounts.
Api
token,
refresh
token
is
the
first
line
on
the
newly
generated
page.
A
A
A
To
have
this
program
here
that
basically
it's
a
very
simple
two-tier
application
with
a
front
end
and
a
MongoDB
and
then
to
support
this
application.
Basically,
you
have
a
front-end
deployment
is
two
deployments.
You
have
a
great
deployment
for
a
friend
and
then
you
have
a
a
database
database
with
one
replica
set,
and
then
you
have
you
know
two
type
of
services,
the
internal
DB,
and
then
you
have
the
external,
no
violence
or
surface
that's
accessible
from
the
outside
and
down.
You
know
how
this
is
gonna
be
controlled.
A
First
action
clappy
KS
will
perform
is
to
create
sufficient
worker
notes
required
for
the
application,
and
once
the
worker
node
is
created,
kubernetes
scheduler
will
schedule
the
pod
and
service
creation
on
the
new
worker
node
once
pods
and
services
are
active.
Kuben
ad
will
then
register
the
newly
created
pods
to
the
services
based
on
label
selector.
A
labor
selector
is
something
you
defined
in
the
mo
of
the
cabrini
configuration
and
that
basically
determines
what
resources
map
to
my
services.
Once
we
confirm
the
expected,
pods
and
services
are
running
active.
We
can
then
use
the
cube.
A
Ctl
describe
service
command
to
obtain
the
external
IP
address,
or
in
this
case
the
load
balancer
that's
required
for
us
to
reach
and
validate
the
application,
simply
copy
the
fully
qualified
domain
name
of
the
address
and
go
to
your
browser
and
open
a
new
window
and
paste
the
address
into
the
the
URL
window,
and
now
our
application
is
running.
This
concludes
our
demo.
Thank
you
so
much
for
watching
the
video
and
I
hope
you
find
this
information
to
be
helpful
and
I
encourage
you
to
try
out
cloud
P
yesterday.
Thank
you.