►
Description
Running Application Containers on Kubernetes (i) Introduction to pod and manifests (ii) Pod states and probes (iii) Live Lab - Deploying an application as pod Scaling and Deploying Applications, Observability (i) Pod controllers - replicaset, deployments, statefulsets (ii) Live Lab - Replicas and HA, services and port forwarding (iii) Logging, Metrics and Troubleshooting (iv) Metrics management using Prometheus.
A
So
we
have
designed
this
content
in
such
a
way
that
there
are
a
number
of
lab
sessions,
and
this
lab
sessions
has
already
also
been
updated
in
the
github
repository
for
you
to
refer
practice
and
learn
at
your
own
convenience.
Okay.
So
now,
let's
move
on
to
the
topics
that
will
be
covered
in
the
first
session.
So
in
the
first
session
we
are
going
to
see
what
is
container
orchestration
and
its
benefits
followed
by.
A
We
are
going
to
dig
deep
into
the
kubernetes
architecture
and
we
are
also
going
to
explore
the
kubernetes
clusters
that
can
be
deployed
across
both
cloud
solutions
and
also
on
the
on-premise
solutions.
Then
we
are
going
to
have
a
couple
of
lab
sessions,
so
in
the
first
lap
session
we
are
going
to
set
up
our
first
kubernetes
cluster
using
k3d,
so
this
will
be
set
up.
This
can
be
set
up
on
the
local
laptop
itself
run.
Some
basic
cube,
ctl
commands
on
top
of
this
cluster.
A
Finally,
we
are
going
to
have
some
q
a
where
we'll
be
answering
the
questions
that
has
been
posted.
So,
as
I
mentioned
earlier
right,
we
have
this
content
already
uploaded
in
github
repository
and
the
content
is
can
be
visited
here.
So
we
have
or
uploaded
all
the
lab
sessions
step
by
step
so
that
you
can
practice
it
at
a
later
time.
A
Okay,
so
now
I
will
go
on
to
the
first
slide
here
so
before
I
begin
right
now
in
most
of
the
slides,
we
would
be
referring
the
kubernetes
documents
of
across
various
topics.
So
the
reason
to
refer
this
is
like
the
cumulative
documents
is
considered
as
kind
of
a
holy
book
with
regards
to
kubernetes.
So
each
and
every
topic
that
is
covered
in
this
specific
document
right
it
details
and
it
has
all
the
details
in
a
step-by-step
procedure.
A
So
even
for
someone
who
is
aspiring
to
write
the
certified
kubernetes
administrator
or
a
certified
kubernetes
application
developer
writer,
it's
open
book
exam
where
you
can
actually
refer
this
kubernetes
documents
to
actually
complete
the
exam.
So
it
is
that
was,
and
it
has
got
all
the
details.
So
that
is
the
reason
we
have
shared
this
kubernetes
link
wherever
possible.
A
Okay.
So
now,
let's
move
on
to
the
first
topic,
which
is
container
orchestration
and
its
benefits.
So
what
are
containers
and
why
do
we
need
them?
So
before
we
go
into
container
orchestration
right,
I
would
like
to
actually
explain
what
is
containers
and
how
it
got
evolved.
So
for
this
I
am
going
to
refer
the
kubernetes
link
here.
A
So,
as
you
can
see
in
this
diagram
right
in
the
traditional
deployment,
we'll
be
having
a
physical
hardware
and
on
top
of
this
we'll
be
running
an
operating
system,
so
this
operating
system
will
be
having
multiple
applications
running
on
top
of
it.
So
the
problem
with
this
approach
is
there
is
no
resource
boundary,
so,
for
example,
that
could
be
one
application
that
could
be
consuming
large
amount
of
resources
that
by
slowing
down
another
application.
So
this
is
not
a
viable
approach.
A
So,
in
order
to
address
this,
that
that
could
be
one
other
alternate
solution
here,
where
we
can
actually
tag
one
application
to
one
physical
server,
but
that
is
not
a
cost
effective
approach,
so
that
is
how
this
traditional
deployment
evolved
into
a
virtualized
deployment.
So
in
a
virtual
virtualized
deployment,
we
are
going
to
have
the
same
physical
hardware
and
operating
system,
but
on
top
of
the
operating
system
we
are
going
to
introduce
a
new
component
called
hypervisor.
A
So
once
we
have
this
hypervisor
right
on
top
of
this
hypervisor,
we
can
actually
run
multiple
virtual
machines.
So
these
virtual
machines
will
have
its
own
operating
system
binaries
and
everything.
So
the
advantage
with
this
approach
is
we
can
actually
what
is
it
bound,
an
application
to
a
specific
resource
and
we
can
also
have
an
advantage
of
application
isolation.
A
But
there
is
one
drawback
here:
the
drawback
here
is:
we
are
introducing
a
number
of
intermediate
layers
like,
for
example,
we
have
an
operating
system
here
and
then
a
hypervisor
and
then
again
an
operating
system
and
then
the
binaries,
and
then
only
we
will
have
the
application
here.
So
there
are.
There
are
a
lot
of
intermediaries
here,
and
this
intermediaries
also
consume
a
lot
of
resources.
A
So
what
is
the
next
approach?
So
that
is
how
we
have
this
concept
called
container
deployment.
So
in
this,
what
we
are
going
to
do
is
instead
of
hypervisor,
we
are
introducing
a
new
component
called
container
runtime,
so
on
top
of
this
container
runtime,
we
are
going
to
convert
our
application
into
containers
and
then
run
on
top
of
this.
So
what
does
this
container
run
time
do
so
this
container
run
tank
is
like
a
component
that
is
installed
on
the
operating
system.
A
They
actually
help
mount
the
containers
and
also
interact
with
the
kernel
process
and
then
help
run
the
container
effectively
on
a
physical
hardware.
So
that
is
the
purpose
of
this
container
runtime.
And
how
are
we
actually,
what
is
a
container
here
and
what
does
it
contain
actually,
so
I
would
actually
like
to
explain
this
with
an
example.
So
let's
say
I
have
actually
developed
an
application
on
my
on
my
application,
which
runs
on
like
kind
of
a
python
2.7
version.
A
So
this
I
have
developed
locally
on
my
laptop,
and
I
have
also
tested
it
locally.
So
now
I
need
to
what
is
it
deploy
this
application?
I
commit
the
code
here
and
this
application
will
be
deployed
across
multiple
staging
environments.
So
when
this
application
is
deployed
under
multiple
staging
environments
right,
I
can't
actually
guarantee
this.
Application
will
run
the
same
python
version
so
that
could
be
environments
like
kind
of
a
staging
like
kind
of
a
test
environment
or
a
prod
or
pre-plot,
which
could
be
running
different
python
versions,
different
python
versions.
A
So
how
do
we
address
this?
So
this
container
is
actually
a
solution
to
your
problem,
where
we
can
actually
reliably
deploy
an
application
across
all
the
staging
environments
without
worrying
about
any
kind
of
three
pps
or
other
os
issues
or
anything.
So,
as
I
have
seen
shown
in
this
diagram
right
container
in
a
container,
we
can
actually
a
bundle,
a
minimal
three
pps
that
are
required
and
then
an
application
can
be
so
for.
A
A
A
So
all
this
needs
to
be
done
without
any
kind
of
manual
intervention,
so
that
is
when
we
have
this
container
orchestration,
so
the
container
orchestration
actually
helps
in
managing
the
containers
that
are
deployed
in
a
in
a
in
a
deployment
environment
so
that
that
is
the
advantage
with
regards
to
the
container.
So,
as
we
mentioned
here
right
since
the,
since
everything
is
a
kind
of
an
automated
and
no
manual
effort
is
required,
it
helps
in
increased
productivity
and
faster
deployment
of
our
application.
A
We
also
have
a
stronger
security
here,
since
the
application
is
actually
isolated,
and
this
container
orchestration
also
gives
us
the
benefits
to
isolate
a
container,
and
also
it
provides
many
our
back
rules
wherein
we
can
actually
what
does
it
reduce
the
attack
on
a
given
contain
generally
right,
we
can
also
easily
scale
up
an
application
or
scale
down
application
based
on
the
traffic
that
it
gets
and
the
faster
error
recovery.
So,
whenever
the
replication
fails
right,
this
container
orchestration
can
actually
help
restart
the
container
in
a
very
quick
time.
A
So
now
we
have
seen
the
benefits
of
container
orchestration
and
why
cuban
it
is
so
kubernetes
is
like
kind
of
an
what
is
it
it's
kind
of
a
default
container
orchestration
that
is
used
globally
across
all
the
organizations.
So
it
is
an
open
source
project
and
it
is
recognized
by
the
cloud
native
computing
foundation
as
well.
So,
along
with
this,
kubernetes,
also
provides
various
other
advantages,
so
it
helps
in
load
balancing
so
suppose.
A
If
I
am
going
to
scale
up
an
application,
it
helps
the
load,
balancing
or
and
traffic
traffic
traffic
routing
to
the
specific
containers
that
we
have
deployed
and
then
station.
So
if
a
container
requires
a
storage
or
something,
it
also
has
a
provision
to
automatically
provision
the
storage
so,
like
I
said,
the
automated
rollout
and
rollbacks
is
provisioned
by
itself
and
then
the
cell
feeling
that
we
just
seen
like
whenever
application
fails.
It
can
automatically
restart
the
application
and
the
secret
and
configure
configuration
management
so,
for
example,
any
application
that
we
deploy
right.
A
So
that's
it
about
the
container
orchestration
and
we
have
also
seen
what
is
kubernetes
and
the
basic.
So
now
we
go
on
to
the
next
slide.
So
in
this
next
slide,
this
is
the
kubernetes
architecture.
So
this
is
like
kind
of
an
high
level
architecture
of
kubernetes.
So
the
major
components
here
are
the
control
plane
and
the
worker
node.
So
this
control
plane
actually
controls
all
the
components
that
are
deployed
on
the
kubernetes
cluster.
So
then
we
have
the
worker
node,
where
the
actual
container
runs.
A
So
the
control
plane
has
got
many
components
here,
like
kind
of
an
api
server,
scheduler
controller
manager,
I
mean
etcd
and
the
worker
node
also
has
some
components
that
needs
to
be
run.
So
now
we
are
going
to
see
the
functionality
of
each
of
this
component,
so
for
explaining
this
coupon
it
is
architecture
right.
I
am
going
to
use
a
code
cloud
document
which
actually
explains
this
architecture
by
using
an
analogy
of
ship.
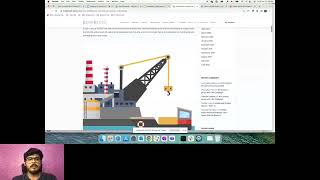
A
So
as
seen
here
right,
this
control
plane
component
is
represented
as
kind
of
a
master
node
here.
These
are
the
four
components
and
the
worker
node
has
this
three
components:
that
is
the
cubelet
q
proxy
and
the
container
run
time
engine.
So
so
this
will
be
used
as
kind
of
an
ship
analogy
here.
So,
as
you
can
see,
the
master,
node
or
the
control
plane
will
be
recognized
as
kind
of
a
controller
shape
and
the
worker
node
will
be
kind
of
a
container
will
be
kind
of
a
container
ship
here.
A
So
now,
let's
go
on
to
the
first
component
here,
so
that
is
the
etcd
cluster
that
we
have
seen
in
here,
the
edcd
cluster.
So
what
does
etcd
cluster
do
so
any
controller
ship
writer,
so
it
will
any
controller
ship
will
have
a
number
of
containers
that
are
incoming
and
these
containers
are
also
transported
onto
the
various
various
container
ships.
So
it
needs
to
make.
A
So
moving
on
to
the
next
component.
So
the
next
component
here
is
the
cube
scheduler.
So
what
does
cube
scheduler
do?
Scube
scheduler
can
be
compared
to
this
of
a
crane
in
a
controller
ship.
So
the
crane
here
right
this
is
responsible
for
scheduling
the
container
or
transporting
the
container
to
various
worker
nodes.
Similarly,
this
cube
scheduler
is
responsible
for
scheduling
a
container
that
has
arrived
here
so
whenever
a
new
container
is
given
to
the
introduced
into
the
cluster.
This
cube
scheduler
for
scheduling
this
container
onto
the
various
worker
nodes.
A
So
this
this
scheduling
considers
many
factors
like,
for
example,
it
takes
into
account
the
resource
capacity
of
that
specific
container
and
also
the
resource
availability
in
that
specific
worker
node.
So
all
these
factors
are
taken
into
account
before
before
a
container
is
actually
deployed
into
an
worker
node.
A
So
moving
on
to
the
next
component,
which
is
the
controller
manager,
so
the
controller
manager
is
kind
of
a
different
offices
that
are
that
exists
within
and
controller
ship.
So
all
these
officers
engage
in
some
kind
of
maintenance
activities
like
kind
of
a
traffic
navigation
or
ship
traffic
control
or
damage
control
and
everything.
So
similarly,
this
controller
manager
here
in
control
plane
right.
It
has
various
sub
components
like
kind
of
a
node
controller,
replication,
controller,
part
controller
and
various
such
as
components
like,
for
example,
this
node
controller.
Here
right.
A
This
is
responsible
for
node
management
in
a
cluster,
so
whenever
a
new
worker
node
is
introduced
into
the
cluster,
this
controller
manager
is
responsible
for
taking
into
account
of
this
new
node
and
scheduling
containers
into
this
new
node
and
also
maintaining
the
balance
between
all
the
worker
nodes.
Similarly,
whenever,
whenever
a
node
is
down
or
something
right,
this
node
controller
makes
note
of
it
and
also
ensures
that
the
parts
that
are
running
on
the
specific
node
is
moved
on
to
other
other
available
worker
nodes.
A
So
the
controller
manager
is
kind
of
a
maintenance
or
the
control
controller
within
kubernetes,
which
has
various
sub
components.
So
now
we
have
seen
the
three
components
in
a
cluster
that
is
the
etcd
controller
manager
and
the
scheduler.
So
now
we
move
on
to
the
final
component
here,
which
is
the
api
server.
So
what
does
api
server
do
so?
A
Api
server
is
like
kind
of
a
centralized
component
which
helps
in
communication
between
all
these
components,
both
internally
and
as
well
as
well
as
externally,
so
it
provides
various
api
calls
through
which
we
can
actually
manage
or
communicate
with
the
with
the
cluster
from
outside,
and
also
this
api
calls
are
also
used
by
the
components
internally
to
communicate
or
send
messages
between
each
other.
So
this
is
like
kind
of
a
centralized
component
that
is
actually
used
by
all
the
sub
components
within
kubernetes.
A
So
now
we
have
seen
the
all
the
control
plane
components.
So
next
we
move
on
to
the
components
of
the
other
worker
node
level.
So
the
first
component
that
we
are
going
to
see
here
is
a
container
runtime
engine,
so
the
container
runtime
engine
we
have
seen
in
this
previous
slide
also
right.
We
have
this
container
engine,
so
this
is
like
kind
of
an
default.
A
So
this
is
like
kind
of
a
default
service
that
needs
to
be
run
on
any
worker
node.
So
the
purpose
of
this
is
like
they
help
in
mounting
the
container
and
also
help
interact
with
the
kernel
process
to
actually
enable
the
communication
or
start
and
management
of
a
ports
on
a
given
worker
node.
So
this
is
the
purpose
of
this
container
runtime
engine,
so
the
the
most
popular
ones
are
the
docker
container
d
and
everything.
A
So
the
next
component
that
we
are
going
to
see
here
is
a
cubelet.
So
what
is
the
purpose
of
this
cubelet?
So
cubelet
can
be
compared
to
that
of
a
captain
of
a
ship,
so
the
captain
of
the
ship
is
responsible
for
responsible
for
the
containers
that
are
run
on
a
given
worker
node.
So,
along
with
this
responsibilities,
he
also
sends
communicates
with
the
control
plane
or
the
about
the
status
of
this
containers.
A
Similarly,
the
cubelet
here
is
responsible
for
all
the
containers
that
are
deployed
in
this
work
or
not,
and
this
cubelet
also
periodically
communicates
with
the
control
plane
to
send
the
status
of
these
containers
and
the
status
of
this
worker
node.
So
yeah
this
is
like
kind
of
another
node
which
which
access
like
acts
like
a
captain
of
the
ship
on
any
given
node.
So
the
next
component
that
we
are
going
to
see
here
is
a
queue
proxy,
so
q
proxy.
A
A
So
that
is
where
this
cube
proxy
comes
into
the
picture,
so
the
cube
proxy
helps
in
communication
between
these
containers
internally,
by
setting
up
all
the
network
configuration
the
traffic
rules
and
everything
between
these
worker
nodes.
So
all
this
internal
communication
takes
place
by
with
the
help
of
q
proxy.
A
So
now
we
have
seen
all
the
components
that
we
that
we
have
that
we
have
just
shown
in
this
architecture
diagram.
So
the
control
plane
has
this
etcd,
which
acts
as
a
metadata
which
has
a
metadata
information
of
a
cluster.
The
controller
manager
controls
various
components
like
kind
of
a
maintenance
activities
and
the
scheduler
helps
in
scheduling
the
container
on
the
worker
notes.
The
api
server
is
like
kind
of
a
centralized
component,
which
has
all
the
api
calls
for
both
internal
communication
and
external
communication.
A
So
this
is
about
the
control,
plane,
components
and
then
the
worker
node
components.
We
saw
the
container
runtime
engine
which
helps
in
the
mounting
of
the
pod
and
the
working
of
the
pod
on
a
given
node
and
then
the
cubelet,
which
acts
as
a
captain
of
a
ship
in
managing
all
these
containers
and
the
final
component,
which
is
the
q
proxy,
which
helps
in
the
communication
between
the
containers
that
are
running
on
a
cluster.
A
A
Pod
is
a
like
kind
of
a
minimal
component
that
can
be
deployed
this
cluster.
So
pod
is
a
place
like
kind
of
a
container.
It
could
contain
one
container,
two
container
or
more
containers
running
on
it,
so
it
is
kind
of
a
wrapper
wrapper
on
top
of
the
container,
and
this
pod
is
a
component
that
can
be
deployed
on
a
on
a
given
node.
So
we
will
see
like
how
this
part
is
deployed
and
how
this
part
runs
and
how
this
container
is
wrapped
inside
a
part
in
the
in
the
upcoming
slides
okay.
A
B
Okay
hope
you
all
can
see
my
screen
so
yeah.
We
we
talked
about
the
cluster
communities
cluster,
like
what
it
is.
What
is
a
kubernetes
cluster
and
the
architecture
behind
the
cluster,
how
it
is
built?
And
we,
when
we
talk
about
the
cumulative
cluster,
we
have
two
primary
classification.
One
is
the
managed
cumulative
cluster,
the
other
one
is
the
unmet
local
or
the
on-premise,
which
is
self-hosted
clusters,
so
be
aware
of
that.
The
fact
that
we're
not
going
to
deploy
today,
you
know
a
cloud
managed
cluster.
B
What
we
are
going
to
deploy
is
a
locally
installed
kubernetes
cluster.
So
when
we
talk
about
the
managed
clusters,
what
are
the
options
available
today?
We
have
from
amazon
the
eks,
which
is
the
elastic
humidity
service.
From
microsoft
we
have
aks
azure
community
service
and
from
google,
the
google
kubernetes
engine.
So
these
services
are
offered
from
the
cloud
vendors
and
most
of
the
control
planes
are
managed
by
them.
So
you
will
not
have
get
access
to
the
complete
control
plane
component,
so
they'll
be
managing
the
control
planes
and
you
will.
B
We
will
be
responsible
for
the
application,
deployment
and
management
of
the
services
within
the
cluster.
So
and
so
that's
the
basic
idea
behind
the
cloud
managed
clusters
cloud,
our
cloud
administered
cubase
clusters,
and
when
we
talk
about
self-hosted
clusters
or
the
on-premise
clusters,
we
will
be
creating
the
clusters
using
one
or
two
machines.
B
Physical
servers,
or
it
could
be
a
virtual
machines-
will
be
combining
the
virtual
machines
or
the
or
the
physical
nodes,
with
physical
servers
combined
all
together
to
form
a
cluster
using
one
of
the
utilities
which
is
listed
down
there,
like
the
qbidm,
cops
mini,
cube
k3.
These
are
the
different
utilities
which
are
available
which
helps
you
create
the
clusters,
and
you
will
require
some
resources
on
the
infrastructure,
be
it
it
is
a
virtual
machine
or
it
is
a
physical
server
or
it
could
be
even
a
container.
B
B
B
So
to
set
up
the
cluster,
we
have
few
prerequisites
which
needs
to
be
completed
it.
The
machines
can
be
this
cluster
can
be
set
up
on
your
local,
laptop
or
desktop,
and
the
requirement
is
to
get
started
off
with
a
operating
system
which
can
be
your
windows
10,
primarily
the
version
2004
plus
or
later,
or
you
can
have
this
workshop
done
on
linux
as
well
or
on
or
on
a
mac
system.
B
Also,
this
the
same
thing
can
be
followed
on
all
the
operating
systems
skipping
few
of
the
section
sessions
listed
in
the
topics
below
so
suppose.
If
you
are
using
the
windows
operating
system,
we
will
get
started
off
with
installing
the
wsl
environment.
So
this
wsl
is
nothing
but
windows,
subsystem
for
linux.
It
comes
with
windows,
10
and
it
it
ships
with
the
linux
kernel
windows
is
shipping.
The
later
up,
I
mean
windows,
10
plus
versions
with
the
linux
kernel,
so
to
activate
the
linux
url.
B
B
So,
by
default,
if
it
is
installed
already,
you
will
get
the
command
help
usage
so,
which
means
that
it
is
already
installed
so
once
installed,
you
can
reboot
and
take
a
reboot
of
the
machine
and
then
come
back
to
this
workshop
page
now.
The
next
command
to
feed
in
is
the
installation
of
linux
environment,
which
is
actually
a
ubuntu
variant
of
linux,
is
what
we
are
going
to
run
inside
the
wsl.
B
B
So
while
this
is
getting
installed,
let's
talk
about
the
overview
of
what
is
what
is
going
to
be
installed
today
in
a
live
environment
like
so.
What
I
plan
to
install
is
set
up
an
initial
host
cluster
host
machine,
which
is
my
windows
machine,
okay
in
this
laptop,
and
I'm
going
to
wrap
it
up
with
wsl.
B
C
B
B
B
B
B
B
So
why
do
we
need
this
docker?
First
first,
in
first
hand,
like
so
docker
is,
as
we
talked
in
the
earlier
slides,
we
need
a
container
runtime
to
host
the
kubernetes
cluster,
so
without
container
cluster
docker.
No
without
a
container
runtime
kubernetes
cluster
cannot
run,
and
this
k3d
uses
this
docker
container
engine.
B
B
So
we
do
have
the
other
forms
of
self-hosted
clusters,
which
makes
use
of
the
utilities
through
which
you
can
build
the
cluster
one
of
them
kind
is
that
mini
cube,
which
comes
with
ubuntu
operating
system.
So
the
primary
difference
between
these
utilities
is
like
how
the
back
end
is
handled.
For
example,
k3d
makes
use
of
docker
to
create
the
cluster
mini,
cube,
use
system,
ctl
service,
to
create
the
clusters
and
qba
dm
or
cops
will
make
use
of
the
server.
B
B
B
So
each
worker
node
can
host
as
as
many
parts
as
it
require
as
it
want,
as
as
is
created
by
this
control.
Plane
control
plane
will
decide
which,
which
part
to
run
on
which
worker
node,
based
on
the
available
metrics
available
capacity.
Suppose
this
worker
one
has
more
resources
available,
cpu
and
memory.
B
It
will
try
to
allocate
the
power
into
that
worker
one
and
if
it
finds
that
there
is
not
enough
capacity
available,
cpu
or
memory
is
not
sufficient.
Then
it
will
move
this
part
or
it
will
try
to
create
the
next
part
in
the
next
worker
node.
So
that
is
how
the
control
plane
will
decide
on
like
how
to
allocate
the
power
how
to
how
the
new
deployment
is
created
on
which
no,
which
worker
node
the
workload
is
sent
to.
B
B
B
B
B
B
So
these
are
all
part
of
the
docker
installation
we
are
not
yet
to.
We
haven't
reached
the
risk
to
the
point
where
we
are
going
to
deploy
the
kubernetes
cluster,
so
docker
installation
is
completed
and
we
configured
it
to
auto
start
now.
Let's,
let's
reboot
this
machine,
which
we
created
the
ws
machine,
so
this
has
to
be
done
outside
the
wsr
terminal.
So
let's
go
back
to
the
command
prompt.
B
C
B
So
the
first
step
is
completed.
Let's
have
the
second,
I
mean
the
next
step
installed
and
completed,
so
we
need
to
have
a
browser
installed
so
which
is
because
we,
whenever
we
are
deploying
an
application
in
the
cluster,
we
want
to
verify
the
application
on
a
you
know:
ui,
basically,
you
need
a
browser
to
verify
the
web
applications.
B
B
So
remember,
if
you
are
using
a
linux
operating
system,
a
native
linux
without
windows,
then
you
can
skip
this
first
first
part
of
this
workshop,
which
is
installing
wsl
and
linux.
And
similarly
you
can
skip
this
part,
install
gwsl,
which
we'll
be
installing
next,
and
you
can
directly
right
away,
install
the
docker
and
chrome
on
your
linux
machine
or
mac,
and
then
you
can
get
started
with
the
installation
of
cumulative
cluster.
So
these
are
preparations
which
we
are
doing
now.
B
B
B
So
we
have
kick-started
the
installation
of
chrome
browser.
So
while
that
happens,
let's
go
on
to
the
next
step
of
installing
gwsl,
so
why
this
component
is
required
is
because
you
need
a,
I
know,
ui,
to
verify
your
application,
as
is
mentioned
in
the
previous
step,
so
you
need
a
browser,
but
the
browser
will
not
know
where
to
render
the
browser,
since
it
is
installed
inside
a
virtual
machine.
This
world
wsl
itself
is
a
virtual
machine,
so
the
virtual
machine
will
not
have
a
ui
by
default.
B
B
So
chrome
is
being
installed
on
the
linux
system.
Gws
component
is
being
installed
in
your
windows,
windows
host
machine,
okay,
and
this
optional
component
gwsl
is
not
required
to
be
installed
if
you're,
using
linux
or
mac.
So
it's
purely
in
a
windows
environment
we
need
will
we
need
this
dependency
to
be
installed
and
and
that
too,
it
is
required
only
if
you
are
using
to
verify
ua
gui
applications
like
a
web
application
or
even
native
applications,
graphical
applications,
which
is
the
which,
which
is
being
developed
in
a
linux
environment,.
B
So
what
this
does
is
it
will
redirect
the
port
to
your
windows
machine.
So
this
is
your
terminal
linux
terminal,
and
this
is
a
windows
you
know
display
service
is
running
within
the
gwsl
application.
It
starts
on
next
service,
so
it
can
it
is.
It
has
a
capability
to
receive
the
forwarded
port
information
from
the
virtual
machine.
B
So
the
configuration
is
very
simple,
so
once
the
installation
is
completed,
chrome
browser
is
completed.
I
will
show
you
how
to
configure
it.
So
basically,
you
have
two
mode
of
configuration.
One
is
the
automatic
configuration
of
gwsl
where
wherein
you
just
need
to
click
this
option,
not
to
export
display
or
audio
so
which
will
activate
the
display
feature
for
your
virtual
linux,
the
other.
The
second
method
is
to
set
it
manually
inside
your
virtual
machine
on
the
linux
wsl
environment.
B
B
B
B
C
C
B
B
B
So
it
is
installed,
you
can
just
verify
by
running
this
command
k3d
version,
so
it
has
installed
the
latest
version
of
k3,
which
is
5.4,
so
that
is
where
what
we
have
executed
so
yeah.
The
next
step
is
to
install
the
cluster
itself,
so
this
is
the
primary
step
which,
with
which
we
will
be
creating
the
cluster
kubernetes
cluster,
so
this
command
is
going
to
create
a
new
cluster
in
the
wsl
environment
which
we
created
just
now,
so
the
command
is
self
explanatory.
B
Pretty
much
so
here
we
have
a
parameter
called
agents
which
is
nothing
but
the
worker
nodes
number
of
worker
nodes
so
mentioned
here
is
three.
So
we're
going
to
spin
up
three
worker
nodes
and
once
server
the
server
we
haven't
mentioned,
but
you
can
give
it
as
a
parameter
extra
parameter
and
give
the
number
of
servers
you
want
number
of
control
planes
you
want.
B
I
have
disabled
the
some
inbuilt
feature
that
the
k3d
creates
a
cluster
along
with.
So
one
is
the
traffic
ingress
and
the
other
is
the
load
balancer.
I
don't
want
these.
These
two
components,
in
fact
I'll
be
installing
these
two
from
a
different
vendor:
okay,
so
and
then
also
I'll,
be
creating
a
registry
for
the
container
images
with
this
option
register
create
and
the
container
registry
name
on
a
specific
port
number.
B
B
B
You
can
see
the
dev
registry,
which
is
the
node
which
actually
represents
a
node
here,
but
since
we
do
not
have
a
dedicated
mission,
so
all
the
machines
are
represented
as
a
container
docker
container.
This
dev
registry
is
a
node,
but
it
is
actually
running
as
a
container.
This
server
node,
which
is
actually
the
control
plane
for
our
cluster
itself,
is
running
as
a
container
image
with
the
container
id
and
we
I
have
mentioned
that
that
will
be
using
three
worker
nodes.
These
three
worker
nodes
again
themselves
of
running
running
as
containers.
B
B
B
B
B
B
So
now,
let's
see
whether
the
the
cluster
is
up
and
running,
there
are
few
commands,
which
is
the
k3d
utility
comes
with,
which
verify
and
see
the
details
about
the
cluster.
So
one
of
them
is
the
cluster
list
and
see
we
can
create
multiple
clusters.
In
fact,
you
don't
have
to
end
up
with
using
only
one
cluster.
You
can
have
multiple
clusters
created
using
this
k3
utility.
B
B
So
this
cubectl
binary
is
a
utility
that
is
provided
by
cumulatives
community
and
that
is
an
cli
utility,
okay,
which
is
provided
by
the
google
and
it
it
talks
to
the
api,
server
and
retrieves.
The
information
from
the
cluster,
whereas
k3
will
not
be,
will
not
have
the
capability
to
talk
to
the
communities
api
servers,
but
this
will
have
that
capability.
So
let's
go
and
install
the
cube
ctl
next.
B
B
So
this
is
for
the
linux
version
of
cubectl.
If
you
want
to
install
it
for
mac
or
native
windows
system,
then
you
got
to
hit
this
url
and
you
know
go
to
the
portal
and
download
the
one
that
is
available
for
your
operating
system.
This
is
purely
for
the
linux
one
linux
variant
cube,
ctrl
yeah.
It
is
downloaded
and
installed
which
you
can
verify
now
it
should
should
print
yes,
so
you
can
run
few
commands
to
check
whether
your
kubernetes
cluster,
install
current
cluster
is
functional.
B
You
can
see
the
nodes
command
is
listing
all
the
component
of
the
cluster.
We
have
one
master
server
and
then
three
worker
nodes-
and
this
is
the
version
of
the
kubernetes
cluster-
that
we
have
installed
1.22.7
and
if
you
want
to
get
all
the
resources
that
are
installed
in
the
cluster,
you
can
run
this
command
cube.
Ctl
get
all
fne,
so
that
is
going
to
throw
out
a
few
resources
which
are
running
inside
the
cluster,
starting
from
the
name
space.
B
By
by
default
we
will
have
two
name
space.
One
is
the
cube
system
and
the
other
one
is
the
default
one
and
within
the
namespace
you
will
have
parts
services
deployments
and
replica
sets.
So
these
are
the
default
resources
that
comes
with
the
cluster,
we'll
be
installing
few
more
resources
on
top
of
this
already
available
and
running
resources.
B
So
let's
remember,
I
have
disabled
the
ingress
controller
and
the
rolled
back
load
balancer
when
I
provision
the
cluster
so
now
I
will
be
installing
them
and
for
the
registry
which
we
have
installed.
It's
a
private
registry
which
is
going
to
which
we'll
be
using
for
our
internal
image,
build
process
in
the
upcoming
session,
we'll
be
in
building
the
image
container
images
on
our
own
for
the
application
which
we
create
and
we'll
be
pushing
the
registry
a
container
onto
the
private
registry.
B
B
Okay,
you
will
see
a
few
messages
like
this,
which
are
nothing
but
the
accumulators
resources
which
are
specific
to
this
metal
lb
load
balancer,
I'm
installing
this
metal
load
balancer
service,
because
on
on,
if
you're,
you
know
having
your
cluster
on
a
managed
cluster,
it's
all
that's
what
appropriate
in
the
cloud
cloud
managed
clusters.
This
is
not
added
as
a
component
in
the
race,
but
it
is.
You
know
the
cloud
managed
clusters
comes
with
we're
going
to
simulate
the
similar
behavior
on
our
local
cluster,
so
installing
the
third
party
load
balancer.
B
B
So
so
I
hope
you
all
aware
of
what
is
the
load
balancer
and
what
is
the
function
of
your
load
balancer,
so
this
load
balancer
is
going
to
take
the
traffic
from
an
external
world,
typically
from
the
user.
Who
is
going
to
invoke
a
solution,
invoke
an
application
which
is
running
in
on
a
remote
server
or
remote
cluster.
B
When
you
want
to
access
an
application,
it
is
usually
directed
through
a
load
balancer
ip
okay,
so
this
load
balancer
ip
is
typically
requires
a
public
ip
and
since
we
do
not
have
on
public
ip
in
our
local
machine,
we
are
going
to
simulate
some
few
public
ips
we're
going
to
take
down
the
public
ips
from
your
local
network.
So
that
is
what
we
are
going
to
do
now.
B
So
there
are
a
few
variables
that
we
are
creating
here,
which
is
going
to
take
the
eyepiece
from
the
network
locally
installed,
dev
cluster
network.
This
is
the
cluster
which
we
created
and
we're
going
to
create
a
subnet
and
then
within
the
subnet.
We
are
going
to
fetch
in
few
ips
and
allocate
to
this
range
variable.
B
Let
me
show
show
you
that
variable
output,
so
this
is
the
subnet
which
we
are
going
to
use
for
our
load,
balancer
network,
okay
and
we're
going
to
create
a
config
map.
This
config
map
is
a
resources
resource
type
within
the
cluster,
which
is
going
to
store
configuration
information
about
the
an
application
any
it
could
be
in
any
application.
So
in
this
case,
the
config
map
is
holding
few
information
about
our
load.
Balancer
addresses.
C
B
B
Internal
application,
which
is
the
cluster
so
when
we
host
multiple
applications
within
the
commuters
cluster,
each
application
can
be
accessed,
will
be
accessed
using
a
domain
name
so,
and
this
domain
name
has
to
be
re-routed
to
the
traffic
within
the
intra
cluster
services,
so
we'll
be
requiring
services
and
then
investors
for
it.
So
it
is
always
good
to
have
an
ingress
installed.
B
So
now
you
will
be
seeing
four
additional
resources
which
we
have
installed
earlier.
The
before
we
installed
load
balancer
ingress.
These
were
not
available,
it
was
a
new
namespace
that
was
created
and
we
have
a
few
parts
running
under
the
name.
Space
also
ingest
iphone
engine
x
has
been
created
and
it
is
running
it
is
running
at
its
own
set
of
parts,
and
we
see
that
the
load
balancer
ip,
which
we
talked
about
earlier,
was
assigned
to
the
increased
controller
through
which
we
will
be
able
to
access
our
applications.
B
So
this,
then
the
next
section
will
be
installing
the
applications
and
we
will
see
how
to
access
those
application
from
an
external
world
and
how
the?
How
do
we
build
an
application?
How
do
we
deploy
an
application
in
container
registry
and
how
to
fetch
that
application
and
put
it
in
a
container
pod
and
then
access
them
from
the
browser
web
browser?
So
that
is
what
we
are
going
to
cover
in
the
next
session.
B
B
D
A
A
Okay,
so
I
have
actually
set
up
my
cluster
here
using
k3d,
so
this
is
the
local
cluster
that
I
have
set
here
and
it
is
created
by
the
name,
local
cluster,
so
we
are
going
to
execute
some
basic
cube.
Ctl
commands
on
top
of
this
cluster.
Okay.
So,
as
karthik
explained,
right,
cubectl
is
kind
of
a
command
line
utility
that
is
provided
by
kubernetes
to
interact
with
a
given
cluster.
A
So
that
would
be
multiple
number
of
clusters
and
we
need
to
interact
with
the
cluster
for
managing
of
resources
or
for
deploying
our
resources.
So
cubectl
is
one
form
where
we
can
communicate
with
the
cube
api
that
we
defined
here.
So
the
api
server
is
there
right
if
you
need
to
interact
with
it,
one
of
the
option
is
to
use
this
cube
ctm.
A
I
think
karthik
showed
us
a
demo
on
how
to
install
on
linux,
but
we
can
install
cube
ctl
on
mac,
os
windows
and
everything.
So
this
steps
that
is
mentioned
here
is
straightforward
and
you
can
easily
install
them
locally.
So,
in
my
in
my
local
machine,
I've
installed
this
cube
ctl.
Now
I
will
be
connecting
to
the
cluster,
so
you
can
see
right.
I
have
this
cube
ctl
locally
and
I
could
have
like
there
may
be
even
three
to
four
classes
that
are
that
I
have
created
here.
A
So
how
does
cube
ctl
know
to
which
cluster
it
needs
to
connect?
So
that
is
why
we
have
something
called
cube:
config
sys,
this
cube
config
right.
This
will
hold
the
information
of
the
cluster
like
the
ip
details
and
the
username
password,
or
some
kind
of
a
token
through
which
we
can
cubectl
will
know
that
it
is
a
cluster
that
we
need
to
communicate.
So
what
I'm
going
to
do
now
is
I'm
going
to
execute
this
command
now?
A
So,
as
you
can
see
right,
this
k3d,
I'm
going
I'm
getting.
This
cube
cube
conflict
from
get
local
cluster,
which
is
the
local
cluster
name
here,
and
I
am
redirecting
it
to
an
location,
so
this
file
will
be
in
a
kind
of
yaml
file,
so
I
am
just
going
to
open
this
file
for
your
reference,
so
this
will
have
all
the
details
that
are
required
for
a
cube
cpl
to
connect
your
given
cube,
kubernetes
cluster.
So
you
could
see
the
cluster
detail.
A
Is
a
user
and
all
the
stock
guns
and
everything
so
any
cluster
that
you
need
to
create?
You
just
need
to
give
this
k.
3D
cube,
config
get
local
with
the
get
cluster
name
and
you
will
have
a
yaml
manifest,
which
you
can
use
it
for
connecting
the
cluster.
So
now
I
have
downloaded
this
file.
So
what
is
the
next
step
here?
I
need
to
define
an
environmental
variable
here,
so
this
environmental
variable
should
be
export,
cube,
config
and
the
file
location
of
this
cube
config.
A
I
am
going
to
export
this
cube
config
now
so
I've
exported
this
now
so
now
I
should
be
able
to
connect
to
the
cluster
I'm
going
to
give
cube,
ctl
get
notes
now,
so
you
can
see.
I
have
deployed
a
three
node
cluster
here,
so
the
three
node
cluster
is:
I
have
a
control
plane
so,
as
mentioned
in
this
architecture,
diagram
right,
I
have
a
control
plane
and
two
worker
nodes
in
my
cluster.
A
So
what
is
the
first
thing
that
I'm
going
to
do
now
here?
The
first
thing
that
I'm
going
to
do
now
after
I
have
connected
to
the
cluster,
is
I'm
going
to
give
get
the
version
of
the
cluster,
so
you
can
get
the
version
by
giving
cube
cdl
version,
so
this
will
actually
give
you
two
versions.
One
is
the
client
version,
so
the
client
version
is
a
cube.
Ctl
version
of
the
component
of
the
client
that
I
have
installed
and
the
other
version
is
the
server
version.
A
A
So
what
does
it
throw?
So,
as
we
mentioned
here
right?
We
we
have
this
apa
server
and
all
the
communication
with
the
with
the
kubernetes
cluster
takes
place
through
this
api
calls.
So
this
cube
ctl
should
actually
know
what
api
should
be,
should
be
contacted
to
manage
or
do
something.
So
these
are
the
various
api
components
that
are
available,
so
this
list
right
this
list
will
be
based
on
the
cumulative
version.
A
So
this
is
about
api
versions.
So
now
I'm
going
to
list
the
resource,
I
think
we
have
already
listed
down
karthik
showed
or
how
to
list
on
the
right
source,
but
I'm
going
to
show
or
once
again
so
she
can
see
cube,
ctl,
get
notes
which
I
executed
previously.
So
this
will
show
you
the
nodes
that
are
running
and
one
more
concept
that
we
are
going
to
see
here
is
name
space.
So
what
is
the
name
space
here?
A
So
this?
These
are
the
available
namespaces.
So
namespace
is
nothing
but
kind
of
a
logical
partition
in
a
kubernetes
cluster.
So,
as
we
know
right,
when
we
move
into
various
staging
environments,
one
cluster
could
be
used
by
multiple
application
teams,
so
that
could
be
one
appli.
One
application
that
meets
the
or
this
cluster
could
be
shared
by
multiple
teams.
So
how
do
we
segregate
them?
Logically?
So
that
is
where
this
name
space
helps.
A
So
once
we
create
a
name
space
right,
we
can
actually
allow
or
permit
that
one
application
team
to
use
that
specific
name
space
alone.
So
that
way
they
will
have
their
own
kind
of
name,
space
where
they
can
run
their
parts
and
everything.
So
let
me
create
one
name
space
here,
for
example,
I'm
going
to
create
a
namespace.
A
Have
one
that
one
is
created
and
I'm
going
to
create
another
namespace
called
app2.
So
if
I
give
get
name
space
right,
I'll
be
having
two
name
spaces,
so
each
namespaces
can
be
allocated
to
one
application
team
and
they
will
have
exclusive
access
to
this
name
space
to
deploy
their
resources
on
this
specific
this
one.
So
now
I'm
going
to
see
so
on.
So
let
us
see
like
what
is
the
component
that
are
available
in
this
app
for
namespace.
A
A
So
you
can
see
nothing
is
deployed
in
the
specific
name
space.
So
by
default
right,
if
you,
if
you're,
not
going
to
give
this
name
space
name,
the
application
will
be
the
application
or
the
parts
will
be
deployed
by
default
into
this
default
name
space.
So
if
I'm
going
to
give
group
ctl
get
parts,
you
can
see
no
resources
found
in
default
namespace.
Since
I
have
not
specified
this
namespace
name,
it
will
actually
execute
this
command
on
this
default
namespace.
So,
since
this
is
a
newly
created
cluster,
we
won't
have.
A
We
don't
have
any
resources
right
now
running
so
now
we
are
going
to
deploy
our
first
part
on
this
on
this
cluster.
So
I
am
going
to
use
nginx
to
nginx
is
the
first
one
that
I'm
going
to
deploy
here.
So
nginx,
as
you
know,
is
kind
of
a
web
server
and
I'm
going
to
use
the
image
nginx.
So
this
nginx
image
will
be
downloaded
from
docker
hub,
which
is
kind
of
an
a
public
repository
which
which
hosts
all
these
images,
so
I
think
even
karthik
explained
about
creating
one
local
registry
right.
A
A
Let's
see
what
happens
so
you
can
see
this
container
is
creating
and
supposed
exactly
is
happening
right.
I
can
give
this
cube.
Cdl
describe
part
and
give
the
body,
so
the
part
name
here
is
engine
x
and
I'm
going
to
give
this
here.
So
you
can
see
in
this
event
right
what
exactly
is
happening.
So
this
pod
is
getting
scheduled
scheduled
on
the
agent
one.
A
That
is
a
worker
note
and
it
is
trying
to
pull
the
image
from
nginx
public
repository,
so
the
image
is
successfully
pulled
now
and
the
container
is
created
and
the
container
is
started
now.
So
now
I'm
going
to
give
this
cube
cpl
get
port
command.
So
you
can
see
this
engine
export
one
minute
and
just
pull
this
to
the
top.
A
A
It
actually
prints
what
exactly
is
happening
inside
the
bomb,
so
you
can
see
like
this.
The
the
process
has
started
and
the
on
the
pod
is
up
and
running
now.
So
this
is
this
is
how
you
you
can
check
the
logs
of
a
locks
of
a
part
that
is
deployed
and
then
also
the
the
describe
option
will
give
you
a
detail
about
what
exactly
is
deployed.
So
if
you
see
here
right
earlier
shown
in
this
diagram
that
pod
is
nothing
but
a
combination
of
one
or
two
containers.
A
So
in
this
case
right
we
have
deployed
only
one
container,
which
is
nginx.
So
that
is
why
we
see
like
engine.
The
container
is
containers
so,
since
I
said,
pod
can
have
one
or
two
containers,
so
it's
mentioned
as
content
image
nginx,
so
the
container
image
is
downloaded
from
the
docker
hub
and
this
other.
These
are
like
the
various
environments
or
the
various.
A
A
So
this
is
the
these
are
the
commands
that
I
wanted
to
show
you
and
similarly,
just
like
we
explained
what
is
what
is
there
and
describe?
What
is
what
is
there
in
a
pod
right?
We
can
also
describe
the
at
a
node
level,
so
I'm
going
to
execute
this
command.
Cpl
describe
node
and
I'm
going
to
pick
this
agent
one.
A
A
So
here
you
can
see
the
nginx
pod
is
allocated
here
and
we
can
also
see
the
events
of
the
specific
node
like
how
this
node
is
seeing
and
how
this
agent
and
everything
is
running
on
how
the
agents
and
the
cubelet
proxy
and
everything
are
started
now.
So
this
will
give
you
all
the
details
of
at
the
node
level
with
regards
to
scaling
and
deploying
application.
We
will
go
through
the
steps
when
we
do
or
deploy
an
application
in
the
next
workshop
in
the
next
second
session.
B
Yeah,
I
already
see
a
question
being
posted
in
so
k3d
is
ready
for
production,
yes,
but
but
the
primary
development
for
the
k3d
is
for
local
development.
Only
it's
not
ready
for
production,
although
it's
a
mature
tool
and
it
can
take
up
the
production
workloads,
but
it
is
not
really
recommended
for
real-time
production
environment
because
it
runs
on
top
of
docker.
B
C
B
Lot
of
money
invested
in
a
cloud
cloud
vendor
where
they
provide
the
service
and
take
up
their
service,
and
then
products
deploy
the
applications
in
the
cloud
cloud-based
kubernetes
cluster
and
test
their
applications.
It's
really
an
expensive
way
of
testing
their
applications.
So
it's
really
meant
for
local
development
and
also
it's
a
way
going
forward
the
all
edge
and
iot
nodes
and
these
kind
of
projects
we
can
make
use
of
k3d,
because
it's
it's
very,
very
you
know
least
like
the
k3d
binary
itself-
is
in
50
mb
space.
B
So
for
that
reason
it's
really
recommended
for
a
very
less.
You
know,
resource
crunch
environment,
where
we
can
deploy
this
cluster
and
make
use
of
yeah,
and
the
question
is
container
d.
So
container
d
is
like
just
docker
d,
so
docker
uses
a
container
environment
called
docker
d:
s
is
a
cloud
native.
You
know,
container
environment
container
d
is
an
sorry
cra
authorized
environment,
which
is
cloud
co-native,
runtime
environment.
Like
that
we
have
cni,
csi
cloud
native
storage,
interface,
cloud
native
network
interface.
B
B
So
this
continuity
is
one
of
the
standards,
one
of
the
form
of
cloud
you
know,
cloud
native,
runtime
and
environment
based
daemon,
which
is
author,
is
to
take
the
container
workloads.
It's
it's
very
similar
to
docker
d.
Docker
d
is
specific
to
docker.
Continuity
is
specific
to
relative
to
it's,
it's
an
open
source
environment.
A
Name
space,
so
let
me
share
my
screen
to
explain
that
same
one
again,
so
I
have
just
opened
one
diagram,
so
the
question
for
like
can
we
have
multiple
clusters
for
one
space?
No,
so
this
name
space
is
right.
These
are
like
logical
partitions
only
within
so
it's
like
kind.
In
this
k.
It
has
cluster
that
you
can
see
right.
You
can
see
the
default
name.
Space,
dev
name
space
or
q,
make
q
a
name
space.
A
So
similarly,
if
I
give
this
ctl
get
name,
space
vlns
is
short
form
from
namespace,
so
I
have
created
multiple
partitions
here,
so
these
are
like
kind
of
a
default
partitions.
The
default
is
something
that
is
created
by
itself
and
cube
system.
So
this
cube
system
right.
This
will
host
all
the
system
related
parts
that
are
required
for
this
container
to
run
so
again
we
created
this
app
one
and
apple.
So
to
explain
it
again
right.
A
Let's
say
there
are
two
applications
and
if
I'm
going
to
deploy
both
this
application
into
kubernetes-
and
let's
say,
if
I'm
going
to
create,
create
this
application
in
the
name
space
or
default
itself,
so
we
will
have
nginx
running
here
and
there
is.
There
will
be
one
one,
other
application
like
kind
of
a
tomcat
that
will
be
running
on
the
same
namespace,
so
this
could
actually
be
confusing
or
we
will
not
know
like
who
is
actually
working
on
the
specific
part.
Or
how
do
we
maintain
this?
A
So
that
is
why
we
are
isolating
this
application
within
the
name
space
like
we
can.
We
could
actually
use
it
for
another
scenario
as
well
like
what,
if
we
are
running
a
cluster
which
hosts
all
the
pre-prod
and
the
test
environments
itself,
so
the
nginx
could
be
the
name
of
the
application,
but
it
needs
to
be
deployed
or
twice
like
one
for
a
testing
environment
and
fun
for
the
pre-production
environment
so
under.
A
In
that
case,
we
can
have
two
kind
of
namespaces
here
I
can
create
namespace
pre-prod
and
I
can
create
namespace
test
here.
So
I
can
deploy
this
pod
on
both
these
name
spaces,
so
the
one
will
be
for
the
testing
purpose,
which
will
be
given
to
the
testing
team
to
work
on
this
specific
part.
The
other
will
be
kind
of
a
pre-prod
which
will
be
used
by
the
various
various
users
end
users
to
actually
see
like
what
is
or
how
their
application
behaves
and
everything.
A
E
All
would
have
very
informative.
I
thank
you,
mr
karthik
and
mr
arun,
for
this
enlightening
workshop
on
kubernetes
audience
about
three
and
four
of
this
workshop
at
2
15
pm.
So
please
stay
tuned
and
for
any
other
questions
you
have
please
post
it
in
our
slack
channel.
I
think
mr
karthik
and
mr
arun
would
be
happy
to
answer
them.
Last
but
not
least,.
E
A
So
welcome
back
again,
so
I
hope
you
like
the
topic
that
we
did
in
the
first
session
so
now
back
to
the
second
session.
So
in
this
second
session
we
are
going
to
cover
the
following
topics
that
is
how
to
deploy
and
how
to
scale
an
application.
So
the
next
one
is
like:
how
do
we
export
this
application
using
services
and
code
forwarding?
So
now,
then,
we
are
going
to
have
a
lab
session
where
we
are
going
to
require
this
cloud
native
application
on
a
kubernetes
cluster,
so
followed
by
observability.
A
So
this
observability
session
will
include
the
monitoring,
metrics
collection,
logging
and
basic
level
of
troubleshooting,
followed
finally
by
q,
a
so
as
in
the
previous
session
right.
We
have
all
this
content
or
readily
available
in
this
specific
workshop
url
so
and
this
the
content
as
well
is
also
available
on
just
the
content
as
well
is
available
in
this
github
repository.
A
A
A
So
this
could
be
a
basic
docker
file
that
that
could
be
returned
by
that
application
developer.
So
what
would
this
docker
docker
file
contain?
So
in
this
previous
first
session
right,
we
would
have
seen
a
container
should
have
a
minimal
os,
the
three
pp
binaries
and
then
the
application.
So
in
order
to
build
this
container
right,
we
need
a
docker
file
so
that
docker
file
is
built
will
have
this
kind
of
commands
like
here.
A
I
am
deploying
a
base
ubuntu
image,
and
then
I
am
installing
utilities
like
hedge
top
and
components
that
are
required
for
my
application
to
run.
So
this
is
kind
of
a
basic
docker
file
that
an
application
developer
needs
to
run
then,
once
this
docker
file
is
written
right,
so
using
this
docker
file,
this
application
is
converted
into
an
container
image.
So
now
we
have
a
container
image
ready
to
be
deployed
into
kubernetes.
So
we
have
these
two
components
here
which
actually
defines
how
this
application
needs
to
be
deployed.
A
A
Then
I
can
actually
define
the
number
of
replicas
that
my
application
requires
and
various
other
features
like
I
could
actually
define
like
if
my
application
needs
to
be
scaled
up
or
scaled
down,
and
I
can
also
define
the
upgrade
strategy
like
how
my
application
needs
to
be
upgraded
like
whether
everything
needs
to
be
whether
we
require
a
down
time
or
whether
it
needs
to
be
phased
out.
The
upgrade
needs
to
be
phased
out
in
a
sequential
manner.
So
all
these
things
we
can't
define
in
this
kind
of
defined
kubernetes
deployment
or
resources
section.
A
So
the
next
thing
is
now:
let's
assume
we
have
defined
everything
and
we
have
deployed
our
application.
So
how
do
we
expose
our
application?
Our
application
could
be
running
on
a
kubernetes
cluster,
but
we
need
some
point
or
some
some
service
or
something
to
actually
access
the
application.
So
that
is
why
we
have
this
kubernetes
services,
so
here
right
we
will
be
defining
what
type
of
exposure
is
required
for
the
application,
whether
an
application
requires
a
internal
exposure
or
whether
it
requires
external
communication
or
exposed
to
the
web
and
everything.
A
A
So
the
part
controller
in
kubernetes
actually
controls
a
part
of
how
it
is
deployed
and
everything.
So
these
are
like
kind
of
a
various
part
controllers
that
are
available.
The
one
is
deployment
replicas
stateful
set
daemon
set
and
everything,
so
the
widely
used
ones
are
like
kind
of
the
deployment
and
a
stateful
set.
So
now.
For
this
example
right,
I
am
going
to
show
how
a
deployment
actually
works.
A
So
in
the
previous
session.
Actually
we
deployed
an
nginx
pod
here,
so
this
nginx
pod
is
still
running.
So,
let's
assume
a
scenario
where
this
pod
is
going
to
be
deleted
for
some
reason.
So
I'm
going
to
delete
this
part.
Let's
assume
this
has
been
deleted
for
some
reason,
so
this
port
is
deleted.
Now,
let's
wait
for
the
port
to
be.
A
Deleted
the
pod
is
deleted
now,
so
no,
no,
we
don't
have
any
parts
running
on
this
specific
engine
export
running.
So
what
if
I
need
a
kind
of
a
controller
which
which
actually
spins
up
this
part,
even
if
someone
accidentally
deletes
or
if
the
node
on
which
it
this
part
is
deployed,
is
has
some
issues.
So
that
is
why
we
have
this
kind
of
a
part
controller
called
deployment.
So
in
this
lab
right,
I'm
going
to
create
a
deployment
here.
A
A
So
now,
let's
see
get
parts,
so
you
can
see
the
two
parts
of
nginx
are
running
here.
So
that
is
why
it
is
mentioned,
as
two
out
of
two
and
up
to
date
is
two
on
the
available
parts
are
two,
so
this
has
been
started
just
now.
So
that
is
why
we
have
this
get
parts.
So
what
I
am
going
to
do
now
is,
I
am
going
to
give
get
port
hyphen
white,
so
here
you
can
see
the
node
on
which
this
is
deployed,
so
the
node
is
kind
of
the
node
eyepiece.
A
A
A
So
so
you
can
see
it
does
automatically
create
another
font,
so
this
part
has
a
different
name
here.
That
is
that
we
deleted
wtl
2x,
whereas
this
one
has
got
nx
n6
nmn,
so
so
the
kubernetes
deployment
actually
will
monitor
like
whether
it
has
got
two
replicas
at
a
given
time,
and
this
replica
is
not
if
it
is
not
available,
it
will
automatically
spin
up
on
other
part
here.
A
So,
even
if
you
see
the
pod
ip
right
so
for
this,
the
pod
ip
was
192
168
16.78,
and
here
the
pod
ap
is
different
and
even
node,
on
which
this
is
deployed
right.
This
is
deployed
on
another
node,
not
the
same
node
where
it
was
previously
deployed.
So
that
is
the
feature
of
this
deployment.
So
using
this
deployment
right,
we
can
actually
even
do
an
upgrade
like,
for
example.
A
So
moving
back
to
the
slide
right
now.
So
here
you
can
see
the
controller
options
and
I
have
pasted
here
two
of
the
widely
used
port
controllers.
The
one
is
the
deployment
the
other
one
is
stateful
set.
So
the
major
difference
between
these
two
is
like
the
deployment
is
usually
used
for
stateless
application,
so
the
application
which
doesn't
bother
about
a
session
affinity
or
transactions
right,
they
will
prefer
to
to
be
deployed
as
a
kind
of
a
deployment.
So
if
you
can
see
here
right,
I
have
three
replicas.
A
So
all
these
three
will
be
having
three
parts,
but
the
same
three
three
parts
will
be
using
the
same
storage
layer,
whereas
in
the
case
of
stateful
set
right.
So
this,
as
the
name
suggest,
is
predominantly
used
for
stateful
applications.
So,
even
here
right,
we'll
have
this
three
replicas
here,
but
this
replicas
will
each
have
its
own
storage.
So
ideally,
this
will
be
used
for
applications
which
require
us.
What
is
it
session
affinity,
transactions
and
details
to
actually
prove
it?
So
yes,
this
one
example
is
a
stateful
set.
A
Example
would
be
predominantly
databases,
so
the
database
is
ideally
when
deployed
in
kubernetes
site.
It
should
be
deployed
as
kind
of
a
stateful
set,
because
each
data,
each
a
part,
should
have
its
own
kind
of
an
storage
access
to
fetch
in
a
transaction
or
refer
a
transaction.
So
that
is
the
difference,
and
that
is
why
we
need
this
part
controllers.
A
So
the
now
next
step
that
is,
we
have
defined
this
kubernetes
using
the
part
controllers
and
everything.
So
the
now
next
step
is
how
do
we
expose
application
for
exposing
a
kubernetes
application
right?
We
have
the
following
options:
like
the
we
introduce
a
concept
called
services
I'm
going
to
so
what
is
a
service
service
is
kind
of
a
layer
of
abstraction
on
on
on
top
of
the
spots.
A
So
as
we
seen
in
the
previous
two
parts
running
here
so
now,
if
we
want
to
access
my
application,
how
do
I
know
which
one
to
apply
which
part
to
communicate?
So
that
is
why
we
introduce
a
layer
on
top
of
it,
so
this
would
ensure
that
the
load
is
equally
spread
to
all
the
replicas
on
a
given
for
a
given
part
like
for
the
circle
right,
we
have
three
different
types:
the
one
is
cluster
ip
load,
balancer
and
then
node
port.
So
what
is
cluster
ip,
so
the
cluster
ip
right?
A
It
is
used
for
internal
communication,
like,
for
example,
I
am
going
to
deploy
a
kind
of
an
application,
a
which
needs
to
communicate
with
application
b,
which
resides
on
the
same
cluster.
So
this
is
kind
of
an
internal
communication
between
two
parts.
So,
in
order
to
provision
this
right,
I
can
create
a
service
so
that
this
service
would
be
used
as
a
reference
for
the
other
application
to
communicate
with
this.
So
this
is
predominantly
cluster.
Ip
is
used
for
internal
communication,
so
the
next
one
is
the
load
balancer.
A
A
So
then,
now
the
next
one
is
cluster
type.
Next
service
type
is
node
port,
so
this
node
port
option
is
predominantly
used
for
non-web
application.
Like
a
database
like
let's
say
we
have
a
postgres
deployed
in
our
cluster
and
this
postgres
needs
to
be
external
exposed
outside
of
a
cluster,
so
the
postgres
default
port
is
5432.
A
So
if
I
need
to
expose
this
port,
I
will
be
defining
the
service
type
as
notepad.
So
once
I
define
the
service
right,
so
this
port
will
be
accessible
on
all
the
nodes
in
a
cluster
like
all
the
workers
on
all
the
work
on
specific
5432
will
be
open.
So
in
this
example,
you
can
see
the
3000
port
is
open
on
all
the
nodes,
so
you
can
pick
and
choose
the
node
on
which
you
want
to
connect
locally
to
that
given
db.
A
A
So
I'm
just
going
to
this
command
and
show
you
like
what
exactly
is
happening
so
here
I'm
going
to
create
a
service,
so
the
service
will
expose
the
deployment
so
the
deployment
right.
Where
is
it?
The
deployment
name
is
nginx,
so
I'm
giving
deployment
slash
nginx
and
the
name
of
the
service
is
going
to
be
nginx
service
and
the
type
is
going
to
be
cluster
id.
So
it
is
predominantly
for
internal
communication
and
the
port,
the
predom,
the
the
port
on
which
this
is
going
to
be
exposed.
A
A
So
now
we
can
see
here,
nginx
service
is
created,
and
this
is
this
has
a
cluster
ip
and
this
is
exposed
on
port
80..
So
if
you
notice
the
difference
right,
the
parts
that
we
listed
down
here-
these
are
kind
of
a
dynamic
will
have,
it
will
have,
will
be
changing
dynamically,
so,
whereas
the
service
ip
write
once
created,
the
service
ip
or
the
ip
for
the
service
would
remain
constant.
So
that
is
why
we
can
actually
use
this
nginx
service
and
the
part
can
easily
come
internally.
A
It
will
refer
to
this
parts
which
dynamically
change
so
that
that
is
why
that
is
how
we
create
a
service.
So
next,
next
one
that
we
are
going
to
see
here
is
ingress
controller.
So
what
is
ingress
controller?
So
the
interest
controller
is
nothing
but
a
layer
on
top
of
this
service.
So
on
any
production
cluster
right,
we
could
be
having
multiple
applications
that
are
exposed
outside,
like
that
will
be
exposed
to
the
outside
world.
A
So
english
controllers
acts
as
kind
of
an
allow
us
to
define
the
rules
through
which
we
can
communicate
with
the
service,
so
we
will
be
defining
the
so
this
is
like
kind
of
fun,
client
and
the
ingress
will
be
on
top
of
this
service.
So
we
will
be
defining
the
various
rules
here
so
based
on
this
rules
right,
this
ingress
will
route
the
traffic
to
the
respective
service,
like,
for
example,
in
this
diagram
right,
you
can
see
food.mydomain.com.
A
So
whenever
someone
is
going
to
enter
this
url,
this
english
will
direct
it
to
this
service
one.
So
if
it
is
going
to
be
another
dns,
it
will
again
be
routed
to
service
two.
So
it
will
have
all
these
rules
that's
defined
internally
to
route
the
traffic,
so
ingress
will
be
on
top
of
service
and
service
is
kind
of
an
layer
that
that
helps
in
routing
the
traffic
to
the
respective
parts.
A
So
so
now
we
have
seen
the
service
and
times
and
the
ingress
and
indus
controller.
So
what
is
port
forwarding?
So
port
forwarding
is
something
like
I
have
deployed
an
application
into
kubernetes
and
I
want
to
check
like
how
the
application
is
behaving
locally.
On
my
laptop
so
using
this
port
forwarding
right,
I
can
actually
check
the
application
behavior
only
on
the
current
environment,
where
I
put
forward
like,
for
example,
in
this
lab
session
right
now,
I'm
going
to
run
this
command
for
forward.
A
So
you
can
see,
I
have
given
q
ctl
port
forward
and
the
service
name,
so
the
service
name
here
is
nginx
service
that
we
previously
created
and
9595
is
the
port
on
my
local
laptop,
where
this
service
is
going
to
be
exposed
and
80
is
the
nginx
service
port.
So
you
can
see
the
port
here
right.
I
think
we
gave
some
git
service
so
that
this
port
is
accessible
on
port
80.,
so
I've
given
this
80
here
so
now,
let's
see
how
this
is
going
to
be
here.
A
F
A
B
Yeah,
thank
you
so
last
session
we
have
gone
through
how
to
build
a
keyword
disk
cluster
locally
on
your
laptop,
so
I
still
have
a
copy
of
the
session
opened.
So
it
is.
This
is
basically
a
wsl
machine
prompt
and
we
have
that
cluster
also
up
and
running
just
verify
that
so
what
we
are
going
to
do
now
is
to
deploy.
You
know
cloud
application,
not
cloud
application
cloud
native
application
on
on
this
kubernetes
cluster,
okay,
so
first,
so
what
is
cloud
native
application?
B
So
there
are
a
few
standards
that
we
can
say
it
has
to
confirm
when
we
talk
about
cloud
native
applications,
so
it
the
application
should
be
capable
of
running
anywhere
or
everywhere
in
the
you
know,
and
any
sort
of
environment.
That
is
what
the
co-native
specification
says,
and
one
another
factor
is
that
it
should
also
be
scalable
resilient
and
accessible
and
yeah.
It
should
be
like
you
know
it.
It
can
also
coordinate
with
the
other
sim
application
seamlessly
with
other.
B
B
Yeah
hope
you
can
see
my
screen
now
yeah
we
can
okay.
So
let's
talk
about
the
application
a
bit
first.
So
I,
as
I
mentioned,
that
it's
a
simple
react
application
that
is
built
on
top
of
javascript
framework
and
it's
going
to
mimic
an
interface
of
how
netflix
looks
like
so.
The
only
exception
is
that
it
is
not
going
to
have
a
back
end
that
can
talk
to
storage
and
get
the
movies
or
the
videos
directly
playable
on
your
browser.
B
So
what
we
will
be
seeing
is
that
is
what
the
application
is
all
about.
So,
let's
without
talking
much,
let's
jump
onto
the
deployment
part,
so
I
have
the
application
build.
You
know
the
code
has
been
already
written
and
it
is
available
on
the
github
repo.
So
I'm
going
to
copy
that
and
paste
it
onto
the
terminal
so
hope
the
font
is
visible
at
least
yeah.
It
is
okay.
G
B
Yeah,
so
here
is
my
source
code
folder.
It
has
a
bunch
of
javascript
files
within
it,
so
not
going
to
go
through
all
the
source
code.
So
what
we
are
concerned
more
about
is
the
docker
file.
So
this
is
the
file
that
is
going
to
help
us
help
us
out
of
building
a
container
image
out
of
this
application
source
code.
So
we're
going
to
build
a
docker
image
now
and
I
I
think
you
we
already
created
a
repository.
G
B
Is
the
registry
server?
Never
registry?
So
I
understand
and
it
is
exposed
on
port
number
3500.
Okay,
so
we're
going
to
create
an
image
and
then
push
it
onto
this
registry.
So
for
that,
so
let's
go
back
to
the
workshop
material.
This
we
have
done
yeah.
This
is
the
command
which
is
going
to
help
us
creating
an
image.
B
B
B
How
this
cluster
is
built,
what
are
the
differences
we
had
for
our
cluster,
the
host
machine,
docker
cumulative
cluster
inside
which
we
we
have
four
service
node
and
then
three
worker
nodes
in
each
worker
node?
We
have
multiple
parts
running
now,
as
aaron
spoke
about
these
components
as
well
like
the
poor
power
services
and
deployments
like
now,
we
we're
going
to
have
within
the
worker
nodes.
Okay.
Now,
how
are
we
going
to
access
this
pod?
Is
we
need
a
service
for
it?
B
B
Okay,
this
service
quickly
accessible
from
outside
okay,
so
we
need
a
external
service.
The
service
can
typically
communicate
between
the
cluster
resources
between
the
parts,
so
by
default
it
will
be
having
a
cluster
ap.
It
will
not
have
a
public
ip
associated
with
it,
so
we
need
to
have
a
public
ip
associated
so
that
we
can
access
the
application,
which
is
which
is
running
inside
one
of
the
part
through
the
service.
So
we're
going
to
spin
up
one
more
component
called
ingress.
B
And
then
from
service
to
the
parts?
Okay,
but
again,
ingress
will
not
have
a
direct
communication.
Direct
accessibility,
english
has
to
come
through
a
public.
Ip
ingress
cannot
be
directly
associated
with
the
public
id,
so
we're
going
to
have
a
load
balancer
component
installed.
So
that
is
also
we
already
installed.
If
you
remember,
we
have
installed
a
component
called
metal
lb.
B
Okay,
so
this
load
balancer
is
accessible
from
an
external
world
or
from
anywhere
in
even
from
your
laptop,
you
can
directly
access
it
forever.
We
are
going
to
make
use
of
a
private
ip,
but
in
real
world
it
will
be
a
public
ap.
Okay,
this
load
balancer,
will
have
a
public
ip
through
which
we
can
access
our
application,
so
load
balancer
will
talk
to
ingress.
B
B
B
B
So
through
this
ingress
we
are
going
to
access
our
application,
and
this,
as
you
can
see,
the
all
the
services
has
a
cluster
ap,
but
none
of
the
services
has
an
external
ap
associated,
but
whereas
the
interest
controller
has
an
external
ip
association
associated,
so
through
this
ip
we
can
access
the
applications
that
are
running
inside
the
cluster,
so
that
we
can
verify
using
your
browser.
So
this
browser
is
running
inside
your
wsl
environment,
which
you
can
yeah.
As
I
mentioned
earlier,
you
can
check
with
whatsmyos.com
and
that
is
going
to
return.
B
B
B
So
yeah,
when
we
talk
about
the
container
build,
so
we
see
our
application,
build
has
already
started.
Build
is
completed
in
fact.
So
now
I
think
yeah
it's
creating
artifacts
for
the
build.
So
the
next
process
will
be
a
deployment
phase
where
it
will
create
a
container
image
out
of
the
artifacts
which
we
just
created.
B
B
Okay,
compilation
is
completed,
so
this
should
be
a
much
faster
on
most
of
the
systems
this,
because
this
laptop
is
eight
years
old,
so
you
will
find
it
a
bit
sluggish,
but
it
should
be
ideally
faster.
Okay,
so
don't
be
what
this
one
is,
which
we
see
here-
yeah,
it's
almost
done
right,
so
application
is
built
and
we
have
a
container
created
with
the
name
and
netflix
hyphen
clone
version
1.0,
okay.
So
let's
go
back
to
the
continue
with
the
session.
B
B
So
in
the
first
command
that
I'm
tagging,
that
with
the
registry
and
then
second
command,
I'm
pushing
that
image
on
to
our
local
registry,
which
is
private
list,
so
it
has
been
successfully
pushed.
So
it
is
now
the
image
is
serviceable
from
content
from
a
community
cluster.
We
can
call
this
image
and
get
a
part
created
out
of
it.
B
B
B
B
Yeah,
you
can
see
two
two
two
parts,
each
running,
probably
on
a
different
worker.
Note,
let's
see
describe
if
you
want
to
see
more
details
about
the
parts
you
can.
You
know,
run
this
command
and
check,
but
otherwise
it
is
not
required.
You
can
see
on
which
node
it
is
running.
Okay
and
these
sorts
of
information
is
available.
It
is
running
on
the
agent
one,
which
is
the
node
one
and
the
port
at
which
that
part
is
exposed
and
these
details.
Okay,
so
now
we
have
a
different
application
completely
deployed.
B
Let's
take
a
look
at
this
object
and
then
load
balancer
to
access
this
application.
How
are
we
going
to
associate
this
interest
to
the
or
how?
How
are
we
going
to
map
the
interest
to
the
service?
So
we
have
an
indus
controller,
but
we
do
not
have
a
mapping
between
the
interest
and
the
service
okay.
So
that
is
what
we
are
going
to
create
now.
B
B
B
B
B
Just
running
this
command
has
not
given
in
the
workshop
material,
but
if
you
want,
you
can
check
what
is
going
inside.
That
interest
object.
As
you
can
see,
all
the
keyword
resources
will
have
the
standard
attributes,
api
version,
kind,
metadata,
stick
and
the
objects
attribute
is
going
to
define
only
within
the
you
know
in
the
sub
chart.
Sub
sub
manifest,
like
the
attribute
that
are
specific
to
the
resources,
are
the
only
ones
that
are
going
to
change.
B
B
B
B
B
B
B
So
again
you
got
to
go
to
this
first
step
in
the
deployment
application
stage
where
you
have
to
code
it
with
version
2.0,
okay
and
then
run
all
these
commands
rerun.
These
commands
once
again,
so
the
cluster
will
automatically
see
that
it
it
has
in
in
a
given
ops
environment.
This
will
be
automatically
spinned
up
to
a
newer
version,
but
in
your
development
environment,
what
you
have
to
do,
in
addition,
is
that
you
have
to
delete
these
services,
delete
this
deployment
and
recreate
it.
B
B
B
So
whenever
you
change
the
code,
just
change
the
deployment
version,
change
the
image
version
and
then
reapply
the
code.
Of
course
you
need
to
label
the
image
within
whatever
version
that
you
want
to
build.
So
this
is
how
a
cloud
native
application
is
usually
built
in
the
cluster
communities
cluster
and
how
it
is
deployed
yeah.
So
that's
pretty
much
so
back
to.
A
As
you
speak,
okay,
so
now
we
are
going
to
see,
we
have
deployed
our
cluster
on
an
this
one
like
we
have
deployed
the
cluster
and
we
have
also
started
running
our
application.
So
now
we
come
to
the
interesting
part,
which
is
the
observability,
so
observable
observability
here
consists
of
matrix
collection,
logging
and
also
basic
troubleshooting.
So
in
this
session
right
first
we
will
see
the
metrics
how
the
metrics
are
collected.
A
So
cuban
it
is
by
itself
right,
provides
an
optional
component
called
a
metric
server,
so
this
metric
server
is
actually
can
be
opted
on
a
kubernetes
cluster.
So
this
provides
basic
mecha
basic
metrics
components
like
the
resource
usage
of
cpu
memory
of
a
given
pod
or
a
node
like,
for
example,
right
in
that
cluster
that
we
have
deployed
I'm
going
to
give
cube
ctl
of
node,
so
you
can
see
the
usage,
cpu
usage
and
the
memory
usage
of
each
of
the
individual
nodes
that
we
have
so.
A
Similarly
right,
if
I
need
to
see
the
pod
usage,
I
need
to
give
cpu
top
port.
So
here
you
can
see
the
engine
export
that
we
deployed
right.
You
can
see
the
amount
of
core
cpu
cores
and
the
memory
that
this
particular
part
requires.
So,
although
this
metrics
server
is
available,
the
the
the
metrics
that
it
provides
is
actually
quite
less,
and
it
is
not
actually
something
that
we
we
are
on
our
distributed
cluster
expected.
A
So
for
this
kind
of
dynamic
changes,
which
literally
happens
in
cloud
nature,
we
need
a
kind
of
an
advanced
monitoring
mechanism
or
matrix
collection
mechanism.
So
that
is
why
we
have
the
prometheus
here.
So
the
prometheus
is
like
actually
stores
its
metrics
in
a
time
series
data
and
it
collects
the
information
periodically
from
all
the
sources
from
which
it
is
it
can
collect.
So,
for
example,
let
me
open
this
prometheus
documentation.
So
this
is
again
a
cncf
project
and
it
is
a
graduated
cncf
project.
A
So
if
you
can
see
here
so
the
prometheus
joined
the
cncf
in
2016
and
the
second
hosted
project
after
kubernetes,
so
it
is
actually
widely
used
matrix
collection
tool.
So
what
we
are
going
to
do
now
is
as
part
of
this,
I
came
through
the
architecture
here
at
a
high
level,
but
before
that
we
will
start
with
the
installation
of
the
one
so
that,
because
this
insulation
takes
a
few
minutes,
so
probably
we
will
just
start
with
this
installation
and
as
we
go
I'll,
explain
the
architecture.
A
A
So
I'm
going
to
clear
the
screen,
I'm
going
to
create
a
namespace
monitoring
here,
so
the
monitoring
namespace
is
created.
So
now
I'm
going
to
deploy
the
prometheus
stack
so
before
going
to
before
deploying
it
right.
I
would
like
to
quickly
give
an
overview
of
help,
so
we
are
going
to
use
helm
here.
A
Is
that
so
what
is
helm
here
so
helm?
I
think
we
had
a
beginner
session
previously
where
film
concepts
was
explained.
So
just
a
quick
overview
here.
Helm
is
kind
of
an
open
source
package
manager
for
kubernetes,
similar
to
what
we
have
for
windows
pack
or
apt
for
ubuntu
helm
is
an
package
manager
for
kubernetes,
so
we
can
actually
bundle
all
an
entire
application
with
kind
of
all
the
services
like
in
this
example
right,
you
saw
like
we
created
a
deployment,
a
service
and
everything
individually.
A
So,
with
regards
to
helm
right,
we
can
bundle
all
this
together
in
a
kind
of
an
software
kind
of
thing
and
we
can
deploy
it
at
one
go
so
this
for
in
order
to
install
that
particular
this
one
right.
We
need
to
add
that
repo.
So
here
we
are,
we
are
adding
this
repo
prometheus
community,
and
this
is
a
github
link
for
this
prometheus,
where
this
particular
film
charts
are
located.
So,
in
my.
A
I
have
already
deployed-
I
have
already
added
this
chart,
so
you
can
see
this.
This
promotes
community
is
already
added,
so
I'm
going
to
directly
install
this
prometheus
stack,
I'm
going
to
give
a
helm
install,
so
this
will
take
some
time.
So
during
this
time
we
will
see
like
what
are
the
high
level
components
that
are
required
so
at
the
top
right
we
have
this
prometheus,
which
actually
helps
in
pulling
the
metrics
from
various
targets.
A
So
in
this
case
the
targets
could
be
at
the
node
level
or,
like
the
node
level,
like
we
have
multiple
worker
nodes
right,
that's
prometheus
would
be
collecting
this
metrics
from
each
of
this
node
and
it
will
also
be
interacting
with
the
cube
and
it
is
apis
to
collect
all
the
matrix
data.
So
once
this
data
is
collected
right,
then
it
we
have
another
in
this
prometheus
tag
we
have
another
component
called
so
in
alert
manager.
We
can
actually
create
rules.
A
So
whenever
a
threshold
or
something
is
hit
right,
this
alert
manager
can
be
used
to
alert
the
end
users,
so
it
could
be
either
an
email
or
it
could
be
any
a
third
party.
What
is
it
alert
alert
triggering
app?
So
so
we
have
this
prometheus
and
alert
managers.
The
next
component
here
is
the
graphana.
A
So,
as
part
of
this
helm,
packaging
right,
we,
this
not
only
packages-
mentioned
this
as
a
prometheus
stack
right,
so
it
actually,
this
stack
will
include
both
all
these
three
components
like
the
prometheus
alert
manager
and
graphana.
All
these
are
bundled
together
and
we
will
also
few
other
components
that
are
required
for
this
interaction
with
the
node
level
components.
So
now
we
can
see
this
prometheus
stack
is
deployed
on
the
cluster.
So
now
I
am
going
to
give
get
parts
here,
so
you
can
see
the
various
components
deployed
here.
A
So
now
we
will
go
through
and
now
so.
The
first
component
that
we
are
going
to
see
here
is
the
node
exporter.
So,
as
I
mentioned
right,
so
the
prometheus
will
help
in
collect
of
matrix
from
the
node
level
is
actually
deployed
on
each
of
the
nodes
in
a
given
cluster.
So
it
will
be
running
on
each
of
this
node
and
it
will
help
in
collection
of
this
matrix
at
the
node
level.
A
So
the
next
one
here
we
are
going
to
see
is
the
operator,
so
operator
is
kind
of
a
centralized
component
manage
all
other
components
that
are
deployed
here.
So
it
will
check
and
validate
like
how
it
behaves
and
it
it
basically
helps
in
the
operation
or
the
availability
of
the
rest
of
the
components
so
the
next
component.
These
are
all
the
node
exporters.
So
the
next
component
that
we
are
going
to
see
is
the
grafana,
so
graphene,
as
I
mentioned,
is
for
visualization.
A
So
the
next
here
is
the
cube
state
matrix.
So
the
cube
state
matrix
is
used
for
collecting
the
metrics
that
are
available
at
at
the
api
level,
so
it
will
be
interacting
with
the
kubernetes
api
calls
to
get
the
kubernetes
api
matrix.
So
the
next
one
is
alert
manager
which
is
used
for
alerting
or
alert
triggering
to
the
end
users.
So
this
one
is
kind
of
a
prometheus
deployment
which
actually
shows
the
prometheus
operator
or
the
prometheus
actual
prometheus.
A
A
You
can
see
the
get
service
like
various.
So,
as
I
said
right
with
helm,
everything
everything
will
be
bundled
together.
So
the
deployment
like,
if
I
give
deployment
here
so
we
will
be
seeing
the
deployment
manifest
being
deployed
the
service
and
everything
will
be
installed
in
one
one,
single
click,
so
that
is
the
advantage
of
using
help.
So
now
we
have
the
service
here.
Let
me
here
my
me:
move
this
to
the
top
now
I'll
copy
paste
this
command
to
port
forward.
So
so
this
is
cube.
A
A
So
this
is
the
prometheus
gui
and
by
default
right
it
has
got
various
metrics
readymade
metrics
available
for
us
to
consume,
like,
for
example,
right.
We
saw
that
node
exporter
that
I
showed
earlier
like
we
had
this
node
exporter
that
is
running
on
various
nodes
individually,
so
I
am
just
going
to
see
what
are
the
node
level
components
that
are
available.
A
Suppose
if
I
want
to
visualize
this
component
in
a
kind
of
a
graphic
right,
so
I
can
just
click
this
graph
option
here
and
I
can
see
all
the
metric
level
components
so
since
this
has
been
installed
just
five
minutes
back,
the
matrix
has
been
flowing
only
for
the
last
five
minutes.
So
this
is
about
the
prometheus.
A
We
have
this
cube:
where
is
it
so
the
cube
state
matrix?
So
let
me
check
if
there
are
any
cube
related
metrics
available
here,
so
these
are
like
kind
of
an
api
information
that
it
can
pull
like.
For
example,
I'm
just
going
to
keep
deployment
created
and
see
if
I'm
getting
any
metrics,
so
it
will
list
down
all
the
deployments
that
have
that
are
created
on
this
cluster.
So
this
is
how
the
prometheus
works.
So
now
we
have
this
metrics
collected
in
prometheus.
Now,
let's
see
how
the
visualization
of
this
looks
in
grafana.
A
A
So
we
we,
we
can
actually
customize
this
credentials,
but
we
are
not
going
to
get
into
it,
so
we
will
use
the
default
credentials
that
is
available
and
I
have
logged
into
grafana
so
similar
to
prometheus
right.
Graphana
offers
many
readily
available.
Dashboards
like
these
are
kind
of
the
dashboards
that
are
readily
available
and
we
can
quickly
check
them
or
use
them
to
check
like
how
it
works
like,
for
example,
I
am
going
to
click
this
node
exporter
nodes
so
to
see
the
node
level
matrix.
A
So
here
I
have
the
various
nodes
and
I
can
check
this
quickly
by
click
of
a
button,
so
all
or
I
can
even
monitor
prometheus
from
using
this
dashboard
like,
for
example,
writer.
I
have
this
prometheus
dashboard
that
is
readily
available,
and
if
I
click
this,
I
will
be
having
all
the
prometheus
level
metrics.
So
it
helps
in
building
the
dashboard
and
everything
so,
as
I
said
like,
we
have
this
coming
only
recently,
since
we
have
deployed
this
just
now.
So
this
is
about
the
dashboard
creation.
A
Suppose
if
you
want
to
customize
this,
if
you
want
to
create
new
dashboards
right,
you
can
click
this
create
and
you
can
actually
build
your
own
dashboards.
So
you
need
the
prometheus
query
or
so
the
metrics
that
we
displayed
here
right.
You
need
to
build
your
own
prometheus
queries
and
use
that
to
build
the
dashboards,
and,
apart
from
building
new
dashboards
right,
we
can
also
introduce
new
data
sources
into
this,
like,
for
example,
by
default.
Prometheus
that
we
have
installed
here
has
a
data
source.
A
Graphene
is
kind
of
a
default
data
source
for
this
installation,
but
suppose,
if
you
want
to
add
few
other
data
sources,
so
if
I'm
going
to
click
this
data
source
right
it,
this
graphic
comes
with
all
this
monitoring
tools
like
here.
You
can
see
the
various
monitoring
tools
on
the
even
the
databases
through
which
it
can
bring
in
the
metrics.
So
all
these
integrations
are
available.
So
this
is
like
a
kind
of
a
default
visualization
that
we
use
whenever
the
prometheus
based
matrix
collection
is
done.
A
So
this
is
about
prometheus.
So
next
we
are
going
to
go
and
look
into
the
elastic
stack
so
there.
What
is
the
elastic
stack,
so
elastic
strike
basically
is
a
log
collection
mechanism,
so
it
comprises
of
three
to
four
components
here,
so
it
as
mentioned
here
right.
It
is
a
combination
of
three
open
source
projects
and
we
also
have
another
project
here.
Maybe
I
will
just
open
this
link
here
to
go
through
the
architecture.
A
So
it
comprises
predominantly
of
four
components.
The
first
component
here
is
the
beats
here.
So
what
is
beats
beats
is
like
a
component
similar
to
the
node
exporter
we
have
seen
right
beat
is
a
component
that
needs
to
be
installed
on
each
of
the
node
in
a
cluster,
so
this
beat
will
tell
the
locks
that
it
needs
to
forward.
So
it
will
be
tailing
that
log
and
it
will
be
sending
it
to
the
log
stash.
A
A
So
elasticsearch
is
basically
a
search
and
analytic
tool,
so
it
could
actually
consume
or
have
a
large
amount
of
data
and
using
the
data
you
could
actually
crunch
the
data
and
bring
you
the
desired
results
like
search,
something
it
actually
searches
and
brings
you
the
necessary
result
at
very
quick
time,
even
though
the
size
or
the
the
law
collection
is
going
to
be
huge.
So
that
is
the
functionality
of
this
elastic
search,
so
the
next
we
have
is
a
kibana,
so
kibana
basically,
is
again
a
virtualization,
so
we
have
this.
A
What
is
it
the
logs
and
everything
stored
and
how
do
we
visualize
this
data?
So
that
is
where
we
have
this
kibana
to
visualize,
whatever
log
that
we
are
so
similarly
similar
to
what
we
have
seen
here
right
we
have.
I
have
provided
this
instructions
to
actually
install
this,
like,
for
example,
we
are
going
to
in
in
this
scenario
right.
I
have
already
installed
elk
stack
following
this
instruction.
A
The
reason
why
I
didn't
want
to
do
this
in
the
workshop
is
like
it
again
takes
some
time
and
I
don't
want
to
wait
for
the
installation
to
complete.
So
here
we
have
this
installation
done
on
this
cluster.
Let
me
show
you
here
and
I'm
going
to
give
ctn
and
the
namespace
that
we
have
created
is
logging
similar
to
the
prometheus
right.
The
repository
is
the
repository
for
this
chart
is
available
in
this
location.
So
I
have
added
this
repository
and
I
am
installing
each
of
this
component,
one
by
one.
A
A
So,
as
you
can
see,
these
are
the
components
that
is
installed
here
like,
for
example,
the
five
bit
so
that
I
mentioned
here
right.
The
file
bead
is
installed
on
on
each
of
the
nodes
individually.
So
this
helps
in
collecting
the
what
is
it
the
log
level
information
from
each
of
the
parts
that
are
deployed
on
each
of
this
node?
So
then
we
have
this
elastic
search,
which
actually
is
kind
of
a
search
and
analytic
tool,
and
then
we
have
this
key
which
is
used
for
visualization.
A
So
you
can
see
the
three
replicas
and
we
have
this
three
replicas
that
is
0,
1
and
2
here.
So
now,
what
we
are
going
to
do
now
is
we
are
going
to
put
forward
elastic
and
the
kibana
to
see
how
it
actually
looks
so
first
one
I'm
going
to
do.
Is
I'm
going
to
port
forward
elasticsearch
as
before?
Right,
I'm
going
to
give
the
name,
spaces,
logging
and
port
forward.
The
service
will
be
the
elastic
search
master
that
we
have
here
and
the
port
will
be
on
9200,
so
this
is
xposed
now.
A
So
you
can
see
this.
Is
this
actually
means
that
the
elastic
search
is
working
as
expected,
you
can
see
the
elastic
search,
master
name
here
and
all
the
build
details
and
everything
here.
So
this
this
means
elasticsearch
is
working
as
expected.
So
now
we
are
going
to
give
the
exp
or
visualize
this
using
grafana.
So
next
I'm
going
to
put
forward
keyboard.
I'm
sorry.
A
Yeah
so
now
we
have
the
kibana
gui
here
so
now,
let's
see,
let's
see
how
the
logs
needs
to
be
ingested.
So
what
I'm
going
to
do
now
is
I'm
going
to
give
to
the
stack
management
here
and
create
an
index
pattern
so
in
elasticsearch
and
everything
we
need
to
create
an
index
pattern
to
actually
visualize
a
log.
So
what
I'm
going
to
do
is
I'm
going
to
give
file,
beat
dot
slack
and
I'm
going
to
give
the
timestamp
as
this
one
and
I'm
going
to
create
this
index
pattern.
A
A
Are
so
you
can
see
all
the
logs
are
now
available
in
kibana
for
us
to
visualize
so
similar
to
prometheus
right?
We
have
this
query
language
that
we
can
actually
filter
out
or
or
what
is
it
filter,
a
specific
log
or
something
and
see
how
it
behaves?
So,
basically,
now
we
have
actually
deployed
both
matrix
collection
and
logging
so
use
using
this
lab
instructions.
So
so
now
we
are,
we
are
going
to
move
on
to
troubleshooting
right
for
any
kind
of
troubleshooting.
A
The
first
step
that
we
would
require
is
kind
of
how
we
would
be
looking
is
for
the
metrics
like
what
is
the
matrix
or
how
the
part
is
behaving
at
a
given
point
of
time.
So
we
can
ideally
use
this
permit
to
see
like
what
is
the
current
status
of
the
part,
and
then
the
next
step
here
is
to
see
how
the
logging,
or,
if
the
logs
has
got
any
errors
like
at
the
pod
level
or
the
container
level.
A
A
So
I
have
referred
the
kubernetes
document
link
here,
because
it
has
got
the
troubleshooting
steps
for
each
of
the
component
or
services
that
exist
like,
for
example,
it
got
specific
instructions
on
how
to
debug
a
pod
or
how
to
debug
a
service
or
anything.
So,
let's,
for
example,
go
into
the
debug
ports.
So
usually
we
what
we
do
is
we
give
a
describe
what
command
so
the
describe
part
command
when
we
give
right,
it
will
give
you
like
what
are
the
events
that
takes
place
like,
for
example,.
A
On
one
of
the
spots,
so
here
we
can
see
the
events
that
actually
takes
place,
so
you
can
see
here
right.
I
think
I
only
showed
this
like
how
the
pod
is
successfully
assigned
to
your
node
and
how
the
image
is
pulled
and
how
the
content
is
created
and
started.
So
whenever
a
pod
or
something
is
going
to
fail
right,
we
will
have
the
even
message
clearly
say
like
what
exactly
is
happening.
So
that
is
why
the
first
step
that
we
do
while
debugging
is.
A
We
have
to
look
into
this
describe
part,
so
we
need
to
check
the
status
of
the
report
like
we
can
see
here
right
whether
it
is
in
ready
state
or
this
pending
state
or
kind
of
an
error
in
image
pool
or
something
we'll
be
getting
this
error.
So
we
need
to
check
this
kind
of
things
and
the
next
step
that
we
do
obviously
is
to
check
the
locks
like,
for
example,
in
this
case
right.
A
I'm
going
to
just
give
cube
ctl
logs
undo
on
log
level
this
one,
so
you
can
see
here
the
logs
doesn't
have
anything.
What
is
it
any
kind
of
warnings
or
fatal,
because
this
part
is
running
fine,
so
that
is
why
the
locks
doesn't
show
anything.
So
this
is
like
how
we
ideally
troubleshoot.
So
apart
from
this
right,
we
can
also
leverage
this
prometheus
and
the
and
the
kibana
to
actually
see
like
if
there
is
any
cpu
spike
or
memory
spike
and
everything.
A
A
So
again,
we
can
actually
list
down
the
cluster
here
similar
to
get
parts.
We
can
actually
give
the
get
notes
and
list
down
the
notes
here
and
if
you
need
to
describe
a
node
or
something
we'll
be
able
to
see
what
exactly
happens
similar
to
how
we
do
for
parts-
and
there
also
will
be
having
an
event
and
everything
to
see
like
what
exactly
so,
we
have
also
another
command
called
cluster
dump
info
clustering
for
down.
This
will
give
a
detailed
information
about
overall
health
of
the
cluster.
A
We
can
collect
this
term,
and
actually
we
will
be
using
this
when
when
we
need
to
what
is
it
analyze
the
cluster
at
a
detail
level?
So
this
is
one
other
command,
so
this
is
how
the
troubleshooting
works
at
the
various
level.
That
is
the
under
cluster
level.
So
so
this
is
about
the
observability
and
that's
all
we
are
open
to
questions.
D
D
D
D
D
D
B
You
should
be
yeah
have
the
luxury
to
afford
that.
That's
fine
perfectly
fine,
but
this
workshop
is
mainly
targeted
at
people
who
can't
afford
the
cloud-based
clusters,
the
eks
or
gk
or
the
aks,
so
that
they
can't
have
the
luxury
of
the
affordability
to
spend
a
large
amount
of
money
to
you
know
test
and
develop
their
own
clusters.
So
k3d
is
absolutely
no
cost
cluster.
You
can
run
it
wherever
you
want.
You
can
install
it
on
a
vm.
B
You
can
install
it
directly
onto
our
windows,
cluster
or
the
next
linux
machine
or
even
on
a
mac
machine,
and
it
is
disposable
as
well.
So
that
is
one
other
you
can
just
create
it,
and
then
you
can
export
the
cluster
and
move
it
on
to
a
different
machine.
That
is
also
possible
with
the
case
of
that.
B
B
Yeah
and
it's
optimized
for
the
latest
technologies,
h,
iot
and
on
these
devices.
If
you
want
to
run
your
containerized
applications
and
you
want
to
do
it
in
a
humanities,
cluster-based
environment
k3
is
the
only
way
to
go,
because
it
is
very
light
and
it's
the
lightest
cluster
I
would
say
which
is
current
in
the
market.
B
B
K3S,
you
know
k3d
again
uses
the
image
same
image.
K3S
is
the
base
image.
What
k3d
uses
this
one
k3d
as
well
as
there
is
another
concept
called
b
cluster.
Again,
that's
a
separate
track
that
is
going
on
the
cluster.
They
also
use
the
same
image
k3s,
both
v
cluster
and
k3,
use
the
same
backhand.
The
base
operating
system
is
k3s
so
that.