►
From YouTube: 3D Printer Control Panel
Description
What you see here at Open Source Ecology is an ambitious program based on a volunteer effort. To help us reach the goals - please consider joining as an OSE Developer in 2017-
http://opensourceecology.org/wiki/OSE_Developers
Take a minute to subscribe to our email newsletter (updates, workshops, etc): http://bit.ly/1LtcM44
B
B
B
B
B
B
B
Otherwise,
me
you
can
still
do
it,
but
it'll
be
a
little
harder
get
the
orientation
correct.
So
we
are
facing
like
this
right
like
that,
so
that
was
this
make
sense
orientation
when
you're
looking
at
the
panel
right
keeping
that
I'm
going
to
thread
the
first
hole
so
do
exactly
what
I
did
put
that
put
that
all
the
way
in
and.
D
B
E
B
B
B
H
I
E
E
B
B
Put
some
solder
on
it,
so
you
touch
both
the
wire
and
the
solder
at
the
same
time,
so
they're
both
hot
and
they
melt
into
each
other.
So
you
once
again
you
do
that
in
the
second
one
touch
touch
both
the
wire
and
the
solder
at
the
same
time,
so
basically
you're
getting
them
all
all
bound
up
in
a
bunch,
so
they
not
they
don't
fray
and
possibly
short-circuit
across
your
power
supply.
You
shouldn't
get
like
a
little
spark
and
fire
hazard,
and
this
is
one
of
those
things
you
need
three
hands
for.
B
N
B
B
And
stick
your
wires
in
there.
So
let's
do
the
green
one
in
the
ground,
so
they
go
into
the
side
underneath
this
screw
just
bottomed
out.
If
you
have
about
this
much,
they
bottom
out
perfectly
well
in
there.
You
don't
want
to
have
metal
exposed
here,
because
you
know,
potentially,
you
can
cross
wires
there.
B
So
the
plastic
should
be
beat
behind
this
plastic
separator
between
the
two,
so
just
tighten
it
down
and
then
black
we're
gonna,
say
black
for
hot
okay
that
sounded
like
some
authority,
so
we're
gonna
do
black
and
I
and
black
hot
would
be
line
and
neutral
is
gonna,
be
which
is
n.
That's
gonna,
be
the
middle
one.
So
you
need
to
do
this
and
that's
your
power
supply.
This
is
ready
for
powering
up
your
system.
B
All
the
other
terminals
are
12
volts,
so
there's
three
of
them
that
are
negative,
12,
volts
and
three
of
them
that
are
positive,
12
volts.
You
can
see
on
this
six
of
them
total
on
the
side.
You
will
see
model
3
6
to
12,
so
12
is
the
12
volts,
make
sure
you
have
12
volts,
which
I
mean
they're.
All
put
360
watts
is
the
total
power,
so
you
get
30
amps
12
volts
out
of
this
kind
of
power
supply.
It
works
either
on
120
or
240.
B
There's
a
there's
a
plug
here
that
there's
a
little
switch
here.
You
can
switch
it
to
220
or
switch
it
to
110
leave
it
alone.
It's
set
preset
at
110,
so
that's
a
power
supply,
so
everybody
can
do
that.
There's
the
wire
strippers
here
we
have
more
I'll,
bring
down
a
second
set.
This
set
of
wire
strippers.
Does
that
work?
Has
anyone
used
these.
O
B
Okay,
let's
take
let's
take
one
of
the
live:
I
haven't
really
used
this
one,
so
it
does
it
work,
so
you'll
put
it
in
the
mouth,
it
grabs
it
and
then
it
has
a
blade
behind
it
that
kind
of
tools
back.
So
let's
see,
if
that
works
sure
does.
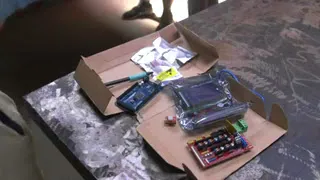
This
is
everything
you're
laid
into
the
controller?
And
surprisingly,
this
actually
has
a
nice
manual
on
the
inside
3d
printed
kid
users,
manual,
controller,
the
screen,
the
Rams
board
and
a
lot
of
a
lot
of
little
parts.
B
They
have
two
pieces.
One
is
a
little
heatsink.
It's
got
a
piece
of
adhesive
on
the
back,
it's
a
tiny
heatsink,
so
you
can
expose
these
there's
a
piece
of
sponge
on
the
back.
Take
that
off
to
expose
the
leads
for
the
heatsink,
take
off
the
plastic,
the
peel
for
the
adhesive
and
then
stick
on
the
the
heatsink
and
ideally,
if
the
board
is
sitting
vertically.
These
are
like
that.
You
would
like
the
grooves
to
go
up
and
down
so
airflow
can
go
up
and
down.
B
B
That's
the
little
chip
in
there
and
that's
that's
what
gets
hot
in
there.
So
that
means
cooling,
make
sure
you
don't
touch
the
pins
on
the
side
or
that
there's
a
little
screw
screw
place
little
screw
below,
don't
touch
that
either
they'll
be
conductive
too.
So
there's
how
many
of
those
five
five
total.
G
B
P
R
C
B
S
B
B
S
C
B
U
V
V
R
B
W
B
W
H
P
Y
L
Y
M
B
Right
on
so
open
up
your
other
other
big
box,
that's
the
ramps
shield,
so
open
up
your
Arduino
open
up
your
ramps
shield.
Now
stick
the
begin,
sticking
in
your
stepper
drivers
into
the
shield.
How
do
you
do
that
the
screw
terminal
faces
down
if
the
plug
is
facing
up
face?
The
plug
up
plug
is
the
green
plug
comes
out.
B
Let's
stick
it
back
in
just
to
show
you
holding
it
vertically
begins
sticking
in
your
in
your
stepper
drivers,
there's
five
of
them
they're
all
identical!
So
there
they
go
into
the
long
rows.
The
long
black
rose
above
those
red,
yellow
and
blue
pins,
and
first
check
that
you
have
those
red,
yellow
and
blue
pins
in
place.
Does
everyone
have
them
those
good.
Z
B
Yeah
those
control,
how
many
steps
the
microstepping
settings
with
those
three
jumpers
their
little
jumpers.
You
can
actually
take
them
out.
Those
jumpers
make
it
16
microstepping,
but
they
should
be
there.
Otherwise,
you're
not
gonna,
get
a
motion
like
the
rest
of
us.
If
you
don't
have
those
so
now
the
screw
side
on
your
stepper
driver
faces
down
down
leans
away
from
the
green
Club.
So
so
like
this.
H
B
N
AA
B
W
B
L
B
R
S
B
B
So
match
up,
how
do
you
match
it
up?
Let's
match
up
the
two
rows
on
the
bottom
of
the
you
look
at
the
double
row
on
the
bottom
of
the
ramps
board.
Stick
that
into
the
double
header
on
the
bottom
of
the
Arduino
and
use
that
to
to
go
from
there
so
put
those
in
first
and
have
a
punch
it
down
and
continue
just
to
superpose
them.
I
have
to
press
down
quite
a
bit.
B
W
B
W
AA
J
B
AB
AE
Q
G
G
B
So
once
we
have
that,
we
actually
don't
need
to
worry
about
sticking
in
the
we
can
open
up
the
belt
for
the
LCD
screen.
It
doesn't
really
have
to
go
in
yet
because
it
seems
you
have
to
work
without
it.
I
think
we
can
plug
in
well
yeah.
There
is
this
one,
the
plug
itself,
and
we
do
want
to
plug
that
into
the
ramps
so
take
out
the
l-shaped
plug.
V
B
V
B
D
G
B
B
So
these
are
two
the
two
side
holes
and
then
doesn't
have
to
be
super
precise,
because
these
are
zip
ties
and
they're
very
flexible,
but
on
the
inner
part
on
the
inside
okay,
this
one's
not
working
for
me
on
the
inside.
You
always
want
to
have
two
holes,
because
you
cannot
thread
through
one
hole
if
you're
inside
so.
G
B
So
para
MOSFET
is
next
and
there
there
is
a
special
requirement
for
it.
It
has
to
reach
to
the
Arduino,
using
the
small
cable
provided
otherwise
you're
going
to
be
extending
cable,
which
is
extra
work
to
make
it
happen.
We
can
take.
Take
our
current
design.
We've
got
the
Arduino
that
we
mounted
just
about
halfway
in
between
you're
gonna,
make
it
closing
up
here
so
facing
up
the
I
guess
the
white
white
plug
facing
up,
but
such
that
when
you
plug
in
the
little
wire
that
little
wire
it
goes
into.
B
H
B
Eight,
so
these
little
wires
have
to
reach
all
the
way
to
the
terminal
set
closest
to
the
plug.
So
put
that
don't
put
it
here,
they
won't
reach,
put
it
as
close
as
possible,
so
it
reaches
and
also
there's
power
wires
coming
from
the
power
supply
into
here.
So
the
closer
the
better
so
just
like
that
and
the
holes
therefore
I
see
up
opportunity
for
two
holes.
So
once
again,
look
on
the
back.
B
B
Okay,
just
about
like
that,
we
can
do
two
or
three
holes.
I.
Think
two
will
probably
be
good
enough.
So
let's
try,
let's
try
two
and
now
be
it
would
kind
of
be
possibly
will
be
good.
I'm
gonna
actually
do
three,
so
we
get
triple
solo
here,
one
through
so
these
ones
once
again
have
to
have
two
holes
and
I'm
gonna
do
one
on
the
edge
here
for
grab
one
of
these.
So
that's
the
drill
through
that.
B
And
here
you
wanna
when
you're
holding
this
since
now
you
have
the
cable
ties
down
there.
I
kind
of
have
to
make
sure
you're
pressing
against
the
wood.
Still
otherwise
you're
gonna
be
cracking
things,
so
it's
actually
getting
a
little
challenging
here,
in
which
case
maybe
I
go
like
this
or
somehow
oh
yeah,
like
that
that
works
all
the
holes
are
exposed.
It's
can
somebody
hold
it.
B
N
AA
B
B
T
Z
AA
AA
B
B
B
B
Is
now
you're
gonna
this
works,
however.
Now
the
power
wires
have
to
go
around
further
to
here.
Well,
just
a
little
more
distance.
Further,
that's
something!
That's
not
too
bad
I
think
the
wires
will
still
fit
they'll
still
fit.
Otherwise
these
terminals
will
be
here,
so
you
got
just
a
little
closer
distance.
Just
leave
it,
but
but
I
would
I
would
suggest.
Do
it
the
other
way,
the
wires
on
top
you
got
to
go
into
there,
so
that
still
fits
that's.
H
B
Yeah
and
the
next
step
after
that,
let's
tin
these
wires
and
put
them
into
actually
stick
them
in
there.
So
we're
gonna
go
as
soon
as
you've
got
that
router
station
tin
it
slip
it
in
these
are
stranded,
so
they're
gonna,
pray
well,
I
think
they
already
might
be.
They
look
like
they're
ten.
Let's
see
what
happens
if
you
just
get
them
in
so
yeah
I
think
we
can
just
put
them
yeah.
Let's
just
try
to
try
to
put
them
right
in
with
a
little
screwdriver.
B
B
So
I'm
gonna
believe
that
that's
true
there's
a
positive
sign
on
the
white
wire.
Can
you
see
it
there's
a
tiny
little
positive
on
that
right
hand
side
there,
and
that's
that's
next
to
the
this
positive
on
the
right
hand
side.
So
this
positive
wire,
which
is
on
the
right
hand,
side
here,
goes
on
the
right
hand,
side
here
so
I'm,
just
gonna.
B
The
last
step
is
the
screen.
Take
out
the
screen.
Note
that
the
screen
has
an
SD
card
on
the
left
hand
side,
so
you
need
to
leave
enough
room
between
whatever
you
have
on
them
on
here.
So
don't
put
it
right
next
to
the
MOSFET,
put
it
as
far
back
as
convenient,
but
don't
cover
the
hole
on
the
edge,
so
here
you're
going
to
be
sticking
your
SD
card
in
and
out,
and
is
that
gonna
be
too
high
up?
Well,
if
you
look
at
this
small
printer.
B
It
goes
underneath
so
that
will
just
fit
it's
easier
to
fit
on
the
larger
machines,
because
they're
taller
so
get
this
down
as
far
as
possible
towards
the
the
power
supply
in
fact,
get
it
all
the
way
down
to
it,
because
that's
no
clear
the
axis
the
most
easily
so
the
poles
in
the
box.
Once
you
have
that
two
holes
in
the
back
I
think
that's
all
we
can
do.
Then,
as
d
card
reader
rides
over
the
top,
we
can
only
mark
those
two
holes
that
are
there
and
we
can
pinch
that
down.