►
From YouTube: OSE Dev Team Meeting - Sep 12, 2017
Description
See notes at http://opensourceecology.org/wiki/Development_Team_Log - or directly at http://opensourceecology.org/wiki/Development_Team_Log#Tue_Sep_12.2C_2017
---
What you see here at Open Source Ecology is an ambitious program based on a volunteer effort. To help us reach the goals - please consider joining as an OSE Developer in 2017-
http://opensourceecology.org/wiki/OSE_Developers
Take a minute to subscribe to our email newsletter (updates, workshops, etc): http://bit.ly/1LtcM44
A
Okay,
welcome
everybody
to
the
Tuesday
September
12
meeting
of
the
development
team.
So
the
working
document
is
in
the
chat
box.
You
can
go
to
the
OSC
devlog
page
on
the
wiki
called
development
team
log.
You
want
to
give
the
history
of
all
the
meetings
you
can:
click
on
September,
12
and
access
the
document.
Okay.
A
So
where
are
we?
This
is
these?
Are
our
numbers
here
of
development
hours
and
everything
so
we're
hovering
about
200
hours
per
week
about
11
or
12
people
logging
time?
So
please,
of
course,
log
your
time
using
the
new
timesheet
and
some
product
demos.
For
today,
let's,
let's
talk
about
I
mean
the
main
focus
right
now
is
getting
doing
good
job
on
the
tractor,
and
it's
actually
coming
along
quite
well
here.
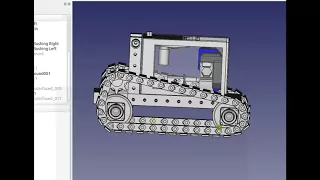
So
if
you
look
at
slide
4,
this
is
the
current
state
of
where
we
are
now
I.
A
A
So
slide
four
is
a
static
shot
as
far
as
what
would
need
to
happen,
let's
dive
right
into
that.
As
far
as
what
well
the
tractor
looks
like
so
we
see
the
tracks,
I
mean
it's
not
it's
a
it's
a
good
model
right
now,
I
mean
it's
not
technically
accurate
and
in
places
as
in
some
things,
don't
line
up
like
just
to
mention
some
things
like,
for
example,
if
you
look
at
the
motor,
the
mounting
plate
is
not
correct.
The
motor
motor
is
up
a
little
bit.
A
That's
because
if
the
sprocket
needs
to
clear
this
bottom
bottom
idler
so
have
to
raise
it
up
a
bit.
The
tracks
are
done
using
the
path
array.
I
did
a
little
video
on
that.
If
you
go
to
OSC,
YouTube
I'll
put
a
link
in
there
and
go
to
the
YouTube
one
at
some
of
the
latest
videos
I
put
a
video
about
how
to
use
the
path
array
to
make
tracks
that
works
really
nicely.
I
thought
it
would.
A
The
tracks
would
be
a
nightmare
but
they're
quite
manageable,
with
with
the
path
array
and
you
just
using
a
line
so
basically
draw
a
line
and
then
then
use
a
little
track.
Piece
select
the
track
piece
select
the
line
and
click
click
on
the
path
or
a
tool
and
draft
workbench,
and
that's
that's
all
you
need
to
do
so.
That's
pretty
good
I
also
did
a
little
walkthrough
video
on
the
micro
track
right
here
also
on
YouTube.
A
A
A
All
right
so
I
don't
see
any
upload
on
your
log
there,
but
we
were
looking
at
the
nice
way
to
do
this
is
in
in
the
in
the
workbench.
The
sketcher,
drawing
simple
shapes
the
nice
thing
about
sketcher
is
that
you
can,
when
you
draw
a
shape,
you
can
drag
the
points
around
to
to
make
the
geometry
fit.
So
that's
good
we'll
talk
about
that,
so
the
power
cube
here.
That's
that's!
Looking
good
thanks,
Roberto,
that's
that's!
Looking
quite
nice,
the
frame
is
20
inches.
A
The
power
cube
is
20
inches,
so
so
this
is
very
nice
in
compact.
It's
it's
about
42
inches
right
now.
It's
43
inches
currently
as
far
as
the
width
of
the
tractor,
and
we
want
to
get
it
to
42.
These
are
10
inch
tracks
too
quite
wide.
We
can
make
them
like
9
or
8
even
and
it
would
still
be
quite
acceptable-
maybe
make
them
9
so
that
we
still
clear
the
sides
here.
Yeah,
probably
they're,
10
inches
right
now
probably
want
to
make
them
like
9
inches.
A
So
we
can
cut
those
out
some
of
the
details
here.
You
see
that
the
tracks
are
not
lined
up
on
idlers.
The
idlers
need
to
be
stretched
out
a
little
bit.
The
shaft
that's
looking
good
there.
That's
a
solid
connected
shaft
instead
was
filled
in
there
there's
a
little
piece
there.
So
if
these
are
the
holders,
so
these
bushings
are
supposed
to
go
inside
them.
The
tubing,
if
they're
the
the
bushing
for
the
shaft,
the
shaft
is
what's
gonna
actually
span
across.
A
So
the
shaft
will
go
all
the
way
across
to
hold
the
hole,
the
loader
arms
it
will
connect
the
two
verticals
such
that
there's
stiffness
there.
It
will
be
a
very
nice
tight
connection,
probably
put
collars
for
the
shaft
like
in
between
here,
so
the
shaft
can't
slide
one
way
or
the
other.
There
will
be
a
convenient
place.
Put
the
collars
inside
so
that
outside
you've
got
the
loader
arms
hanging
on
the
shaft.
Now,
where
would
two
missing
pieces?
Where
do
the
loader
cylinders
then
go
right
now?
The
geometry
at
the
back
is
tight.
A
It's
possibly
you
can
mount
them
somewhere
here,
but
that's
close
to
the
tracks.
Probably
the
easiest
thing
to
do
is
see
if
we
can
do
a
geometry
where
we've
got
the
loader
arms
mounted
so
put
some
kind
of
a
structure.
Here,
we've
got
some
access
here
to
some
structure
to
some
of
the
frame.
So
if
we
build
this
up
here
go
over
the
tracks
because
the
tracks
are
low
in
the
front.
A
If
we
go
over
the
tracks
that
we
can
mount
the
cylinder
about
here,
somewhere
somewhere
here
mounted
somewhere
in
the
front
so
that
the
fixed
end
of
the
cylinder
somewhere
here
and
then
the
cylinders
going
up
somehow
like
up
vertically
somehow
to
get
the
best
geometry
for
the
loader
arms.
It's
not
optimal.
Typically,
a
cylinders
mounted
towards
the
back,
but
the
cylinders
are
plenty
strong,
so
we
can
play
with
getting
a
cylinder,
maybe
mounted
at
the
front
the
way
the
geometry
is.
A
A
A
Just
about
6
inches
under
the
shaft,
so
14,
plus
20,
that
sounds
like
about
34.
That
34
is
pretty
pretty
close
to
accurate.
Actually,
let's
get
another
see
if
I
can
get
any
better
measurement
here
to
the
bottom
of
the
plate.
We
got
28
and
there's
probably
like
about
for
about
32
height.
We
are
at
right
now,
I
mean
it's
really
excellent,
very
low
and.
A
Quite
good,
what
else
is
missing?
The
missing
is
the
idler.
If
you
put
on
the
tracks,
you
need
to
tension
them
right
now.
What
we
can
do
is
probably
I
was
I
was
thinking
about
two
ways.
One
is
I
mean
we
can
definitely
do
some
kind
of
an
idler
here
where
we
put
a
shaft
through
the
middle
of
the
frame
or
under
the
frame,
probably
the
middle
of
the
through
the
right
through
the
frame
so
that
it's
not
getting
in
the
way
of
the
tracks
at
all.
A
So
the
tracks
would
never
end
up
rubbing
against
it,
but
do
a
shaft
through
here
put
one
of
the
idlers,
the
smaller
ones.
These
are
10
to
the
12
inch
idlers.
You
can
say
10
and
10
inch
column
10
inch.
Do
the
8
inch
idlers,
the
smaller
ones
that
we
also
had
from
the
previous
build
and
make
it
rotate
such
that
you
can
lift
this
idler
kind
of
up
and
push
up
against
the
track,
so
they
will
push
up.
A
That's
one
way:
that's
a
bunch
of
parts,
more
idlers,
more
more
bearings,
more
shafts,
which
made
me
think
about
like.
Is
there
some
way
that
we
can
put
these
two
motors
I
mean
why
not
maybe
mount
the
two
motors
in
such
a
fashion
that
the
whole
motor
assembly
once
that
one
and
the
other
on
the
other
side,
which
is
not
shown
right
now
we're
showing
only
one
motor,
but
what
if
we
could
so,
let's
view
it
an
orthographic
view
here.
A
What
if
we
just
somehow
put
an
assembly
here
where
I
don't
know,
maybe
mount
the
motors
on
some
kind
of
a
plate
against
the
the
verticals
here
such
that
a
bolt
could
simply
lift
up
that
entire
assembly
and
move
the
tracks
up
now.
That
would
be
the
easiest.
So
that
means
that
you
lower
the
sprocket
all
the
way
down
you
put
on
your
track
and
you
have
enough
looseness,
so
you
can
actually
get
the
pin
in
because
the
way
you
do
it,
it's
like
a
chain
on
a
bicycle.
A
You
take
out
a
pin
and
then
connect
the
track
through
the
one
of
any
one
of
the
pins
I
mean
these
are
all
pins.
1-Inch
pins
with
the
washer
on
them,
take
out
the
pin
and
put
on
the
track,
and
then
you
have
to
tension
it,
and
you
see
here,
the
sprocket
is
sticking
up
a
little
bit
too
high.
We
need
to
probably
raise
the
tracks
just
a
little
bit
to
be
a
little
more
accurate,
but
you
also
see
that
the
spacing
between
the
tracks
is
just
a
little
too
big
here.
A
A
Basically
the
whole
complex
assembly
underneath
the
tractor.
It
would
really
be
nice
to
leave
all
this
alone.
I
mean
that's
under
the
tractor.
You
know
not
super
easily
accessible,
I'm.
Thinking
about
like
super
easy
access,
looks
like
the
tensioning
of
the
motors
would
best
be
done
through
the
back
here
now.
That's
where
the
little
stand
for
the
operator
would
also
be.
A
This
is
a
ride
behind
tractor
have
a
little
platform
for
the
operator,
but
it
would
be
very
convenient
and
accessible
to
have
a
tensioning
mechanism
right
in
the
back,
so
I
think
we
could
probably
think
about
something
like
that
means
a
plate.
We
can
do
as
simple
as
a
plate,
that's
here
and
and
some
kind
of
a
tensioning
bolt.
That's
just
sticking
up
on
top
here.
That's
actually
quite
quite
a
doable.
A
If
we
have
these
arms
here
vertically,
like
this
they're,
a
good
attachment
flat
attachment
surface
so
here
this
kind
of
opened
up
here
is
a
very
convenient
attachment
point
for
some
kind
of
a
plate
that
could
slide
up
and
down
to
tension.
The
motors
up
and
down
so
I'm
kind
of
leaning
towards
that
right
now,
simply
because
that
is
very
accessible
as
opposed
to
having
to
work
under
the
tractor,
like
you
know,
mounting
under
the
tractor
or
poking
a
hole
through
this
one
of
these
beams
here.
That
is
an
attractive
proposition.
A
A
Sighs
take
some
images
here,
so
if
you've
got
a
loader,
you've
got
some
kind
of
a
mechanism
where
you
can
attach
implements.
So
this
would
be,
like
you
know,
say,
take
this
one.
That
would
be
that
looks
like
a
bobcat
standard,
that's
a
bobcat,
and
what
it
has
is
these
arm
these
little
fingers
here
that
you
put
the
implement
upon
them,
they're
an
inclined
thing:
you
put
the
implement
across
this,
and
then
you
have
this
lever
here
that
pokes
this
bolt
down
through
a
hole
in
a
bottom
part
of
the
implement.
A
A
We
did
some
work
before
we
actually
so
this
is
like
you
can
look
at
this
here,
exploring
the
geometry-
or
we
actually
drew
this
up
and
in
an
Libre
CAD
before,
like
we've,
got
the
full
technical
specs
here.
So
you
can.
You
can
take
a
look
at
that,
and
this
is
this
is
what
we
did
actually
on
life
track,
6
this
kind
of
a
mechanism.
A
So
it's
it's
well-documented.
This
was
a
thing
in
Sketchup,
so
we
did
this
thing
which
got
your
incline
here
and
then
this
vault
was
was
here
and
that's
it.
So
you
got
to
do
be
pretty
precise
on
that
and
because
the
geometry
is
quite
specific,
but
that's
already
developed.
We
want
to
do
this,
this
more
or
less
worked
decently,
but
it's
kind
of
like
the
goddess
2
point
thing:
it's
not
good!
Those
things
can
bend
under
heavy
weight,
even
though
that's
half-inch
steel.
A
Linked
to
the
working
document,
so
next
steps,
loader
arms,
curls,
cylinder
and,
of
course,
the
cylinders
they're
the
quick
attach
and
then
curl
cylinder.
We
might
want
to
discuss
that
just
a
little
bit
just
for
role
allocation
here.
So
let's
do
that,
but
I'll
go
through
some
of
the
other
items.
So
if
you
want
to
take
a
look
at
the
YouTube,
we
got
a
nice
two
minute,
promo
video
on
the
3d
printer
workshop.
A
We
need
some
registrations
for
that.
The
event
is
occurring
on
October
30
and
the
second
day
of
that
we're
still
doing
the
filament
maker,
so
I'm
still
printing
parts
right
now
and
sourcing.
All
of
that,
we
can
take
a
look
at
this
video.
It's
a
nice
video,
just
a
two-minute
short
on
the
event
Thank
You
Dixon!
That's
that
so
the
footage
was
taken
at
the
October
12
event
here
and
then
next
I
just
posted.
If
you
look
at
this
workshop
here,
if
you
look
at
that
link,
I
posted
the
experimental
CNC
torch
build.
A
A
14
15
Saturday
Sunday
and
we're
gonna.
Take
it
this
time
around
gonna
change
the
workshop
format
a
little
bit
to
be
more
Design
Build.
So
this
is
definitely
a
design
build
workshop
where
the
first
day
we're
gonna,
spend
half
the
day
on
free
cat
and
manipulating
the
design
and
actually
getting
people
trained
up
in
the
free
cat
skill.
A
So
everything
from
modifying
the
parts
to
extracting
fabrication,
drawings
and
primarily
fabrication,
drawings
and
and
modifying
parts
and
freecad,
so
that
anyone
can
understand
our
files
and
work
with
them
effectively
and
then
throw
in
that
design
component
so
that
when
we
build
that
day,
people
kind
of
work
off
the
various
fabrication,
drawings
and
details
that
we
can
generate
in
the
first
half
of
that
day.
So
that
should
be
pretty
good
it'll
be
kind
of
a
hands-on,
the
free
CAD,
which
is
somewhat
first
time
for
the
level
of
intensity
on
the
free
CAD.
A
We're
actually
training
people
actively
on
it.
That's
that's
pretty
good,
and
this
infographic
is
an
old
one
from
a
few
years
ago,
but
it's
still
quite
relevant,
except
we've
got
the
universal
axis
right
now.
Instead
of
instead
of
doing
this
kind
of
rail
system,
mm-hmm
I've
also
talked
to
some
people
about
actually
to
some
experts
on
unbelt
drive
like
gt2
belts,
which
have
half
a
thousandth
or
about
ten
micron
positioning
accuracy
and
by
multiplying
them
up
by
by
doing
like
two
inches
wide
of
belt,
either
2
or
4
inches
wide
of
belt
on
an
axis.
A
The
universal
axis,
with
very
thick
rods
like
2
inch
rods,
we're
aiming
for
1/2,
a
thousandth
of
accuracy
for
heavy-duty
CNC
machining.
When
you
say
heavy-duty,
we
mean
a
machine
that
can
have
at
least
200
pounds
of
working
strength
per
tool.
Drive
so
say
you
got
a
CNC
mill
milling
bit
or
a
lathe
bit.
You
can
punch
that
into
the
workpiece
with
say,
like
200
pounds
or
100
kilos
of
force
for
heavy
duty,
machining
I
think
we
can
end
up.
I
mean
nobody
in
the
world.
Does
belt
drive
for
heavy-duty
machines.
A
The
industry
standard
is
ball,
screws
all
metal,
but
in
our
case
I
think
we
can
actually
do
the
belts.
I
did
some
initial
calculations
using
belt
stretch
and
so
forth
and
and
just
back
of
envelope.
Calculations
do
indicate
that
it's
possible
to
make
a
workable
machine
and
we
may
have
to
go
slower
on
the
feed
rate.
Now.
A
Is
that
acceptable?
If
we
talk
about
decentralized
production,
we're
not
talking
about
maximum
throughput
of
say,
like
a
hundred
parts
or
you
know
a
hundred
parts
a
day,
maybe
whatever
that
is
say,
we
are
decreased
in
our
feed
rates
or
speed
of
machining,
even
like
10
fold.
Well,
if
you've
got
a
community
scale,
shop,
you're
interested
in
say
maybe
one-off
production,
you
want
one
per
day.
That's
our
current
business
model.
We
produce
one
of
something
per
day
and
I.
Think
in
that.
In
that
sense,
the
the
belt
drive
could
work.
A
Even
if
you
have
slower
feed
rates,
you
can
still
produce
something
you
just
let
the
Machine
go
overnight,
like
a
3d
printer
doing
its
machining
slowly.
Well,
you
don't
have
to
worry
about
it
because
you
reduce
the
feed
rates
if
the
belt
dry
allows
us
to
do
not
the
maximum
performance.
Like
an
industry
which
is
gonna,
be
the
case.
The
belt
is
not
gonna.
Get
you
that
much,
but
the
question
is:
is
it
acceptable?
A
Is
it
workable
and
I
think
the
answer
is
yes
from
initial
calculations,
so
we've
got
the
CNC
torture
experimental
workshop
in
October.
Looking
at
November
like
mid
November,
do
an
experimental,
heavy-duty
CNC
machine
workshop
I've
already
done.
You
know.
I've
got
a
little
bit
of
experience
like
the
heavy-duty
drill
press.
If
you,
google,
that
we've
already
built
hydraulic
drill
presses
here
that
could
drill
like
hat
one
inch
holes.
Have
you
do
the
drill
press
oscy,
you
can
see
a
video.
A
A
Linked
on
a
document
to
the
drill
press,
this
was
that's
the
that's
from
old
times
ago,
but
the
thing
is
it's:
we
can
build
these
larger
heavy-duty
machines
as
well.
We've
done
the
drill
press,
we
did
a
lathe
prototype,
so
we
know
it
works
and
we
know
how
to
do
the
structure
now.
We're
gonna
add
the
CNC
to
that,
but
this
time
around
use
both
hydraulics
hydraulic
for
the
heavy
duty
motor
that
actually
does
the
milling
or
laving,
and
then
stepper
motors
for
the
drive
on
the
axis
so
and
once
again,
using
the
same
technique.
A
Gt2
belt
is
what
we
use
in
the
3d
printer,
make
it
fatter
and
wider
and
multiply
it
and
you've
got
heavy-duty
drive.
The
breaking
strength
of
gt2
belt
is
800
pounds
for
one
inch
of
belt,
so
you
can
safely
operate
say
maybe
like
25%
of
that
so
200
pounds
per
inch
of
belt
so
that
the
numbers
look
good.
Actually
so
say
you
got
2
belts
or
2
inches,
that's
400,
pounds
of
working
strength
or
or
if
you
quadruple
the
belts
like
Accord
quadruple
axis,
which
we
can
possibly
do
for
heavy-duty
800
pounds
of
working
force.
A
That's
not
peak
force,
that's
working
force,
that's
excellent
I
mean
so.
The
initial
indication
is
that
we
can
do
a
belt
driven
heavy-duty
machining
using
the
same
universal
access.
Okay,
next,
so
next
topics,
it's
moving
right
on
Roberto
is
moving
forward
on
other
ways
to
ask
them
about
exploded.
Part
drawings
like
when
we
have
a
complete
machine
done,
like
the
brick
press
and
into
your
product
manual.
What
you
want
to
do
is
an
overall
huge
explosion,
drawing
with
every
every
single
part
down
to
every
single
bolt.
A
So
that's
gonna
be
a
lot
of
parts
like
for
the
brick
press.
That's
probably
like
300.
If
you
include
all
the
bolts
here,
it's
quite
manageable
for
say
that
this
is
the
ruler
for
filament.
Making.
This
actually
doesn't
show
all
the
parts.
Even
it's.
It's
missing
the
power
supplies
and
everything
underneath,
but
you
see
how
many
different
parts
there.
So
this
is
doing
a
different
workflow
within
freecad.
This
is
not
Roberto's
language,
agnostic,
instructional
script
or
the
isometric
extraction
macro.
This
is
another
route
which
maybe
Roberto
you
want
to
pipe
in
on
your
latest.
A
C
B
B
B
C
A
Okay,
so
zooming
in
so
a
little
a
little
bit
of
manipulation.
It's,
which
means
just
a
little
bit
more
work,
and
maybe
I,
don't
know
if
we
can
go
into
the
code
and
see
if
we
could
clean
it
up
just
like
we
that
can
be
done
through
some
programming,
because
I
don't
know
we
might
have
to
get
at
the
code.
I
mean
it
will
be
less
convenient.
If
we
have
to
do
multiple
screen
shots,
it
will
add
to
the
work.
A
A
A
A
A
It
makes
sense
because
the
power
cube
is
such
a
distinct
unit.
We
can
keep
that
as
one
part,
but
then
we
have
to
have
another
file
which,
where
we
can
simply
have
the
power
cube
all
exploded
in
in
another
shot.
So
maybe
we
have
for
the
manual
for
the
tractor.
We
would
have
one
explosion
for
the
tractor
and
another
explosion
for
the
the
power
cube.
I,
think
that
would
make
sense,
since
it's
such
a
clear
division,
such
a
clear
module,
I,
think
that
would
be
pretty
good.
What
do
you
think
yeah?
A
A
Thank
you,
okay,
mmm-hmm
and
then
so.
Maybe
last
one
one
more
item
as
the
gasifier
itself,
so
I
talked
to
Troy
Mart's
who'd,
built
gasifiers
before
he
quit
that,
but
we
are
still
planning
on
a
gasifier
for
the
the
workshop.
The
tractor
workshop,
which
is
at
the
end
of
October
October
27th
through
the
29,
so
we
did
a
simple
gasifier
last
time.
We're
gonna
do
a
little
smaller
version
with
a
better
so-called
carburetor,
better
air
inlet
valve,
but
you
can
click
on
the
gasifier
link
to
see
the
notes
that
we
have
so
far.
A
I
mentioned
about
the
link
of
3d
printing
to
gasifiers.
If
you
print
in
ceramics
ceramics
are
high
temperature
materials
that
you
can
actually
end
up,
3d,
printing,
so
basically
print
in
clay
clay,
paste
that
you
then
fire,
then
you
can
3d
print
the
heart,
the
the
core
of
the
gasifier,
which
has
got
this
gasifier
here.
Has
it's
basically
a
charcoal
burner,
put
charcoal
inside
of
it,
but
there's
a
very
high
temperature
flame
inside
there
that
generates
the
carbon
monoxide
fuel
for
the
engine
from
hydrogen
from
sorry
it's.
A
What
is
it
carbon
carbon
is
charcoal
charcoal.
Is
the
fuel
it
burns
partially
inside
the
chamber
to
release
the
the
gases
that
the
engine
then
burns,
but
it's
a
very
high
temperature.
So
it's
useful
to
do.
3D
printing,
therefore
high-temperature
ceramic,
which
is
another
link
in
the
product
ecology
of
of
osc,
okay,
feel
free
also
to
put
any
questions
and
comments.
How's
it
how's
everything
going
in
an
OSC
is
oh
I,
haven't
gotten
a
chance
to
to
actually
play
with
the
new
version.
I
need
to
do
that.
I'll.
A
D
B
E
E
E
C
E
A
B
C
E
E
The
Freak
app
folder,
all
right
so
yeah,
obviously
atom,
and
maybe
the
element
is
not
up
to
date,
but
actually
this
is
kind
of
recommended
here.
So
it's
the
first
one
I
use
I
can
also
do
the
other
thing.
Maybe
it's
actually
that
your
version
it's
a
bit
more
current
and
the
one
that's
using
the
add-on
manager
that
was
possible.
Oh.
E
E
E
So,
okay,
maybe
maybe
you
can
you
can
look
it
into
it
as
well?
Maybe
you
could
install
it
by
a
uninstalled,
the
one.
That's
that's
there
at
the
moment.
It's
installed
your
way
and
look
whether
it
looks
different
or
I
can
do
that
as
well,
because,
like
I
said
I,
don't
know
how
it
should
look
to
you
that
that's
my
problem,
otherwise
I
will
try
to
make
it
I.
F
E
E
F
E
G
G
E
I'll,
do
that,
of
course,
but
maybe
a
little
sip
pilot
is
pretty
good
at
this
I
think
so
when,
when
you
don't
know
how
to
how
to
edit
just
start,
the
downloaded
take
the
link
from
where
to
style.
Note
it
so
in
your
download
manager,
control
J
in
Chrome
and
paste
it
in
there.
So
then
it
kind
of
it
kind
of
resembles
the
download.
G
G
That
helps
if
you
can
control
the
speed
and
stuff
too,
but
mostly
my
connection
just
varies
here
and
I
know:
there's
probably
a
few
people
at
that
issue,
but
yeah
I
didn't
test.
Oh
SELinux
previous
version
extensively
either
other
than
just
checking
the
stuff
in
there
loads.
It
looked
like
in
the
new
newest
version
that
you're
getting
a
lot
of
the
icons
and
the
unity
bar
set
up
and
more
the
the
customizations
in
though
yeah.
E
Yeah
exactly
so,
there's
the
customization.
There
are
this
all
on
a
bunch
of
software.
That
was
a
bit
corrected.
For
example,
the
Arduino
was
the
wrong
version,
suggest
just
a
bit
of
adjustment,
and
the
main
issue
remains.
The
driver
problems
and
I
am
bit
at
a
loss
because
I
don't
know
what
to
do,
because
it
works
planned
for
me
and
what.
G
E
E
Yeah,
it's
not
the
doctor.
You
meant
that
that's
what
I
mean
it's
something
I
want
to
put
up
right
after
that
I'm
using
a
gift,
a
project
called
composer.
It's
basically
corn
pie,
that's
compiled
into
that
file,
it's
pretty
small
and
it's
actually
not
everything's
working
I
actually
had
to
rewrite
a
little
bit
of
the
Python
code.
That's
why
I'm
a
bit
afraid
of
putting
that
down
into
a
documentation,
because
this
is
getting
a
bit
well,
it
looks
kind
of
weird
how
how
I
did
it,
but
thanks
and
it.
G
E
E
That's
that's
creative
and
inside
that
user
file
directory,
there's,
there's
the
file
system
and
everything
and
it's
pretty
convenient,
so
you
can
clean
it
up
and
provide
it
another
ISO
and
stuff
like
that,
and
it
Browns
everything
up
by
itself.
So
it's
quite
more
easy.
Like
like
I
said
there
was
just
a
little
talk:
I
had
to
resolve
it
by
changing
like
five
lines.
E
E
It's
actually
nothing
of
the
of
the
Linux
distribution
itself.
I
can
show
you
actually
how
it
is
packaging,
the
the
filesystem
back,
because
that
part
of
the
script
was
what
I
was
modifying,
but
it's
also
where
you
can
see
what
is
happening
when
I
was
taking
out
was
actually
it
couldn't
it
couldn't
find
out
what
kind
of
kernel
it
was
using.
So
I
just
put
in
use
the
default
kernel
and
that's
actually
64
bits.
So
it's
it's
the
just
a
normal
stuff
right.
E
So
not
nothing
weird
happening
there
before
that
he
couldn't
quite
find
it
and
therefore
he
tried
to
get
install
a
file
that
was
there
because
the
carwash
was
wrong
or
was
just
empty
or
something
like
that
so
I
had
just
put
that
out,
but
shouldn't
it
shouldn't
actually
destroy
anything
in
there.
In
the
Linux
version,
like
I
said,
my
internet
is
working,
fine
I,
don't
know
what
happened
on
your
side.
However,
what
I
wanted
to
ask?
You
is
so
of
DNS
era.
There's
always
one
thing:
that's
interesting
in
beds.
E
G
G
E
G
E
So
that's
that's
actually
pretty
weird
because,
like
I
said
it's
working
for
me,
so
it
and
as
the
hardware
is
connected
correctly
as
configure
rather
yeah,
strange,
yeah,
I,
actually
think
e
and
s
summer
is
not
provided
by
your
Linux
normally,
but
most
of
the
time
it's
provided
by
your
router.
So
that's
actually
something
on
that.
Yeah
and
also
the
information
is,
if
you
have
to
do
rather,
basically,
the
router
can
send
you
every
internet
page
so
yeah.
If.
G
E
E
G
E
E
G
Think
they
they
include
it
as
an
option
on
some
other.
Well,
probably,
since
there
were
CDs,
of
course,
I
think
the
whole
fruits
of
that
whole
ISO.
All
that
stuff
is
kind
of
an
extra
thing.
It's
left
over
from
the
area
of
Arab
CDs,
which
we're
not
use
it
anymore.
So
it's
all
kind
of
a
lot
of
extra
stuff
really
but
I
assume
that's
what
the
CRC
check
was
included
on
the
menu,
because
you're
likely
to
get
more
airs
on
a
CD
or
something
like
that.
Yeah
count.
How
to
that
is
right.
Yeah.
E
E
E
I
A
I
C
I
I
A
I
I
A
E
I
I
B
I
A
I
I
A
I
A
H
I
B
E
What
what
you're
trying
to
expose
it's
part
out
of
colors
right,
yeah
I'm,
not
quite
sure
whether
this
disposal
of
the
obj,
because
I,
probably
the
algorithms
behind
that-
is
pretty
long,
I'm,
not
quite
sure,
because
I
don't
know
how
just
that
works.
But
maybe
you
could
kind
of
make
a
little
macro.
That's
actually
creating
a
second
file,
a
little
file,
that's
just
providing
for
each
object,
the
color
kind
of
an
array
and
then
array
together
with
that
you
could
them
put
them
together,
load
both
up
and
or
merge
them
into
a
known
file.
E
E
I
E
A
The
answer
is,
of
course,
because
I
mean
WebGL
is
gonna,
be
its
own
animal,
whereas
the
simple
black
and
white
that
would
go
into
into
product
manuals,
so
different
formats
for
different
things.
The
product
manual
is
a
printed
copy
like
say
you
even
print
it
out
and
give
it
to
a
fabricator.
They
want
to
have
this
simple
black
and
white
drawing
so
because
you
can't
have
that
on
paper,
but
then
on
electronic
media
you
would
have
the
full-blown
WebGL
and
then,
of
course,
in
in
augmented
reality
media.
You
would
have,
you
know,
different
equipment.
E
E
A
Yeah
one
thing
at
a
time:
I'd
say:
yeah,
yeah,
yeah
yeah,
definitely
I
mean
we
want
to,
at
the
end
of
the
day,
have
freecad
like
really
upscale
its
capabilities.
Now
Michelle
right
now,
we've
got
so:
we've
got
Steven
working
on
the
3d
printer
Construction,
Set
workbench
and
a
free
can
and
you
can
actually.
I
I
A
Well,
you
don't
have
to
miss
it
because
you
go
to
Steven
log
and
he
actually
has
his
new
workbench
on
there
already
so
yeah,
but
it
doesn't
do
anything.
It's
just
good.
He
just
programmed
it's.
It's
called
example
workbench
and
you
can
click
on
the
icon
for
the
frame
and
it
inputs
an
object
into
the
viewing
window.
So
that's
you
know
prototype
one
so
now
he's
able
to
click
on
an
icon
and
get
things
to
appear
in
the
window.
A
So
that's
where
we're
at
with
that.
But
that's
a
great
start.
We're
programming,
free
cat
already
so
he's
gonna
report
out
on
on
this,
probably
next
week
to
the
team.
So
we
look
forward
to
that,
but
yeah
we
got
to
basically
keep
going
with
that.
Just
keep
keep
working
with
freak
out
if
I
mean
anyone
knows
Python
and
they
could
start
getting
involved
in
that
so
and
that's
something
we'd
down
the
road
I
asked
Steven
also
to
teach
us
some
Python
in
the
Python
environment,
probably
in
brackets,
if
that's
acceptable,
just
do.
I
A
Yeah
yeah
very
good,
so
this
is
excellent
so
anyway,
to
continue
on
a
meeting
here.
So
so,
let's
just
wrap
up
a
couple
of
things.
So
we've
got
a
bunch
of
people
on
on
this
meeting,
but
if
there's
any
roles
to
be
divvied
out
so
definitely
Josh
is
working
on
the
quick
attach
so
I'm
gonna
put
some
names
here.
Well,
actually,
I
mean
we're
supposed
to
be
using
our.
A
D
D
D
A
D
A
A
A
A
Does
anyone
want
to
take
a
stab
at
doing
an
initial
geometry
for
them
for
the
quick
attach
plate
so
basically
transferring
the
stuff
we
have
from
the
in
a
link
to
the
bobcat
standard
and
make
appling
plate
like
that?
But
not
I?
Wouldn't
do
the
I
mean
a
problem
with
what
we
did
last
year?
Was
it
wasn't?
You
kinda
need
a
connector
plate
between
the
two
things,
otherwise
the
geometry
can
miss
a
line.
If
it's
bolted
into
the
front
anyway,
we
need
a.
We
need,
somebody
to
design
something
that
makes
sense.
A
A
A
B
A
G
G
A
Let's
take
a
look
at
this,
so
please
go
back
to
slide
number
with
a
tractor
slide
number
eight
there's
I'm
just
starting
now
we
can
start
working
out
some
of
the
details
like
there's
a
bunch
of
details
missing.
So,
let's
start
covering
them
so
Bobcats
standard,
I'm
gonna
do
that
okay,
narrow
down
the
tracks
to
nine
inch,
we've
got
them
at
and
that's
actually
pretty
quick.
A
So
once
you
take
the
take
the
individual
track
unit
and
keep
track
of
the
individual
track
unit
uploaded
over
the
old
track
unit
in
a
part
library,
the
part
library
being
oh
yeah,
so
the
second
part
is
anyone
who
wants
to
do
accounting
stuff.
We
need
to
move
up,
move
the
part
library
over
from
the
osc
part
library
to
the
tractor
page.
So
move
and
refine
part
library
move
part
library
from
OSC
part
library
to
tractor
construction
set
2017
page.
G
A
Let's,
let's
talk
about
the
part
library
just
for
a
second
here,
just
to
explain
how
it
works,
so
the
general
part
library,
I
think
will
be.
Will
we
be
good
there?
So
if
we
go
to
part
library,
it's
got
all
the
other
part.
Libraries
like,
for
example,
the
first
one
is
the
filament
part
library.
The
second
one
is
the
d3d
sadhika
home
power
cube.
So
it
basically
goes
project
by
project.
So
it's
a
link
to
the
other
part
library.
A
So
let's
make
this
an
index
to
the
individual
projects
and
not
put
the
individual
parts
for
the
machines,
so
that
I'm
eight
I
mean
because
this
page
is
gonna,
get
pretty
long
and
then
today,
let's
put
all
the
tractors
stuff
on
the
tractor
library
so
that
people
will
know
it.
Okay,
this
is
the
tractor
in
the
Micro
track,
go
to
those
respective
libraries
and
use
this
as
a
master
index
pretty
much.
So
let's
do
that.
Does
that
make
sense,
Abe.
G
A
G
G
A
G
A
Say
I
would
say
so:
a
fastener
library
for
OSC,
which
we
download
I,
mean
there's
gonna,
be
lots
of
different
ones,
lots
of
different
bolts,
but
then
very
specific
ones
that
we
use
often
and
we're
trying
to
actually
reduce
that
set
like
for
the
tractor
like
for
the
heavy
machines
we're
just
trying
to
stick
to
one
inch
bolts,
you
know
forget
about
like
3/4.
Just
do
like
make
everything
one
inch,
keep
it
simple,
but
things
like
that,
just
to
keep
things
nice
most
general.
G
A
A
And
that's
actually
a
good
way
to
go
and
then,
in
terms
of
making
these
libraries,
because
then
we
can
cool
off
everything
from
that
library
like
whenever
we
were
working
on
hydraulics,
we
go
there
as
our
first
stop.
So
it
is
useful
and
then
PVC
library
like,
for
example,
in
a
CD
Cajon
I
mean
there's.
Plumbing
and
plumbing,
is
typically
PVC
or
pipe
pipe
fittings
library
and
then
there's
just
standard
metal
pipe
fittings.
A
So
those
are
things
that
are
immediately
very
useful
metal
pipe
PVC
pipe
I
mean
there's
construction
materials,
which
already
is
actually
we
can
put
a
link
to
construction
materials
because
the
official
freecad
library
has
some
construction
materials
in
there-
maybe
not
so
many,
but
has
some
and
I
know
we
want
to
generate
that
for
the
CD
go
home
because
we
use
standard,
like
you
know,
two
by
six
lumber,
two-by-four
lumber
whatever
so
so.
Some
of
the
construction
materials
like,
for
example,
metal
roofing,
is
already,
for
example,
in
the
official
record
library.
A
That's
you
can
find
on
github
yeah
and
it
would
be
useful
to
assign
some
people
to
basically
like
have
Stewart
to
these
different
libraries.
So
you
know,
as
we
get
people
stabilized
with
the
project,
you
know
some
people
can
maintain
those
different
libraries.
We
need
maintainer
z'
for
all
of
these
items
here.
So
abel
are
gonna,
continue.
Signing
you
here,
I'm
gonna
sign
the
tracks
to
you.
Abe.
G
A
We've
got
a
couple
of
people
applying
German.
He
just
emailed
me
saying:
he's
got
to
cut
out
four
month
and
actually
Joseph
said
he's
he's
got
really
busy
with
stuff
and
he
can't
continue
on
the
team.
So
we
got
two
people
leaving
for
now.
As
far
as
new
people,
we
we
had
salaam
and
german,
but
we
don't
really
have
new
people
until
there's
like
three
people
in
the
pipeline
that
are
applying
right
now,
so
we'll
see
if
we
can
maybe
assign
it
will
be
nice
to
kind
of
on
board
people
with
a
decent
program.
A
A
B
G
A
We
just
need
to
extend
that
plate.
That's
there.
We
just
need
to
change
the
play
okay
and
that
will
depend
on
the
yeah
assume
that
the
motor
is
pretty
correct,
but
that
plate
simply
needs
to
be
extended
up.
It
just
needs
to
be
taller,
that's
it.
So
we
got
to
go
to
the
underlying
sketch
and
work
from
there,
but
yeah.
It's
just
an
extension
of
that
not
a
big
deal,
but
also
it
so.
There's
that
extend
the
plate,
there's
add
the
bolts
to
mount
the
motor
to
the
plate.
A
Will
bolt
holes
plus
bolts,
two
motor
plate
plus
a
motor
those
bolts
bolt
holes
are
not
in
there
if
that's
in
the
underlying
sketch,
then
that
could
be
changed
readily.
So
that's
good,
but
I,
guess
that
you
know
the
effectiveness
in
doing
this
relies
on
being
effective
at
finding
all
the
parts,
so
the
workflow
once
again
is
go
to
the
we
got
to
create
the
part
library,
but
then
just
you
know,
take
the
plate
go
to
the
original
source
file.
Just
delete
the
plate
here,
so
so
here's
the
plate
delete.
A
So
that's
the
preferred
workflow
it's
it
helps,
so
you
don't
have
to
when
you
import
it,
you
don't
have
to
move
it
around
it's
already
there,
and
that
would
be
very
useful
to
do
so.
Try
to
do
that
whenever
possible
and
import,
then
you
think
so.
The
effectiveness
lies
in
getting
rid
of
parts
uploading,
well,
saving
them
in
a
positional,
correct
position,
modifying
them
merging
them.
So
there
will
be
a
very
simple
basic
workflow.
A
Okay,
just
a
couple
more
notes
here:
clamp
like
the
clamps
link.
Look
at
the
clamps.
Those
clamps
need
to
go
underneath
the
tractor
right
now,
there's
nothing
preventing
the
shaft
from
moving
back
and
forth,
so
those
clamps
would
go
underneath
next
to
the
plate,
so
the
clamps
would
clamp
around
the
shaft
here
and
be
right
next
to
the
plate,
so
the
clamp
is
stiff
and
nothing
is
moving.
This
axle
here
is
not
rotating
the
the
bearings
are:
what
rotates
the
idler
rotates.
The
shaft
is
solid
and
the
fixed.
A
So--That's
clamps
power,
cubes
suction,
hose
power
outlet
to
the
Quick
Connect,
coupler
and
I
drew
that
up
where's
my
what
would
happen
there.
It's
right
there.
No
this
one
right
here,
look
at
that!
This
piece
see
that
quick
coupler
that
goes
into
the
outlet
of
the
pump
where's,
the
outlet
of
the
pump.
The
outlet
of
the
pump
is
right.
B
A
A
A
What's
holding
that
idler
from
shifting
on
a
shaft
here,
there's
two
set
screws
in
the
idler
collar
there.
Those
just
need.
We
want
to
add
those
to
make
sure
that
here
that
looks
transparent
to
me.
I'm
gonna
make
it
appearance,
get
rid
of
the
transparency
okay.
So
in
this
collar
right
there
that
part
that
part
right
there
there's
two
set
screws
in
there
that
poke
into
the
shaft.
So
this
this
bearing
does
not
slide
on
the
shaft
and
then
the
four
bolts
in
this
idler
they
need
to
have
bolts
in
them.
A
A
A
Add
bolts
to
idler
plates
right,
that's
what
I
just
mentioned.
So
that's
that's
some
of
the
details,
so
we
got
to
continue
working
on
this.
Whoever
gets
to
that
first,
please
do
it.
If
you
don't
have
a
task
please
take
on
one
of
these
and
the
other
tasks
for
anyone
who
is
truly
unemployed
would
be
to
now
in
the
November
workshop
way.
A
It
was
it
I
know:
October
27th
through
the
29,
we're
gonna
build
this
thing,
I'm
gonna
prototype
that
here
we've
got
the
power
cube
and
we've
got
the
tracks
and
pieces
here
that
we
can
start
prototyping,
but
at
the
event,
we're
gonna
build
a
basically
two
of
these
units
and
the
wider
units.
Gonna
have
two
power
cubes
next
to
one
another.
So
we're
gonna
make
a
wide
base
version
of
this.
A
So
for
that
we
need
a
wide
platform
which
is
40
inches,
and
then
we
can
talk
about
how
we
connect
the
front
piece
to
the
back,
which
means
that
the
operator
is
no
longer
gonna,
be
riding
on
the
back.
They're
actually
gonna
sit
in
a
cab,
so
we're
gonna
have
to
provide
enough
room
for
both
the
power
cube.
A
So,
let's,
let's
just
take
a
look
at
that
real
quick.
So
in
a
wide
version
of
the
tractor,
we're
gonna
expand
the
width
twice,
but
also
probably
put
room
extend
to
the
front
such
that
we
can
put
an
operator
cab
in
there
where
the
operator
actually
sits
and
not
on
top
cuz.
That
would
make
this
thing
already
too
tall
I
want
to
keep
it
low
to
the
ground,
say,
low
and
safe.
So
we
widen
this.
We
can
still
use
the
same
tracks
absolutely
identical.
A
These
shafts
are
three
inch
shafts
they're
over
built
to
easily
hold
like,
like
ten
tons
of
weight,
easily
the
tracks
right
now,
here,
they're
shown
in
I,
think
3/8
inch
or
1/2
inch
1/2
inches
of
what
we
actually
used
in
the
machine.
That's
super
overbuilt,
so
you
can
make
a
very
heavy-duty
machine
out
of
this.
The
current
length
right
there
is
half
an
inch
for
the
track,
as
you
see
there,
but
that's
way
over
built
and
this
machine
right
here.
A
A
We
should
actually
take
a
look
at
what
the
specs
for
the
Toro
dingo
on
the
wheel
drive
are,
but
here
we
have
7000
without
any
gear
down,
because
the
motors
are
very
strong
and
if
we
double
this
up,
we're
gonna
have
14,000
pounds.
So
that's
some
decent
bulldozing
capacity.
So
we
widen
this
twice,
put
a
cab
on
the
front
of
it
and
then
attach
do
a
connection
between
the
front
and
back
sections
to
do.
The
two-piece
articulated
steering
version
where
cylinders
are
gonna,
steer
the
back
and
front
piece.
A
A
A
Now
80
is
a
little
under
seven
feet,
so
seven
feet
width,
that's
pretty
good.
I
mean
8.
Foot
wide
is
what
you
want
to
keep
your
machine
to,
but
we're
still
under
8
feet.
So
I
would
make
this
even
like,
possibly
60
inches.
We
can
kind
of
have
to
play
with
that
to
see.
What's
what
makes
most
sense,
but
right
now,
I
would
migrate
from
this
version
here
to
a
version
that
60
inches
wide,
where
you
can
even
put
three
power
cubes.
So
maybe
the
solution
is
it's
it's
eighty
inch,
the
sixty
inches
wide.
A
We
put
three
power,
cubes
say
on
the
back
piece
and
one
power
cube
on
the
front
so
that
the
cab
can
fit
easily
on
the
front,
and
maybe
this
power
cube
here
is
side
to
side
so
that
the
cab
has
more
space.
If
you
guys
follow
what
I'm
saying
here,
but
basically
the
geometry
needs
to
be
such
that
we
can
easily
fit
a
cab
and
the
geometry
is
nice
to
workable
and
easy
access
for
the
operator
and
so
forth.
A
So
it
would
make
a
case
for
sixty
inch,
wide
platform
and
possibly
like
three
power
cubes
and
one
and
one
power
cube
on
the
other
side.
Something
like
that
to
make
it
easy
to
fit,
or
maybe
even
like
the
front
hall
front-
is
just
a
cab
and
all
the
back
is
all
the
power
cubes
for
power
cubes.
So
we
can
play
with
different
configurations,
but
right
now
I
would
go
for
if
we
go
to
the
main,
let's
actually
do
a
new
slide
for
the
big
tractor.
A
Sixty
inch
wide
and
how
long?
Well,
if
we
consider
twenty
inches
like
say
we
make
this
side-to-side,
it's
20
inches
wide,
we
want
say,
like
I,
would
call
out
for
about
three
feet
for
the
operator
like
one
meter.
So
like
thirty
six,
let's
call
it
even
call
it
forty
inches,
plus
twenty
inches
of
sixty
inches.
So
it's
exactly
five
feet
so
five
feet
long.
A
If
we're
talking
in
feet
here,
so
actually
it
makes
it
60
inches
wide
and
60
inches
long,
let's,
let's
start
with
that
as
a
workable
thing
and
see
how
the
geometries
all
fit
for
the
next
tractor.
So
once
again,
the
geometry
here
would
be:
you've
got
one
tractor
piece
in
the
front,
another
tractor
piece
in
the
back
and
then
they're
connected
and
with
hydraulic
cylinders,
to
do
steering
articulations
steering
back
and
forth
side
to
side.
Rather
then,
the
tracks,
of
course,
are
here
on
the
sides.
A
So
a
machine
that
looks
like
this
and
we're
doing
tracks
tracks
are
really
good.
We
can
then
modify
this
in
the
future.
Four-Wheel
drive
because,
because
literally
wheels
can
be
attached
just
like
the
tracks
can
be
attached.
If
you
replace
this
with
a
wheel,
you've
got
a
a
wheel
drive,
and
that
would
be
quite
interesting
because
the
same
identical
drive
system
could
drive
the
wheel.
You
can
drive
that
wheel
through
the
chain,
so
you
have
just
like
here.
A
You've
got
the
sprocket
and
then
you
can
have
a
wheel
with
a
chain
with
another
sprocket
on
that
wheel.
So
you
actually
drive
that
wheel,
but
that's
one
way
to
do
it:
to
use
the
identical
geometry
once
again
for
like
multi-purpose
craziness
that
we
typically
do
here.
That
would
be
an
option
and
if
you
have
a
chain
drive,
the
Train
Drive
allows
you
to
do
various
gear
downs
depending
on
the
size
of
the
wheel
and
size
of
the
sprockets.
A
You
can
have
different
gear
down
or
gear
up
for
slower,
faster
motion,
so
I
think
I'll
quit
right
here.
So
anyone
who
doesn't
have
anything
please
select
one
of
the
tasks.
I,
don't
know
if
I
missed
anyone.
Let
me
see
just
going
real
quick
through
so
Abe
has
got
some
Roberto's
busy
on
instructional
Christians
doing
the
Christian
you
busy
on
ISO
stuff.
E
F
B
A
A
Yeah,
it
looks
like
we're
pretty
much
allocated
so
people.
Please
continue
we'll
work
on
on
the
tractor
now
I'm
gonna,
just
post
that
announcement
right
up
on
this
Saturday
so
we'll
see
if
we
can
get
this
looking
more
complete
with
the
loader
arms
and
a
quick
attach
and
have
a
nice
relatively
decent,
looking
machine
that
we
can
put
into
the
advertisement
for
the
workshop
itself
and
right
now
it
stands
as
it
would
definitely
want
to
do
the
so.
A
The
tractor
is
small
and
big
version,
the
gasifier
on
the
back
of
this
or
on
the
front
small
gasifier
for
running
on
charcoal
which
we've
done
before,
and
the
computer
vision.
If
we
can
get
that
from
Salaam,
so
we'll
see
what
can
happen,
but
the
idea
is
focus
on
the
tractor:
do
all
the
documentation
around
that
keep
evolving
the
the
workflows
to
make
it
more
efficient?
A
This
is
a
blog
post,
but
basically
there's
this
like
the
toys,
these
toys
from
the
Far
East
there
they
have
these
language
agnostic
instructions
that
are
a
little
different
than
what
we
do,
but
they're
kind
of
nice,
they're,
they're
kind
of
like
exploded,
part
part
diagrams,
but
they're
a
little
more
than
that.
They
kind
of
show
you
a
little
more
information.
So
take
a
look
at
that,
but
that's
something
we
probably
want
to
do
for
the
tractor
and
probably
add
that
to
our
skill
set
of
documentation.
A
A
A
B
A
Yep,
so
do
that
okay,
everybody,
so
it
was
a
long
meeting.
Let's,
let's
continue
going
for
this
week.
Let's
just
continue
interacting
on
the
on
where
we
are
with
the
CAD.
If
you
guys
want
to
check
in
on
a
Saturday
like
I'll,
be
around
like
noontime
to
1,
so
we
can
do
a
quick
check-in
where
we
are
with
a
CAD
they'll,
be
useful
and
that
evening
I'm
gonna
aim
to
publish
whatever
we
have
on
the
CAD.
Do
some
maybe
do
some
nice
renderings
so
that
we
have
an
attractive
announcement
for
people.
A
I
think
this
is
very
exciting.
I
think
a
lot
of
people
are
excited
about
the
tractor
and
at
least
for
us
it's
very
practical.
It's
we're
gonna
be
using
that
here
and
hopefully,
there's
gonna
be
replications
coming
about
so,
let's
check
in
on
for
anyone
who
wants
to
on
Saturday
for
the
little
office
hours
where
we
kind
of
go
over
where
we
are
on
the
the
CAD
and
maybe
wrap
up
any
loose
ends
on
that
and
get
ready
for
publishing
this
event
to
event
bright
into
our
website
and
they'll.