►
From YouTube: OSE Working Team Meeting - Feb 27, 2017
Description
See Critical Path for Distributive Enterprise 3D Printer - D3D - and related documents:
1. http://opensourceecology.org/wiki/D3D
2. meeting log - http://opensourceecology.org/wiki/D3D_Meeting_Log
3. Developmnet Team Numbers - http://opensourceecology.org/wiki/Dev_Team_Numbers
4. Design Integration - http://opensourceecology.org/wiki/D3D_Integration
5. Extruder - http://opensourceecology.org/wiki/D3D_Extruder
6. Frame - http://opensourceecology.org/wiki/D3D_Frame
7. Controller - http://opensourceecology.org/wiki/D3D_Controller
Take a minute to subscribe to our email newsletter (updates, workshops, etc): http://bit.ly/1LtcM44
A
Here
so
we
can
share
with
the
rest
of
the
world
what
we're
doing
it
open
starts
to
ecology
with
a
core
development
team.
So
here
we
go.
First
thing
is
so
last
week
just
to
review
what
we've
been
doing.
Last
week
we
talked
about
the
process
of
how
we
collaborate
and
the
idea
is
to
build
a
team
and
that's
a
challenge
so
we're
just
basically
starting,
but
here
look
at
that.
Let
me
share
my
screen
here
and
show
you
where
we
are
with
numbers.
A
A
As
far
as
the
OSC
stats
here,
this
is
the
some
keeping
a
spreadsheet,
but
also
look
at
this
development
hours
from
the
first
day
was
about
15
hours.
Second,
the
second
week
it
was
about
24
hours,
the
dropped
last
week,
but
that
drop
is
not
a
drop,
its
I.
Don't
think
people
have
been
logging.
So
here's
an
invitation-
and
please
take
a
second
right-
now
go
to
the
what's.
It
called
its
called
volunteer
hours.
Timesheet
go
to
timesheet,
put
in
your
hours
from
last
week,
so
so
I'm.
A
Not
this
is
real
data
right,
so
I'm
not
putting
any
fake
numbers
this.
What
happens
on
this
spreadsheet
here
and
this
graph
is
what's
recorded
on
the
spreadsheet,
so
everyone
has
to
log
that
helps
us
get
data
and
basically
how
far
we're
growing
and
how
how
everything
is
moving
along,
because
essentially,
if
you
can't
measure
it,
you
can't
improve
it.
A
Indispensable,
if
you
want
to
talk
about
a
rigorous
program,
I
mean
as
the
ambitions
are
to
develop
a
replicable
method
of
how
people
can
develop
products.
We
have
to
back
it
up
with
some
data.
So
please
take
a
second
right
now
to
put
in
your
your
data
from
last
week.
I
put
that
in
hey
Richard
yeah.
A
A
A
A
Because
we
want
to
get
clear
information
on
how
the
development
team
itself
is
doing
as
opposed
to
like
okay,
there's
all
kinds
of
work
happening,
but
won't
be
very
specific
on
what
what's
happening
exactly
with
the
development
team.
So
we
can
scale
that
effort
for
the
future.
So
that
does
require
that
point
here.
That
does
require
diligent
and
logging
hours.
Okay,.
A
A
No
I
did
not
like,
for
example,
I
worked
about
10-15
hours
on
the
actual
free
printer
work,
but
a
lot
of
other
stuff
I
worked
around
HR
other
things
so,
but
I
think
for
the
development
team.
I
think
we
actually
might
want
to
simplify
this,
the
spreadsheet
to
say:
I,
don't
know
because
it
kind
of
gets
its
going
to
graph
it
and
actually
maintain
it
properly.
I
think
we
should
keep
it
super
simple
I
would
say
we
revisit
that
yeah.
A
Yeah
I'll
edit
that
because
what
we
want
to
do
is
in
one
simple,
yeah,
I'm
going
to
edit
this
and
say
so.
First,
your
name
was
the
main
task
project
you
worked
on,
so
you
can
put
your
hours,
but
then
no
I
will
say
how
many
hours
total
did
you
work
because
it's
going
to
get
kind
of
confusing
like
we
use
as
far
as
the
capacity
we
have
right
now?
What
how
many
total
hours
did
you
work.
A
A
Yeah
I
mean
that's
still
relevant.
We
worked
on
the
3d
printer.
You
can
be
specific,
like,
for
example,
the
frame
or
whatever,
but
then
how
much
time
did
you
spend
in
total
and
then
the
second
question
which
we
don't
necessarily
grab?
So
the
second
question
is
going
to
capture
all
the
different
hours,
but
the
third
question:
what
other
tasks
did
you
work
on
and.
A
A
So
when
we
graph
it,
we
just
grass
point
number
two,
which
is:
what's
the
total
number
of
hours
you
worked
and
then
you
can
get
specific
like
what's
you'll
break
that
down
further
into
some
details
so
which
is
which
I
don't
think
has
to
be
required.
The
second.
The
third
question
is
not
really
required,
but
the
second
question
is
the
first
question:
what
you
worked
on
required.
Your
name
that's
required,
and
the
last
task
is
basically
asked
you
to
break
things
down
into
more
detail
so
yeah.
A
A
A
A
A
Altogether,
the
success
rate
is
is
low,
which
is
a
which
is
okay,
that's
fine,
but
the
idea
is
to
get
the
numbers
of
recruits
up
and
set
up.
These
processes
like
Richard
and
I,
are
talking
about
get
a
pipeline
of
people
and
then
interviewing
them
and
then
automate
some
of
those
processes
possible.
I.
Guess
we
really
want
to
grow
the
large
numbers
we
get
as
efficient
as
we
can
on
that.
A
So
we
actually
talked
about
setting
up
a
call
center
even
to
process
applications
quickly
up
front
so
that
we
don't
have
to
do
the
work
if
it's,
if
it's
affordable
and
low
cost-
and
it
actually
gets
us
real
developers,
you
can
possibly
look
into
that,
but
right
now
we're
we're
just
developing
the
protocols
and
everything.
So
it's
about
all
on
organizational
overhead
jean-baptiste
is
another
person
who
is
applying
he
was
he
is
our
graphics
lead.
He
mentioned
that
we
should
have
a
little
kind
of
a
crash
course.
A
A
The
number
of
the
person
who
actually
like
the
number
like
number
one
Emmanuel's
number
one
here
he's
got
that
unique
distinction
there.
But
that
way
the
badge
itself
is
a
documentation
piece.
It
shows
how
many
developers
have
have
passed
through
the
system,
and
then
you
know
say
we.
You
know
we're
on
one
thousand,
you
know
thousand
developers
who
who
came
through
the
program
and
then
we
can
compare
that
to
how
many
are
current
and
active,
and
that
tells
you
retention
rates,
how
many
people
are
sticking
around
versus
popping
in
and
then
coming
out.
A
So
so
that's
once
again
good
statistics.
Now
the
other
statistic
that
I'm
going
to
keep
track
of
is,
if
you
go
to
the
wiki,
there's
actually
number.
If
you
go
to
the
wiki
anywhere
there's
special
pages
and
on
special
pages,
you
have
current
wiki
editors.
So
if
you
go
down
to
that
list,
actually
active
users
list,
so
I'm
logging
that
as
well
but
basically
I
counted
like
so.
A
This
is
people
who
have
done
edits
within
the
last
30
days
and
tells
you
how
many
edits
so
2
4
6
8,
10,
12,
14,
16
18,
okay,
so
we
got
18
people
last
week
it
was
16.
So
now
we've
got
18,
so
called
active
contributors
to
the
wiki,
and
the
numbers
vary
anywhere
from
one
edit
in
the
last
30
days
to
1081
edits
by
myself.
Here,
I
live
on
a
wiki
pretty
much
last
next.
One
down
from
there
is
the
manual
with
93
here
so
he's
quite
active.
A
Richard
has
been
quite
active
with
30
or
James
wives,
with
24
edits
and
so
forth,
so
James
wives,
dork
mo,
for
example,
that's
people
who
are
just
contributing
at
an
ad
hoc
fashion
and
there's
some
of
them
names.
We
recognize
put
immitis,
that's
Emanuel,
Richard
white
people
from
the
14
who
are
recognized
as
active
ose
developers
as
far
as
the
OC
badge
and
as
well
as
a
welcome
letter.
A
So
I
owe
you
guys
that
a
welcome
letter
which
basically
provides
all
the
critical
information
like
how
to
have
a
lot
of
your
hours,
how
to
use
the
witty
and
so
forth.
Just
basically
a
welcome
message,
including
your
CAD
badge,
where
one
thing
I
forgot
to
mention
this.
This
badge
will
also
have
some
data,
like,
for
example,
put
stars.
A
star
will
represent
every
90
day,
iteration
cycle
that
a
person
completes
successfully
and
for
successful
completion.
A
You
have
to
meet
your
requirement
of
development
for
I
would
say,
but
you
can
miss
pretty
much
like
two
meetings
that
to
be
in
good
standing,
meaning
that
you,
you
know
every
just
about
every
week.
You've
contributed
if
it's
more
than
like
two
or
so
that
you're
missing
meetings
and
continuity
is
not
happening.
A
We
might
not
give
you
the
star,
but
basically
a
high
grade
for
the
fact
that
you
have
been
active
and
that
you
can
continuing
an
active
and
inactive
fashion
as
opposed
to
coming
in.
Maybe
you
know
showing
up
for
six
meetings
and
then
failing
to
show
for
the
next
six
I
mean
that
wouldn't
cut
it
for
the
star
and
we're
hoping
that
people
get
multiple
stars,
meaning
that
they
continue
through
the
90
development
cycles
as
much
as
possible
as
much
as
they
can
and
last
thing
about.
A
This
badge
also
is
on
the
score
which,
in
this
round
text
here,
we
can
put
some
some
other
text
and
this
badge
is
actually
editable.
So
we
have
that
in
in
in
inkscape,
I
believe
or
inkscape
I
I
forget,
I.
Think
it's
a
no
it's!
No
thanks.
That's
a
vector,
vector
graphics,
but
upon
being
accepted,
you
can
actually
edit
your
badge
put
it
all
your
values,
11
value
you
put
in
there
is
actually
your
score
on
the
free
cat
exam.
A
So
so
far,
we've
had
scores
from
like
about
seventy
to
a
hundred
or
70,
no
more
like
yeah
something
but
but
basically
passing
grade.
As
you
get
I
mean
we
kind
of
have
to
refine
a
specific
number,
but
I
mean.
Obviously,
if
you,
if
you
upload
the
video
and
do
the
whole
exercise,
that's
that's
pretty
much
considered
passing,
but
if
you
miss
some
of
the
steps
it
might
might
not
be
a
hundred
might
be
90
or
80
or
whatever,
because
there's
a
number
of
steps
in
there.
A
So
we
want
to
have
people
great,
and
so
it's
a
little
bit
of
gamification
that
you
can
say:
okay,
I'm
number
one
I
get
a
hundred
and
I'm
and
so
forth.
So
you
can
kind
of
brag
about
your
brat
badge
to
two
people
add,
and
it
is
this
badge
itself
does
have
significant,
meaning
in
a
sense
that
the
exercise
itself
it's
it's
non-trivial,
it's
I
mean
once
you
know
how
to
do
those
basic
things
in
freecad
I
mean
you're
you're,
pretty
I
mean
you
can
do
a
lot
of
tasks.
A
C
Makes
the
minute
that's
nice
to
know
the
wiki
I
went
through
that
whole
list
of
recruiting
sites
and
just
kind
of
some
are
actually
like,
volunteer
posting
boards
and
then
some
are,
and
some
are
just
sort
of
like
references
to
other
volunteer
sites
summer
for
nonprofits.
But
only
you
can
only
post
like
paid
positions
require
subscription
like
a
require
payment
to
pose
so
I,
just
kind
of
weeded
out
the
ones
that
are
useful
than
one
set.
Our.
D
C
A
C
A
We
posted
HR
human
resources
generalist
on
several
websites.
Now
we're
going
to
do
the
posting
specifically
asking
for
Allah,
see
developers,
which
is
good,
and
one
thing
to
point
out.
I
emailed
the
entire
group
of
design
sprinters
and
from
that
list
one
person
only
has
responded
in
any
way
so
out
of
about
400
people
would
basically
what
that.
What
does
that
mean?
I
mean
we're
asking
for
a
pretty
significant
commitment
on
a
lse
dev
team
with
the
10
hours
per
week.
A
But
that
means
that
a
lot
of
people
who
were
on
a
design
Sprint's,
which
are
the
ad
hoc
kind
of
like
you,
put
in
a
few
hours
every
week.
People
kind
of
didn't
want
to
upgrade
from
that
to
the
more
deep
commitment.
Well,
that's,
okay,
but
it
shows
that
there's
definite
different
markets
of
people,
so-called
people
who
do
have
the
time,
people
who
kind
of
just
come
in
and
out
a
little
bit.
But
it's
clear
that
if
we
focus
on
other
people
who
can
make
a
significant
commitment,
of
course,
that
would
get
you
more
results.
A
But
it's
harder
to
get,
as
you
see
like,
like
not
a
single
person
from
the
design.
Sprint's
list
is
yet
on
the
official
development
team
right
now,
though,
that
probably
will
change
in
the
future,
so
yeah
just
know
yeah,
so
we're
posting
the
OC
developer
announcement
and
start
making
noise
and
as
we
get
the
printer
ready
for
prime
time,
we
can
do
much
better.
So,
let's,
let's
get
right
to
the
printer.
Let's
show
you
something
here.
So
I
do
have
the
frames.
So
those
are
the
frames.
A
A
So
we
go
to
to
hear
the
d3d
is
the
main
development
page
on
a
3d
printer.
So
let
me
zoom
out
there,
but
if
you
look
at
the
dates,
we're
at
the
last
week's
fabric
on
the
controller
I
think
we
got
quite
a
bit
of
it
done
like
the
designers,
I
mean
I.
Think
it's
a
decent
and
Cedric
worked
on.
That
with
me.
Here
is
some
of
the
some
of
the
product
there,
so
that
and
I'll
go
over
that
a
little
bit
more.
A
But
that's
looking
reasonably
well,
but
to
get
a
bigger
overview
of
that
februari,
27
controller
and
electronics
software.
We
didn't
work
on
a
software
wiring.
We
did
work
on
that
quite
a
bit,
so
the
next
next
thing
in
line
is
februari.
27
I
have
the
heated
bed,
but
what
I
would
say
is
right
here
at
home.
What
I
will
do
is
put
together.
The
frame
I've
got
the
electronics
things
like
I've
got
the
ranch,
but
but
I
think
we
want
to
go
with.
We
were
looking
at
the
oil.
A
You
were
called
the
Rambo
board,
but
that's
since
that's
like
80
or
120
bucks
I
think
we
go
with
a
cheap.
You
know
twenty
dollar
ramps,
which
then
every
one
of
us
can
prototype
and
still
we
can
kind
of
design
a
general
design,
a
general
tso's,
all
our
wiring,
which
is
actually
a
big
deal
in
this
whole
thing:
how
to
make
it
simplify
the
wiring
I
think
we
can
coordinate
between
Rambo
compatibility,
ramps,
compatibility
and
then
our
own
controller,
but
for
now,
because
ramps
is
widely
available,
we
can
just
roll
forward
with
that.
A
April
22nd
is
the
event,
which
means
that
all
the
publicity
has
to
be
out
pretty
much
a
month
before
that
meaning
March
20,
which
is
that
Monday
by
that
Monday
pretty
much.
We
have
to
have
the
PR
already
out,
which
means
that
we
have
februari
27
march
six
march
13.
Those
are
all
mondays,
those
weeks
to
work
on
if
we
want
to
succeed
for
april
twenty
seconds.
A
Okay,
here's
the
thing:
here's
how
it
works,
here's
the
beauty
of
it-
and
I
think
the
main
thing
we
have
to
pitch
here-
is
the
modularity
concept
about
the
one
is
the
universal
access
and
to
some
of
the
magnetic
attachments
which
allow
you
to
modify
this
structure
very
easily,
including
the
wiring
which
is
very,
very
much
turkey.
So,
let's
go
into
the
wiring
a
little
bit,
but
before
we
go
there,
I
want
to
just
check
in
what's
the
status
Emmanuel
on
the
frame
itself
there.
How
far
did
we
get
on
that?
A
Let's
see
so
what's
the
latest,
so
we've
got
fixed
hola
update
a
universal
carriage
side.
Okay,
so
definitely
there's
a
bunch
of
work.
That's
happened.
We've
got
a
lot
of
the
individual
component
of
the
idea.
Was
there
let's
look
at
this.
This
is
the
complete
frame
here.
If
we
download
that
you
can
even
down
okay,
let
me
share
my
screen
what
I'm
doing,
but
it's
on
the
manuals
log,
if
you
go
to
if
I
share
my
screen
here,
that's
his
log,
I'm
downloading
the
free
Cadfael
here
and
I'm
going
to
open
that.
A
But
that's
that's
the
manuals
log
and
what
I'm
seeing
here
is
the
top
frame
is
coming
together.
There's
parts
like
the
universal
carriages
and
so
forth,
left
axis,
but
yes,
I'm,
seeing
the
axis
elements
are
in
progress,
but
the
complete
free
cat
is
not
done
yet.
But
let's,
let's
see,
for
example,
if
we
cut
the
frame
here,
if
we
double
click
on
that,
let's
see
what
comes
up
okay,
so
frames
in
progress
and
I
know.
Can
you
fill
us
in
on
the
latest?
A
A
C
B
A
B
A
Okay,
so
here's
what
I
keep
I
can
tell
you
what
I
do
know
the
proper
workflow
for
free
cat
should
be
that,
just
as
we're
doing
right
now
we
are
making
individual
parts
and
then
putting
them
into
one
file
right,
but
whether
you're
making
okay
so
listen
to
this.
So
what
are
you
making
the
parts
or
the
complete
file?
The
thing
that
does
work
well,
at
least
on
my
version-
is
that
you
can
snap
two
corners
and
kind
of
like
we
did
with
a
cube
building
a
cube
exercise.
B
Algorithm
that
show
second
today,
if
you
put
more
two
identical
strange
Philip
Sousa,
so,
for
example,
if
you
go
to
put
a
motor
on
on
the
axis
you
can
you
have
to
put
two
constraints
on
okay,
you
know
the
name
and
run
on
the
Holy.
You
cannot
Susan
show
right
now.
The
current
development
of
chicken
tikka
work
with
a
solution.
E
A
So
so
that
yeah,
so
what
we're
hearing
is
because
the
assembly
is
not
in
good
enough
shape,
you
can't
properly
constraint
things
and
actually
expect
it
to
work
and
yeah,
seeing
that
there's
bugs
in
it,
but
the
only
thing
you
can
do
is
don't
constrain
it.
You
just
put
those
things
together,
yeah
so
that
they
fit
that's
it
yeah
bye,
yeah.
So
that's
that's
kind
of
an
issue,
but
if
you,
if
you
go
to
the
what
happened,
what
works?
Well,
is
you
go
to
X,
Y
or
Z?
A
You
know
like
whichever
plane
and
then
you
can
align
things.
So
you
know
it's
on
a
face,
or
you
know
it's
on
a
corner
and
stuff
like
that,
so
yeah
it
might
take
longer,
but
it's
acceptable
as
a
workflow.
If,
if
there's
actually
people,
you
know
if
you
have
been
enough
bodies
to
do
it
and
we
split
the
task
into
into
many
pieces,
it
does
work
well
to
then
put
them
all
together
into
a
final
assembly
at
the
end
of
the
day.
A
A
He
logged
in
as
four
hours
last
week,
so
I'm
not
sure,
but
as
far
as
that,
so
what
we
were
trying
to
do
is
the
module
d3d
integration.
What
we
were
trying
to
do
basically
for
everyone's
references,
create
the
frame
and
everything
is
made
up.
We
kind
of
broke
it
down
into
about
13
parts
and
we
had
people
collaborating
on
them,
but
maybe
you
know
maybe
what
would
be
useful
right
now.
A
B
A
A
Yep,
you
know
that
page.
So
can
we
get
you
maybe
to
help
out
since
where
we
need
the
cat,
I
mean
the
cat
is
an
important
asset,
one
for
design
and
two
for
the
publicity,
because
once
we
get
the
full
cat,
we
can
animate
it
and
render
it
and
stuff
like
that.
So
can
you
oh
right,
go
running
mate
I
mean
you
could
do
blender,
there's
a
so
within
freecad.
A
You
have
exploded,
part
animations,
but
in
order
to
do
an
improper
animations
like
renderings,
you
can
export
that
to
blender,
but
the
very
useful
thing
is
and
I
don't
personally
know
how
to
do
this.
Yet
as
far
as
the
exploded
part
animations,
but
that's
a
there's-
a
workbench
exploded
part
animations
workbench
that
works
well
with
in
free
cat
right
now.
So
that's
there'll
be
a
useful
thing,
but
the
first
thing
is
to
generate
the
entire
file.
A
A
Well,
if
those
are
yeah
I,
don't
know
how
it
works,
but
as
long
as
we
keep
the
individual
files
for
everything
that
we
can
probably
rework
it
to
to
make
it
work
and
I
and
as
you
see
we're
exploring
that
we
haven't
done
that
yet
so
we
don't
have
that
workflow
down
yet,
but
we'll
see
when
we
get
to
it.
So
in
the
meantime,
so
the
manuals.
So
do
you
think
subject
couldn't
help
out
on
that?
Can
you
guys
work
together.
A
A
A
C
A
D
A
A
A
F
B
A
A
A
A
This
extruder
won't
do
it.
Ok,
we're
going
to
upgrade
down
and
so
forth,
but
for
now
let's
do
the
simplest,
lowest
hanging
fruit
and
as
far
as
the
heated
bed
we
haven't
talked
about
which
sheeted
bed
to
source,
but
we
want
the
current
concept
is
get
at
the
aluminum
heated
bed
so
that
the
probe
the
high
probe
can
detect
the
bed
so
select
the
go
online
and
search
for
the
aluminum
heated
bed.
It's
got
the
aluminum
surface
and
the
heater
built
into
it
already.
So,
in
fact,
do
you
remember?
The
posting
on
proofs
are
cloned.
A
D
B
A
Those
yeah
you
take
a
look
at
this
link
here,
yeah,
so
it's
in
yeah
there.
It
is,
but
that
link
shows
you
all
the
parts
of
the
you
so
so
find
identify
and
source
that
part
and
from
the
data
that's
available
on
that
part.
We
have
to
draw
it
up
and
if
you
don't
know
some
specific
dimensions,
I
mean
pretty
much
it's
going
to
be
a
flat
sheet,
and
the
thing
we
have
to
consider
is:
if
it's
a
if
it's
an
aluminum
plastic
sheet,
we
have
to
mount
it
to
our
z-axis.
A
A
A
So
if
you
use
the
z-axis
you
can
you
can
put
another
one
of
our
carriage
pieces
that
are
at
a
90-degree
angle,
and
then
we
have
to
attach
the
bed
to
that
could
be
as
simple
as
a
single
hole
through
the
aluminum
bed,
but
that
aluminum
atoms
got
the
heater
on
it.
So
we
can't
do
that.
It
would
have
to
be
a
some
kind
of
a
mechanical
connection,
some
kind
of
a
clamping
or
something
so
I,
don't
know.
A
A
A
A
A
A
I
mean
it
will
be
and
won't
then,
because
it's
solid,
but
it
can
slope
yeah,
it
can't
slow,
yeah,
yeah
yeah.
If
the
bed
slope.
You
know,
however
much
it
slopes
the
Z
probe,
which
finds
the
height
of
the
bed
over
the
entire
bed.
We
will
do
something
like
a
nine-point
probing,
so
so
touch
detect
the
bed
at
nine
points
and
just
correct
the
print.
For
that.
So
that's
I
mean
that's
the
beauty
of
it.
You
don't
have
to
mess
with
a
just
put
it
on
and
it
works
now.
A
Yeah
yeah
I
mean
all
that
software
is
open
sourced.
The
probe
is
now
industry
standard
for
the
reprap
project
and
they
have
software
for
it
and
last
time
we
started
doing
that,
but
we
didn't
get
it
to
work
for
some
reason,
simply
because
we
didn't
have
enough
time,
but
now
you
have
you
know
we
have
a
week
or
two
to
get
this
to
work
and
show
beautiful
results
right
now,
so
we're
pretty
good.
A
A
A
A
Let
me
just
share
my
screen
and
show
you
I
mean
I
mean
that's
the
whole
beauty
of
this
project.
We've
got
a
universal
axis
that
does
x,
y
and
z.
So
if
you
look
at
this
here,
so
that's
how
the
3d
printer
is
going
to
look
it's
going
to
look
like
this
except
the
motors.
You
want
to
put
the
motors
at
the
back.
A
Why?
Because,
if
this
motor
is
here,
it
can,
they
can
possibly
have
a
conflict,
but
you
don't
want
to
run
wires
to
motors,
just
keep
it
at
the
back,
because
the
controller
is
going
to
be
towards
the
back.
So
no
need
to
put
the
motors
here
put
them
in
the
back
as
far
as
the
YY,
so
the
Y
is
going
into
the
page.
That
X
is
the
main
axis
with
extruder
to
Z
is
the
vertical
one?
Does
that
make
sense,
so
the
Z?
A
A
So
there's
a
little,
you
see
what
I'm
drawing
there
there's
that
carriage
piece
that
we
that's
already
at
90
degrees
to
the
to
the
yeah,
see
that
piece
there
yeah
there's
already
platform
there
and
to
that
you
have
to
attach
the
bed
and
the
bed
is
only
eight
inches
so
and
that
piece
is
two
inches,
so
it's
holding
it
two
or
three
inches.
So
it's
holding
it
like
three
inches
and
I'm
going
a
bit.
A
Its
standard
is
8
by
8
inches
and
so
look
at
the
link
of
the
you
have
to
take
a
look
at
the
link,
exact
picture.
So
it's
very
easy.
That's
the
point.
It's
I
mean
it's
really
trivial
I
mean
that's.
That's
that's
the
beauty
of
this
as
I'm
saying
it's
the
universal
system.
And
now,
if
you
have
a
larger
bed,
I
mean
you
want
to
put
on
access
on
one
side
and
the
other
side,
but
48
inches.
You
can
just
suspend
it
and
let
it
let
it
hang
off
one
side.
A
B
A
A
A
Cedric,
does
that
make
sense
what
to
do
like
d3d
x,
axis
I
mean
we're
doing
there.
Look.
There's
the
x
axis
the
y
axis.
The
y-axis
is
the
axis.
Each
axis
is
made
of
the
three
printed
pieces
and
then
there's
a
whole
bunch
of
other
pieces.
Like
you
see
on
the
universal
access
page.
The
point
is
that
we
put
all
of
those
into
individual
files
we
make.
Specifically
we
make
13
files
and
once
we
have
those
13
files,
they
should
be
sufficient
that
you
can
put
together
the
entire
printer
with
them.
A
A
A
B
A
A
Does
that
make
sense?
It's
just
this.
This
piece
is
bolted
to
that
piece.
Those
are
bolted
together.
Now
we
don't
know
how
to
connect
that
together.
I
mean
one
way
you
can
do
it
is.
You
can
put
magnets
on
the
bottom
of
each
and
yeah.
You
can
put
magnets
on
the
bottom
of
the
heated
bed
that
would
work.
I
mean
each
of
those
magnets,
so
put
all
the
magnets
here
on
this
end,
and
each
of
them
has
eight
pounds
of
pulling
force.
A
That
would
be,
but
you
have
to
glue
the
magnitude
aluminum,
because
aluminum
won't
stick
to
the
magnet.
So
you
can
do
this.
You
can
do
this
little
thing
and
put
little
magnets
underneath
that
are
glued.
So
already
you
know
that
our
axes
have
places
for
magnets.
We
use
those
magnets
there
and
then
glue
one
onto
the
bed.
There
will
be
the
simplest
way
to
do
it.
That's
the
beauty
here,
so
you
can
do
that
and
you
know,
and
accordingly
you
know
put
your
other
magnet.
You
know
whatever
you
got.
A
Does
that
make
sense,
so
whoever
is
doing
that,
but
you
know
that'll
be
those
are
just
magnets
right.
There
the
little
super
magnets
that
would
hold
it,
and
then
you
have
I
mean
that
is
really
cool,
because
it's
you
know
it's
so
modular.
You
can
modify
this
in
a
second,
so
any
questions.
So
can
you
guys
work
on
that?
Oh
but
I
mean
the
start,
would
be.
Let's
get
some
okay,
so
we're
good.
We
want
to
put
Cedric.
So
what
are
you
going
to
do?
You're
going
to
do?
A
F
B
A
F
G
A
B
A
A
B
A
A
A
A
I'm,
putting
it
right
now
so
number
redirect
I'm
redirecting
it
to
the
feedback,
there's
a
page
called
feedback
and
that's
for
all
bug,
reports
and
everything.
So
we
should.
We
should
use
that
kind
of
a
lowbrow
thing,
but
we
can
you
can
use
that
page
put
it
on
in
an
immediate
sense.
You
can
put
it
right
under
the
picture,
just
edit
and
say:
hey
those
those
washers.
There
don't
belong.
A
A
A
G
G
A
Yeah,
no,
that's
cool!
Okay!
So,
let's
see,
let's
see,
let's
just
look
at
just
finalize
this
this
page
here,
so
the
3d
extruder
only
so
basically
for
all
these
parts,
with
a
caveat
on
the
extruder
we're
not
using
the
one
from
the
prusa
original
we're
just
using
a
simple
one,
but
that
should
be
use
a
simple
one.
That's
documented
on
the
extruder
page.
C
C
A
A
D
A
A
A
B
A
A
A
A
A
B
A
D
A
But
that's
the
only
if
you
try
to
do
that
all
in
one
file,
you'd
that
workflows
takes
much
longer
time
because
it
because
it
does
it's
much
simpler
to
do
the
individual
part.
So
then
you
import
them
into
one
document.
That's
that's
the
easy
way.
Otherwise
the
files
get
hard
to
work
with
and
if
you
have
bugs
then
you're
you
can
be
losing
a
lot
of
work.
You
know,
okay,
so
here's
a
link
to
the
specific
use
that
one
I
put
it
in
the
chat
box,
but.
A
G
A
It's
the
easy,
easy
thing
to
do
now.
You
see
the
the
Prasad
original.
We
can't
do
that,
but
not
in
the
next
two
weeks.
That's
a
great
upgrade
I
think
it's
also
good
to
do
like
the
super
basic
minimum
system.
That
you
know
is
super
highly
replicable.
You
know
so
guys.
I
mean
the
for
December
I'd
like
to
have
an
event,
a
radically
large
event
where
we
build
a
hundred
printers
in
a
single
day.
A
So
so
let
me
just
wrap
up
with
the
wiring,
so
the
wiring
just
to
update
you
on
this
I'm
working
on
this,
but
you
have
to
make
the
wiring
extremely
simple
and
subject
has
worked
on
us
a
little
bit,
but
the
idea
is
we
simplify
it
radically,
instead
of
using
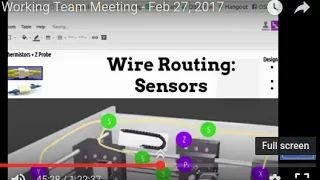
set
six
wires
for
like,
for
example,
for
all
the
sensors.
If
we
use
a
cat5
cable,
we
we
can
run
one
wire
from
the
control
for
all
the
sensors.
A
You
see
that
so
that's
what
we're
doing
there
for
like
when
you're
wiring
this
up,
you
reducing
the
wiring
time
from
minutes
2
seconds.
So
it's
going
to
take
you
30
minutes
to
do
the
wiring
for
an
hour,
will
only
take
you
just
60
30
to
60
seconds.
If
you
do
this,
because
it's
just
plug
and
play
you
use
these
couplers,
the
splitters
and
one
cat
a
wire
and
you
can
connect
six
there's
six
sensors
3n
stops
to
thermistors
and
one
height
probe.
So
that's
the
height
probe.
A
A
The
splitters
are
used
so
that
here's
the
deal
every
device
gets
a
cat5
wire.
The
wiring
goes
into
this
step
and
therefore,
when
you
make
the
connections
with
unions
or
splitters,
you
use
standard,
cat6,
cable,
cat5,
cable.
In
other
words,
the
wiring
is
already
determined
by
the
plug.
You
have
on
the
device,
so
you
have
to
wire
like,
for
example,
the
stepper
motor.
A
A
G
A
Ability
and
modularity
and
rapid
build
those
are
the
three
reasons.
Rapid
build,
scalability
modularity
is
part
of
the
rapid
build,
but
this
way
you
can
reconfigure
this
to
any
device
and
then,
if
we
go
to
the
open
source,
this
is
just
using
the
ramps
here.
But
if
we
go
to
other
machines,
you
can
you
have
absolute
plug
and
play
so
the
wires
are
plug
and
play
what
I
was
thinking
actually
mount.
A
The
splitters
on
magnets
on
the
frame
the
frame
is
metal
just
attach
them
using
magnets,
just
Google
a
magnet
to
the
splitter
and
then
attached
to
the
frame
there
you
go,
you
have
to
worry
with
out
about
any
like
cable
ties,
I
mean
wiring
six,
you
know,
would
it
take
us?
We
have
data
from
last
time,
but
I
think
the
wiring
took
us
like
an
hour
last
time.
G
A
You
include
all
the
steppers
and
the
heat
bed
and
everything
it
gets
a
little
more
complicated,
but
once
again,
relatively
simple,
like
one
wire,
goes
to
the
entire
extruder
and
it
splits
into
three
items:
extruder
the
fan
on
the
heater
and
then
the
steppers,
each
each
cat
five
carries
to
signal
for
to
power
for
two
steppers,
so
11
wire
those
two
motors
like,
for
example,
this
Y
right
here,
one
wire
splits
into
y1
and
y2.
You
know
things
like
that,
so
it's
super
simple
modular.
A
So
that's
the
deal
and
that's
why
I
I
kind
of
I'm
ready
to
build
this
basically
crimp
some
connectors
and
build
this,
because
this
is
I.
Have
all
the
parts
here
pretty
much
I've
got
I
can
pretty
much
build.
So
my
goal
is
to
build
this
completely
this
week
and
have
the
probe
up
and
running
through
the
access
probe.
I
just
need
to
get
a
heated
bed.
That's
only
part,
that's
missing,
I
can
use
them.
It
needs
a
regular
bed
platform.
That's
not
heated
right
now!
A
In
fact,
I
can
you
know
I
mean
the
absolute
minimum.
Minimum
viable
product
is
an
unheated
bed,
so
you
can
only
do
PLA
because
you
can
do
unheated
with
PLA
right,
so
we
can
do
even
that.
If
we
you
know
for
prototyping
and
by
thing
we
should
do
the
bed
right
now.
So
we
can.
You
can
do
that,
but
it
will
be
even
acceptable
without
a
heated
bed.
So
we
would
avoid
this
this
wire
here,
but
I'm
going
to
put
this
all
together.
A
So
won't
you
guys
keep
working
on
on
on
the
frame
and
see
how
far
we
can
go,
but
I
mean
that's
pretty
good,
I'm
kind
of
encouraged
by
this
and
that
yeah
very
modular,
very,
very
flexible
system.
So,
let's
see
how
it
looks
in
real
life,
and
then
this
week
put
it
together,
take
some
videos
next
week
and
get
some
publicity
out
I
think
so
this
will
be
pretty
good.
A
It'll
be
better
so
that
the
wiring
a
shorter,
if
you
put
them
in
the
back,
the
wiring
is
going
to
be
shorter
because
you
don't
have
to
carry
another
wire
to
the
front.
The
wire
is
there
and
see
this.
Why
wire
and
just
goes
to
the
back
like
say,
the
controller
is
right.
There
then
you're
just
sending
in
the
you
know:
you'll
have
to
go
up
to
the
front
and
then
all
the
way
around
into
the
chrome
yeah,
I
think
the
controller
might
be.
A
We
can
possibly
put
its
good
closest
if
you
put
it
behind
the
machine,
because
it's
closest
to
everything
not
on
the
side
but
right
at
the
back
and
attach
it
so
the
controller
we
can
I
mean
I'm
thinking,
use
the
magnets
just
glue
on
some
magnets
and
attach
the
controller
to
the
frame
like
I'm,
cooking
magnets.
For
everything
we
got
a
metal
frame.
We
should
use
it.
Nobody
has
a
metal
frame.
A
Everyone
uses
aluminum,
even
the
lowes,
about
that's,
not
magnetic,
but
we
have
this
unique
opportunity
and
it
really
works.
Well.
I
mean
the
magnets.
We've
used
those
on
a
sensors
for
the
brick
press
before
they
work
well
to
attach
things,
but
not
alone.
Magnets
are
a
good
combination
and
nobody
that
I
know
of
in
the
3d
printer
world
does
that,
because
nobody
uses
a
metal
frame,
do
they
do
these
metal
they
use
aluminum.
A
But
with
this
frame
this
10
gauge
I
mean
you
can
have
a
tractor
drive
on
top
of
it
and
we'll
hold
it.
I
mean
well
hold
thousands
of
pounds
of
10
gauge.
Once
you
put
into
the
frame
configuration
that's
going
to
hold
values
with
pounds,
it's
very
going
to
be
very
strong,
so
one
of
the
things
you
can
do
is
you
can
stack
these
things
vertically.
So
for
your
print
farm,
you
know
you're
going
to
do
a
print
farm.
You
can
just
stack
them
one
and
stack
these
printers
one
on
top
of
each
other
right.
A
A
A
A
A
B
A
Yeah,
so
actually
this
is
just
a
frame.
The
frame
sits
on
the
inside
I
mean
we
could
also
put
it
outside,
but
that
would
be
a
different.
You
know
we
can
experiment
with
that
to
get
more
area
out
of
the
same
machine,
but
you
have
to
mount
the
other
axes
differently,
like
you
can't
put
the
one
that
yy-you
can
put
it
on
the
outside,
but
then
you
have
to
attach
the
X
in
some
way.
B
A
B
A
D
A
A
A
D
A
Droid
up
as
accurately
as
you
can
like
try
to
find
the
dimensions
of
everything,
I
mean
you
can
kind
of
search
yeah
I
mean
what
you
should
do.
Is
you
should
start
by
creating
an
individual
file
for
each
piece
so
that,
if
there's
any
questions
like
it's
much,
the
workflow
works.
Well,
when
you
create
individual
file
for
each
piece,
because
then
you
modify
the
peace
without
having
to
modify
the
entire
file
and
then
yes,
and
then
you
put
them
together
into
one
file
at
the
end,
Oh.
D
A
A
A
B
B
A
That's
the
problem
right
so
and
then
it's
a
little
different
than
what
we
have
right,
because
it's
not
exactly
the
same
thing.
So
we
have
to
modify
it
like
look
at
the
back.
I
mean
the
fan
is
not
like
that
right,
so
yeah
I
mean
the
thing
is
you
kinda
have
to
you
can't
use
it
as
the
first
approximation,
but
then
we
should
get
a.
We
should
get
a
better,
more
exact
file
and
if
it's.
D
D
C
D
A
The
reason
is
that
having
a
complete
CAD
file
is
very
central
to
the
development
process,
because
then
first
you
know
exactly
what
you
have.
So
you
can
say
to
somebody
hey
five
years
ago.
We
did
this
thing
and
its
exact
we
can
show
it
to.
You
can
generate
build
instructions,
you
can
generate
exploded.
Part
diagrams,
you
can
do
do,
renders
and
animations
it's
a
very
central
part
of
everything.
A
You
can
do
a
professional
fabrication,
drawings
everything
everything
comes
out
of
the
cab,
so
it
and
then,
if
you
want
to
evolve
this,
so
this
is
version
1,
let's
say
say,
say:
if
you
want
to
take
version
2,
when
you
do
version
2,
when
you
design
that
you
don't
have
to
start
from
scratch,
you
can
modify
the
existing
file
because
you've
got
all
the
parts.
So
it's
very
important
yeah,
it's
critical.