►
From YouTube: 1" Universal Axis
Description
Notes at https://docs.google.com/presentation/d/18M6Qw-2pqrRgK4g3G3Nkc_5tjLEJcZgKSP9BI0gHOqM/edit#slide=id.gb328b2d63d_0_9
-----------------
What you see here at Open Source Ecology is an ambitious open source project for the common good. Join our development team:
http://opensourceecology.org/wiki/OSE_Developers
We run One Day Extreme Build workshops in many locations. Please put yourself on our map if you'd like us to host a workshop near you:
https://microfactory.opensourceecology.org/request-a-workshop/
Take a minute to subscribe to our email newsletter (updates, workshops, etc): http://bit.ly/1LtcM44
B
C
B
B
D
B
D
D
B
D
B
D
D
C
B
D
B
C
B
B
D
A
B
D
C
A
B
D
A
B
A
B
A
C
C
B
B
B
D
B
D
A
D
A
D
A
B
D
B
A
D
A
D
A
D
B
A
B
A
B
C
B
B
D
B
D
A
D
B
Keep
it
there,
how
do
you
keep
it
there?
The
standard
technique
that
we
used
before
is
the
the
universal
idler
carriage
closure.
So
this
could
look
a
little
different
here.
We
can
use
these
bolts
here
for
carriage
closure.
So
say
we
just
did
this
here.
We
already
have
these
bolts
here
that
candid
so-
and
this
is
all
for
m6
bolts,
they're
printed
as
about
5.5
millimeters,
so
you
actually
thread
into
them.
B
So
the
concept
here
is
everything
threads
in
now.
You
might
see
the
challenge
here.
These
are
5.5
and
you're.
Attaching
this
idler
piece
which
you
would
want
to
do
is
take
a
six
millimeter
bit
and
ream
these
out,
so
that
the
bolt
goes
through
and
starts.
Catching
starts
catching
threads
on
the
idler
here.
If
that
makes.
A
B
C
B
C
B
D
A
B
It
would
look
something
like
this:
that's
your
closure,
so
it
allows
the
rods
to
go
freely
through
it
and
then
you
need
the
appearance
yeah.
I
actually
drew
a
feature
on
this,
so
that's
that's
not
a
proper
closure.
That's
a!
I
need
to
draw
a
separate
piece
there,
because
the
whole
thing
lights
up
here,
but
I
just
wanted
to
show
the
appearance
here,
a
little
transparency.
B
B
B
D
B
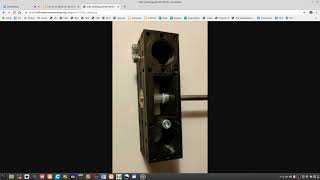
There's
little
flanges
on
the
motor.
If
you
look
at
the
details
so
so
you
can
send
the
bolt
right
through
the
back
and
thread
it
into
the
plastic
3d
printed
piece,
so
that
would
work
those
are
what's
the
size
of
those
holes.
It's
like
they're,
like
four
millimeter.
I
believe
something
like
that.
So
so
tiny
bolts
that
go
in
there.
B
B
A
B
C
A
B
E
B
B
D
B
D
B
D
D
B
C
B
B
D
A
B
B
B
A
B
C
D
B
A
B
D
C
A
D
B
A
D
A
D
D
C
E
B
B
B
C
B
A
C
D
C
C
B
C
E
B
B
A
B
B
A
A
C
D
B
A
A
B
E
D
B
B
D
D
B
B
A
D
E
B
B
D
B
E
B
B
B
D
A
A
A
B
A
D
B
B
B
C
B
What
we
have
before,
except
you'd,
have
to
once
again,
because
the
belt
is
much
wider.
This,
if
you
use
the
reference
design
from
the
before
make
the
make
this
slit
here
just
longer,
so
it
can
accept
the
15
millimeter
belt,
so
that
will
be
the
design
change
there
and
then
you
need
to
add
the
carriage
closure,
as
I
talked
about
belt-
clamp
so
a
convenient
way
here.
So.
D
B
D
B
D
B
The
hardware
store
cool
thing
is
you
can
use
m6
or
a
quarter
inch?
The
threading
does
not
mind
six
millimeter
compared
to
six
point:
two:
five
millimeter,
that's
what
quarter
inches
quarter
inches
six
point
two
five
millimeter
or
something
close
to
that
both
bolts
would
work.
So
this
is
readily
accessible
for
off-the-shelf
hardware,
if
you
use
a
two-inch
bolt
so
now,
if
you
have
a
two-inch
bolt
though-
and
this
is
40
millimeters,
then
you're
threading
in
only
10
millimeters
you'd
like
to
thread
in
a
little
more.
B
B
B
B
B
Like
to
see
the
thread
in
like
maybe
like
20
millimeters,
like
close
around
three
quarter
inch,
so
that
you
make
sure
that
when
you
thread
it
in
it's
not
coming
out
it's
a
very
solid
connection,
I
would
say
about
20
millimeters
of
threading
would
be
good,
so
we
have
to
think
about
both
sides
bolt
holes.
Now
you
can
use
a
longer
bolt
like
60
millimeter,
or
you
know
two
and
a
half
inch
or
something
yes,
sure
we're
just
trying
to
use
very
common
parts.
B
B
Through
the
side
and
you've
got
a
little
you've
got
there,
you
have
about
a
quarter
inch
about
six
millimeters,
seven
or
maybe
seven
millimeters
there,
where
you
can
grab
a
bolt
onto
that.
But
what
I
would
do
here
make
that
more
solid
of
a
connection.
So
I
would
build
up
this
side
here,
build
this
up
like
this,
give
it
a
little
pad
and
then
poke
through
it.
So
you've
got
much
more
meat.
If
you
want
to
stick
a
bolt
through
this,
so
now
we're
gonna
do.
B
B
D
B
Well,
that's
what
we're
doing
the
equivalent
of
in
this
case
here
we
actually
connected
pieces
through
the
four
four
bolt
pattern.
This
is
the
original
one
with
a
nema
17
motor.
I
use
these
belt
pegs.
We
went
away
from
the
belt
pegs
because
they
have
to
be
very
precise.
Otherwise
they
fall
out
or
are
too
tight,
but
that's
the
equivalent
and
you're
kind
of
thinking.
Okay,
you've
got
the
motor.
You've
got
the
idle
idler
here
here.
We
actually
use
this
long
idler.
B
B
B
If
you
go
to
longer
lengths
like
say
you
wanna
do
still
one
inch
universal
axis
torch
table,
which
is
longer
than
four
by
four
feet,
use
hollow
rods.
They
do
have
one
inch
hollow
rod,
which
is
much
lighter,
because
the
the
thing
that
happens
is
with
one
inch
solid
rods.
They
end
up
sagging,
we
did
a
torch
table
that
was
like
10
feet
long
and
to
show
you
that
one
d3
cnc.
B
B
A
A
A
B
C
B
C
D
D
D
B
B
A
C
B
C
B
B
A
B
A
B
D
B
D
A
D
B
D
B
B
C
C
D
D
E
D
B
B
A
B
B
B
D
B
B
E
B
B
B
D
B
B
B
C
A
B
Already
built-in
ability
to
control
stepper
motors
and
larger
stepper
motors,
so
it's
like
what
else
do
you
need?
You
need
inputs?
You
need
to
control
things
as
signals
through
outputs
that
you
can
run
through
power,
handling
elements
like
transistors
or
solid-state
relays
or
mechanical
relays.
So
yeah,
that's
only
very
cool
yeah
with
the
lcd.
You
can
program
that
to
to
say:
okay
now
this
is
the
torch
table
program
firmware.
So
that's
for
programmers
like
anybody
who
wants
to
help
us
with
that.
We
can
do
it
otherwise,.
C
B
C
B
D
B
B
D
E
B
B
Effectively,
what
you're
looking
for
is
you
just
see
that
everything
is
lit
up
so,
in
other
words,
this
pocket
here
contains
all
the
information
so
yeah
you
can
go
like
you
can
export
this
as
a
simple
object.
But
no
you
don't
need
to
do
that.
As
long
as
you
have
everything
selected
and
if
it's
in
multiple
parts
you
can
go
into
the
part
tree
and
then
select
multiple
parts
by
hitting
control
so
say
you
did
have
more
pieces
that
were
part
of
the
object.
You
want
to
print
what
I'm
doing.
B
B
B
D
B
E
B
B
B
E
B
B
It's
just
this
is
just
getting
stripped
down
to
the
essential
features
which
is
good
so
that
if
we
need
to
modify
it,
one
easy
way
to
do
it
is
you
know,
modify
the
existing
pieces
to
a
different
version
for
a
specialized
purpose.
Don't
don't
need
to
do
one
thing
that
does
everything,
but
if
we
make
the
design
very
transparent
easy,
then
it's
very
easy
to
modify
to
different
applications.