►
From YouTube: OpenShift Virtualization - Overview Demo
Description
Red Hat OpenShift Virtualization brings virtual machines to the world of containerized applications. This includes the ability to create, destroy, manage, and consume applications deployed using virtual machines, all while natively integrating with container-based application components and microservices.
This demo explores the OpenShift cluster configuration backing virtual machine deployment, including compute, network, and storage, followed by deploying and managing a virtual machine from the OpenShift administrator console.
For more information about OpenShift Virtualization, please visit https://openshift.com/virtualization.
A
This
demo
will
review
OpenShift
virtualization
a
way
to
bring
virtual
machines
into
your
openshift
cluster
and
connect
them
into
other
pod
based
communities
based
applications
running
inside
of
there.
So
the
interesting
part
here
is
that
openshift
virtualization
puts
virtual
machines
into
pods,
so
we
are
going
to
be
able
to
look
and
see
and
touch
all
of
those
different
components
inside
of
there
and
connect
them
in
with
all
of
the
other
OpenShift
features
and
capabilities.
A
So,
as
with
any
virtualization
solution,
there's
a
couple
of
precursors
that
we
need
before
we
can
begin.
So
quite
simply,
these
are
compute
storage
and
a
network
and
they're
pretty
straightforward
to
use
and
configure
inside
of
our
OpenShift
deployment.
So
when
we
look
at
our
cluster
here,
we
can
see
that
I'm
running
OpenShift
version
4.4
10
at
the
time
of
this
recording.
A
That
is
the
most
current
version
and
if
we
in
order
to
deploy
openshift
virtualization,
we
need
to
deploy
the
operator
now,
in
my
case,
I've
already
done
this
because
it
does
take
a
couple
of
minutes
when
you
do
it
and
we
don't
want
to
sit
here
and
watch
pods
churn.
So
what
we
see
here
is
the
container
native
virtualization
operator
so
be
aware
that
the
name
of
OpenShift
virtualization
has
changed
a
little
bit
over
time,
so
it
is
currently
publicly
known
as
open
shift
virtualization.
A
Previously
it
was
container
native
virtualization
prior
to
that
it
was
a
part
of
the
kubernetes
native
infrastructure
project,
so
sometimes
you'll
also
see,
for
example,
out
here
in
the
deployment
name,
references
to
the
hyper-converged
operator
or
HCO.
That
are
a
part
of
that.
Naming
scheme
so,
if
I
look
at
my
container
native
virtualization
operator
deployment
here,
we
can
see
all
of
the
standard
things
associated
with
an
operator
deployment.
In
my
instance,
I
am
using
version
2.3.
A
For
this
particular
demo.
Note
that's
the
openshift
virtualization
and
openshift
versions,
while
they're
not
the
same.
They
are
tied
together,
so
openshift
version,
4.4
and
OpenShift
virtualization
version.
2.3
are
a
pair
OpenShift
version,
4
three
and
openshift
virtualization
version
2.2
are
a
pair
and
that
will
continue
going
forward.
So
once
the
operator
is
deployed,
I
need
to,
of
course,
instantiate
it.
A
In
this
instance,
we
have
our
couvert
hyper-converged
we
go
in
and
if
I
were
to
create
a
new
one,
all
I'm
doing
is
creating
a
new
instance
of
this
object
and
allowing
it
to
deploy
into
our
open
shifts,
env
project
so
notice,
I'm
already
in
the
open,
shifts
env
project.
If
I
were
to
come
in
here
and
look
at
all
of
my
pods,
we
can
see
all
of
the
things
that
make
up
our
open
shift
virtualization.
So,
for
example,
here
is
the
containerize
deployment
or
excuse
me:
containerized
data
importer,
broth,
pods
running.
A
We
see
things
like
here's,
the
couvert
node
labeler,
which
is
what
looks
at
and
ensures
that
the
nodes
have,
for
example,
KVM
enabled
and
accessible
on
them.
So
that
way
we
won't
schedule
a
virtual
machine
to
a
node
that
cannot
host
a
virtual
machine.
We
see
the
nm
state
operators
pods
running
outside
of
here.
This
is
how
we
configure
our
up
our
node
networking
using
network
manager
and
the
nm
state
operator.
As
we
move
down,
we
see
a
couple
of
other
things,
so
here's
vert
operator
this
is
the
actual
controller.
That
is
excuse
me.
A
The
Burke
controller
is
the
actual
controller.
That's
implementing
our
API
vert
operator
and
vert
handler
are
used
to
control
the
virtual
machines
that
have
been
deployed
across
our
cluster
and
across
our
nodes.
Okay,
so
compute
pretty
straightforward.
We
just
looked
at
that
we're
using
the
nodes
in
our
cluster
and
if
I
were
to
look
at
my
nodes,
we
can
see
this
cluster
has
three
control,
plane,
nodes
and
two
worker
nodes,
so
those
nodes
do
need
to
be
physical
nodes
that
have
access
to
KVM.
A
So
if
you
have
virtualization
extensions
on
your
processor,
whether
it's
AMD
or
Intel
make
sure
those
are
turned
on
now,
you
can
technically
use
nested
virtualization
as
well
as
emulation.
Neither
one
of
those
is
supported,
but
you
can
use
it,
for
example,
in
a
lab
or
in
a
test
environments
just
be
aware
of
performance
penalties
associated
with
each
one
of
those
methods
as
well
as,
of
course,
the
lack
of
support,
so
computes
taken
care
of.
A
Let's
take
a
look
at
networking,
so
networking
as
you
would
expect,
we
need
to
be
able
to
connect
our
pods
to
the
outside
world
and,
in
this
case,
I'm
going
to
use
my
a
secondary
interface
on
my
worker
nodes.
In
order
to
do
this,
so
we
can't
see
it
through
this
particular
through
the
GUI
here.
So
what
I'm
going
to
do
is
connect
to
and
use
the
CLI
so
from
the
CLI.
What
I
want
to
do
is
look
at
a
couple
of
different
objects.
A
So,
for
example,
here
I
have
a
bridge
interface,
let's
scroll
down
a
little
bit
a
bridge
interface
named
BR
one.
It
has
one
port
connected
to
it,
ENS
for
no
spanning
tree
enabled
and
node
ipv4
or
ipv6
address
assigned
to
this
particular
interface.
So
this
is
that
second
interface,
that
I
was
describing
a
moment
ago,
so
it
is
connected
to
the
one
92168
14
0
/
24
network.
So
when
I
use
this
in
a
few
moments,
this
is
where
we're
going
to
expect
to
see
our
virtual
machines
receive
a
DHCP
address
from
now.
A
The
other
interface
on
my
particular
nodes
is
ENS,
3
and
E,
and
s
3
is
connected
directly
to
the
lab
network.
In
this
case,
it
is
a
10.0,
101,
0/24
network,
and
we
see
here,
ENS
3
is
directly
connected
to
that.
So
my
net,
my
nodes,
have
two
interfaces.
One
is
connected
to
the
public
management
kind
of
Sdn
overlay
right
this,
the
network
that
openshift
uses
for
basically
everything
the
other
interface
is
connected
directly
to
the
external
public
world.
A
A
different
network
now
I
could,
if
I,
wanted
to
use
the
network
state
operator,
the
nm
state
operator
in
order
to
do
things
like
configure
bonds,
put
VLAN
interfaces
on
top
of
that
set
up
bridges
for
those
right.
I
can
configure
this
just
like
I
do
any
other
node
leveraging
the
network
manager
concept
and
if
I
were
to
connect
to
my
node
I
would
be
able
to
go
and
look
at
and
see
what
that
actually
looks
like,
however,
I
want
to
do
this.
A
A
So
we
see
here,
I
have
one
creatively
named
worker,
so
this
one
will
apply
to
all
workers
to
create
BR
one
using
ENS
4.
If
I
look
at
this
guides,
if
I
look
at
this
guy
again
doing
an
output
yamo,
we
can
see
my
desired
configuration.
So,
first
and
foremost,
what
we
have
here
is
a
node
selector,
so
for
all
worker
nodes.
I
want
you
to
create
a
new
bridge
interface,
using
port
en
s4,
with
no
IP
address
assigned
and
give
it
the
name,
be
r1,
so
pretty
straightforward.
A
But
down
here
with
our
worker
nodes
and
has
been
successfully
configured
and
I
can
take
a
look
at
the
details
for
one
of
these
again
by
doing
an
output,
yamo
and
I
can
see
the
desired
states
and
what
we
want
it
to
look
like
and
then
up
here
we
can
see
the
different
conditions
as
it
went
through
and
applied
our
configuration.
So
we
went
from
progressing
to
successfully
configured
relatively
quickly.
It
only
takes
a
few
seconds
for
it
to
apply
our
configuration
here.
So
with
that's
done.
A
We
have
now
configured
the
node
networking
now
we
need
to
enable
our
pods
to
connect
to
that
particular
Network,
and
this
is
done
using
a
network
attachment
definition.
So
this
is
independent
of
OpenShift
virtualization
and
the
NM
state
operator.
This
is
how
we
tell
our
in
form
kubernetes
and
form
openshift,
that
a
pod
can
connect
to
whatever
multi
set
work.
I
want
to
connect
it
to
so.
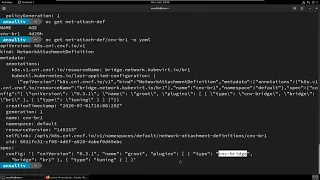
If
I
look
at
my
network
attachment
definitions,
we
can
see
that
I
have
created
one
named
cnv
b,
r1.
A
And
as
you
would
expect
here,
this
is
a
standard,
CNI
definition.
When
we
look
at
this,
we
see
I'm
using
a
plug-in
type
cmd'
bridge
which
bridge
I'm,
pointing
at
B
r1,
and
then
it
is
of
type
tuning,
see
the
so
these
are
specific
to
OpenShift
virtualization,
but
this
network
attachment
definition
the
concept
the
application
of
these
is
not.
It
is
a
kubernetes
multis
concept
that
can
be
applied
to
any
other
node
network
or
other
Sdn.
That
happens
to
be
inside
of
our
cluster
okay.
So
we
have
now
looked
at
our
compute.
A
We've
looked
at
our
network,
so
let's
look
at
storage,
so
inside
of
my
cluster
I
have
a
single
storage
class.
We
can
see,
it
is
creatively
named
managed
in
FS
storage
and
it
is
the
default
storage
class.
So
the
reason
why
I'm
using
NFS
in
this
case
is
because
I
want
to
read
right
many
storage
to
be
available
to
my
virtual
machines.
This
is
for
live
migration.
I
can
use
readwrite
once
rwo
PVS.
However,
I
cannot
do
live
migrations
when
I'm
using
those
I
need
to
use
rwx
in
order
to
do
live
migration.
A
So
how
do
I
tell
in
particularly
the
containerized
data
importer,
which
is
going
to
create
PVCs
on
my
behalf
when
I
instantiate
VMs
the
defaults
for
my
storage
classes,
because
it
will,
if
no
configuration
is
provided,
it
will
assume
all
storage
is
readwrite
once
in
order
to
do
that.
We
want
to
look
at
our
storage
class
defaults
for
OpenShift
virtualization.
A
So
we
have
a
configuration
map
inside
of
the
open
shifts,
env
namespace.
This
was
where
we
deployed
the
operator
to
that
contains
that
configuration
information
and,
in
particular,
when
we
look
at
the
data
inside
of
there,
we
see
a
bunch
of
different
options
available
here
at
the
top,
so
first
you'll
notice
that
there
is
a
couple
of
things
in
common
local
SC
managed,
NFS
storage.
This
is
the
name
of
my
storage
class,
as
well
as
this
access
mode
and
volume
mode.
A
So
what
happens
here
is
when
containerize
data
importer
is
requested
when
the
data
volume
paradigm,
rather
not
just
container
I
stat
importer,
when
the
data
volume
paradigm
sees
that
a
new
PVC
has
been
requested
of
a
particular
storage
class,
it
will
check
here
and
use
the
access
mode
and
volume
mode.
That's
provided
or
we'll
use
the
default
if
none
is
specified
for
that
storage
class.
So
what
this
means
is
that
when
I
create
a
VM
using
this
storage
class,
it
will
default
to
readwrite.
A
Many
therefore
I
can
do
live
migration
so
important
that
you
configure
this.
If
you
are
not,
especially
if
you
are
not
using
block
storage
but
also
kind
of
anytime,
you
want
to
change
these
from
filesystem
to
maybe
Rob
block
or
whatever.
That
happens,
to
be
for
your
virtual
machines
and
the
storage
class.
A
You
happen
to
be
using
so
note
that
open
shift,
container
storage
does
have
the
ability
to
do
read/write
many
with
block
storage
devices,
so
that
would
definitely
be
one
that
you
want
to
tune
and
adjust
based
on
what
your
needs
happen
to
be
and
how
you're,
using
that
storage
option.
So
with
that
taken
care
of,
we
now
have
all
three
of
the
core:
the
the
legs
of
that
stool,
so
to
speak,
to
be
able
to
begin
to
ploy
virtual
machine
to
our
cluster.
A
So
if
I
come
up
here
to
workloads,
you'll
notice
that
we
have
after
we
deployed
our
operator,
we
have
GUI
integration
directly
with
the
open
shift
console.
So
this
comes
not
only
through
this
virtual
machines
menu
item
and
the
ability
to
create
and
manage
them
through
this
through
this
vessel,
the
specific
interface,
but
also
things
like
on
the
overview.
If
I
look
at
the
overview,
you
see
that
I
have
virtualization
status
at
a
high
level
here
down
here.
A
Underneath
the
cluster
inventory,
you
can
see
the
number
of
VMs
that
I
have
deployed,
there's
a
lot
of
information,
a
lot
of
other
little
ways
that
it
integrates
throughout
the
user
interface.
So
let's
go
to
our
virtual
machines
and
let's
switch
to
our
default
project
because
that's
where
we
have
created
our
network
attachment
definition,
note
that
those
are
named
spaced,
so
let's
go
ahead
and
create
a
virtual
machine
using
the
wizard.
A
So
the
first
thing
when
creating
a
new
virtual
machine
is
we
want
to
specify
where
it's
going
to
get
the
operating
system
for
this
virtual
machine
and
there's
four
different
options
that
we
have
available
here.
The
first
one
is
pixie,
quite
simply,
it
will
pixie
boots
the
virtual
machine.
This
is
the
only
option
that
is
diskless,
so
I
do
not
have
to
provide
a
PVC
for
this.
A
If
I
don't
want
to
do
note,
however,
that
OpenShift
fertilisation
does
not
provide
any
of
the
pixie
infrastructure,
essentially
you're,
connecting
it
to
an
external
pixie
capable
network,
so
you
provide
DHCP
TFTP.
All
of
the
other
things
that
are
needed
there,
the
second
one
is
URL,
so
this
will
use
the
containerized
data
importer
to
reach
out
to
that
URL
and
pull
in
that
cue
cow
or
raw
disk
image
from
an
HTTP
https
s3
endpoint
and
put
it
into
the
PVC
that
will
be
used
for
our
virtual
machines.
A
Disk
container
is
to
pull
a
container
image
and
use
that
for
our
disk.
So
the
difference
between
that
here
is
URL.
Will
pull
that
disk
image
in
and
put
it
into
a
PVC
container
will
pull
that
as
a
standard
container
image
from
a
registry
when
I
instantiate
the
VM,
when
I
turn
it
on
it's
going
to
treat
it
just
like
any
other
container
image,
it
will
create
a
copy
on
right
layer,
on
top
of
that,
any
modifications
read
rights,
etc
or
rights,
changes,
etc.
A
That
the
virtual
machine
does
are
happening
in
that
copy-on-write
layer
and
that
virtual
machine
is
terminated
so
when
it's
powered
off
or
if
it
is
migrated
that
copy-on-write
layer
is
removed.
So
this
is
helpful.
This
can
be
useful
if
you
have,
for
example,
a
template
virtual
machine,
and
you
want
to
attach
additional
PVCs
to
act
as
application
persistence,
so
I
can
pull
in
that
virtual
machine
container
image,
power
up
or
instantiate
based
off
of
that
and
then
attach
other
PVCs
for
application
data.
Last
but
not
least,
is
disk,
so
disk
is
basically
just
telling
its.
A
You
know:
hey
use
this
existing
PVC.
You
don't
need
to
do
anything
like
with
URL,
which
will
use
containerized
data
importer
to
bring
in
that
disk
image.
So
I
am
going
to
use
URL
I
happen
to
have
a
locally
hosted
version
or
a
locally
hosted
instance
of
the
rel
8.1
KVM
image.
So
all
I
did
here
was
go
to
access
dot.
Redhead
comm
go
to
the
download
page
for
rel
88.1
and
pull
down
the
KVM
image.
I've
made
no
modifications
to
it
whatsoever.
A
It's
just
that
standard
image,
I
can
use,
rel
I
can
use
fedora
I
can
use
pretty
much
any
cloud
image
that
I
have
prepared
here,
just
keep
in
mind
and
there's
a
kcs
and
acts
a
case
es
article
that
has
the
supported
guest
operating
systems.
So
you
could
do
the
same
thing
with
Windows.
If
you
wanted,
you
could
create
your
own
template
image
using
that
so
I
need
to
tell
it
which
operating
system
I
want
to
use
in
this
case,
come
on
in
this
case,
I'm
going
to
use
if
I
can
get
it
to
cooperate.
A
I'm
going
to
use
red
hat
enterprise,
linux
8.1,
so
the
flavor
here
this
is
how
I
specify
my
RAM
and
CPU
so
custom.
Of
course,
I
can
provide
that
myself
or
I
can
use
the
t-shirt
flavoring
that
I
have
available
here.
Work,
so
small,
for
example,
represents
one
see
you
and
two
gigabytes
of
RAM,
so
I'm
going
to
go
ahead
and
pre-select
that
workload
profile
applies
some
settings
to
Lib,
verts
and
cue
EMU
when
we
instantiate
a
virtual
machine.
So
if
you've
used
rev
before
these
should
be
a
familiar
concept.
A
So,
for
example,
if
I
use
high-performance,
it's
gonna
do
things
like
automatically
turn
on
Io
threads
automatically
enable
CPU
and
Numa
penning
a
number
of
other
things
in
there
to
give
that
virtual
machine
maximum
performance
at
the
cost
of
some
additional
resources.
So
my
virtual
machine
here,
I'm,
just
gonna,
go
with
Desktop
workload
profile
because
it's
a
lab
and
it's
a
temporary
VM
just
for
this
demo
and
I'm
going
to
give
it
the
ultra
creative
name
of
rel.
A
So
the
next
step
is
to
specify
our
networking
we
can
see
by
default.
It
will
use
a
vert,
IO,
NIC,
NIC
type,
connected
to
the
standard
pod
networking
on
our
host
now
note
this
is
mass
grade,
so
it's
basically
NAT
and
from
the
outside
world.
I
don't
want
this
I
want
to
use
our
bridge
that
we
talked
about
earlier
note
that
I
can
specify
a
MAC
address
if
I
so
choose.
A
Moving
on,
I
can
specify
storage,
so
in
this
instance,
I
am
going
to
change
this.
To
use
a
20
gigabyte
Drive
see
I
still
have
my
URL
for
my
cue
cow
to
up
here
and
I,
don't
need
to
because
it's
the
default
storage
class
but
I'm
going
to
anyways
I'm
going
to
specify
my
managed
NFS
storage
here
now,
I
can
add
more
disks
if
I
so
choose
I
have
the
same
option
with
network
adapters,
so
I
could
have
as
many
network
adapters
is
supported
by
the
underlying
VM
Hardware
type.
A
The
default
being
q35
I
do
want
to
use
cloud
in
it
for
this
particular
virtual
machine.
This
is
so
that
I
can
log
in
on
the
command
line,
so
I'm
going
to
provide
the
world's
simplest
cloud
init
here,
which
just
sets
a
password
and
allows
me
to
log
in
if
I
wanted
to
attach
a
cd-rom,
maybe
I'm
trying
to
load
the
operating
system.
A
That
way,
I
can
do
that
from
this
interface
and
then
last
but
not
least,
do
a
quick
review
of
all
of
the
decisions
we
just
made
before
defining
our
virtual
machine,
creating
the
virtual
machine.
So
if
I
go
to
my
list
here,
we
can
see
that
I
created
the
virtual
machine
named
rel.
Its
status
is
currently
importing,
so
our
virtual
machine
definition
exists
here
and
if
I
were
to
look
at
the
ammo,
you
can
see
all
of
the
metadata
that
are
associated
with
our
VM.
A
So
you
see
the
CPU
and
how
many
CPUs
are
associated
with
it.
It
is
one
core
on
one
socket
with
one
thread:
I
can
have,
for
example,
multiple
cores
on
multiple
sockets
or
multiple
cores
on
one
socket.
Whatever
configuration
works
best
for
my
application,
we
can
see
our
disk
definitions
as
we
can
scroll
down.
We
see
our
memory
definition
is
here,
see
here's
our
q35
machine
type
definition.
A
Our
multi
set
work
definition
happens
to
be
here,
so
we
can
see
in
Nik.
0
is
connected
to
C
n
BB
r1.
So
this
is
a
standard.
Kubernetes
yamo
object
definition.
This
follows
the
same
pattern
as
any
other
kubernetes
object
that
we
happen
to
be
interacting
with,
and
importantly,
I
can
copy
this
directly
out
and
I
can
use
it
as
a
template
to
create
additional
virtual
machines
in
the
future.
So
I
just
need
to
change
the
virtual
machine
name
in
order
for
that
to
happen
when
I'm
creating
from
the
command
line.
A
Now,
why
is
this
important?
This
is
important
because
well
maybe
I
need
to
spin
up.
You
know
two
or
five
or
ten,
or
a
hundred
virtual
machines
very
quickly
and
I'm,
going
to
rely
on
OpenShift
virtualization
to
import
those.
According
to
this
data
volume,
template
definition,
so
we
see
here
I'm
going
to
create
a
readwrite
mini.
So
every
time
I
submit
this,
it's
going
to
create
a
read/write
mini
PVC,
that's
20
gigabytes
in
size,
using
the
managed,
NFS
storage
class
and
it's
going
to
pull
in
this
disk
image.
A
So
if
we
look
at
our
pods
so
first
remember,
our
virtual
machine
here
is
in
a
status
of
importing
and
if
we
look
at
our
pods,
we
can
see
that
we
have
an
importer
pod,
that's
running.
We
also
have.
If
we
were
to
look
at
our
persistent
volume
claims.
We
see
our
L
root
disk,
which
is
bound
to
this
particular
PVC,
which
is
a
read/write
mini
PVC.
A
So
when
I
created
that
VM
it
created
put
in
the
PVC,
the
the
PVC
was
bound
to
a
pv
that
was
dynamically
created
by
our
storage
class
and
then
our
importer
pod,
because
we're
using
a
data
volume
was
instantiated
with
that
PVC
attached.
And
if
I
look
at
my
importer
pod
here
and
in
particular,
if
I
look
at
the
logs,
we
can
see
that
it
is
pulling
down
that
image
from
my
HTTP
server.
So
it's
pulling
that
in
it
is
putting
it
on
to
the
PVC
that
has
been
assigned.
A
You
can
see
it's
about
80%
done.
This
is
about
a
gigabyte
image
and
I'm
on
gigabit
network,
so
it'll
take
it
just
a
little
bit
to
finish
up,
but
if
we
were
to
look
at
the
events
here,
we
can
see
exactly
what
I
just
described.
So
you
can
see
it's
waiting
on
the
volume
to
be
bounds.
So
we
have
a
couple
of
errors
about.
The
PVC
basically
has
not
had
a
pv
bound
to
it,
yet
it
was
assigned
to
the
node
it
was
started,
and
then
we
began
to
to
the
import
process.
A
A
So
looking
at
our
virtual
machine
definition,
now
you
can
see
that
the
status
is
off.
It
is
no
longer
in
importing
if
I
were
to
come
into
this
virtual
machine
definition.
There's
a
couple
of
things
that
we
want
to
do
so.
First,
you
see,
I
can
modify
a
network
configuration
here.
I
can
modify
disk
configuration
from
here.
Note
that
we
do
have
a
cloud
init
disk,
because
I
did
specify
a
cloud
in
it.
Inside
of
my
configuration,
we
can
also
do
things
like
attach
secrets.
A
A
Now
the
virtual
machine
interface
here
abstract
away
much
of
the
details
that
are
happening
underneath
but
I
can
very
easily
look
at
the
pods
here
and
see
my
vert
launcher
pod
for
my
rel
VM
and
if
I
look
at
the
details
associated
with
this,
it
is
just
like
any
other
pod.
That's
running
in
my
environment,
I
can
look
at
the
logs
associated
with
all
the
things
going
on
inside
of
here.
I
can
look
at
the
terminal
and
importantly
see
we
have
our
compute
container
inside
of
here.
A
If
I
were
to
do
a
psdf,
I
can
see
the
processes
that
are
associated
with
my
virtual
machine.
So
you
see
here,
I
have
Q
mu,
K
VM,
which
is
our
actual
virtual
machine
process.
I
would
expect
to
see
at
least
one
of
these
processes
for
each
CPU,
each
core
that
is
assigned
to
our
virtual
machine
and
then
vert
launcher,
which
is
doing
our
virtual
machine
management.
A
So
it's
doing
things
like
if
the
resources
change,
if
property
changes
for
launcher,
is
what
informs
q
mu
k
vm,
that
something
has
changed
and
if
we
switch
back
over
to
our
virtual
machine,
which
should
be
done
booting
by
now.
We
see
that
we
have
our
our
console,
so
I
will
login
using
the
password
that
I
specified
in
my
cloud
in
it
and
if
I
do
a
quick
check
of
our
IP
address,
you
can
see
that
it
has
been
assigned
the
IP
of
14.1
98,
so
just
to
quickly
show
that
we
have
external
connectivity,
I.
A
A
So
we
are
able
to
reach
out
to
the
Internet
as
well
now,
because
this
is
a
bridge
network
to
the
public
interface.
This
means
that
this
pod
does
networks
to
me.
This
virtual
machine
would
have
to
traverse
the
standard
ingress
egress
from
excuse
me
egress
into
our
the
remainder
of
our
openshift
cluster.
A
Now,
if
I
used
a
network
rate
with
the
masquerade
or
the
bridge
configuration
if
I
used
a
pod
Network,
then
I
would
be
traversing,
openshift
Sdn,
so
we're
able
to
do
things
like
assign
a
service
to
it
and
be
able
to
access
through
that
service
name,
because
this
is
connected
to
an
external
world,
just
like
any
other
virtual
machine.
That's
connected
to
a
layer,
2
network,
it's
following
a
more
traditional
network
path
in
and
out
of
other
OpenShift
services
inside
of
the
cluster.
A
So,
while
we're
here,
let's
take
a
look
at
a
couple
of
things.
So,
first
in
the
overview
screen,
we
can
see
things
like
CPU
memory.
A
lot
of
other
details
inside
of
here
note
that,
because
this
is
really
tot
one
it
nor
rl8,
it
does
have
the
qmo
guest
tools
already
installed.
So
it's
surfacing
up.
Information
like
the
IP
address
by
default.
I
can
see
different
properties
about
my
virtual
machine
now.
These
will
take
a
little
bit
of
time
to
populate.
That's,
why
we're
not
seeing
them
here
yet,
but
it
will
eventually
get
there.
A
I
can
also
from
my
actions
menu
here.
I
can
migrate.
This
virtual
machine
remember
that
I
use
readwrite
mini-storage
specifically.
For
that
reason,
so
I
can
select
the
migrated
option
and
we'll
go
into
a
migrating
status.
So
what
we
should
see
here
in
just
a
moment
is
it's
going
to
switch
over
to
worker
0
and
be
running
on
that
particular
node.
Now,
in
this
instance,
I
only
have
two
nodes
up.
There
just
did
the
switch
over
to
worker
0,
so
I
only
have
2
nodes,
so
it
doesn't
really
need
to
offer
me
a
selection.
A
It
just
moves
it
to
the
other
one.
The
other
thing
that
we'll
note
here
and
I'll
stop
this
ping
now,
so
you
see
that
there's
a
little
bit
of
jitter
inside
of
my
ping
times
right.
It
went
from
below
a
millisecond
for
the
most
parts
up
to
8
or
11
milliseconds
at
the
top,
as
it
switched
over
from
one
host
to
the
other,
but
otherwise
there
was
no
no
downtime.
For
my
application,
no
lost
pings
know
us
connectivity,
etc.
A
It
all
stayed
up
exactly
as
you
would
expect,
and
my
virtual
machine
is
still
running
just
happens
to
be
running
from
the
other
note.
It
doesn't
know
that
it
changed
host
because
it's
been
abstracted
away
by
OpenShift
virtualization.
So
the
last
thing
that
I'll
do
here
is
I
will
go
ahead
and
stop
my
virtual
machine.
We
can
see
that
it
goes
through
the
standard
of
shutting
it
down.
If
I
go
to
my
virtual
machines
overview
here,
we
can
see
its
current
status.
This
will
update
in
just
a
moment.
A
There
goes
to
remove
the
node
and
IP
address.
Information
and
I
can
also
go
here
and
I
can
delete
my
virtual
machine
and
when
I
do
this,
because
I
created
using
the
URL
type,
so
the
data
volume
concept
is
responsible
for
the
persistent
volume
etc.
It
will
also
clean
up
all
of
those
other
objects
associated
with
my
virtual
machine.
So
if
I
come
down
here
to
persistent
volume
claims,
you
can
see
that
my
PVC
was
removed,
and
thus
so
was
my
persistent
volume
okay.
A
So
that
was
a
brief
overview
and
introduction
to
open
shift
virtualization
and
the
capabilities
associated
with
deploying
and
managing
and
consuming
virtual
machines
through
your
open
shift.
Kubernetes
deployment.
If
you
have
any
questions,
if
you
have
anything
that
we
can
help,
you
with,
please
feel
free
to
reach
out
to
the
BU,
and
we
will
be
more
than
happy
to
help
with
that.
Thank
you.