►
Description
Introduction to Planetary Imaging
Richard Senegor
Let's take a dive into everything you need to know to hit the ground running with planetary imaging. We'll cover the absolute basics, benchmarks to check your progress, lessons learned the hard way (so you don't make the same mistakes!), and a live walkthrough of processing planetary data. In fact, you'll probably realize that you already have everything you need to get started in your own backyard.
A
A
B
Little
bit
of
a
detour
from
the
usual
Sig
programming,
I,
there's
a
lot
of
deep
Sky
talk,
but
tonight
I
want
to
approach
this
as
a
little
more
of
a
tutorial
or
a
reference
manual,
rather
than
a
technical
Deep
dive
on
planetary
Imaging
in
particular,
so
hopefully
for
any
seasoned
veterans
in
the
audience.
This
won't
seem
too
basic,
but
the
goal
here
is
by
the
end
of
this.
Everyone
on
this
call
should
be
instilled
with
the
confidence
to
take
their
own
planetary
images,
with
whatever
gear
you've
got.
B
B
Then
we're
going
to
talk
a
little
bit
about
you,
the
imager,
before
jumping
deeper
into
my
hardware
setup
and
how
it's
built
around
the
things
that
I
think
you
need
to
worry
about
for
planetary
Imaging,
particularly
in
Hardware,
the
real
world
troubles
you're
going
to
have
and
what
you
need
to
consider
for
your
software
packages
and
we'll
also
talk
about
the
various
tips
and
tricks
settings
and
features
of
each
software
package.
That
I
think
is
important
to
give
you
an
advantage.
B
So
a
little
bit
about
myself,
my
name
is
Richie
nice
to
meet
you
all.
Obviously,
I'm
an
astronomy,
Enthusiast
I've
been
an
active
member
of
the
fjaa
for
coming
up
on
a
couple
years
now,
I
emphasize
active
because
I
was
actually
a
member
a
number
of
years
ago,
if
I
remember
correctly
and
I
contributed
exactly
nothing
because
I.
B
In
the
way
of
astronomy,
but
with
that
said,
I've
been
fortunate
enough.
I've
had
a
telescope.
My
whole
life
and
I
had
to
telescope
at
that
time,
but
it's
only
recently
that
I've
really
been
trying
to
get
some
real
performance
out
of
it,
and
hopefully
now
I
can
pass
that
on
to
you,
but
other
than
that
I'm.
Actually
an
electrical
engineer
by
trade.
B
In
a
past
life
I
was
doing
research
on
nanocarbons,
so
carbon,
nanotubes,
graphene
applications
for
integrated
circuitry
and
if
anyone
ever
wants
to
talk,
nanocarbons
absolutely
feel
free
to
reach
out
I'm,
always
happy
to
jump
back
into
that
skin,
but
now
I'm.
Actually,
the
private
sector
designing,
electronics
and
working
on
robotics
I
know
from
past
meetings
that
we
actually
have
some
Woodworkers
in
the
audience,
so
I
couldn't
resist.
Putting
in
a
plug
here,
I
currently
work
as
an
electrical
engineer
at
shaper
tools.
B
B
So
if
you
also
want
to
talk
about
woodworking
or
Electronics,
also
up
for
that,
okay,
now
I'm
a
little
bit
about
my
setup
and
location,
I'm
living
and
imaging
in
beautiful
light,
polluted,
San,
Francisco
and
I'll
kind
of
unpack
that
a
little
more
as
we
go.
But
I
did
want
to
mention
a
few
things
just
to
get
started
from
these
pictures.
B
First
off,
if
you
haven't
noticed,
I'm
actually
Imaging
from
the
roof
of
my
apartment,
building
in
San
Francisco,
and
you
can
see
in
the
background
of
the
pictures
there
I'm
just
a
stone,
throw
away
from
a
major
freeway
and
what
that
means
for
me
is
while
I'm
Imaging.
If
a
loud
motorcycle
or
a
big
truck
drives
by
or
someone
slams
their
door,
a
couple
floors
down.
My
entire
setup
starts
shaking.
B
B
All
that
is
to
say
I'm
Imaging
from
some
like
uniquely
terrible
conditions,
so
my
claim
tonight
is
that
all
else
being
equal
just
about
anyone
on
this
call
should
be
able
to
easily
get
better
planetary
pictures
than
me.
If
you
just
follow
the
same
steps
that
I'm
going
to
outline
yeah.
Okay,
so
enough
about
me
as
I
promised,
let's
talk
about
you
so
coming
in
here
tonight.
You've
got
the
gear,
probably
or
you're
thinking
about
getting
a
gear.
B
You've
got
the
Deep
Sky
experience,
but
there's
a
planet-sized
hole
in
your
heart
that
you're
trying
to
fill.
Well,
thankfully,
we're
not
too
late
with
this
talk.
I
know:
Uranus,
Neptune,
Jupiter
and
Mars
are
all
in
great
positions
in
the
sky.
These
days,
Saturn
not
as
much
lately,
but
still
it's
a
great
time.
You
can
still
get
pictures
of
Saturday.
You
can
get
pictures
of
pretty
much
anything
you
want.
So
I
think
this
is
very
Timely
when
you
leave
tonight.
B
The
goal
here
is
that
you're
going
to
be
aware
of
what
the
main
hurdles
are
for
your
Imaging,
and
hopefully
this
will.
This
presentation
will
serve
as
enough
of
a
reference
to
give
you
an
easy
to
follow
workflow
that
should
follow
or
should
work
for
about
80
of
your
pictures,
or
at
least
getting
you
to
80
of
of
your
best
quality.
B
B
B
B
At
least
a
gem
is
not
strictly
necessary
for
planetary,
but
it
will
absolutely
help
by
keeping
things
stable
and
aligned
as
far
as
cameras
I'm
splitting
my
time
between
two
different
ones,
the
zwo
ASI
294mc
Pro,
which
I've
also
used
for
DSO
and
more
recently
I,
actually
got
a
224
NC
which,
if
you
look
online,
it's
kind
of
the
quintessential
planetary
camera
right
now.
Basically,
everyone.
B
It
it's
cheap,
it's
performant
and
it's
basically
made
for
planetary
Imaging,
all
right.
Some,
oh
also.
Yes,
I
have
the
explore
scientific,
2X
and
3X
focal
extender,
slash,
Barlow
lens.
Those
have
been
two
of
the
most
amazing
purchases.
I've
made
hands
down
for
deep
Sky
stuff,
I
started
with
the
you
know,
0.63
focal
reducer
that
everyone
with
this
telescope
seems
to
have,
but
the
the
focal
extenders
were
the
things
that
really
started,
bringing
out
the
detail
and
kind
of
took
me
to
the
next
level.
B
In
my
own
opinion,
so
I
highly
recommend
those,
but
can
I
go
in
down
the
list
now
of
the
more
supporting
characters.
I've
got
two
Celestron
12
volt
power
tanks,
I
use
those
to
power,
the
mount
Motors
and
the
thermoelectric
cooler
on
the
294
when
I'm
Imaging,
with
that
one
I
do
use
the
Celestron
vibration
suppression
pads
because
I'm
Imaging
from
such
unstable
ground,
but
if
I'm
being
totally
honest,
it's
probably
not
doing
a
whole
lot
for
me
because
I'm
on
really
unstable
ground
I
think
it's
well
beyond
the
capabilities
of
these
things.
So.
C
B
B
This
is
used
for
a
couple
of
things,
but
mostly
to
deal
with
the
fact
that
light
is
traveling
differently.
Different
wavelength,
wavelengths
of
light
travel
differently
through
the
atmosphere.
So
you
can
get
this
atmosphere
of
dispersion.
This
almost
like
chromatic
aberration,
looking
thing
where
you've
got
like
a
red
shifted
to
one
side
and
blue
shifted
to
the
other.
This
corrects
for
that,
but
in
general,
just
kind
of
give
you
sharper
images
if
you
use
it
well,
so
I've
only
recently
started
playing
with
it.
B
I
get
to
get
any
really
good
pictures
with
it.
So
I
don't
have
any
example.
Images
tonight,
but
I
do
want
to
mention
this,
because
if
anyone
here
is
serious
about
getting
into
planetary,
it's
not
that
expensive.
It's
like
a
little
over
100
bucks
and
I
highly
recommend
it,
because
this
will
eventually
you'll
find
that
you
need
this
and
it'll
make
it
so
that
you
can
take
really
good
pictures
of
the
planets.
Even
when
they're
not
super
high
overhead.
B
B
But
if
I
can
give
one
piece
of
advice
now
to
someone
who's
thinking
about
what
sort
of
Imaging
setup
to
build
out
for
themselves
in
field,
I
would
recommend.
Don't
do
something.
Power
hungry,
like
my
you
know,
tricked
out
laptop
here,
try
to
build
around
something
like
a
Raspberry
Pi,
because
my
number
one
bottleneck
personally
in
the
field.
I,
don't
usually
have
power
available
to
me.
So
once
my
battery
dies,
that's
kind
of
it.
B
So
if
I
could
run
a
Raspberry
Pi
off
of
a
12
volt,
you
know
you
know
portable
battery
I'd
be
out
there
all
night,
so,
okay,
now
actually
starting
to
get
into
some
details
and
advice.
In
some
ways.
Planetary
Imaging
is
much
more
forgiving
than
deep
sky,
but
where
that
completely
goes
out
the
window
is
that
now
your
targets
are
very
Dynamic,
while
you're
Imaging,
with
the
intention
of
flattening
and
stacking
your
subs,
your
target
is
rotating
and
if
you're
not
careful,
that
rotation
will
at
best
maybe
obscure
some
detail.
B
But
if
you're,
really
not
careful,
it'll
completely
blur
your
picture
and
I
mean
it'll
just
ruin
your
night.
With
that
in
mind,
the
first
piece
of
advice
here
is
that
you're
going
to
have
to
tailor
your
Imaging
sessions
per
planet
to
capture
for
a
reasonable
amount
of
time.
We'll
talk
a
little
bit
more
about
this
later
and
how
to
figure
that
out,
but
I
really
like
these
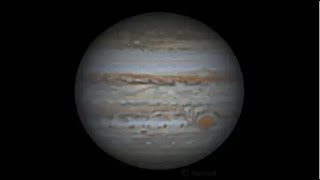
Graphics.
B
That
help
illustrate
and
give
you
a
sense
of
the
relative
rates
of
rotation
and
give
you
a
more
intuitive
sense
for
why
very
slow
rotating
Planet
like
Venus.
You
can
image
for
like
10
minutes,
whereas
a
very
fast
rotating
Planet,
like
Jupiter,
you're,
more
limited
to
about
three
minutes
and
to
be
clear.
This
is
not
a
three
minute
long
exposure
of
Jupiter
you're
taking
and
that
concept
actually
introduces
us
to
a
pretty
fundamental
shift
in
approach
from
Deep
Sky,
which
is
the
concept
of
Lucky
Imaging.
B
B
This
point
is
well:
how
do
we
take
images
that
fast?
Well?
Actually,
what
you're
going
to
do
is
record
a
video
so
you're,
hopefully
using
a
very
performance,
very
fast
camera.
It's
going
to
record
a
video
and
it's
going
to
be
taking
lots
and
lots
of
frames
per
second
and
the
frames
of
those
videos
are
going
to
be
broken
down
into
your
subs.
Okay,
great
so
approachable
concept,
easy
to
understand.
But
how
do
we
actually
do
that?
You
know
we're?
We
need
to
move
fast.
So
where
does
that?
B
Speed
come
from
it's
important
to
to
realize,
when
you're
Imaging
DSO
generally
you're
actively
working
to
increase
the
amount
of
time
that
you
can
spend
on
a
single
subframe,
so
you
may
not
necessarily
have
to
consider
where
the
bottlenecks
in
your
system
are.
But
there
are
a
couple
easy
bottlenecks
you
can
eliminate
on
the
capture
side
of
the
equation
and
the
storage
side.
So
on
the
capture
side,
USB
2.0
versus
3.0
literally
has
a
10-fold
difference
in
Max
transfer
rates.
B
Now
it's
one
thing
to
just
Jam
data
through
the
pipeline
quickly.
Then
you
need
something
ready
receiving
it
on
the
other
side
that
can
handle
that
speed
as
well.
So
on
the
sword
side,
there's
actually
a
lot
more
options
to
choose
from
without
going
into
the
details,
I
can
recommend
going
with
an
nvme,
solid
state
drive
and
you
can
see
I
mean
this
is
way
far
ahead.
Usb
3.0
and
you
know
order
of
magnitude.
Higher
orders
of
magnitude
higher
than
2.0
point.
Is
that
you'll
be
able
to
save
the
pictures.
B
Those
are
coming
down
the
pipe.
You
can
make
sure
that
your
storage
space
and
your
storage
device
is
not
the
limiting
factor
here.
Once
upon
a
time,
I
started
out,
Imaging
I
was
on
my
roof
about
10
feet
that
way,
trying
to
save
images
over
Wi-Fi
to
my
network
storage,
which
was
you
know,
50
feet
that
way
and
it
was
shamefully
slow.
I
was
maybe
getting
a
few
frames
per
second,
because
everything
was
just
getting
stopped
up.
My
on-chip,
you
know
my
buffer.
B
B
A
First,
the
more
Richie
can
I
ask
a
question.
Yeah
absolutely
around
three
years
ago,
I
saw
a
presentation
from
Christopher
go
about
planetary
and
I.
Remember
him
telling
me
or
I.
Remember
him
saying
in
the
talk
that
he
imaged
to
memory
like
the
length
of
his
video
was
the
amount
of
ram
he
had
that
that's
no
longer
necessary.
Now
the
ssds
are
fast
enough,
where
you
don't
need
to
do
that.
I.
Take
it
well.
B
You
know
there's
a
lot
of
different
ways.
We
can
dive
into
that
question
because
I
can
tell
you
for
sure
I'm
maxing
out
the
cash
that's
built
into
my
camera.
So
you
know
I'm
maxing
out
memory
in
that
sense,
but
you
know
you
can
see
on
my
system
here.
I've
got
32
gigs
of
RAM.
I
am
certainly
not
using
up
all
of
that
for
Imaging.
Definitely,
there's.
A
B
Trick
to
that
I'm
going
to
mention,
as
on
the
next
slide.
Actually
another
approach
for
how
we're
going
to
make
sure
to
you
know,
keep
file
streams
small
so
that
we're
not
maxing
out
our
space,
but
when
I
started
out,
I
wasn't
doing
any
cropping
or
anything
like
that.
I
was
taking
the
full
resolution
of
my
sensor,
every
single
frame
and
so
I
had
you
know:
I
take
10
minutes
of
Jupiter
data
and
it
would
take
like
300
gigabytes
or
something
insane.
You
know.
D
D
B
B
D
B
B
B
I,
basically
tricked
it
out
as
much
as
I
could
I
put
an
8
core
2.5
gigahertz
processor
in
there
32
gigs
of
RAM,
but
the
thing
that
really
matters
here
is
the
two
terabyte
nvme
in
there.
So
that's
my
my
recommendation
and
you
know
I'm
happy.
We
can
talk
offline
or
after
class
I
can
help
give
people
some
recommendations
for
how
to
build
out
their
specific
systems
too.
B
But,
like
I
said
this,
if
you
were
to
follow
this
slide
as
as
gospel,
you're,
still
probably
going
to
have
another
bottleneck
in
your
system
that
you
need
to
deal
with,
which
is
going
to
be
on
the
camera
side
of
things.
So
I'm
going
to
be
talking
throughout
this
throughout
this
presentation,
I'm
going
to
be
referencing,
two
cameras,
the
ASI
294
MC
Pro
and
the
224
MC,
but
I
do
want
to
emphasize
that
any
camera
will
work
for
planetary.
B
You
can
sincerely
I
actually
started
with
just
strapping
my
phone
to
my
eyepiece.
Actually
I
started
by
holding
up
my
phone
to
my
IPS
I'm
doing
my
best
to
keep
it
in
view.
I
don't
recommend
that.
But
if
you
you
know
before
you
drop
some
money,
if
you
want
to
try
out
with
your
phone
like
go
for
it,
any
camera
will
work.
It's
just
that
some
are
faster
and
more
appropriate
than
others.
B
B
You
can
change
what
region
of
your
sensor
is
being
read
out
and
saved
while
capturing,
and
that
is
called
the
region
of
Interest.
So
if
you
know
your
whole
sensor,
is
this
big,
but
you
only
care
about
this
small
of
a
portion.
You
can
set
that
small
of
a
region
of
interest.
That
term
is
going
to
come
up
a
lot
tonight
and
all
else
being
equal,
the
smaller
the
region
of
Interest,
the
faster
you're
going
to
read
out
your
data.
B
Of
an
image
as
you're
aiming
for
and
the
amount
of
detail,
you
want
the
more
frames
per
second
that
you
can
squeeze
out
the
better
you're
gonna
do
so.
Here's
some
set
resolutions
from
the
ASI
spec
sheets
and
their
corresponding
frame
rates
for
both
these
cameras
and
notice.
How
at
the
bottom
here
the
at
the
same.
You
know
tiny
resolution.
The
224
is
capable
of
reading
out
data
three
times
as
fast
as
the
294..
B
B
Your
region
of
interest
is
usually
going
to
be
larger
than
300
by
200,
so
your
frame
rate
is
going
to
go
down,
but
the
the
op
or
the
like
operating
piece
of
advice
here
from
this
slide
is,
if
you
aim
for
100
frames
per
second,
you
know
stable
minimum
during
your
capture,
then
you'll
be
in
a
comfortable
spot.
Also
for
reference
with
my
setup.
I
took
both
these
cameras
side
by
side.
B
When
I
set
them
to
a
five
millisecond
exposure
and
a
500
by
500
pixel
region
of
Interest,
the
294
averaged
out
at
96
frames
per
second
and
the
224
was
at
200
frames
per
second,
so
twice
as
fast.
So
you
can
see
why
why
people
prefer
the
224
for
planetary,
okay.
So
a
lot
of
a
lot
of
hard
work
talk,
but
now,
let's
talk
about
when
you're
actually
out
in
the
real
world.
What
are
some
of
the
areas
that
you're
going
to
run
into
trouble?
B
The
first
is
collimation
making
sure
that
you're,
you
know
in
good
alignment
the
seeing
for
the
night
light
pollution
and
sampling,
so
digging
into
some
examples
here,
I
actually
waffled
a
bit
on
whether
collimation
should
be
number
one
or
number
two,
but
ultimately
I
decided
that,
even
if
you
have
the
most
amazing
perfect
seeing
and
atmospheric
conditions,
if
your
collimation
is
off
you're
doomed
to
not
get
great
detail
now.
This
is
also
something
else
that,
like
might
seem
pretty
obvious
on
its
face,
but
the
farther
out
of
pollination.
B
B
So
the
main
takeaway
from
this
slide
is
that,
if
you're
getting
serious
about
planetary,
you
should
get
comfortable
with
the
concept
that
you're
going
to
be
culminating
every
single
time
that
you
go
out
before
you
take
pictures
and
if
you're
like
me,
that
is
an
incredibly
intimidating
concept,
because
I
at
first
was
not
confident
at
all
in
my
culmination
abilities,
but
now
that
I've
had
some
time
to
work
with
them,
I
cannot
recommend
Bob's
knobs
enough.
These
are
little
thumb
screws
that
replace
the
factory
secondary
screws.
B
B
B
Develop
too
much
on
this,
because
I
think
everyone
here
is
familiar
with
the
concept
of
seeing,
but
just
know
that
you
are
exceptionally
sensitive
to
seeing
when
you're,
trying
to
capture
the
very
fine
details
of
the
planets.
So
most
of
you
in
the
South
Bay
are
probably
familiar
with
regions
like
two
to
four
on
this
scale.
Maybe
you
know
four
if
you're
lucky
for
me,
honestly,
most
nights
are
a
one
to
two
in
San
Francisco,
which
you
know
seeing
continues
to
be
the
most
frustrating
aspect
of
planetary
Imaging.
B
For
me,
it
took
me
a
while
to
realize
why
I
had
such
high
variability
in
my
images,
I
mean
some
days.
I
could
reach
Focus
like
that
like
super
fast
and
get
a
stable
image
and
maybe
get
about
a
three
of
detail
after
sharpening,
but
some
days
after
stacking,
my
images
look
like
a
one
at
Best,
you
know
probably
a
zero.
If
you
know
we
could
go
down
that
low
and
I
look
at
tutorials
online
to
figure
out
what
I
was
doing
wrong
and
I
swear.
B
That,
okay,
that
you
know
poor
seeing
level
one
image,
is
exactly
what
my
pictures
were
looking
like,
so
maybe
obvious
advice,
but
do
what
you
can
to
avoid
turbulent
atmospheres.
So
that
means
waiting
for
favorable
weather
conditions,
waiting
for
your
targets
to
be
as
high
in
the
sky
as
possible
and
not
positioned
over
sources
of
heat.
B
B
In
my
opinion,
it's
fine.
You
can
see
the
the
you
know,
sharpened
stack
on
top
and
then,
when
you
post
processes
them
the
same
image
on
bottom
and
across
the
three
bottom
images
yeah.
You
can
kind
of
see
that
you
know
details
are
maybe
getting
a
little
fuzzier,
but
honestly,
all
three
of
those
pictures
I
would
be
proud
to
publish
personally
so
again,
you
know,
especially
if
you're
starting
out,
if
you're
a
novice,
you
know
what
I'm
saying
is:
don't
really
worry
about
light
pollution.
Obviously
you
want
to
aim
for
Less.
B
Okay,
now
I
also
wasn't
sure.
If
I
should
you
know
how
much
detail
I
should
go
into
sampling
at
all
or
if
I
even
should
touch
on
it
at
all,
but
I
decided.
This
is
worth
a
brief
discussion,
especially
if
people
are
going
to
be
investing
in
some
gear.
Based
on
this
talk,
this
is
not
a
unique
concept
of
planetary,
Imaging
and
I.
Think
that,
with
very
little
forethought,
you
can
pretty
comfortably
position
yourself
to
not
have
to
worry
about
this,
at
least
until
you
get
more
advanced.
B
But
the
basic
idea
here
is
the
same
one:
that
you've
grappled
with,
with
literally
every
single
digital
picture.
You've
ever
taken
you're
taking
a
digital
sample
of
an
analog,
real-world
Target,
and
if
you
don't
fit
within
certain
guidelines
for
good
sampling,
then
you
risk
losing
detail
or
contrast
again.
It's
not
really
something
that
I've
been
super
worried
about.
Personally,
but
you
know
here's
an
example.
B
If
you
can
bear
with
me,
I'm,
not
sure
how
well
everyone's
screens
are
going
to
render
these
Brave
blocks.
But
basically,
if
you
have
some
picture
you're
trying
to
sample
in
the
middle
here,
it's
got
some
shape.
If
you
under
sample
it,
then
you
risk
getting
a
kind
of
Blocky
appearance
of
whatever
shape
you're
trying
to
capture
and
if
you
over
sample
it,
then
you're
spreading
out
detail
unnecessarily
over
bordering
pixels
in
your
sensor,
which
will
tend
to
give
the
target
a
bit
of
a
softer
look.
B
But
in
my
opinion,
at
least
when
you're
oversampled,
the
information,
is
there
you're
not
really
losing
any
information,
maybe
put
a
little
more
tangibly
with
stars.
If
you
under
sample
stars
on
the
left,
you
see
they're
kind
of
coming
out
square
and
blockish,
but
if
you
over
sample
them,
you
know
they're
kind
of
they're
getting
softer,
but
at
least
they're
still
kind
of
round
point
I'm.
Trying
to
make
here
is:
don't
really
worry
too
much
about
sampling
either
way
you
go
under
or
over
sampling.
B
B
This
is
the
deepest
we're
going
to
go
on
the
topic,
but
this
is
where
you're
actually
going
to
apply
the
guidelines
of
sampling,
to
figure
out
what
gear
to
invest
in
so
the
primary
factors
that
are
going
to
influence
your
sampling
are
one
your
focal
ratio
of
your
setup,
so
aperture
size
to
focal
length,
keeping
in
mind
that
if
you
have
a
focal
extender
or
reducer
in
your
image,
train
that
that's
going
to
change
your
effective
focal
ratio,
so
that'll
change
the
equation
here.
Number
two:
is
your
sensor's
pixel
size?
B
Another
thing
I
should
mention
for
good
hygiene
is
if
you're
binning
your
sensor,
pixels,
that's
also
going
to
change
your
effective
pixel
size,
but
this
is
another
topic.
I
think
if
anyone's
particularly
worried
about
bidding
in
their
setup,
maybe
come
talk
in
the
after
class,
and
we
can,
you
know,
talk
about
the
specifics
there.
I
don't
think
most
people
need
to
worry
about
this
right
now
and.
B
I've
also
included
a
link
to
this
web
page
that
I
have
a
screenshot
of
here,
so
you
can
run
the
calculations
yourself,
but
as
an
example,
calculation
for
one
of
my
go-to
setups
I'm
using
an
8sc
telescope
at
F10
ratio,
I've
got
a
3X
Barlow
lens
I'm,
using
a
224,
MC
camera
and
I'm
in
poor,
seeing
conditions
in
San
Francisco.
If
you
look
on
the
bottom,
you
can
see
you
know
I'm
way
over
in
the
purple.
B
This
is
where
people
are
going
to
start
really
differing.
There
are
three
main
areas
of
software
that
you're
gonna
lean
on
for
planetary.
There
are
image
capture,
stacking
and
post-processing,
starting
on
the
capture
side
of
things.
The
number
one
most
recommended
software
for
planetary
capture
is
fire
capture.
B
That's
the
one
that
I'm
going
to
focus
on,
and
that's
the
one
that
I
use
the
most
I
do
also
see
people
using
sharp
cap
and
I've
also
seen
them
use
that
for
DSO.
So
you
know,
if
you're
more
comfortable
with
that,
maybe
you
can
stick
with
that
one,
but
you
know
I'm
giving
an
honorable
mention
for
stacking
there's,
also
a
number
of
options
to
tackle
this
part
of
the
workflow,
but
I'm
not
even
going
to
give
them
a
chance.
B
Just
use
Auto
Stacker
3
you're
going
to
get
the
most
support,
there's
great
reference
material
and
it
is
a
phenomenal
tool.
It
is
not
every
day
that
I
personally
consider
donating
money
to
free
software,
but
Auto
stackered
is
absolutely
one
of
those
tools.
It's
it's
magical
and
amazing
that
it's
free
for
post-processing.
This
is
where
you
start
having
the
most
flexibility:
I'm
not
going
to
go
into
detail
on
all
of
these,
but
I
want
to
just
kind
of
make
you
aware.
B
B
B
You
can
do
that
in
a
couple
different
ways,
but
I'm
going
to
say
just
use:
Auto
stacker
for
it
and
you're
going
to
align
your
good
frames
again.
You
have
some
options,
but
Auto
stacker
will
take
care
of
this
for
you
and
then
you're
gonna
stack
those
aligned
and
sorted
frames
once
again,
Auto
stack.
It
will
take
care
of
it
for
you
and
it'll
do
a
way
better
job
than
any
other
program.
B
I've
ever
seen,
then
you're
going
to
take
that
stacked
that
raw
stack
and
you're
going
to
sharpen
it
registax
an
Astra
image
or
the
two
that
I
would
recommend
the
most
I'm
going
to
show
you
how
to
do
this
in
Bridget
Stacks
tonight
then
you're
going
to
post
process,
it
I
personally
use
Photoshop
I'm
fortunate
enough
to
have
access
to
a
license,
but
will
work
just
as
fine
as
well
and
then
optional
step.
Number
seven
here
is
derotation.
B
I
want
to
just
touch
on
this.
For
a
second,
because
this
is
where
we're
going
to
start
Crossing
into
more
advanced
territory,
but
it
is
relevant
for
some
people,
especially
if
you
don't
have
a
One-Shot
color
camera.
But
this
is
where,
when
jukebox
comes
into
play,
in
my
experience,
most
of
the
like
really
amazing
planetary
shots
that
you've
seen
posted
around
have
been
derotated
to
some
degree
and
there's
a
few
reasons
why
you
would
want
to
do
this.
One
is
usually
when
you
image
planetary
and
you
stack.
B
Another
reason
is
this:
can
just
even
further
improve
your
signal
to
noise
ratio
and
really
bring
out
even
more
subtle
details,
but
for
people
who
are
Imaging
mono,
it's
probably
one
of
the
most
important
tools,
because
if
you
want
to
produce
a
color
image
of
Jupiter
you're
going
to
need
to
take
RGB
pictures,
and
so
afterwards,
you're
going
to
need
to
de-rotate
to
align
all
of
your
channels
to
a
good
midpoint
so
that
you
can
actually
create
the
RGB
stack.
But
for
now
at
first
most
of
you
here,
I
recommend.
B
B
B
B
B
A
big
thing
to
note
is
that
the
exposures
and
the
gains
are
definitely
going
to
change
with
your
specific
setup
and
your
viewing
conditions,
but
hopefully
this
is
a
good
sense
of
where
to
start
also
as
another
example,
if
let's
say
you
want
to
image
Saturn
with
all
the
same
gear
that
I've
shown
here,
except
you
want
to
use
a
2X
Barlow.
Well,
my
recommendation,
you
know
my
gain
of
445
is
going
to
be
too
high
because
that's
taken
with
a
3X
Barlow.
B
B
You
need
to
divide
these
capture
Times
by
the
number
of
filters
that
you're
Imaging
with.
So
if
you
want
to
do
an
RGB
of
Jupiter,
my
capture
time
here
says
three
minutes.
So
three
minutes
divided
by
three
filters.
That
means
each
filter
gets
one
minute,
Max
and
then
you're
gonna
have
to
go
and
de-rotate
those
Three
Stacks
in
win
jukebox.
B
Now,
if
you
are
really
Advanced
and
you
really
want
to
squeeze
out
as
much
performance
as
possible,
there
are
actual
trigonometric
calculations
that
you
can
do
based
on
your
particular
setup
and
your
conditions
to
figure
out
the
ideal
capture
time.
But
these
are
safe
values
compiled
by
the
cloud
unites
community,
so
I
recommend,
starting
here,
foreign
okay,
now
actually
getting
into
the
software
I
want
to
just
give
you
a
real
quick.
B
First,
in
fire
capture
under
the
control
panel,
turn
on
your
high
speed
mode
to
make
sure
that
you're
not
artificially
slowing
down
your
your
data
stream,
and
if
your
camera
supports
cooling,
you
can
set
a
Target
temperature
here.
Excuse
me:
I've
also
mentioned
a
bunch
about
trying
to
get
the
smallest
region
of
Interest
as
possible.
That
is,
under
this
menu,
the
smallest
region
of
interest
that
captures
as
large
of
an
image.
As
you
can.
B
You
know,
you're
interested
in
the
smaller
the
region
of
Interest,
the
faster
you're
going
to
read
out
your
data.
So
that's
under
the
image
menu
for
reference,
I
use
a
500
by
500
pixel
Square
for
most
planets
on
both
of
my
cameras,
but
that's
also
a
little
Overkill,
because
my
Mount
is
so
unstable,
the
planet's
kind
of
bouncing
around
and
I'm
trying
to
make
sure
that
I
don't
ever
lose
the
planet
in
my
field
of
view.
C
B
C
B
Next
to
it
are
some
pretty
key
features.
So
first
is
the
Ottawa
line
that
will
basically
cut
and
paste
the
image
of
whatever
Planet
you
have
in
your
sensor.
View
it'll
cut
and
paste
it
into
the
center
of
the
live
view.
I'll
show
you
how
to
use
this
in
another
slide
soon,
but
this
is
the
feature
that
one
removes
the
need
for
that
pip
program,
so
you
don't
ever
have
to
open
pip
and
two.
B
B
Note
that
auto
align
will
Center
The
View
on
the
reticle,
which
is
in
the
center
of
the
live
view,
and
you
can
toggle
the
reticle
on
the
left
side
menu.
There
I
recommend
turning
this
off
and
on
whenever
you
slew
your
scope
to
realign
the
planet
and
I
recommend
trying
to
keep
the
planet
centered
in
your
live
view
window
and
then,
once
you
have,
it
centered
make
sure
to
hit
the
center
Roi
button
so
that
your
newly
defined
region
of
interest
is
actually
taking
from
the
center
of.
B
C
B
B
But
a
huge
word
of
caution
is
you
want
to
make
sure
to
turn
off
debayering
for
your
actual
capture.
You
can
enable
it
in
the
settings
so
that
it
always
previews
debayered.
But
then,
when
you
go
into
capture
mode,
it
goes
mono
and
the
reason
you
want
to
do
that
is
it
takes
processing
time
to
pre-debayer
the
picture
before
writing
out
the
data,
and
that's
just
wasted
time
that
could
be
spent
on
capturing
more
data.
So.
C
B
Get
a
little
bit
of
a
speed
boost.
If
you
have
you
capture
in
mono
and
then
you
just
let
Auto
stacker
debater
for
you.
I
do
also
recommend
capturing
Avi
format.
Historically,
a
lot
of
people
have
recommended
Sarah
format
because
it
carries
the
Bayer
Matrix
information
along
with
the
file,
but
personally
I've
never
had
an
issue
with
this
and
I
haven't
seen.
Anyone
have
a
problem
with
it
recently
and
in
my
experience,
AVI
has
been
much
more
manageable.
B
It's
also
worth
mentioning,
while
you're
capturing
an
Avi,
you
can
just
stay
in
the
default
8-bit
capture
mode.
You
know,
if
someone's
going
trolling
around
your
settings,
you
might
see
that
there
are
higher
bit
depth
modes
and
yeah.
Technically,
you
can
store
more
detail
and
information
with
that,
but
with
the
dynamic
range
of
the
planets.
B
Okay,
all
that's
important,
but
the
most
important
piece
of
advice
on
the
screen
is
that
you
should
manually
focus
on
the
planet's
globe
or
circumference
and
don't
rely
on
using
a
stellar
mask
I
used
to
use
a
bottom
knob
mask
for
my
deep
sky
and
it's
great
for
that.
I
thought
it
would
transfer
well
to
planetary,
but.
B
Focuser
even
better,
but
you
know,
do
your
best
by
eye
to
get
details
as
sharp
as
possible.
I
actually
have
a
couple
video
examples
of
this
on
the
next
slide,
which
let's
get
this
done.
Let
me
Loop
this,
so
you
can
see.
Jupiter
is
out
of
view,
or
is
that
a
focus
because
I
was
culminating
just
before
this,
but
once
I
get
the
planet
in
view,
I
centered
on
the
reticle
I
enable
auto
align
to
keep
it
steady
and
then,
when
you're
focusing
on
Jupiter,
you
can
use
the
moons.
B
You
crank
down
the
gamma
crank
up
the
exposure
and
use
the
moons
as
a
visual
aid.
Try
to
get
them
as
small
and
sharp
as
possible.
You're
also
getting
a
glimpse
here
into
how
unstable
my
Mount
is.
You
know
you
can
see
me
constantly
having
to
fight
against
it.
This
is
sped
up
a
bunch
and
you
can't
hear
me
swearing
in
the
background
because
I'm
so
frustrated
with
like
conditions,
but
once
you've
got
the
moons
as
sharp
as
possible.
B
B
Then
another
example
here
Jupiter
was
pretty
easy
because
we
had
moons
to
rely
on,
but
for
Mars,
for
example,
it's
way
harder.
The
process
is
basically
the
same,
except
now
you're,
relying
on
the
disc
get
that
as
sharp
and
small
as
possible.
Luckily,
in
this
video
I
had
some
contrasting
features
on
the
surface
of
Mars.
That
I
could
rely
on
to
gauge
my
focus,
but
really
my
advice
here
is
I
mean
other
than
everything
else.
We've
discussed
is
just
to
really
take
your
time.
B
Notice,
I
keep
going
in
and
out
of
focus
to
make
sure
that
I
really
get
it
right,
and
you
know
it's
kind
of
bouncing
around,
but
not
as
much
because
we
have
the
auto
align
on
it's
just
it
can
be
a
very
frustrating
process.
It
takes
the
patience
of
a
saint,
but
you
will
get
there
if
you
have
a
motorized,
Focus
or
even
better,
but
just
really
take
your
time,
and
even
still
you
know
it
happens
to
the
best
of
us.
B
A
B
Not
at
all,
and
in
fact,
usually
what
I'll
do,
especially
for
like
Mars,
Uranus,
Neptune
I'll
go
find
a
star
as
close
as
I
can
and
focus
as
well
as
I
can
on
that,
and
that
will
get
you
pretty
dang
close,
if
not
right,
on
the
money,
but
of
course
the
farther
away.
You
are
the
you
know,
the
more
quickly
all
beds
are
off
so
I
found.
Even
you
know,
last
weekend,
I
tried
exactly
that
and.
C
B
After
you
know,
it
looked
like
I
was
in
really
good
focus
and
then
I
went
and
did
kind
of
a
pre-stack
and
I
was
still
coming
out.
Looking
a
little
soft
in
my
you
know
my
raw
stack
so
then
I
went
in
and
took
this
video
actually
that
we
were
just
looking
at
a
short
answer:
yeah,
it's
not
a
problem
at
all.
It's
a
good
way
to
start,
especially
if
you
don't
know
you
know
how
out
of
focus
you
might
be
slewing
to
the
planet.
B
Of
Auto
stacker,
this
is
the
stacking
program
that
I've
been
singing
the
phrases
of.
Don't
worry,
we're
going
to
take
a
look.
You
know
more
functionally
at
how
to
use
this
over
the
next
few
slides,
but
another
setting
that
I
want
you
to
turn
on
and
just
forget
about.
Is
the
planet
on
edge
of
fov
detection
just
turn
it
on
leave
it
on
forever?
C
B
B
So
this
was
not
a
great
data
set
coming
in
so
enable
that,
and
then
you
can
come
on
over
to
the
main
Auto
stacker
menu
here
or
window
I
recommend,
especially
for
people
just
starting
just
copy.
My
setup
that
I
have
here
my
configuration
as
you
get
more
comfortable.
You
can
start
tweaking
all
of
these
these
knobs
and
see
how
it
affects
your
final
output,
but
this
will
get
you.
B
Eighty
percent
of
the
way
for
just
about
anything
that
you
want
to
produce
is
my
assertion,
so
without
really
getting
into
the
dirty
details
of
how
all
these
settings
work,
I
recommend,
set
your
image.
Stabilization
to
planet
center
of
gravity,
plus
Dynamic
background
set
the
quality
estimator
to
LaPlace,
with
a
noise
robust
of
five
and
using
local
alignment.
Point
mode.
B
B
What
it'll
do
is
take
whatever
stack,
you
tell
it
to
compute
it
and
then
Auto
sharpen
it
within
these
parameters.
It's
important
to
note
that
your
auto
sharpened
result
will
never
be
as
good
as
you
manually
sharpening
the
raw
stack,
but
this
is
a
great
way
to
just
you're
out
in
the
field.
You're
not
sure
do
the
auto
stack
and
you'll
start
to
get
a
sense
kind
of
the
quality
that
it
outputs
and
you
can
use
that
to
calibrate
your
setup
now
up
here
in
the
top
right
corner.
B
Roughly
you'll
develop
your
own
strategy
for
interacting
with
this
region,
but
the
general
wisdom
online
is
find
your
50
crossover
Point
by
seeing
where
the
smooth
green
curve
intersects
the
the
midpoint
horizontal
axis.
So
you're
going
to
you,
know,
find
the
horizontal
axis
here
and
I
just
happen
to
have
my
vertical
green
bar
I've,
just
selected.
The
frame
that
happens
to
be
at
the
crossover
point.
But
it's
right
about
here.
That's
my
50
crossover
point.
That
is
the
maximum
number
of
frames.
You
should
ever
plan
to
stack
from
your
your
planetary
capture.
B
B
You
know,
start
more
conservative
and
get
out
to
the
maximum
and
auto
stacker
will
actually
batch
process
these
for
you
so
it'll
just
go.
You
know,
do
the
top
15
and
look
at
the
top
25
percent
and
what
you're
doing
is
you're,
seeing
how
much
you
want
to
trade
off
the
sharpness
of
the
image
right.
The
top
15
is
always
going
to
be
sharper
than
the
top
70,
but
the
top
15
is
going
to
be
noisier
than
the
top
70.
B
C
B
Let
off
stacker
do
its
thing:
okay,
that
was
a
ton
of
info
somewhat
pretty
technical.
So
you
know
it
took
us
55
minutes
to
get
here.
Here's
your
takeaway
prize,
if
you
totally
checked
out-
and
you
save
only
one
thing
from
this
talk-
just
take
a
screenshot
of
this
slide.
This
is
all
the
general
advice
that
I've
given
compiled
together
as
a
quick
reference
I'm
starting
in
the
capture
section.
B
There's
actually
three
points:
I
haven't
yet
explicitly
mentioned,
but
I
do
want
to
bring
up
numbers,
11,
12
and
13.
for
number
11.,
when
you're
trying
to
figure
out
your
own
exposure
and
gain
values.
Right,
I've
already
told
you
what
length
of
capture
to
use
for
each
planet,
and
then
you
have
figured
out
what
region
of
Interest
size
to
set
that
gets
you
your
high
frame
rate,
but
what
you
want
to
do
is
you've
already.
B
If
you
go
too
low,
you're
going
to
lose
detail,
but
if
you
go
too
high,
you're,
not
leaving
yourself
any
room
to
sharpen
and
your
pictures
are
going
to
be
forever
doomed
to
be.
You
know
blurrier
than
they
need
to
be
or
you're
going
to
totally.
You
know
blow
them
out
and
oversaturate
them
for
number
12.
One
way
that
planetary
Imaging
is
less
overhead
than
DSO
is
that
your
exposures
are
generally
not
long
enough
to
incorporate
issues
that
require
calibration
frames.
B
Maybe
if
your
Optical
train
is
dirty,
then
you
could
consider
taking
flat
frames,
but
I
have
experimented
with
this.
More
than
I
should
have,
and
I
personally
haven't
really
seen
any
benefits
to
using
calibration
frames
and
like
planetary
stuff.
The
exposures
are
just
too
short
for
number
13
I
did
want
to
give
a
quick
comment
on
Barlow's
I
have
some
crappy
Two
element
barlows
that
came
with
different
eyepiece
sets
and
they're.
Just
trash
I
honestly
have
considered
just
throwing
them
out.
I,
never
use
them
anymore.
B
I
highly
recommend
investing
in
the
explore
scientific
or
the
Powermate
Tel
avivs.
There
are
four
element:
design:
more
engineering,
higher
quality.
It's
like
a
really
premium
performance,
so
I
can
recommend
those
over
traditional
marlows
when
stacking
you're
going
to
find
a
lot
of
different
recommendations
out
there,
but,
like
I,
said,
don't
use
pip
unless
you
image
your
planet
without
tracking,
you
can
still
get
away
with
this.
There
are
people
that
just
let
the
planet
move
through
their
field
of
view.
B
That
is
one
case
where
pip
can
help
by
pre-aligning
your
your
frames
or,
if
you
had
the
planet
drift
in
and
out
of
view,
and
you
have
a
lot
of
empty
frames,
pip
can
kind
of
delete
the
frames
for
you,
but
also
Auto
stacker
can
handle
all
of
those.
So
you
know
I'll
leave
it
up
to
you
to
decide
that
one
if
you
do
end
up
in
PIP
with
a
color
camera
for
the
love
of
God.
B
There's
a
check
box
for
preserve
the
Bayer
Matrix
check
that
it
seems
obvious,
but
there
was
a
whole
threat
on
cloudy
nights
about
this
and
I
know
this
wasn't
the
first
one,
but
a
bunch
of
us
couldn't
figure
out
why
our
Jupiters
looked
like.
They
were
a
rainbow
dance
party
disco
ball
and
it
was
because
we
had
failed
to
preserve
the
Bayer
Matrix
after
cropping
in
PIP,
so
again
stay
out
of
pip.
It's
caused
me
more
pain
than
Joy.
B
B
B
Not
a
whole
lot
of
advice,
honestly,
technical
advice,
because
this
is
generally
where
it
turns
into
more
of
an
art.
In
my
opinion,
just
do
this
with
you
know
some
restraint:
don't
over
saturate,
don't
you
know,
increase
your
Vibrance
Super
High,
a
lot
of
planets
or
a
lot
of
cameras
will
give
planets
kind
of
this.
Like
anemic.
Look
so
I
do
recommend
you
know,
boost
the
saturation
and
the
Vibrance
a
little
bit,
but
you
know
try
to
keep
it
natural.
B
In
my
opinion,
you
can
also
do
an
RGB
balance
in
registax
and
just
that
save
those
numbers
to
get
a
more
natural
look
for
your
planet
moving
forward,
but
I
think
you
know
the
number
one
sin
that,
in
my
opinion,
a
lot
of
novice
planetary
imagers
make.
Is
they
really
over
sharpen
their
pictures
because
they
want
to
get
as
much
detail
as
possible?
And
you
know
the
over
sharpened
pictures,
just
in
my
opinion,
they
look
terrible
now.
B
Thing
I'll
say
where
I
finally
do
break
down
and
I
say
tip
is
better
than
anything
else.
If
you're
trying
to
make
an
animation
of
a
planet
rotating
once
you've
done
everything
else,
literally
the
last
step,
you
can
entrust
to
pip
to
just
align
your
frames
and
that's
another
topic.
You
know
we
can.
If
there's
interest,
we
can
do
another
Talk
of
the
actual
workflow
for
making
those
animations
okay.
So
now
your
reward
for
sitting
through
an
hour
of
advice,
you
know
learned
the
hard
way
from
me.
B
I
won't
claim
to
have
the
best
planetary
pictures,
even
just
within
this
group.
I
know
that
there's
a
number
of
veterans
in
the
audience
that
are
going
to
immediately
notice
things
that
I
can
improve
on
and
I
absolutely
welcome
the
feedback.
This
is
a
practice,
we're
all
still
learning
and
I
would
like
to
be
as
good
as
possible.
B
Then,
once
we
go
through
these
pictures,
real
fast
I
have
a
couple:
video
demos
to
walk
through
processing
the
Jupiter
data
that
I
sent
out
a
couple
weeks
ago.
So
we'll
start
here
starting
off
strong
I
realize
these
are
some
of
the
first
Saturn
pictures.
I
ever
took
with
an
actual
astrophotography
camera
and
I
clearly
had
a
lot
to
learn,
but
you
can
see
the
picture
on
the
left
was
stacked.
The
final
stack
was
about
112
frames,
but
compared
to
the
picture
on
the
right
that
was
stacked
with
about
4
000.
B
So
you
know.
Suddenly
you
can
see
the
benefit
to
taking
a
lot
of
Subs,
even
without
changing
anything
else
about
your
actual
hardware
setup
now
starting
to
improve
these
are
not
super
comparable
images
because
they
were
taken
with
different
cameras
using
different
lenses
and
in
different
locations.
One
was
taken
on
the
left
from
the
top
of
Mount
Diablo.
B
The
one
on
the
right
was
taken
from
my
roof,
but
I
think
it
does
do
a
good
job
of
showing
you
know.
I
went
to
Mount
Diablo,
partially
with
the
goal
of
getting
away
from
the
light
pollution,
because
I
thought
that
was
what
was
really
killing
my
images,
but
you
know
I'll
leave
it
up
to
you
to
decide
which
of
these
views.
You
prefer
but
I,
think
it's
pretty
clear
that
the
light
pollution
is
not
the
limiting
factor
here.
B
These
were
taken
on
the
same
day,
both
in
San
Francisco,
both
with
3x
barlows,
except
the
one
on
the
left.
I.
Think
here,
I
can't
see
my
own
slides.
The
one
on
the
left
is
taken
with
a
294
and
the
one
on
the
right
thing.
With
the
two
two
four,
this
I
I,
you
know
found
actually
pretty
interesting.
I
didn't
quite
realize.
You
know
same
stack,
percentage
same
exposure,
similar
numbers
of
frames.
B
Again,
you
know,
I'd
leave
it
up
to
you,
for
which
one
you
prefer,
because
at
that
point
it
turns
into
more
of
an
artistic
exercise.
But
hopefully
this
gives
you
a
sense
of
kind
of
capabilities.
I
haven't
spent
as
much
time
with
Saturn
as
I
should
have
so
I
claim.
My
gear
can
do
better
than
this
I
need
to
spend
some
more
time
on
it.
C
B
I'm
going
to
skip
a
lot
of
pain
and
heartache,
and
these
are
some
of
the
most
recent
pictures
I've
taken
of
Jupiter.
These
are
actually
both
the
same
picture
generated
from
a
derotation
of
14
sets
of
8
000,
stacked
images
over
a
couple
of
hours
in
San,
Francisco
and
I
know.
I
just
said:
don't
do
this,
but
I
intentionally
over
sharpened.
These
pictures.
Normally,
when
I
see
pictures
this
over
processed.
B
You
could
easily
do
better
than
this
now
moving
into
some
more
kind
of
work
in
progress,
shots
I
spent
the
most
time
on
Jupiter
here,
I
tried
my
hand
at
Uranus,
there's
not
a
whole
lot
of
detail.
You
know,
don't
go
expecting
something
like
Jupiter
for
Uranus,
it's
very
far
away.
It's
a
very
homogeneous
Planet.
If.
B
An
IR
there's
a
little
more
detail.
You
can
pull
out,
but
this
is
straight
RGB
and
you
can
see
the
difference
that
about
a
year
of
experience
in
a
3X
Barlow
makes
the
first
time
around
on
the
left.
I
got
my
debaring
wrong,
so
Uranus
came
out
with
this
deep
green
color.
That
is
wrong,
but
on
the
right
side
there
you
can
see
a
more
recent
image
and
again
there's
a
lot
more
room
for
improvement.
B
I
also
didn't
realize
how
similar
in
color,
Uranus
and
Neptune
truly
were
I
feel
like
I,
always
see
pictures
of
this
like
pale
cyan,
and
then
this
deep
blue,
the
picture
on
the
right
here.
The
saturation
was
boosted
a
little
bit,
which
kind
of
brought
the
blue
out
more.
But
you
can
see
the
picture
on.
The
left
is
actually
basically
the
same
color
as
Uranus.
B
B
So
that's
another
way.
You
can
extract
more
information
out
of
this.
I,
do
also
want
to
point
out
for
people
that
you
know
are
if
you're
going
to
start
with
imaging-
and
you
start
with
Mars-
don't
despair
on
the
left
picture
on
the
far
left
edge
of
Mars.
You
can
see
this
really
bright
section.
That's
something
called
the
Mars
rind
you're,
almost
certainly
going
to
run
into
this
issue
when
you're
processing
your
Mars
pictures.
B
If
you
want
to
Google
Mars
rind,
you
can
find
a
lot
of
articles
about
how
to
deal
with
it,
but
it's
an
artifact
that
shows
up
when
you're
Imaging
Rocky
bodies
like
Mars
Mercury,
the
moon,
because
the
sharp
edge
of
the
planet
against
the
black
background
represents
a
very
noisy
boundary
when
you're
processing.
So
you
have
to
take
care
to
process
around
it,
which
I
have
not
done
here.
B
But
one
thing
I
did
note
is
that
these
pictures
came
out
a
lot
less
noisy
than
the
previous
slide,
which
I'm
proud
about
I.
Think
it's!
You
know
we're
trending
in
the
right
direction,
so
more
examples
of
what
you
can
accomplish.
With
this
setup,
honorable
mention
I
did
Once
Upon
a
Time
Try
to
image
about
Pluto
and
Venus
Venus
was
very
early
on
I
had
zero
clue
what
I
was
doing.
The
data
was
incredibly
Overexposed
and
it's
totally
unsalvageable.
B
So
that's
the
only
monstrous
monstrous
image
I
have
of
Venus
and
Pluto
I
didn't
know
what
to
expect
so
I
actually
put
on
a
reducer
and
imaged
it
more
like
DSO.
So
I
think
this
was
like
100
second
integration
time,
and
then
it
took
me
about
a
year
before
I.
Finally,
just
sat
down
in
stellarium
and
figured
out
where,
in
this
picture,
Pluto
actually
was,
and
so
you
can
see
the
teeny
tiny
dot
there.
It
was
not
the
one
that
I
thought
it
was
going
to
be.
You
know.
B
B
B
The
moon
also
really
lends
itself
to
making
these
like
giant
High
magnification
mosaics,
so
the
picture
on
the
right
is
actually
seven
sections
taken
with
a
2X
Barlow,
each
with
a
stack
of
a
thousand
frames
and
then
I
stitched
it
together
using
that
Microsoft
ice
program
that
I
mentioned
earlier
this.
You
know
that
workflow
is
probably
worth
another
document
of
itself
as
well,
there's
a
lot
of
ways
that
you
can
skin
that
cat
and
then,
while
I
have
everyone's
eyes.
B
B
You
can
also
clearly
see
my
Orion
Nebula
up
there.
That
was
the
first
deep
Sky
I
took
and
I
got
my
debaring
totally
wrong,
but
I
was
so
deep
into
it.
You
know
so
much
sunk
cost
by
that
point,
that
I
decided
just
to
roll
with
it
and
I
kind
of
like
it,
but
really
I
bring
these
up,
because
if
anyone
is
thinking
like,
oh
no
I
only
have
DSO
gear.
You
know
I
can't
get
into
planetary,
don't
despair!
B
B
B
It
will
get
you
most
of
the
way
there
for
everything
you
want
to
do
and
hopefully
cover
all
of
your
questions.
My
goal
with
this
presentation
was
to
save
you
all
the
reading.
It's
a
pretty
hefty
FAQ,
so
I
argue
that
just
off
of
this
presentation,
you've
probably
gotten
enough
information,
but
if
you
have
more
specifics
that
I
haven't
covered.
That
FAQ
is
the
first
thing
to
look
at
I,
also
included
a
link
to
a
presentation
that
the
developer
of
Auto
stacker
gave
a
few
years
ago.
B
It
was
actually
for
auto
stacker
2,
so
an
older
version.
So
it's
a
little
outdated,
but
a
lot
of
the
concepts
apply
if
you're
trying
to
find
some
more
specifics
about
how
you
should
stack
your
particular
images
and
then,
if
you
are
someone
who
doesn't
have
a
camera
for
planetary
and
is
looking
to
invest,
High
Point
scientific
has
a
really
great
tutorial
on
how
to
choose
your
planetary
camera.
B
B
Interested
I
also
jotted
down
I,
was
telling
hi.
You
know
before
we
got
here
before
everyone
else
got
here.
There
were
a
lot
of
topics
that
I
wanted
to
touch
on
and
then
ultimately
decided
not
to.
But
if
there's
interest-
and
you
know
people
are,
you
know
they
want
some
more
input
on
how
to
do
any
of
these
other
things
here.
B
B
I
have
a
couple
of
videos
showing
me
actually
capturing
the
data
out
in
the
field
and
then
I'm
actually
going
through
the
workflow,
and
then
we
can
watch
it
together
and
kind
of
play,
pause
and
talk
through
it,
but
I
think
now
a
pretty
good
opportunity.
If,
if
anyone
had
questions
based
on
the
content,
we
saw
so
far
and
I
think
that's
probably
a
good
time.
A
D
I
could
just
say
it
what
it
was
I
I
had
I
had
just
put
in
the
chat.
What
that
m.2
memory
device
I
bought
was
just.
If
you
want
to
comment
on
it
at
some
point
you
can
see
it
was
that
second
type,
which
I
don't
really
understand.
The
difference
was
what
it
was
an
nvme,
and
it's
really
very.
Quite
it's
really
fast.
So
I
don't
know
what
the
difference
is
between
that
and
the
SATA
is
the
other
version
of
the
m.2.
B
B
B
D
Yeah
this
was
this
was
me
again
and
I.
Have
a
observed:
I
I
have
a
full-fledged
Observatory
on
my
roof
and
I
never
would
have
dared
put
it
up
there.
If
I
hadn't
found
a
structural
element
in
the
roof,
which
was
absolutely
Rock,
Solid,
so
I'm
just
saying
that
on
your
roof
there,
that
you're
stuck
with
I,
don't
know
if
you've
looked
at.
You
probably
have,
since
you
seem
to
have
a
good
technical
background,
but
you
might
look
for
some
support.
D
That's
beneath
the
actual
Roofing
that
would
be
a
solid
structural
member
and
then
like
what
I
did
was
I
put
concrete
over
that
sucker
and
rebar
and
all
sorts
of
rest
of
it.
So
I
I
basically
made
myself
a
peer
on
top
of
a
structural
element
of
the
roof.
Now
you
may
have
to
do
that
at
midnight
sometime
when
no
one
is
at
your
apartment.
House
is
looking
looking,
but
you
know
remember
it's
easier
to
ask
for
forgiveness
than
to
ask
for
permission,
but
I
I,
just.
D
I'm
just
saying
I'm,
just
saying
buddy,
you
know
if
you
want
a
stable,
you
want
a
stable
Pier.
You
find
that
structural
element.
You
pour
some
concrete
over
it
with
a
little
rebar
and
maybe
a
little
bolt
straight
through
into
that.
That
element
and
you'll
be
you'll,
be
you'll.
Think
you
won't
have
to
worry
about
collimation
yeah.
B
You're
you're
describing
my
my
dream
home
accessory.
You
know
that's
what
at
some
point,
you
know
I
want
a
nice
stable
spot
to
build
my
own
Observatory,
but
you
kind
of
hit
the
nail
in
the
head.
I
won't
go
into
a
whole
lot
of
detail,
but,
let's
just
say,
I'm
kind
of
Imaging
out
there
secretly
so
I'm
more
concerned
with
finding
a
clandestine
spot
rather
than
the
most
secure.
B
But
you
know
again,
I
hope
that
what
the
impression
I've
left
with
people
is
that
from
those
pictures
you
know
I
think
some
of
those
are
objectively,
not
bad.
At
least.
Certainly
you
know
from
taking
from
an
unstable
setup
with
a
lot
of
light
pollution,
and
you
know
kind
of
modest
gear,
I
hope
what
people
see
is,
or
you
know
they
take
away
some
confidence
that
they
could
also
pull
this
off.
C
B
Of
atmosphere
that
we're
traveling
through
and
based
on
their
wavelength,
they're
going
to
you
know
the
the
red
light
versus
the
blue
light
is
going
to
be
bent
at
different
rates.
You
know
they're
going
to
travel
at
different
speeds,
so
you
know,
if
you
can
imagine
if
you're
Imaging
like
on
the
moon,
you
don't
have
this
problem
because
there's
no
atmosphere
to
distort
the
photons
of
light
coming
in.
B
You
know
to
split
up
the
white
light
into
its
constituent
colors,
but
through
the
Earth
you
can
imagine
right
if
you're
Imaging
perfectly
at
the
Horizon
you're
kind
of
you're
going
through
a
lot
of
atmosphere,
as
you
start
increasing
the
angle
with
respect
to
the
sensor
that
the
light
is
hitting
your
sensor,
there's
less
opportunity
for
the
atmosphere
to
act
as
a
prism
and
break
apart
the
light.
Basically,
what
you're
doing
is
you're
going
to
install
the
ADC
I
actually
have
it
here.
B
B
Fire
capture
also
does
have
an
ADC
helping.
You
know,
widget
installed
in
it
to
you
know,
take
some
of
the
guesswork
out
of
this,
but
basically
to
answer
your
question.
What
you're
doing
is
the
atmospheric
dispersion
is
a
well
understood
phenomenon.
It's
a
solved
function
of
wavelength
and
angle,
so
you're
setting
two
prisms
to
undo
the
dispersive
effects
of
the
atmosphere.
So
it's
you
know
it's
the
anti-atmosphere
basically
and.
B
B
B
A
C
B
This
was,
you
know,
there's
actually
there's
a
number
of
schematics,
also
our
circuits
behind
it
that
you
probably
can't
see
as
well.
This
particular
one
I
think
was
a
technical
interview.
Question
that
my
wife
was
asked
when
she
was
interviewing
around
a
couple
years
ago.
You
can
see
I,
haven't
I've,
been
using
the
space
back
here,
but
I
think
the
question
for
this
one
was
to
figure
out
based
on
the
configuration
of
fets
here.
What
operational
mode
is
each
set
in.
B
Section
yeah
all
right,
so
yeah
I
want
to
be
sensitive
in
people's
time
here.
So
there's
two
videos
I
mentioned
the
first
one
is
just
a
couple
of
minutes
and
then
other
one
is
about
eight
minutes,
but
let's
just
kind
of
play
and
pause.
Let's
go
through
I'm.
Also
gonna
come
out
of
my
presenter
review,
but
let's
see
if
I
can
pull
this
off.
B
B
That's
what
the
little
test
tubes
there
are,
and
here
I'm,
enabling
the
auto
guiding
mode
so
that
I
can
control
my
Mount
from
the
computer.
This
is
pretty
sped
up,
but
basically
my
alignment
was
off
I'm
hunting
around
to
find
Jupiter
and
I'm
in
a
test
profile
so
that
I
can
mess
with
the
gamma
the
gain
the
exposure
just
to
get
comfortable
get
my
bearings
without
actually
changing
the
ideal
capture
parameters
that
I
usually
use
for
Jupiter
and.
B
Edited
out
the
section
where
I
was
focusing
and
I
made,
that
its
own
video
that
we
watched
earlier,
but
you
can
see
here
at
the
histogram,
is
sitting
in
the
60
to
80
region.
You
can
see.
Jupiter
is
actually
not
looking
terrible.
Given
my
setup
and
what's
going
to
happen,
is
now
that
I
took
my
capture.
I'm
gonna
go
look
at
the
video
and
just
make
sure
that
what
I
captured
there
wasn't
anything
weird
that
happened
with
it.
B
And
then,
unfortunately,
there
was
an
issue
with
the
screen
recording
here,
but
I
brought
the
video
into
Auto
stacker
and
I'm.
Just
gonna
real
fast
click
stack
and
generate
that
auto
sharpened
raw
stack
that
I
mentioned
earlier
just
to
see
how
I'm
doing
out
in
the
field
also
notice
that
I
imaged
in
mono,
so
you
can
see
Jupiter,
is
in
grayscale
here
it's
in
black
and
white,
so
I
get
that
little
extra
speed
boost
now
on
this
other
video.
B
This
is
where
we
really
get
into
the
mean
of
the
processing.
So
this
is
the
data
that
I
sent
out
a
couple
weeks
ago,
and
hopefully
you
know
I
would
recommend
for
someone
who's
getting
into
planetary.
They
don't
really
know
what
they're
doing
this
video
is
meant
to
be
come
back
later
on
I'll
embed,
a
link
in
the
the
pdf
version
of
the
slides
that
I
set
out
so
that
you
can
go
to
my
YouTube
channel
and
see
this.
But
this
should
give
you
you
can
play
and
pause.
B
You
can
keep
following
it
along
and
watch
the
actual
workflow
and
process
here.
So
first
step
is:
go
check,
your
your
data
that
you
grabbed
and
oh
looks
like
I
lost
Jupiter
in
the
field
of
view,
so
I'm
gonna
have
to
deal
with
that
I
intentionally
sent
out
bad
data
like
that,
because
I
wanted
to
see
if
anyone
was
going
to
get
tripped
up
by
it,
because
that
that
will
ruin
your
image.
B
The
planet
is
being
chopped
in
half
there,
so
I
bring
the
brightness
down
and
make
sure
my
debaring
is
okay,
make
sure
I've
set
the
detection
for
edge
of
fov
I
have
set
on
my
other
settings
based
on
how
I
recommended
and
then
I'm
going
to
go
ahead
and
hit
analyze
and
I
spend
that
way
up
now.
I
want
to
point
out
here
the
quality
graph
down
here
notice,
how
it
shows
that
basically,
every
single
frame
is
below
50
quality.
B
B
If
we
turn
up
the
brightness
and
we
go
search
elsewhere
somewhere,
oh
right
at
the
front,
so
Auto
stacker
saw
that
sharp
edge
and
rated
that
as
a
very
high
quality
frame,
because
it's
got
a
very
sharp
edge
to
it.
So
Auto
stacker
it
sees
oh,
this
is
the
top
frame.
It
ranks
that
very
high
everything
else
gets
normalized
and
rescaled
off
of
that.
So
it's
tricking
you
into
thinking
that
you
have
absolutely
garbage
data.
B
B
Think
I
literally
took
45
minutes
doing
this
over
and
over
again,
but
it's
basically
the
same
process
up
I
turn
up
the
brightness
I
find
any
frames
that
look
like
they're
cut
off
I
hit
the
space
bar
to
reject
it,
and
then
I
go
re-analyze
and
now
I'm,
just
kind
of
playing
back
and
seeing
well.
It
looks
like
oh
I
missed
some
more
drifting
I.
Do
also
want
to
point
out,
oh
hit
the
wrong
button.
B
B
B
B
I
generally,
don't
find
the
need
to
stray
too
far
off
of
what
the
software
has
recommended.
I
also
want
to
point
out
this
setting
here.
An
AP
size
of
96
and
multi-scale
gave
me
33
alignment
points
on
Jupiter.
That's
actually
a
pretty
good
number.
You
don't
necessarily
want
thousands.
It's
going
to
take
forever
to
process
and
doesn't
you
know,
there's
diminishing
returns,
but
I
am
going
to
go.
Add
a
few
more
manual
points
on
the
Great
Red
Spot.
Just
to
you
know,
make
sure
that
that
section
gets
a
little
extra
care.
B
B
C
B
Alignment
points,
but
once
you've
got
all
that
set
up,
you
can
go
ahead
and
hit
stack
and
I've
sped
this
up
a
ton
but
Auto
second
goes
and
it'll
first
generate
my
15
stack
that
I
have
there
and
then
it's
going
to
go
through
and
do
my
25
stack
and
then
my
35
and
my
56.
I
have
the
option
save
in
folders
selected.
B
So
what's
going
to
happen,
is
each
stack
is
going
to
be
saved
in
its
own
15
folder
25
percent,
and
you
can
see
the
15
folder
showed
up
here
and
I'm
going
to
go
open
and
check
the
raw
stack.
Okay
like
looking
decent
kind
of
blurry
as
expected,
but
now,
let's
go
check
the
auto
sharpen
stack
and
not
too
shabby
You
can
compare,
and
you
know
the
sharpened
one
is
on
the
left.
The
raw
one
is
on
the
right.
There's
pretty
good
detail
when
I
first
started
doing
planetary.
B
B
B
This
is
you
know
from
the
the
raw
data
and
then
the
RGB
alignment
in
Auto
stacker,
so
I'm
just
going
to
hit
the
auto
balance
button
and
you'll
see
it
gets
rid
of
that
blue
green
cast
and
gives
it
a
more
much
more
natural
look,
and
now
this
is
a
good
setting
for
you
know
if
I
ever
image
Jupiter
again
with
this
setup,
I
can
basically
pretty
much
rely
on
these
numbers
to
be
pretty
consistent.
But
that's
always
my
first
step
is:
do
the
RGB
balance?
B
Now,
if
you
don't
have
an
ADC,
the
atmospheric
expression
corrector,
you
can
do
this
RGB
align.
This
image
does
not
really
have
issues
with
dispersion.
I
imaged
it
pretty
high
in
the
sky,
but
I
have
had
images
where
you
can
see
like
there's
kind
of
a
red
smear
on
one
side
and
a
blue
smear
on
the
other.
B
You
can
start
to
you
can
kind
of
combat
that
by
dragging
this
green
square
to
Encompass
the
entire
globe
and
then
hit
estimate
and
it'll
think
for
a
minute
and
in
my
case
there
was
no
dispersion
that
it
felt
it
could
correct.
So
it
just
didn't
change
anything
so
get
rid
of
that
come
into
the
histogram
tool.
B
I
recommend
using
the
log
based
graph
just
to
give
you
a
really
good,
sensitive
sense
of
how
the
changes
that
you're
about
to
make
affect
the
histogram
and
they're
going
to
come
over
into
the
wavelets
section.
So
there's
a
few
things
to
point
out
here:
oh
my
gosh
I
apologize
I'm
clicking
too
much
I'm
getting
too
excited.
So
there's
a
few
things
in
the
wavelets.
B
There
is
a
huge
huge,
huge
huge
art
to
interacting
with
wavelets
I
have
yet
to
find
someone
who
has
really
explain
this
to
me
in
a
way
that
I
find
satisfying
and
comfortable
I'm
sure
there's
a
number
of
experts
in
this
group
that
could
do
a
good
job
of
that.
But
what
I'll
say
is
most
people
don't
understand
what
they're
doing
here?
I,
certainly
don't
have
a
great
sense:
I
have
a
relative
sense,
but
not
really
an
absolute,
but
I
recommend
don't
use
linked
wavelets.
B
B
One
will
operate
on
very
small,
fine
details
and
then
moving
up
to
layer,
six
will
operate
on
much
coarser
detail
and
basically,
what
you're
going
to
do
is
move
the
sliders
to
determine
how
strongly
that
particular
layer
is
affected
and
then
you're
going
to
adjust
the
sharpen
values
and
the
denoise
values.
So
sharpen
is
going
to
do
exactly
what
it
sounds
like
it's
going
to
bring
out
the
detail,
but
it's
also
going
to
bring
out
noise
and
then
you're
going
to
want
to
combat
that
with
denoise.
B
So
you'll
come
up
with
your
own
strategies
here
for
Jupiter
I,
usually
start
with
just
crank
up
layers,
one
and
six.
This
is
mostly
a
Superstition
I
have,
but
then
I
hit
the
up
button
about
five
times
and
you
can
see
the
image
is
starting
to
sharpen,
but
you
can
also
see
now
it's
starting
to
add
noise,
so
I'm
going
in
and
denoising.
B
You
can
also
see
how
it's
affecting
the
histogram
and
you
can
use
the
zoom
panel
here
to
get
kind
of
a
closer
view
of
you
know
in
particular,
I'm
worried
about
the
great
red
spot.
So
I
think
this
is
over
sharpened.
At
this
point,
I'm
starting
to
back
off
the
sharpening
and
I
want
to
have
a
good
balance
between.
If
you
put
too
much
denoising,
your
image
is
going
to
go
soft
again
and
you're
going
to
lose
that
detail.
B
If
you
go
too
hard
on
the
sharpening
you're
going
to
add
a
lot
of
noise
and
it's
going
to
look
unnatural,
so
I'm
just
tweaking
this
finding
some
good
settings
that
I'm
comfortable
with
then
I'm
going
to
go
in
and
I'm
going
to
rotate
it.
So
it
looks
nicer
to
me
orients
properly
and
then
I
took
this
show
processing
area
I'm
using
a
very
small
region
of
Interest.
Here
this
is
500
pixels
by
500
pixels
roughly,
so
the
processing
area
is
the
entire
picture
here.
B
But
if
you're
doing
larger
pictures
with
a
larger
region
of
Interest
like
you've
got
on
the
moons
or
something
you're
only
going
to
get
a
preview
of
the
changes
that
you're
making
everything
that
I'm
doing
is
only
going
to
show
on
one
small
part
of
the
screen,
that's
encompassed
by
the
four
Great
Corners
here.
That's
the
processing
area,
there's
also
another
feature.
The
show
Full
image
I
generally
stay
away
from
that
it
kind
of
zooms
it
in
a
little
bit.
B
But
in
my
experience
it
actually
shows
a
lower
quality
preview
than
the
picture
actually
will
be
so
I
stay
away
from
that,
then
you're
gonna
hit
do
all
to
apply
the
changes
to
every
portion
of
your
image
and
then
go
save
them.
So
I
go
and
save
this
to
a
process
folder
and
then
without
changing
anything.
B
This
is
really
sped
up
because
I'm,
just
dragging
in
my
additional
Stacks,
my
25,
my
35,
my
56
I'm,
dragging
them
into
Reddit
stacks,
and
it
will
automatically
apply
the
exact
same
changes
that
I
made
across
all
of
them.
And
now
we
can
see
the
side
by
side
by
side
comparison.
I
did
three
stacks.
The
56
percent
is
still
running
in
the
background
in
Auto
stacker,
but
you
can
kind
of
see
it's
pretty
hard
to
tell
in
this
view,
I
think,
but
on
my
screen
it's
pretty
noticeable.
B
The
lower
percentage.
Stacks
have
more,
you
know:
they're
sharper,
the
higher
percentage
Stacks
have
less
noise,
but
they're
also
softer.
So
this
is
the
point
where
you
choose,
which
one
kind
of
came
out
best
for
you
and
so
at
some
point,
I
picked
one
of
these
I
guess:
I
went
with
the
35
I
pulled
it
into
Photoshop.
B
B
You
can
mess
with
the
saturation
like
I
said
earlier,
be
gentle
with
this,
because
you
can
pretty
quickly
ruin
your
picture,
but
I
recommend
do
everything
in
camera
raw
filter.
There
is
also
a
sharpening
function
in
Photoshop
that
I
didn't
want
to
point
out.
I.
Think
it's
really
coarse.
It's
really
rough
I,
don't
usually
get
good
results
with
it.
I
usually
do
all
my
sharpening
and
radio
Stacks
or
after
image.
B
So
this
is
me
just
kind
of
playing
around
but
I
recommend
going
to
camera
raw
filter.
It's
a
plug-in
that
is
very
powerful
and
pretty
straightforward,
and
then
you
can
go.
You
can
add
a
little
bit
of
simple
sharpening
if
you
want
I,
usually
add
a
very
tiny
amount
of
noise
reduction
at
the
very
least
just
a
very
small
amount
to
kind
of
clean
things
up
and
I'm,
just
kind
of
picking
the
point
that
I
think
looks
and
feels
nice.
B
Then
I'm
gonna
go
back
in
and
I'm
going
to
boost
the
saturation
and
the
Vibrance
and
I
never
remember
where
this
menu
is
I.
Remember
hunting
around
for
this
I
clicked
everywhere,
except
where
it
actually
was
turns
out.
It's
under
basic
I'll
find
it
eventually
there
we
go
who's
the
Vibrance
in
the
saturation
just
a
little
bit,
get
rid
of
that
kind
of
anemic.
Look
so
I'm
getting
comfortable
great
okay.
I
picked
my
values.
B
Now
you
can
see
also
there's
these
sharpening
artifacts
in
the
corners
of
the
picture,
so
I'm
just
gonna
go
crop
those
out
and
then
I'm
going
to
Center
the
planet
in
my
crop
View
and
then
don't
forget
to
add
your
watermark
and
put
that
somewhere,
not
in
the
way
and
then
I
go
and
Export
this
as
a
PNG.
Now.
B
B
Carefully,
but
what
I'm
going
to
do
is
stretch
this
I'm
dragging
the
bar
on
the
far
right
side,
inward
and
I'm,
going
to
make
better
use
of
the
histogram
space
that
I
have,
and
what
that's
going
to
do
is
brighten
up
the
planet
a
little
bit.
Oh
there
you
go
it's
a
little
bit
brighter
for
some
data
sets
it's
more
pronounced
of
an
effect
than
others,
but
here's,
my
56,
you
know
I
stretched
it.
You
can
see
the
difference
in
brightness
and
I'm
going
to
go.
B
B
You
know.
Boost
and
performance
also
note
that
this
final
result
on
the
left.
This
is
not
a
d
rotation
right.
This
is
just
a
single
set
of
of
this
one
frame
stack
frame
from
the
set
of
a
single
capture,
so
the
images
that
I
showed
you
earlier
in
the
presentation
that
was
14
of
these
left
images
that
had
been
de-rotated
and
stacked
on
top
of
each
other,
and
that's
how
I
got
so
much
more
detail,
but
this
is
still,
in
my
opinion
again,
like
you
know,
it's
not
bad
I.
B
Think
for
you
know
Imaging
in
the
San
Francisco
rooftop.
This
is
great
if
you're
doing
it
in
your
suburban
backyard,
I
think
you
can
get
way
better
data
than
this.
So
move
on
to
the
next
slide.
Thank
you
for
listening,
I've
included
pictures
of
my
emotional
support
animals.
Here
we've
got
Bart
minzy
and
Oscar
I'll.
Leave
it
up
to
you
to
guess
which
one
is
which
oh
I
did
also
I
do
want
to
point
out.
I
have
some
bonus,
slides
here
for
people
that
are
interested.
B
B
I
mentioned
the
edge
rind
effect
on
Mars
there's
also,
something
called
the
onions
can
affect.
I
won't
really
get
into
it
right
now.
This
is
getting
a
little
more
advanced,
but
here's
a
reference
if
you
find
that
you're
having
problems
with
this
in
your
processing,
there's
a
link
that
talks
about
how
you
can
approach
this
and
kind
of
process
around
it
and
then,
finally,
for
anyone
having
trouble
with
the
RGB
balance
or
you
know
their
one
shot.
B
Color
camera
balancing
the
author
of
The,
Claudia,
Knights
planetary,
Imaging,
FAQ,
actually
wrote
a
post
about
this
I'm
just
linked
to
here
talks
a
little
bit
about
how
you
can
deal
with
the
RGB
balancing
on
the
capturing
side
rather
than
on
lead
process
inside
okay.
Now
for
real,
that's
it.
That
is
all
of
my
slides.
That's
all
the
information
I
have
the
rest
of
this
is
time
for
questions
or
if
people
want
to
call
it
quits
there.
But
thank
you
for
giving
me
the
platform
and
the
time.
A
A
B
B
You
have
access
to
me
through
the
the
group
and
I'm
sure
my
contact
information
is
somewhere
but
I'll
send
out
the
slides.
Please
reference
those
and
if
you
have
questions
reach
out
to
me,
I'm
happy
to
answer
and
talk
about
specifics
of
your
setup,
and
you
know.
Let
me
know
if
you
have
other
questions
that
you
want
to
see
in
other
talks
and
I'm
excited
to
see
I
hope,
there's
now
a
flood
of
planetary
pictures
that
put
mine
to
shame,
because
everyone
is
Imaging
from
better
conditions
than
I
am.