►
From YouTube: SJAA Imaging Special Interest Group 05 18 2021
Description
Glenn Newell will discuss his latest (not so) secret Pixinsight weapon, the Autointegrate script and will give an update on (technical) plans to safely share Live Stacked images with the public at SJAA events. Then Francesco Meschia will give an introduction to NINA, Nighttime Imaging 'N' Astronomy imaging suite.
A
A
He
will
be
talking
about
nina
that
it's
a
an
data
acquisition
program
and
we
touched
on
that
a
little
bit
last
time,
but
he's
gonna
give
us
a
deeper
dive
into
nina,
which
is
these
days
there's
a
lot
of
choices
in
programs
you
can
run
and
so
nina
is.
Is
a
fairly
new
one
and
and
one
that's
a
little
more
user,
friendly
than
say
a
sequence
generator
pro,
but
maybe
not
as
full
featured,
but
you
know
it's
it's
getting
there.
A
B
B
A
Yeah
everybody
was
muted,
okay,
so
yeah,
as
I
mentioned,
so
I'm
going
to
talk
about
auto,
integrate
for
pics
insight.
This
is
a
a
script
that
I
recently
stumbled
across
and
I've
been
using
it
like
mad
and
it's
really
made
a
big
difference
in
my
enjoyment
of
the
hobby
and
what
I
can
do
in
in
pixel
sight
in
a
in
a
hurry
so
yeah,
so
I'm
glenn
newell.
A
I
run
the
hands-on
imaging
program
for
sjaa,
I'm
also
on
the
board
of
directors
and
my
email
address
is
there?
If
you
want
to
reach
out
to
me,
that's
no
problem,
so
we're
going
to
talk
about
start
with
some
links
and
I've
already
put
the
the
links
in
the
in
the
chat
as
to
where
you
can
get
the
script
and
where
you
can
learn
about
the
script.
A
Where
did
this
script
come
from
or
really
how
I
found
out
about
it
and
and
how
long
has
it
been
around
and
then
we'll
dive
into?
What
does
it
do
and
we'll
do
a
couple,
quick
demos,
and
then
we
can
do
some
some
q,
a
on
the
right
hand
side
here.
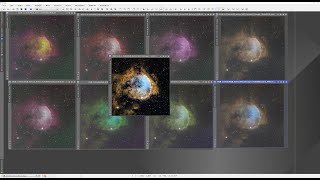
One
of
the
things
that
auto
integrate
can
do
is
is
do
a
bunch
of
different
color
palettes.
So
here
I've
shown,
I
guess
what
are
there.
A
Eight
nine
different
eight
different
color
palettes
for
the
same
data
and
then
in
the
center.
Here
is
what
I
what
I
ended
up
using
and
and
that's
the
the
finished
image.
So
it's
just
interesting
that,
because
it's
so
quick
you
can
go
through
and
try
all
these
different
color
color
palettes,
and
it's
interesting.
A
They
have
a
little
different
model
of
how
things
go,
but
anyway
he
has
also
written
some
books
on
how
to
do
astrophotography
and
how
to
process
and
so
between
the
two
of
them,
they've,
really
kind
of
honed
in
on
a
process
for
both
rgb
and
and
narrow
band
processing
in
pixin
site,
and
then
the
first
gentleman
here
has
has
written
this
script.
So
let
me
jump
into
that
here,
just
to
show
you.
So
this
is
his
home
page.
A
There's
various
information
on
the
page
here
about
what
it
is
and
and
how
to
use
it,
but
we'll
we'll
dive
in
deeper
and,
as
I
said,
there's
there's
a
couple
videos
here,
I'll
be
showing
one
of
them
in
a
minute.
So
I
wanted
to
show
you
that
and
then
and
again
these
are
you
can
shoot
the
qr
codes
here
or
the
I
pasted
these
links
in
the
chat,
the
other
one
here
and
I
apologize
for
the
4k
monitor.
I
can
make
things
bigger.
I
guess.
A
B
A
A
Okay,
so
I
was
saying
this
gentleman
wrote
this
remote
astrophotography
handbook
and
so
he's
written
a
couple
books
that
are
available
at
no
cost
their
their
ebooks
and
while
it
does
at
least
this
one
focuses
on
this
particular
astra
imaging
service.
There's
a
lot
of
good
information
in
there
about
processing
and
whatnot.
A
So,
and
I
wanted
to
show
you
the
site,
because
you
know
he
really
takes
you
through
this
script
in
in
a
lot
of
details
right
so,
including
giving
you
some
sample
data
to
play
with
how
to
get
the
script,
how
to
run
it,
how
to
install
it
into
the
scripts
menu
and
pix
insight
how
to
use
it
so
really
kind
of
just
similar
to
my
presentation
here.
What
what
it
does,
what
the
options
are,
understanding
what
the
options
do.
A
A
B
A
So
the
the
image
that
you're
going
to
see
here
in
a
minute
is
almost
to
the
point
where
you
could.
You
could
publish
it
right.
I
mean
this
is
the
point
where
I
would
jump
off
into
photoshop
is
already
non-linear,
but
you
know
it's.
It's
pretty
well
digitally
developed
and
it's
in
it's
in
a
pretty
good
shape
so
and
you'll
see
more
of
that
in
the
demo,
but
I
just
wanted
to
start
with
that.
A
So
I
guess
this
is
not
so
much
where
did
this
come
from,
but
but
how
did
I
hear
about
it?
And
I
I
didn't
really
notice
that
I
had
gotten
this
email
back
in
december
and
again
this
was
from
the
gentleman
that
that
wrote
those
ebooks
and
he
mentions
that
jarmo.
The
author
wrote
this
this
script
at
that
time,
focusing
on
on
slu.com,
which
doesn't
have
any
narrowband
imaging,
but
now
the
script
has
been
updated
for
telescope
live
and
itelescope.net
and
etc.
A
So
I
don't
know
if
you
were,
if
you
were
watching
my
output
on
bin
you'd
notice
that
suddenly
there
was
a
huge
increase
in
publishing
things,
because
because
I
was
enjoying
this
this
script
so
much
so
that's
how
that's
how
I
found
it
and
found
it
in
march,
so
yeah
talking
about
astrobin.
So
these
this
is
the
top
part
of
my
page
from
astrobin,
and
these
ones
that
are
circled
here
are
the
ones
that
I
have
done.
A
A
And
also
you
know,
I'm
not
super
excited
about
this.
This
image,
it's
you
know,
you're,
not
supposed
to
start
with
an
apology
I
guess
in
in
presenting,
but
this
started
out
as
a
scratch
target,
and
I
was
debugging
a
camera
that
wasn't
working
right,
and
so
I
hadn't
even
like
framed
this
or
I
wasn't
paying
attention
to
the
fact
that
the
moon
was
up
or
or
whatever
I
was
just.
A
So,
in
this
case
you
know
I
had
almost
11
hours
of
data
and,
and
so
it's
399
subs,
and
that
generally
you-
you
name
your
stacking
program
and
that
amount
of
data
can
cause
some
problems
and
make
you
have
to
break
it
up
into
into
you,
know
four
pieces
and
then
integrate
the
output
of
the
four
or
something
like
that.
But
with
this
this
auto
integrate
script.
I
didn't
have
any
problems
at
all.
It
just
went
right
through
and
did
it
all
in
pix
insight
without
a
problem,
and
I
guess
you
could
contrast
that
too.
A
It's
interesting
to
me
that
the
weighted
batch
pre-processing
script,
which
is
also
a
a
javascript,
pixel
insight
script.
It
has
a
problem
with
with
garbage
collection
and
it
generally
crashes
out
when
you
try
to
use
you
know
more
than
maybe
I
don't
know
150
subs
or
something
I
guess
it
depends
on
your
on
your
camera
size.
A
So,
unlike
the
weighted
batch
pre-processing
script,
this
this
one
is
designed
to
start
with
calibrated
subs
because
it
was
really
designed
to
work
with
these
services
that
provide
you
with
calibrate,
already
pre-calibrated
files.
So,
yes,
these
services,
let
you
download
your
own,
you
know
their
calibration
files
and
the
data
and
calibrate
it
yourself,
which
you
know
you
could
argue
is,
is
the
right
way
to
go,
but
again
for
speed
and
convenience.
They
provide
the
the
calibrated
versions.
A
So
this
script
starts
with
that
and
it
takes
you,
as
I
mentioned
before,
all
the
way
through
to
a
non-linear
state
where
you
could
save
it
as
a
16-bit
tiff,
with
no
other
changes
and
and
jump
off
into
lightroom
or
or
photoshop
or
whatever.
You
wanted
to
do
your
your
post,
processing
in
or
stay
in
pics
inside
and
finish
it.
A
A
Defects
an
example
would
be
australia2
from
telescope.live
has
some
big
white
columns
in
every
every
sub-exposure,
and
I
personally
have
struggled
with
using
cosmetic
correction
in
in
pixinsight
to
deal
with
those
types
of
things
and
and
trying
to
figure
out
exactly
what
column
they
are
and-
and
you
know
putting
the
number
in
there
and
all
that-
and
this
just
seems
to
magically-
do
it
on
its
own.
So
that's
really
really
great
and
we'll
get
into
some
of
the
other
options
here
in
the
in
the
demo.
D
D
A
Yeah
well
me
personally,
I've
decided
that
I
like
a
tool
in
photoshop
more
than
than
some
of
the
ones
in
pix
insight
for
dealing
with
with
gradients.
It's
called
astro
flat
pro,
and
so
it's
sort
of
you
know.
In
the
beginning
we
had
gradient
exterminator
and
then
this
is
one.
That's
I
think
better
than
than
that,
and
I
find
it
does
a
a
better
job
for
me
dealing
with
gradients.
A
A
Okay,
so
yeah
what
happens?
If
you
don't
have
calibrated
subs?
Well,
you
can
I've
been
using
the
the
weighted
batch
pre-processing
script
to
do
just
the
calibration
and
I
haven't
figured
out
in
the
latest
incarnation
of
that,
how
you
do
that,
but
the
the
older
version
is
still
there
in
the
scripts
menu
and
picks
insight
and
there's
a
check
box.
That
says
you
know
calibrate
only
or
stop
after
calibration
or
something
to
that
effect.
A
If
I'm
you
know
images
from
home
rather
than
from
one
of
those
services,
I'll
use
the
weighted
batch
preprocessing
to
do
all
the
flats
and
darks
and
flat
dark
stuff,
and
then
I
take
the
output
of
that
and
put
it
in
the
auto
integrate
script
and
it
seems
fairly
flexible
and
intelligent.
So
you
can
even
take
images
that
you've
stacked
all
the
way.
A
A
A
D
A
A
You
know
other
things
like
the
easy
processing,
suite
and
other
things
and
in
pics
inside
to
to
further
process
things.
So
you
might
want
to
take
a
look
at
that
and
you
can
point
your
phone
at
the
qr
code
there
to
get
that
link.
If
you
want
and
then
of
course
you
know,
francesco
is
presented
in
the
past
and
will
probably
again
in
in
the
future
so
past
and
futures
sig
meetings
will
will
get
you
more
information
on
pix
insight.
A
A
A
Telescope.Live
and
this
these
are
just
one-click
observations,
so
basically
for
for
free,
you
don't
have
to
and
you
pay
your
your
monthly
fee,
but
you
did.
I
didn't,
have
to
go
and
do
an
advance
request
for
these
and
schedule
time
and
all
that,
so
I've
got
the
script
installed
here
on
the
under
the
script
menu.
So
this
is
the
auto
integrate
script
and
I
notice
that
he
presses
run
first
and
then
adds
the
the
files,
but
that's
kind
of
counter
intuitive
for
me.
So
I
just
add
them
first.
So
let
me
navigate
here.
A
E
A
A
A
A
A
A
A
A
A
A
So
there's
our
16-bit
tiff
and
you
know
one
of
the
things
that
I
like
to
tell
people
about.
Photoshop
is
you
set
it
up
to
to
have
tiff
files
brought
in
through
camera
raw,
and
then
you
get
all
your
lightroom
type
controls
over
here
and
it
doesn't
always
help
but
nine
times
out
of
ten,
you
know
hitting
auto
and
then
maybe
adjusting
the
black
point
will
just
kind
of
polish
off
your
your
digital
development
there.
A
So
that's
a
great
start
for
a
finished
finished
image
right
there
and
then
I
won't
bother
cropping
this
or
doing
much
with
it
here.
But
I
just
to
finish
my
thought,
with
with
hi
on
the
pro
digital
software
astro
flat.
Pro
is
what
I'm
using
to
kind
of
clean
things
up,
and
usually
just
the
default
settings
and
then
probably
tweaks
the
black
point
one
more
time,
although
that's
pretty
good
right
there,
so,
okay,
so
that
was
the
narrow
band.
Any
questions
on
that
before
I
do.
The
lrgb.
E
A
A
All
those
I
did
share
that
with
the
author
and
giarmo
and
and
he
thought
that
was
interesting
and
said
he
should
do
something
with
that.
So
I
don't
know
if
that's
coming
or
or
if
he
just
meant
he
was
going
to
go
off
and
and
look
at
the
different
colors.
I
noticed
since
then
he's
he's
removed
one
of
the
the
options
you
know
there
was
a
hubble
palette,
natural
which
I
was
actually
using.
A
It
seems
like
it's
not
there
anymore,
but
he's
he's
reworked
this
part
of
the
the
ui
so
there's
natural
ho,
but
not
natural
hubble
palette
anymore,
but
and
and
one
of
the
things
that
I
kept
telling
him.
You
know
that
hey,
there's
no
hso
and
he
said
well,
didn't
you
know
you
can
just
type
in
these
boxes
right.
A
So
I
had
no
idea
that
you
could
do
that
right
because
I
just
figured
oh,
it's
a
drop
down
and
you
have
to
pick
from
from
what's
there,
but
you
can
put
whatever
you
know
formulas
you
want
in
here
to
do
whatever
custom
custom
stuff
you
want
and
I've
done.
You
know
some
of
the
the
hoo
and
I've
done
some
I've
done
some
of
these
macs,
where
I've
had
both
rgb
and
narrow
band
data
and
so
for
any
given
pixel
pick
the
pick
the
max
of
right.
D
D
A
A
A
A
E
B
B
A
A
So
so
in
the
the
extra
processing
for
for
both
rgb
and
lrgb
and
narrow
band,
this
section
here
can
be
applied
and
you
know
oftentimes-
and
I
I
know
from
hearing
adam
block
and
others
talk
about
how
they
judge
at
least
lrgb
photos
that
that
I
always
have
too
much
contrast,
and
my
background
is
too
black,
but
I
generally
prefer
to
add
contrast
and
a
darker
background,
but
but
and
I'm
sorry,
this-
the
tool
tips
jump
up
there.
But
well
are
you
doing
your
images
for
adam?
D
A
And
that's
why
I
haven't
totally
you
know,
but
if
you
want
to
win
contests
on
telescope
live,
I
guess
you
got
to
please
them
but
anyway,
so
we
can
throw
the
kitchen
sink
it
here
here
and
I'm
I'm
just
sort
of
assuming
that
these
things
are
going
to
give
me
more
detail
in
in
finer
areas
and
stuff,
but
maybe
it's
appropriate.
Maybe
it's
not
for
this
image,
but.
A
A
C
Hey
glenn:
this
is
gary.
I'm
I'm
wondering
if
this,
if
this
would
make
a
good
sort
of
stair
step
to
learning
pix
insight,
I
mean,
instead
of
just
diving
right
in
and
learning
pixel
insight
from
scratch.
If
this
might
be
a
good
stepping
stone
to
be
able
to
use
pics
insight
on
the
way
to
learning
the
full
tool.
A
Yeah,
I
would,
I
would
say,
that's
the
case,
although
you
know
a
lot
of
the
learning
curve.
You
know
I
put
pics
inside
off
for
a
long
time,
because
I
was
it
it
just
felt
so
alien.
You
know
the
different
user
interface.
It's
got
its
own
paradigm,
for
you
know
how
you
close
and
open
windows
and
how
you
due
processes
and
stuff-
it's
just
different
from
any
other
piece
of
software
right.
So
it
has
a
huge,
steep
learning
curve
and
so
yeah
anything
that
could
help
people
be
more
comfortable
and
more
familiar.
A
So
this
would
certainly,
I
think,
get
you
you
know
like
you
feeling
you're
getting
your
money's
worth
out
in
in
a
hurry
and
but
I
get
and
then
I
guess,
working
through
the
working
through
the
options
in
the
program
would
teach
you
about.
You
know
some
of
the
individual
processes
in
pix
insight,
but
it's
not
going
to
help.
You
learn.
You
know
the
user
interface
and
and
some
of
those
other
things
that
I
found
difficult.
A
A
C
The
pix
insight
demos,
I've
seen
the
user
interface
just
seems
it
seems
really.
Oh,
it's
very
different.
Let's
put
it
this
that
way,
and
I
I
can
see
what
you
mean
about,
because
I
found
that
I
found
it
also
kind
of
intimidating.
I
mean,
maybe
it's
genius
and
maybe
it's
you
know.
I
don't
know
I'm
trying
to
keep
an
open
mind,
but
but
the
demos
I've
seen
have
kind
of
like
left
me
scratching
my
head.
A
Yeah,
I
I
won't
argue
with
you
on
that,
but
yeah
I
don't.
I
don't
pretend
to
use
it
enough
or
be
an
expert
enough
to
really
take
advantage
of
some
of
the
some
of
those
other
things
I
mean.
I
do
drag
processes
you
know
like
the.
If
you
want
to
apply
the
the
stretch
from
the
from
the
screen
stretch,
transfer
screen
transfer
function
to
a
histogram
right.
You
got
to
drag
the
the
triangle
over
there
and
do
that.
A
So
I
know
how
to
do
that,
but
that's-
and
I
think
I
understand
when
to
do
global
and
when
to
do
the
circle
and
when
to
do
the
square,
but
that's
there's
a
lot.
I'm
not
doing
I'm
not
doing
projects,
I'm
not
doing
history,
there's
a
ton
of
stuff
there
that
I
haven't
haven't
adopted
yet,
but
but
that's
why
you
know
there'll
be
other
people
here
that
can
present
that
that
are
that
are
experts
at
that
stuff,
and
so
we
can
all
learn
and
move
forward.
A
A
Didn't
want
to
work
through
that
I
mean
I
actually
got.
I
got
an
image
out
of
it.
It
just
it
just
aired
out
before
had
completed
all
of
the
stuff
it
wanted
to
do
so
I
I'm.
Maybe
it
just
needs
more
than
the
five
minutes
that
I
gave
it
last
night
so
but
yeah
it's
supposed
to
work
with
with
one
shot,
color.
A
Yes,
that's
true,
yeah
good
point,
although
you
know
I
like
it
seems
like
you
can
just
throw
anything
at
it
and
it'll
just
take
it
right.
So
it's
not
gonna
complain
that
you
haven't
calibrated
your
files
and,
like
I
said
I
put
you,
know,
stacked
stacked
images
in
and
uncalibrated
calibrated
whatever
and
it'll
it'll
process
them
one
way
or
the
other.
A
A
A
And
I
won't
go
this
I'm.
This
is
turning
into
a
huge
powerpoint
here
with
all
the
documentation
for
this
project
I'm
working
on,
so
I
won't
go
through
the
whole
thing,
but
just
gonna
give
you
an
overview.
So
let
me
just
talk
for
a
minute
here.
So,
yes,
people
are
getting
vaccinated
and,
yes,
we
may
not
have
to
wear
masks
soon,
but
people
that
provide
these
sja
star
parties.
A
A
Even
though
you
know
governor
newsom
or
whoever
cdc
says
you
can
go
without
a
mask:
they're,
not
ready
to
share
their
eyepiece
and
telescope
hands-on
with
a
long
line
of
public
people
at
a
star
party.
Yet,
and
so
I
was
trying
to
find
ways
that
and-
and
this
goes
back
almost
a
year
now-
you
know
to
for
sja
to
to
still
provide
you
know-
star
parties
and
public
outreach
and
and
whatnot.
So
we
we
started
with
you
know
virtual
star
parties
and
the
the
arm.
They
called
it.
A
You
know
with
via
zoom
or
youtube
or
whatever,
whatever
we
we
used,
and
so
now
I'm
I'm
wanting
to
do
something
similar,
but
a
little
bit
more
in
person.
So
you
go
out
under
the
dark
sky,
but
you
don't
put
your
eye
on
somebody's
telescope
and
you
don't
touch
their
telescope,
but
you
use
your
you
bring
your
your
smart
device
with
you
and
you
can
view
what
they're
what
they're
looking
at
through
the
telescope
on
your
on
your
smart
device.
So
that's
that's
the
idea,
and
so
that's
a
project.
A
That's
that's!
Being
worked
on
and
there's
going
to
be
a
acid
test
or
dry
run
or,
however,
you
want
to
call
it
coming
up
in
in
on
on
june
5th,
it's
it's
not
for
the
public,
but
some
of
us
are
going
to
gather
it
at
our
cdo
and
and
see
if
we
can
make
this
this
project
work
and
and
get
a
lot
of
feedback
from
what's
easy.
What's
not
easy
and
fine
tune
it
before
we
go
and
buy
all
the
gear
and
and
whatnot.
A
A
So
that's
that's
what
this
is
about
here.
So
I'm
only
going
to
go
through
the
executive
overview,
part
of
this
presentation
and
it's
to
just
describe
you
know
my
thought
process
and
and
what
how
this
is
going
to
work.
So
basically,
it's
instead
of
eyepieces,
you
know
use
the
public
smart
devices
that
they
have
with
them
and
the
point
is
to
make
sure
that
there's
no
app
that
they
need
to
load
ahead
of
time.
They
don't
need
any
internet
or
cellular
access,
because
it's
you
know
a
lot
of
our
sites.
A
A
So
the
whole
idea
is
that
you
know
the
social
distance
is
maintained
and
actually
you
know
an
advantage
over
a
traditional
star
party
is
that
there'd
be
less
queuing
up
for
the
for
the
eyepiece
and
and
of
course,
you
know,
knocking
it
out
of
focus
and
off
target
and
all
that
stuff.
So
maybe
a
little
more
kid-friendly.
A
I
don't
know
we'll
see
so
the
the
concept
is
also
to
keep
it
as
just
as
low-tech
and
as
simple
as
possible,
because
the
the
people
that
that
do
public
outreach
at
these
star
parties,
you
know
they're,
not
imagers
and
they're
they're
visual
observers
and
they
love
visual
observing,
and
so
they
don't.
You
know,
come
with
a
bunch
of
computers
and
cameras
and
and
whatnot
so
try
and
keep
it
just
as
as
low-tech
as
as
possible.
A
So
you
know
we'll
have
a
a
couple:
batteries
with
an
inverter
running
a
router,
that's
going
to
run
for
five
hours,
which
is
way
more
than
we
need
we'll.
Have
it
at
each
station
we'll
have
a
raspberry
pi
and
just
two
cables
right,
just
power
for
the
pi
and
a
cable
for
the
for
the
camera
and
then,
ideally
a
color
one
shot
camera
would
just
drop
in
the
eyepiece
holder.
A
You
do
a
little
refocus
and
and
you're
on
your
way.
So
that's
that's
the
the
goal,
and
so
hi
has
has
helped
me.
You
know
tweak
some
python,
so
we
we've
written
our
own
client,
and
this
is
not
the
the
final
version
here,
but
but
pretty
close.
So
basically
there's
just
two
controls
that
they
have
to
deal
with
exposure
time
and
gain
and
then
you've
got
a
stretched
image
to
see
what
you're
looking
at
and
then
you've
got
a
histogram
to
help
you
with
the
with
the
exposure.
A
Just
this
should
be
some
kind
of
a
tracking
mount
right
because
we
are
going
to
I'm
sort
of
assuming.
I
guess
that
that
this
won't
go
well
with
the
with
the
dob
or
something
that's
not
not
going
to
track.
Although
the
live
stacking
is
doing
a
certain
amount
of
of
star
registration
and
stuff,
but
if
the
exposure
is
long
enough
such
that
the
image
is
blurred,
because
you
know
you
weren't
tracking,
then
then
that
will
be
a
problem.
A
So
I
think
we
can
get
away
with
alt
as
or
ge
cube
mounts,
and
certainly
you
don't
have
to
you
know-
be
the
auto
guiding
or
anything.
But
this
is
all
tbd,
so
yeah
I've
been
playing
around
with
exposures
around
you
know,
40
to
60
seconds
and
then
stacking
them
so
that
you
get
a
better
looking
result
as
as
time
goes
on.
A
So
this
is
an
early
experiment.
This
was
a
m1
stack
and
again
this
was
from
my
white
zone
here
in
the
east
bay,
so
that
was
that
was
22
45
second
exposures,
but
you
know
rcdo
should
be
much
better
and
again
the
the
the
perceived
advantage
of
of
live
stacking
over
you
know
just
long
exposures
is
that
you
get
some.
A
This
was
a
couple
nights
ago
just
before
the
clouds
rolled
in
again
from
my
white
zone
here,
but
I
was
pretty
happy
with
with
this.
So
this
is
an
actual
capture
of
the
ipad
screen.
This
is
what
the
public
would
see.
So
that
is
your
m51
and
yeah.
I
guess
I've
got
the
iphone
one
later
but
anyway,
so
one
one
of
the
things
is,
I'm
not
sure
exactly
the
the
the
best
way
to
to
set
this
up.
A
So
the
you
know,
the
original
idea
is
the
visual
observer
star
party
veteran,
would
do
it
all
right,
he
he
or
she
they
bring
their
scope,
they
set
it
up.
They
get
on
target,
they
put
the
ipc
the
camera
in
for
the
eyepiece.
They
run
the
software
and
interact
with
the
public.
Well,
maybe
maybe
that's
doable.
A
Maybe
it's
not
we'll
we'll
find
out,
but
maybe
a
better
way
would
be
to
have
them
work
in
pairs
right,
so
bring
only
one
person
brings
a
scope
and
the
other
person
deals
with
the
public
and
that
frees
the
first
person
up
to
just
focus
on
on
the
technical
tasks,
and
then
you
know
kind
of
a
third
idea
and
of
course
this
is
kind
of
an
over-the-top
picture
here,
but
I'm
not
sure
what
this
dslr
is
doing.
But
you
know,
another
idea
is,
is
like
we
did
in
the
virtual
star.
A
Parties
just
go
ahead
and
have
a
full-on
imager
there
with
their
their
rig,
and
so
you
get.
You
know
higher
resolution,
better,
looking
results,
but
you
you
still
have
the
the
visual
observer
working
with
them
working
with
the
public
and
telling
the
imager
what
targets
they
want
to
see
and
whatnot.
So
I
think
we'll
play
with
all
of
these
and
see.
Maybe
it's
a
combination
see
what
works
best,
and
so
you
know
some
of
the
things
that
we'll
be
we'll
be
testing
out.
A
Is
you
know
how
easy
is
it
for
the
visual
observers
to
to
switch
to
a
camera
and
and
get
back
on
focus?
You
know
I
can't
make
these
these
cameras
will
not
be
par
focal
with
with
eyepieces
they're
gonna,
be
in
my
experience.
They're
gonna
need
inward
focus,
inward
travel
of
of
at
least
like
15,
millimeters
and
stuff,
and
if
we
decide
to
use
focal
reduction,
then
that's
even
crazier.
You
probably
have
to
remove
a
diagonal
or
something
and
have
the
camera
closer
to
the
ota.
A
Then
there's
different
options
for
how
is
the
operator
going
to
see
the
the
software,
so
you
know,
are
they
going
to
bring
a
laptop
or
are
they
going
to
use
vnc
in
from
a
smart
device,
or
am
I
going
to
provide
a
touch
screen
or
what
sorry?
What
so?
Those
are?
Those
are
some
of
the
things
we'll
be
testing
and
then
does
that
need
to
be
mounted
somehow
on
the
telescope
or
or
what
and
then
yeah
I
mentioned.
You
know
we
could
also,
rather
than
mess
with
the
visual
scopes.
A
We
could
also
have
some
some
imaging
rigs
there
as
well
yeah.
So
this
talks
about
you
know
the
the
prime
focus
is
equivalent.
At
least
I
was
messing
with
an
80
millimeter
f,
7.5,
visual
scope
out
in
the
yard
here,
and
that
fov
came
out
to
be
the
same
as
as
like
a
seven
to
eight
millimeter
eyepiece,
and
that's
a
lot
of
that's
a
really
small
fov.
A
And
then
software
wise
I
haven't
dealt
with.
You
know
the
shorter
exposures
that
we
would
be
using
for
for
planetary.
At
that
point,
we
might
jump
off
into
something
that's
already
pre
built
for
for
planetary
and
there
there
is.
There
is
a
program,
a
free
program
like
that
in
the
astro
berry
distribution
that
that
we're
using
for
the
pies
already
then
there's
the
whole
idea
of
you
know.
A
The
visual
observers
usually
don't
want
imagers
there
because
of
the
bright
screens,
and
you
know
they
want
to
be
dark,
adapted
and
and
whatnot.
So
you
know
with
with
people
having
to
look
at
screens
to
deliver
this.
You
know
what
are
are.
Is
that
going
to
be
a
problem
or
not?
And
then,
if
we,
if
we
are
utilizing
imagers,
you
know
our
cdo
is
usually
on
the
same
night
as
the
imaging
workshop.
A
So
how
does
that
work
and
how
do
imagers,
if
they're
participating
in
star
parties,
how
do
they
get
to
take
advantage
of
darkish,
open
space
authority
sites
and
stuff?
So
so
that's
that's
kind
of.
As
far
as
I
was
gonna
go,
you
know,
they're,
building
these
little
kits
and
they're
labeled
with
the
ipad,
the
last
octet
of
the
ip
address
and
got
these
little
keypad
goodies
to
to
to
mouse
and
and
keypad
things
that
have
worked
out
really
well.
So
I'm
just
trying
to
you
know
document
this.
E
A
C
B
It
was
a
kind
of
a
surreal
experience
because
it
was
like
a
bizarro
world.
You
know
it
was
a
zoom
full
of
different
people
that
I
had
never
seen
but
yeah.
You
know
it
was
like
one
of
our
meetings,
but
at
any
rate
they
had
shared
that
they
used
this
stuff
called
first
contact
to
clean
some
of
the
mirrors
of
the
reflecting
telescopes
up
there.
C
B
I
had
no
idea
about
this
stuff
and
you
can
just
buy
it
on
the
web
and
you
kind
of
paint
your
mirror
with
it,
and
it's
like
a
polymer
that
dries
onto
the
onto
the
mirror
and
then
you
peel
it
off
and
it
it
cleans.
You
know
all
the
dirt
and
junk.
So
if
you
have
like
a
big
reflector,
you
know
if
you're
going
to
clean
it
like
once
every
10
years
or
something
and
you
don't
want
to
use
water
or
you
know
whatever
cotton
balls.
This
stuff
looks
like
an
interesting
alternative,
so.
B
A
B
C
A
Yeah,
I
just
had
to
replace
my
my
shroud
on
my
truss
rc,
because
it
you
know
the
elastic
were
out
and
it
was
sagging
and
all
this
stuff.
So
the
you
know
the
some
of
these
things
that
are
outside
all
the
time,
the
telegizmos
and
and
you
do
have
to
go
through
and
replace
them
every
once
in
a
while.
So.
F
A
A
Using
a
lot
of
deionized
water,
distilled
water
to
to
kind
of
just
knock
the
grit
off,
try
not
to
touch
it
with
with
anything
right
and
I've
been
known
to
put
some
windex
on.
There
don't
shoot
me,
but
you
know
I
somewhere,
I
keep
buying
these
cleaning
kits
and
then
I
can't
figure
out
where,
where
I
put
them,
you
know
there's
one
that
was
stored
at
hp
that
disappeared
and
but
you
know
it's
dr
somebody's
kit
that
you
buy
from
from
opt
and
it
has
a
a
two-part.
F
A
F
Anyway,
thank
you
glenn
and
hi
everybody,
so
my
my
name
is
francesco.
I
people
who
know
me
and
know
that
I've
been
a
low-tech
imager
for
the
last
four
years,
and
only
this
year
I
decided
to
do
a
little
jump
in
technology
and
try
automation,
and
the
reason
was
that
I
moved
to
a
place
with
a
decent
backyard
for
astronomy.
So
I
can
leave
my
gear
up
all
night
without
fear.
F
It's
secure
enough,
and
so
I
needed
a
solution
to
you
to
be
able
to
image
all
night,
while
sleeping
and
not
without
not
by
staying
up
all
night
and
babysit
the
telescope,
and
so
I
decided
to
try
this
new
product
that
I've
been.
I
had
read
about
nina,
which
is
an
acronym
for
a
night
night,
nighttime
imaging
and
astronomy.
F
It's
essentially
a
soft,
a
one-man
show.
This
stefan
berg
is
the
the
main
developer.
There's
there
is
a
community
of
developers
around
it,
but
stephanie
still
has
the
lion's
share
of
the
work
and
he
developed
it
in
to
be
as
open
as
possible.
It's
open
source
and
it
doesn't
charge
a
fee
to
use
which
seems
to
be
to
become
harder
and
harder.
In
these
days
everybody
wants
to
do
a
subscription
model.
F
It
supports
quite
a
bit
of
hardware,
although
it's
a
it's
limited
to
what
is
supported
by
ascom,
because
it
is
a
windows
application,
it's
written
in
the
c-sharp
runs
on
windows
there's
both
currently
both
the
32-bit
and
the
64-bit
version,
but
the
32-bit
will
be
probably
dropped
soon.
I
hear
lots
of
campaigns
about
having
to
maintain
the
two
versions,
so
anything
that
has
a
an
ascon
driver
for
windows
would
work
and
even
things
that
are
not
that
common.
Like
my
own
guider,
the
lesser
time,
gen
is
had
some
level
of
support.
F
The.
What
really
got
me
interested
is
that
this
level
of
support,
although
insufficient,
could
be
easily
implement
incremented
by
by
changing
the
software,
because
it's
open
source,
so
I
found
the
bugs
that
this
implementation
still
had
relatively
quickly
corrected
them
and
started
using
the
exactly
the
hardware.
F
That's
the
one
yes
perfect
sure!
So
what
you're?
What
you're?
Seeing
now,
I
hope
is
my
windows
desktop
yep.
We
see
it,
it's
a
it's
a
remote
desktop
to
my
mini
pc,
which
is
currently
velcroed
to
one
of
the
the
legs
of
my
tripod.
So
it's
it's.
It
controls
the
telescope
via
a
usb
serial
converter
control,
the
mount
sorry,
it
controls
the
camera,
the
focuser
and
the
the
guider,
and
it
connects
to
my
home
wifi.
F
F
As
you
can
see,
it
asked
me
to
choose
a
profile.
This
is
an
interesting
feature
that
it
has
the
selection
of
the
profile
up
front.
You
can
have
a
different
profiles
for
different
set
of
hardware
components,
ideas
what
I
have
here.
I
have
a
one
profile
for
my
130
millimeter
refractor,
with
the
0.79
times
a
focal
reducer
one
for
the
1.0x
field,
flattener
and
one
for
my
65
millimeter
quadruplet.
F
F
Let
me
expand
it
in
this
case.
As
you
can
see,
I
have
a
configuration
of
a
number
of
devices
and
then
I
have
a
few
other
options.
The
user
interface
is
for
me.
It
was
a
little
bit
awkward
because,
as
you
can
see,
there's
no
menu
bar.
So
this
is
an
application
that
is
entirely
probably
designed
to
be
used
on
a
on
a
tablet,
so
the
more
than
menus
and
the
buttons
to
click.
F
There
are
big
buttons
that
you
just
hover
and
click
so
probably
good
for
pointing
with
your
finger
on
a
touch
tablet,
but
let's
say
that
I
want
to
connect
my
devices.
My
profile
has
stores
all
the
devices
that
I'm
using.
So
I
just
need
to
click
here
and
it
will
ask
me:
do
you
want
to
connect
all
devices?
F
F
What
does
what
it
means
is
that
I
can
use
all
the
features
that
a
real
rotator
would
allow
me
to
like
changing
the
position
angle
of
my
frame,
but
when,
when
the
rubber
meets
the
road,
it's
going
to
ask
me
to
go
out.
Rotate
the
camera
using
the
camera
angle,
adjuster.
And
then
it's
going
to
tell
me
whether
I'm
closer
enough
and
I
can
specify
the
tolerance
or
I
need
to
do
something
more.
A
A
F
F
F
F
It
supports
what
ascom
compatible
flat
panels,
like
the
I
think,
the
they
have
the
spiker
flat
and
the
elni
tack
and
the
arty
sky
flat
box.
Also
the
pegasus
flat
master.
I
don't
have
any
of
those.
So
I'm
when
I,
when
I
take
my
flats,
I
use
the
the
manual
option
that
nina
has
in
which
I
go
out
with
my
ipad.
F
I
put
it
on
the
on
the
objective
lens
and
I
take
the
flats
if
you
have
a
weather
station
or
if
you
subscribe
to
one
of
the
internet
weather
service
like
weather
underground,
you
can
download
the
the
weather
data
and,
as
we
will
see,
there
are
options
you
can
use.
You
can
build
the
sequence
of
operations
that
takes
into
account
the
weather
like
if
the.
F
If
the
wind
increases
past
a
certain
threshold,
close
the
dome
close
the
roof,
which
brings
us
to
the
dome-
which,
of
course
I
don't
have-
although
it
would
be
nice
and
it
supports
various
methods,
this
is
really.
I
never
seen
how
dom
automation
would
work,
so
I'm
not
able
to
go
any
deeper
into
this.
F
Safety
monitors,
I
think
it
would
be
interesting.
You
can.
As
I
understand
you,
can
have
a
number
of
hardware
switches
that
detect
potentially
unsafe
conditions
like
positional
the
mount
or
the
telescope,
or
I
think
rain.
It's
also
a
possibility
and
would
be
able
to
trigger
the
shutting
down
parking
the
telescope
and
shutting
down
the
the
imaging
operations
for
the
night.
F
So
this
is
probably
less
useful
if
you
image
from
the
backyard
more
useful,
if
you
image
remotely,
you
know
not
at
20
feet,
but
apart
from
the
devices,
what
is
the
philosophy
of
of
nina?
I
don't
know
how
much
similar
or
different
it
is
from
solutions
like
sgp.
I
never
used
sgp
but
and
the
workflow
that
I
personally
use
is
this.
I
decided
that
I
want
to
image
a
certain
object
and
I
go
into
the
framing
wizard
and
I
decide
and
I
search
for
that
image.
Let's
say
that
I
want
to
image.
F
M51,
I
can
load
the
imagery
for
this
for
this
object
in
this
case,
it's
coming
down
from
one
of
the
sources
of
data
that
it
has,
or
it
can
come
from
a
local
cache
so
that,
when
you
are
in
the
field,
you
don't
lose
the
ability
to
do
framing
what
you
lose
is
just
ability
to
download
the
image
of
the
imagery
data
that
you
don't
have
in
the
cache
yet.
But
if
you
do
your
homework
at
home
and
you
prepare
the
cache,
you'll
be
fine.
F
So
then
you
see
that
you
have
your
image.
You
can
change
the
position
angle.
If
you
want,
you
can
recenter
it
in
a
different
way.
You
can
decide
to
create
a
mosaic.
Of
course.
Foreign
51
would
be
a
completely
absurd
idea,
but
when
you
are,
when
you
are
happy,
you
can
slow
the
telescope
to
the
object.
If
you
want
or
zoo
and
center,
which
means
the
zlu
and
plate
solve
and
correct
or
you
can
create
a
sequence
of,
and
the
sequence
is
the
the
focus
of
the
the
image
acquisition
activity
in
nina
every
image.
F
Acquisition
run
must
follow
a
sequence
and
the
sequence
is,
as
the
name
implies,
a
set
of
operations
that
arrive
that
happen
one
after
the
other
in
time,
and
you
can
decide
what
the
sequence
looks
like
by
using
essentially
a
programming
language,
completely
visual
by
dragging
and
dropping
elements
in
the
sequence.
So
let
me
let
me
show
you
what
I
mean.
Let's
say
that
I
want
to
create
a
sequence
to
image
m51
I
can.
F
I
will
start
by
using
what
is
called
a
simple
sequencer,
so
I
just
added
it
and
nina
takes
me
to
the
simple
sequencer.
This
is
very,
very
simple,
probably
way
way
too
simple
for
for
what
we
like
to
do,
but
I
can
say:
okay,
I
want
to
image
one
or
more
targets.
You
see
here
in
this
this
arrow
up
here.
I
could
have
multiple
targets,
one
after
the
other,
but
let's
say
that
I
want
to
start
only
one.
F
F
Then
I
will
want
to
autofocus
at
when
the
sequence
starts.
I
can
refocus
when
the
filters
change.
I
don't
have
a
filter
wheel,
so
it
doesn't
really
apply
to
me.
I
can
refocus
after
a
certain
elapsed
time
after
a
certain
number
of
exposure.
After
a
certain
temperature
change
or
when
the
half
flux
radius
of
the
sequence
of
images
already
taken
is
a
in
a
at
an
increasing
progression,
we
need
to
increase
more
than
five
percent,
ten
percent
etc
very
focused
this
moment.
F
F
F
If
I
had
a
cool
camera,
I
could
say:
okay,
cool
the
camera
before
starting
the
sequence,
support
the
meridian
flip,
and
also
I
I
could
say
if
the
month,
if
the
mount
is
parked,
I
could
say
I'm
parked
before
before
starting
and
the
conversation
park
it
when
the
sequence
ends
and
even
warm
the
camera
after
the
signals-
and
I
don't
want
to
do
any
of
this
right
now.
So
if
I
were
to,
if
this
is
okay,
I
would
just
click
the
play
button
and
the
sequence
will
start.
F
But,
as
you
can
see,
this
is
very
limited.
So
in
the
nina
1.11,
which
is
still
not
even
a
beta,
it's
a
nightly.
It's
a
series
of
nightly
builds.
They
added
one,
a
new
type
of
sequencer,
what
they
call
the
the
advanced
sequencer.
So
if
I
click
this
button,
I
will
turn
this
seq.
This
simple
sequence
into
the
the
version
of
the
same
represented
in
this
more
powerful
programming
language,
visual
programming,
language
that
I
will
be
able
to
fully
customize.
F
F
When
the
sequence
starts,
there
will
be
a
set
of
preparation
instructions
which
could
be
okay.
You
want
to
switch
to
a
certain
filter,
I'm
going
to
remove
this
from
the
sequence,
because
I
don't
have
filters
here,
so
I
just
click
the
trash
can
button.
I
want
to
slew,
I
want
to
center.
I
want
to
start
guiding
and
I
want
to
run
out
of
focus
preparation,
and
then
I
want
to
start
imaging
imaging
will
have
one
instruction,
which
is
called
the
smart
exposure
that
it's
it
basically
tells
nina.
F
I
want
to
you
to
take
10
subs
300
seconds,
each
of
type,
light
with
a
certain
binning
gain,
filter
and
a
certain
littering
set,
and
I
can
add
at
this
point
triggers
and
conditions
to
the
to
this
smart
exposure
instruction.
What's
the
trigger
trigger
is
something
that
a
condition
that
is
evaluated
at
between
one
exposure
and
the
next
and
can
determine
the
execution
of
certain
routines.
E
F
F
B
F
These
are
the
ones
with
the
lightning
bolt
are
triggers.
You
can
say
I
want
to
do
auto
focus
after
10
exposures,
for
instance,
easy.
I
drop
it
here
and
I
say
after
exposure
10
do
the
auto
focusing-
and
this
is
a
counter
that
will
keep
track
of
how
many
images
I've
taken.
In
my
sequence,
I
can
move
the
focuser
by
temperature
so
that
the
to
implement
an
automatic
temperature
compensation
if
you
have
calibrated
your
focuser.
This
makes
it
very
easy
to
support
that
either,
of
course-
and
these
are
loop
conditions,
which
are
also
interesting.
F
F
Oh
sorry,
it's
not
this
one
yeah!
It
was
wait
for
altitude.
Sorry,
okay!
I
wanted
to
wait
until
it
has
cleared
the
10
degrees,
or
this
is
10
degrees
over
the
the
absolute
horizon
or
even
above
the
the
local
horizon.
There's
a
module
that
in
nina
where
you
can
specify
a
file
that
describes
the
minimum
elevation
that
your
la
your
horizon
allows
for
force
for
a
sequence
of
azimuth
values
and
then,
when
you
want
to
say,
I
want
to
loop
until
the
object
until
astronomical
dawn.
F
I
just
drag
and
drop
this
loop
until
time
until
astronomical
dawn,
or
let's
say
that
I
want
to
do
it
either
until
astronomical
dawn
or
until
the
object
sets
below
30
degrees
on
the
horizon.
Whichever
happens
first,
that's
fine!
I
can
drop
two
conditions
and
as
soon
as
one
of
the
two
is
no
longer
satisfied,
the
sequence
will
will
this
will
exit
this
loop?
Essentially
now
let
me
remove
some
of
the
sequences,
because
I
will.
F
F
F
You
can
you
prepare
the
the
sequence
that
you
want,
you
save
it
as
a
template
and
you
reiterate
it
customizing
it
each
time
for
the
object
in
the
framing
tool
there.
There
is
actually
another
option
that
I
didn't
show
you
when
I
do
add
a
target
to
a
sequence.
I
have
the
option
of
doing
a
simple
sequencer,
which
is
what
I
did
or
I
can
use
one
of
the
predefined
templates.
Sorry
not
predefined.
F
The
templates
that
I
defined
like
custom
imaging
or
custom
imaging
with
refocusing
between
targets.
Those
are
all
possibilities
all
right.
So
when
I
run
the
sequence,
the
telescope
will
slew
to
m51
we'll
play
center
it
via
plate.
Solving
we'll
start
the
guiding
and
we'll
run
another
an
autofocus
routine.
Let's
do
it.
F
F
F
F
Sorry,
three.
Second
exposure:
now
it's
downloading
converting
the
raw
into
essentially
an
array
and
debayering
it.
My
computer
is
very
slow,
so
be
patient
and
it's
going
to
show
here
the
the
image
yeah
there.
It
is,
and
now
it's
using
s,
tab
for
to
plate
solve
this
image
and
the
error
right
now
is
six
arc
minutes
and
51
arc
seconds.
F
F
F
Now
I
don't
have
the
telescope
my
telescope
with
me,
so
I
cannot
show
you
directly
what's
happening,
but
this
is
the
equivalent
of
using
phd2.
My
guider
is
essentially
the
equip
is
a
hardware
equivalent
of
a
phd2,
so
this
would
be
the
calibration
in
phd
or
what
is
it
guiding
assistant?
They
call
it
now.
It's
switched
to
measuring
the
calibration
in
an
array
it's
going
to
take
another
30
seconds
and
then
it's
going
to
start
showing
the
guide
graph
here
I
hope
seeing
it
tonight
is
not
too
bad.
So
we're
gonna
have
a
quiet
guiding.
F
If
something
is
not
to
my
liking,
I
can
go
back
to
the
equipment
panel
and
in
the
equipment
panel.
I
actually
get
to
see
the
ui
that
my
hardware
guider
shows
on
the
field
just
without
the
beam
on
the
field
but
yeah
guiding
us
started.
You
see
here
it's
converging
to
a
zero
position
and
at
the
same
time,
the
system
started
out
auto.
Focusing
this
window
here
is
the
autofocus
window.
F
The
first
sample,
which
will
be
then
compared
to
the
subsequent
hfr
values
from
from
each
of
the
exposures
and
nina,
would
move
the
focuser
between
one
and
the
next
until
it
has
enough
points
that
it
can
fit
with
a.
I
think
it
uses
a
hyperbole
and
that
point
will
determine
the
position
of
best
focus.
F
F
F
All
right,
we
have
two
points,
as
you
can
see.
In
addition
to
the
actual
mean
value,
there's
also
an
estimation
of
the
the
uncertainty
using
error
bars,
which
is
nice.
You
can
definitely
see
how
the
the
curve
that
will
nina
will
try
to
fit.
Typically
is
a
good
typically
fits
well
in
the
within
the
error,
bars.
F
F
F
F
I
understand
if
with
a
faster
computer
or
probably
faster,
faster
camera,
usb
3
or
a
camera
that
doesn't
doesn't
require
the
bearing
it
would
be
definitely
faster,
and
I
am
happy
when
I
can
also
focus
in
two
minutes.
So,
as
you
can
imagine
I
don't
I
tend
not
to
do
it
very
frequently.
During
the
night
I
tend
to
use
temperature
compensation,
and
so
I
use
a
I
built
over
time,
a
calibration
function
from
from
the
temperature
to
the
number
of
steps
that
I
needed.
I
need
to
command
the
focuser
to
move.
F
I
think
it's
a
j
3500
I
can.
I
should
double
check
it's.
Eighty
four
gigabytes
of
ram
64
gigabytes
of
of
the
solid
state
storage.
It's
it's
not
powerful
at
all,
but
it's
quite
cheap
but
and
it
does
what
it
needs.
You
don't
need
the
performance
for
for
this
kind
of
activity.
It's
not
like
your
processing
in
pixel
site.
F
F
F
You
can
make
it
pretty
much
what
you
want,
given
that
this
heading
initially
was
quite
a
bit
off
and
then
it
was
suffering
from
shakes
when,
when
the
motor
was
doing
big
steps,
I
would
probably
clear
this
chart
as
soon
as
it's
done,
and
it's
done
now
now.
It
has
estimated
that
the
best
position
is
9578
steps
at
13.76
degrees
celsius,
which
is
the
current
temperature,
and
now
it's
ready
to
imagine
so
I'm
going
to
clear
the
chart
and
get
ready.
F
In
one
second
waiting
for
the
camera,
yes
and
the
first
exposure
has
started
now-
I
can
move
to
this
other
panel,
the
image
panel
that
right
now
contains
a
well.
It
doesn't
contain
only
noise.
It
contains
the
last
image
that
was
played
solved,
which
is
the
last
auto
focus
shot
that
was
done
a
few
seconds
ago
in
five
minutes.
When
this
is
done,
it
will
be
replaced
with
the
image
that
that
will
be
downloaded
from
the
camera.
F
This,
the
image
will
also
be
shown
as
a
thumbnail
here
in
the
image
history
part,
its
statistical
properties
will
be
shown
here,
the
mean
value,
the
median
value,
the
standard
deviation,
the
mean
absolute
deviation,
the
hfr
and
the
number
of
stars,
which
are,
of
course
important,
and
you
can
also
have
a
chart
that
shows
you
how
things
have
are
progressing
in
the
sequence.
You
can
customize
the
chart
to
show
different
variables,
the
hfr
number
of
stars,
the
median
value
the
mean
value
standard
deviation,
mean
absolute
deviation,
temperature
or
the
rms
guiding
value
of
each
sub.
F
Actually,
you
can
show
two
variables,
one
on
the
right
side
and
one
on
the
left
side.
If
so,
if
you
are
so
inclined
and
it's
useful
because
at
the
end
of
the
night,
what
I
normally
do,
I
I
start
the
sequence
and
and
then
I
go
to
sleep
and
in
the
morning
I
connect
back
to
my
via
remote,
desktop
to
my
mini.
E
F
F
F
There
is
a
built-in
bathroom
of
analyzer
that
will
try
to
analyze
the
x
shapes
that
the
mask
has
drawn
around
your
stars
and
suggest
whether
you
need
to
move
in
or
out,
but
there
are
also
other
things
that
you
can
do.
You
can
do
polar
alignment
now.
Polar
alignment.
To
be
honest,
is
nowhere
near
the
sophistication
of
the
polar
alignment
that
our
friend
high
is
built
into
ecos.
F
F
D
F
You're
right
now,
you're,
I'm
tracking,
with
the
telescope
on
the
west
side
of
the
pier.
This
is
the
guide
rate
in
ra.
This
is
the
guy
trade
in
declination
and
hopefully
the
right
practice.
Junction
and
definition
don't
change,
whereas
altitude
and
azimuth
are
changing
because
the
amount
is
tracking.
F
F
F
This
image
is
being
stretched
and
shown,
and
this
is
the
first
one
of
the
sequence
now
the
thumbnail
has
been
is
being
shown
here,
and
this
is
the
first
data
point
on
the
chart
that
we
collect
all
this
information
from
across
the
night.
I
can
at
this
point
zoom
in
and
examine
the
guiding
how
it
was
yeah-
it's
not
too
bad.
If
I,
if,
for
instance,
I'm
not
satisfied
with
this
image,
I
can
just
downvote
it
with
the
thumb
down
and
it
will
be
moved
from
one
folder
to
it.
No
sorry,
it's
a
file
name.
F
It
will
be
changed
from
the
file
name,
that
the
inner
would
normally
attribute
to
bad
underscore
the
original
file
name.
So
you
can
easily
recognize
and
by
the
way,
speaking
of
naming
nina
likes
g
pro
can
embed
a
number
of
header
values
in
in
your
files.
You
can
embed
the
array
and
declination
can
embed
the
temperature,
the
hfr
other
and
the
object
name,
but
for
for
camera,
just
like
mine,
dslr
does
not
support
fits
metadata
in
the
raw
files.
F
This
information
can
also
be
embedded
in
the
in
the
file
name.
If
I
move
to
the
option
panel,
I
can
show
you
here
that
you
can.
This
is
the
the
image
file
pattern
that
I'm
currently
using
I'm
using
the
data
and
a
folder
for
the
date,
a
folder
for
the
image
type,
so
it
would
be
light
flat,
dark,
etc,
and
then
the
file
name
will
be
the
name
of
the
target
date
and
time
the
filter
sense
of
temperature
exposure
time
and
the
frame
number
in
the
sequence.
But
you
can.
F
F
This
is
this:
this
is
the
option
file,
as
you
can
see,
there's
a
number
of
options
that
you
can.
You
can
specify
how
the
images
are
stretched,
whether
they
are
stretched
after
the
bearing
whether
the
hfr
is
calculated
after
the
bearing
or
not
whether
the
stretch
is
linked
or
unlinked.
It
is
just
like
picks
inside
you
can
specify.
F
F
This
plugin
implements
a
new
trigger
item
that
I
can
find
here.
Just
like
there
is
meridian
flip.
There
is
a
smart
meridian
flip
in
what
ways
there
is
my
meridian
flipped
marked
you
can
fit
it
with
a
with
a
file:
that's
specified
for
each
of
the
declination
angles
between
them:
minus
90
and
plus
90.
What
is
the
minimum?
F
The
latest
hour
angle,
that
the
mount
can
safely
track
to
at
that
declination
and
the
minimum
hour
angle
that
must
elapse
before
the
mount
can
safely
flip
to
the
other
side.
In
this
way,
you
can,
if
you
have
an
abstraction,
but
only
for
certain
declination
angles.
You
don't
need
to
waste
imaging
time
when,
when
you're,
shooting
at
a
different
destination,
nina
will
always
use
the
the
minimum
waste
of
the
time
for
the
flip.
So
we
wasted
the
minimum
time
between
the
the
moment.
That
tracking
must
stop
and
the
mean
in
the
moment.
F
Easy
you
need
to
have
a
you
need
to
use
a
microsoft
visual
studio
which,
given
that
I
don't
have
a
windows
machine,
I
installed
visual
studio
on
this
very
same
pc.
You
can
see
it
here
and
it
runs
it's
slow,
but
it
runs
so
you
can
actually
develop
develop
software
and
extend
the
nina
before
with
this.
With
this
development
environment,
all
the
software
is
available
is
a
all.
The
source
is
available.
F
F
Let's
say
that
I
want
to
see
how
the
knight
is
progressing,
so
you
can
see
not
only
the
hfr
is
going
down,
but
also
the
median
is
going
down.
We
started
with
the
median
adu
of
about
4500,
and
now
we
are
well
already
below
4
000,
so
it's
becoming
darker
and
after
a
while
you're
gonna
start
seeing
that
maybe
not
all
images
are
are
perfect.
I
I
don't
have
a
perfect
mount
by
any
stretch
and
you're
gonna
start
rejecting
some
of
them,
but
it's
good
that
you
can
easily
do
it
here.
F
G
So
you,
when
you
plan
you
can
plan
not
let's
say
ideally,
but
with
your
actual
local
horizon,
with
all
your
or
obstruction
that
you
have
in
your
in
your
place,
especially
if
you
are
in
the
backyard
or
something
like
that
like
I
am.
I
have
trees,
trees,
houses
knees
and
the
app.
So
that's
another
very
nice
feature
that
I
think
is
worth
mentioning.
Yes,
thank
you
for
mentioning
that.
F
You're
right,
this
is
the
so
let
me
quickly
show
it
this
is
the
sky
atlas.
You
can
search
for
a
various
criteria,
type
of
object,
the
constellation
it's
it's
in
the
coordinates
of
the
object,
the
surface
brightness,
the
size,
the
magnitude
or
the
minimum
altitude.
As
you
were
saying,
compared
to
your
local
horizon,
let's
say
that
I
want
to
to
see
what's
available
tonight
in
ursa
major.
F
Now
we
are
in
the
framing
assistant,
the
image
is
being
downloaded
from
the
fitz
sky
server.
In
this
case,
I
don't
have
it
in
cache.
Strangely,
oh
yeah,
so
this
is
the
what
it
will
look
like
with
my
camera
and
my
focal
length.
So
that's
interesting
and
I
can
continue
doing
my
framing
just
just
like
I
showed
you,
but
another
interesting
thing
is
that
nina
is
integra
can
be
integrated
with
the
car
to
the
cl
planetarium.
So
let
me
run
the
car
to
cl.
F
If
I
go
back
to
nina,
I
can
click
this
button
that
says
get
coordinates
from
the
planetarium
software.
It
uses
an
api
called
to
to
cartoucle,
takes
the
information
and
already
understood
that
I
was
interested
in
m66
and
now
it's
downloading
the
m66
imagery.
So
it's
going
to
take
a
moment
and
it's
going
to
show
here.
F
Yep,
that's
it,
but
the
centering
is
poor,
so
I
can
do.
I
can
start
it
by
doing
things
in
cartoucle
and
then
refine
them
here.
When
I'm
happy,
I
can
create
another
sequence
item
that
I'm
gonna
image.
Maybe
I
can
put
it
after
my
image
of
of
the
10
10
frames
of
f
m
51
that
I'm
doing
right
now
and
nina
would
automatically
execute
that
sequence.
You
know
I'm
sure
that
this
is
nothing
new
for
people
who
are
accustomed
to
using
sgp
or
other
programs
like
that
or
ecos.
F
F
B
Yeah,
I
think
what
it's
for
is
kind
of
your
smart
meridian
flip,
because
apcc
has
all
that
stuff
where
you
can
draw
a
surface
where
you
say
you
know
declinations
from
here
and
here
exactly
what
you
just
described
and
then
apcc
can
pass.
You
know
what
the
meridian
flip
point
should
be
into
sgp,
so
it's
a
little
bit
of
a
hack,
but.
F
F
Api
integration
they
can,
we
can
import
in
nina
the
same
instruction
profile
that
apcc
has
because
apparently
in
the
astrophysics
forum,
many
people
have
been
complaining
about
this
and
it's
for
me.
It
was
an
interesting
little
project,
because
when
I
discovered
that
I
had
this
problem
that
my
mount
was
was
limiting.
F
I
couldn't
track
all
the
way
to
the
meridian
for
declination
between
46,
north
and
63
north,
and
if
I
I
need
to
stop
it
like
30
minutes
before
the
meridian,
and
I
cannot
flip
it
before
35
until
35
minutes
after
I
wasted
55
minutes
at
no
declination.
If
I'm,
if
I
want
to
be
conservative
to
the
to
the
utmost,
so
initially
I
thought.
Okay,
I
can
just
throw
money
at
the
problem
and
buy
a
health
pier
and
it
would
remove
much
of
the
problem,
given
that
it's
actually
colliding
with
the
tripod
legs.
B
B
Yeah
I
mean
this
is
kind
of
too
bad
because
for
years
ray
you
know
at
astrophysics
or
his
contract
program
for
astrophysics
has
been
talking
about
getting
these
kind
of
properties
into
ascom.
So
you
can,
you
know,
say
it's
safe.
You
know
safe
to
flip
from
this
point
and
not
from
that
point
etc,
and
it
hasn't
gone
anywhere
and
it's
actually
something
that
should
you
know
should
be
in
there.
But
you
know
everybody's
moving
on
so
we're
just
you
know,
implementing
whatever
it
takes
in
the
capture
programs.
I
guess
to
get
there.
F
B
B
B
F
F
This
is
the
guide
the
guide
star,
and
these
are
the
guy,
the
the
parameter,
the
imaging
parameters,
I'm
imaging
with
the
exposure
time
of
two
thousand
micro
milliseconds,
so
two
seconds
with
a
certain
gain,
and
I
have
a
certain
guide,
tolerance
in
ra
and
a
certain
one
in
declination,
with
a
certain
aggression
percentage,
a
certain
mode
which
is
similar
to
the
backlash
correction
mode
in
phd2.
I
understand
it's
way
less
sophisticated
again
than
the
multi-star
guider
that
phd2
has
and
the
highest
implemented
for
ecos,
but
it
works.
It's
giving
me
0.41
arc.
F
If
there
are
no
other
questions,
I
will
stop
my
sharing
and
just
show
you
yeah.
There
are
already
four
images
collected
you
can
see
here.
The
median
is
going
down
and
hopefully
the
hfr
shouldn't
change
too
much
around
the
knife,
so
you
should
oscillate
around
the
3.2
pixels
all
right.
Thank
you
very
much.
I
hope
you
find
it
useful.
A
Okay,
well
we're
a
little
past
time
here,
any
last
minute,
announcements
or
anything-
I
I
don't
think
bruce-
has
anything
planned
yet
for
the
next
month's
meeting,
but
he
should
be
back
to
to
take
up
the
reigns
again.
Oh
I
know.
One
thing
I
wanted
to
say
was
telescope.
Live,
has
just
announced
planetary
images
with
a
couple
really
nice
shots
that
they
dropped
in
their
email
of
saturn
and
jupiter.
A
So
I'm
not
quite
sure
how
it's
going
to
work
yet
because
they
mentioned
that
somebody
was
going
to
be
there
live
to
help
you
along.
I
don't
know
how
that
can
be
sustained,
but
that's
interesting.
So
that's
going
to
be
available
in
a
in
a
week
or
two,
I
think
so.
That'll
be
interesting
to
have
a
you
know,
meter,
class,
telescopes,
doing
planetary,
so
we'll
see
what
happens
and
you
know
continue
to
work
on
getting.
I
I
have
permission
now
from
the
open
space
authority
to
go
back
to
little.
A
Yuvas
would
have
gone
a
week
ago
or
two
weeks
back.
I
forget
new
moon
weekend,
but
the
weather
didn't
cooperate
so
and
looks
like
I'll
be
at
at
rcdo
next
month,
but
maybe
we
can
sneak
in
the
week
before
the
week
after
or
something
have
to
look
at
the
schedule.
But
we
should
be
back
out
there
pretty
soon
now
with
some
social
distancing,
but
at
least
we'll
get
some
photons
so
yep.