►
From YouTube: SJAA Imaging 7/20/21: 3D Printing for Astrophotography
Description
Glenn Newell, Paolo Barettoni and Jo Herz will each spend 10-minutes giving their perspectives on 3-D printing, perhaps showing off their productions, followed by a general discussion on the topic.
A
So
welcome
to
the
imaging
sig
meeting
and
tonight
we're
gonna
talk
about
3d
printing.
I
wanted
to
talk
about
the
format
a
little
bit
we're
going
to
have
three
presenters.
I've
asked
them
to
talk
10
minutes
I'll,
interrupt
them
at
15
minutes,
but
you
know
shoot
for
10
minutes
kind
of
thing
and
I'd
say
we
do
this
without
questions
have
sort
of
three
presentations
like
that
for
a
half
hour
to
45
minutes
and
then
we'd
have
another
half
hour
or
so
of
interaction.
A
A
B
So
what
I
want
to
tell
you
about
3d,
printing
first
of
all
is
a
little
bit
of
an
introduction
on
overview
for
people
who
have
not
used
the
3d
printer
before
so.
This
is
basically
my
setup.
It
is
one
of
the
cheapest
ones
you
can
have,
but
also
one
of
the
most
versatile
ones
called
the
ender
three
and
what
you
can
see
here
is
this:
that's
the
3d
printer,
that's
the
printhead
in
here,
a
spool
with
the
thermoplastic
material.
B
B
The
only
difference
is
that
it's
not
using
ink,
but
it's
using
thermoplastic
material,
which
you
can
weld,
which
is
welding
together
to
form
a
three-dimensional
object
and
both
operate
on
the
same
principle.
The
3d
printer
also
uses
stacking
software
to
create
a
3d
image
and
that's
not
unlike
what
picks
inside
the
deep
sky,
stacker
also
doing
with
individual
image
frames,
but
in
reverse.
B
So
basically,
if
you've
ever
used
an
inkjet
printer
and
if
you're
using
pics
inside
the
keepsky
stacker,
you
already
have
all
the
ingredients
in
place
to
productively
use
the
3d
printer
as
well.
So
3d
printers
are
incredibly
versatile
and
I
cannot
understand
really
how
I
could
ever
live
without
one.
I'm
going
to
give
you
a
little
bit
of
an
overview
on
that,
and
you
can
talk
about
that
later.
So
supporting
the
astrophotography
hobby
is
really
only
one
small
application.
B
3D
printers
are
good
for
asking
more
during
the
discussion
session
about
this,
and
the
best
thing
also
that
I
don't
want
to
forget
to
mention
is
all
the
basic
software.
You
need
to
run
your
3d
printer
is
open
source
and
it's
free,
so
you're
not
really
really
risking
a
lot.
The
printer,
I
showed
you
costs
about
200
and
that's
all
it
takes
you
to
get
into
into
this
hobby
and
start
printing
whatever
you
like,
not
just
escrow
here.
So
this
here
is
an
image
of
one
object,
for
instance
the
pattern
of
mask.
B
So
this
is
images
created
in
software
called
slicer,
and
that
is
the
software
which
prepares
the
data
to
be
sent
to
the
3d
printer.
So
pretty
much
the
same
thing
as
what
you
would
have
in
the
print
menu-
and
this
here
is
one
one
of
the
things
which
I've
printed
is
a
case
for
a
pi
4.
lots
of
these
things.
You
can
actually
download
directly
from
the
internet,
so
you
don't
have
to
design
them
themselves.
B
There
is
a
fantastic
place
called
thingiverse
and
various
others.
There
are
all
sorts
of
3d.
Printable
objects
are
deposited.
You
just
download
the
files
for
this
this
one.
Here
I
have
modified,
so
it
actually
fits
my
purposes.
I
cut
in
some
extra
opening
and
so
forth
to
make
it
more
accessible
and
to
mount
it
on
my
rig
okay.
So
this
is
another
object
which
I'm
going
to
show
you
shortly.
This
is
a
frame
for
a
asi
1600.
The
camera
would
fit
in
here.
B
My
little
guide
scope
would
fit
in
up
there,
and
here
I've
got
a
rail
where
I
can
mount
my
auto
focus
and
I'm
going
to
show
you
the
pictures
of
those
in
a
second.
This
is
what
this
looks
like.
What
I
just
showed.
You
is
another
action,
so
I
used
3d
printed
this
file,
which
I
designed
on
the
computer
using
freecad,
very
simple
software,
not
more
complicated,
really
than
photoshop.
B
B
I
put
this
gear
ring
around
it,
so
that
I
can
connect
it
to
my
auto
focuser
here
and
that
is
just
driven
by
a
small
toy
analog
motor
which
then
is
controlled
by
the
ecos
highest
already
told
you
probably
a
lot
about
ecos
and
the
software
package
entails
and
a
driver
called
fc
usb.
So
I
can
autofocus
with
this
here
a
standard
135
nikkor
camera
lens,
which
I
got
on
amazon
for
fifty
dollars
attached
to
an
asi
1600,
and
that
gives
you
a
a
very
nice
pictures
of
night
sky.
B
So
this
is
what
I
actually
took
with
this
about
the
year
and
a
half
ago,
so
obviously
the
orion
region
with
the
horse
head
and
that
picture
was
taken
with
the
isi
1600
mm
and
the
135
millimeter.
I
think
it
was
a
135
millimeter
lens,
and
this
manually
this
this
auto
focuser,
which
I
just
showed
you
3d
printed
so
all
just
put
together
from
some
really
basic
pieces.
You
could
also
do
the
same
thing
with
a
dslr
and
a
regular
dslr
lens.
So
this
is
and
then
next
step
up.
B
I
wanted
to
use
that
same
3d
printed
system
here,
in
which
I
again
is
on
auto
focuser,
but
I've
now
adapted
it
to
a
white
cat
very
similar,
basically
same
design
as
a
space
cat
or
a
red
cat
from
william
optics
and,
as
you
know,
that's
a
helical
focuser.
So
I
had
to
clamp
this
gear
ring
here
around
it.
B
Then
I
wanted
to
get
a
little
bit
more
sophisticated
wanted
to
get
away
from
the
analog
motors.
For
my
auto
focuses,
and
so
I
changed
that
and
use
basically
the
same
design
again
but
now
to
mount
a
stepper
motor
to
this.
This
is
the
setup
same.
The
same
25,
this
rail
here
stepper
motor
is
there
drives
that
gear
attached
to
the
helical
focus
of
the
william
optics
white
cat,
okay.
So
this
here
is
again
another
piece
which
has
3d
printed
the
case
for
the
electronics
for
the
autofocus.
B
So
what
you're,
seeing
down
there
underneath
all
those
wires,
is
simply
a
little
board
with
a
an
arduino
on
top
of
it
you're
seeing
this
the
cpu
unity
of
the
arduino
right
there-
and
here
is
the
stepper
motor
driver
on
the
software
for
this,
as
well
as
the
design,
is
also
freely
available.
So
the
entire
setup
here,
including
the
thermal
thermoprobe,
so
you
get
refocusing
when
the
temperature
shifts
by
more
than
a
predetermined
amount
of
degrees,
in
my
case,
2
degrees
centigrade.
B
So
almost
all
almost
everything
holding
just
a
rig
here
together,
has
been
a
3d
printer,
okay.
So
now,
then
next
I
wanted
to
adapt
that
to
my
ed
102,
explore
scientific
102
so
that
for
that
I
didn't
have
an
auto
focuser.
Yet
so
I
printed
the
new
autofocus
or
control
unit,
but
now
I
needed
to
have
a
new
frame
to
drive
the
focus
on
that
102,
and
this
is
a
picture
which
you
see
now
from
the
bottom
of
that.
B
So
I
designed
the
clamp
basically
which
just
which
I
can
just
screw
onto
clamp
around
the
base
of
the
telescope
between
the
focuser
gears
and
so
there's
nothing
which
is
actually
screwed
onto
the
telescope.
So
this
is
just
a
pure
clamp
construction
and
put
some
gears
in
here.
The
stepper
motor
is
here
driving
this
little
gear,
which
contrives
a
large
gear
which
is
attached
directly
to
the
fine
focus
knob.
So
I
didn't
have
to
take
the
fine
focus
knob
off
the
the
shaft.
B
This
is
just
stuck
on
and
held
in
place
with
three
screws
which
are
threaded
through
the
3d
printed
gear.
Here
now
you
wonder
probably
what
the
spring
here
is
so
turns
out
that
the
crayford
focuser
in
the
ed102
has
a
tendency
for
slipping,
and
that
would
be
the
same
actually
with
a
commercial
focuser
as
well.
B
So
I
use
this
spring
here
in
order
to
take
weight
off
the
filter,
wheel
and
the
camera,
so
the
focuser
doesn't
slip
when
the
telescope
is
pointing
straight
up,
and
so
the
the
spring
really
just
helps
supports
the
bait
of
the
filter,
wheel
and
the
telescope,
and
this
entire
setup
here
really
works
very
well.
So
this
is
a
screenshot
here
from
ecos
control
panel.
I
assume
that
hai
has
already
told
you
all
about
the
software
package
down
here.
B
You
can
see-
and
he
actually
designed
this
surface
here
and
down
here.
Is
you
see
the
the
recurve
of
the
focuser
and
the
focus
which
I
just
showed?
You
hits
the
absolute
minimum
of
the
v-curve
every
time
you
can
see
here,
the
yellow
spot,
so
extremely
reliable,
all
from
self-designed
3d
printed
pieces.
So
this
works
really
well
and
now
you're
wondering
probably
well
and
now
I'm
environmentally
conscious.
I
don't
want
to
waste
a
lot
of
plastic
and
contribute
to
the
environmental
disaster
we're
already
living
in
well.
B
I've
got
some
good
news
for
you,
so
the
material
which
is
I'm
using
it,
which
is
the
most
popular
one,
is
called
pla
so
that
stands
for
polylactic
acid,
and
that
is
an
organic
material.
It
is
fully
compostable.
So
whatever
I'm
not
using
goes
into
my
compost,
pile
here
in
the
backyard
and
it
does
take
a
long
time
and
you
have
to
cut
it
up,
but
the
material
is
going
to
be
completely
biodegradable,
so
you
don't
have
any
plastic
waste
okay.
B
A
C
C
What
I
have
using
as
a
filament
just
to
sorry
joe,
but
I
I
don't
like
the
pla,
because
for
my
point
of
view,
okay,
that
saved
the
planet
but
is
a
little
too
soft,
especially
in
terms
of
of
temperature,
because
here
in
the
sun
in
california-
and
I
think
also
the
same
in
the
in
texas.
Where
are
you
where
you
are
the?
C
If
you
leave
the
the
scope
out
like
I
do
during
the
day
also
it
covered
the
pla
can
bend.
If
that,
if
you,
if
you
are
under
the
sun,
so
normally
I'm
using
or
asa,
I
please
don't
ask
me
to
to
read
the
the
the
very
cryptic
chemical
name
from
the
acronym
is
coming
or
the
pet.
Gpg
is
a
good
compromise
that
I'm
using
a
lot
in
this
moment,
because
it's
the
same
plastic.
C
C
I'm
not
using
the
the
the
the
the
software
that
joe
was
mentioning,
but
I'm
using
another
approach-
I
am
a
let's
say,
programmer
by
trade.
So
this
kind
of
openscad
and
other
open
source
is
very
useful
for
me
because
you,
you
use
a
sort
of
c
that
has
many
basic,
primitive
circle
cylinder
these
kind
of
things,
and
with
that
you
construct
the
the
things
that
you
are
designing,
I'm
using
ultimate
cura
for
slicing
the
slice
is
the
process
that
is
a
sort
of
talking
about.
C
C
C
Another
little
things
was
a
non-rotating
focus,
focuser
and-
and
that
was
a
very
let's
say,
challenging
and
interesting
design,
because
I
have
no
idea
how
to
do
it.
So
I
researched
in
on
internet
how
a
lens
camera
lens
are
constructed,
and
I
say
I
reverse
and
generate
the
idea
and
I
construct.
Those
are
three
pieces
one
pieces
here,
the
second
one
here
and
the
middle
one
has
the
two
thread:
one
clockwise
and
the
other
counterclockwise.
C
C
Next
one
was
a
support
for
a
an
old
tamron
category
optic
for
an
olympus
attachment-
and
I
used
this
for
with
microfocus
control
here
in
order
to
focus-
and
that
was
a
manual
not
a
motorized,
and
I
have
different
bases-
and
I
did
a
lot
of
testing
in
order
to
stiffen
the
the
base
and
avoid
fracture
with
these.
Let's
say
ribs
that
I
discover
it's
definitely
better
to
have
these
kind
of
ribs
instead
of
having
a
thick
material
like
here.
C
Now
you
see
the
ribs
here,
that's
the
lost
monday,
duct
tape,
another
one
okay.
That
was
the
of
course
in
this
moment,
and
I
that's
that
was
the
the
the
batting
of
mask
that
I
printed
for
the
yeah
that
one
that
high
is
showing
in
this
moment,
and
these
ones
instead
are
smaller
for
my
geider
atsd
short
tube
and
that's
another
use,
and
that's
it
and
basically
I'm
using
the
3d
or
beside.
Of
course,
a
bunch
of
cover.
C
Extension
boxes
for
other
projects
for
related
projects
is
useful.
Of
course.
Sometimes
you
have
to
plan
very
carefully
because
the
let's
say
the
the
3d
printing
has
a
problem
to
print
without
the
support
some
pieces.
So
you
have
to
better,
let's
say
plan
for
that,
but
it
is
very
useful
and
that's
it.
D
F
F
So
let's
go
on
yeah,
so
I'm
glenn,
hi,
you've
probably
seen
this
before,
but
here's
my
email
or
what?
If
you
want
to
reach
out?
That's
fine,
so
I'm
just
going
to
kind
of
list
a
bunch
of
stuff
that
that
I've
done
so
so
paulo
and
I
have
kind
of
built
up
a
thread
library
of
of
each
time.
We
need
a
new
astro
thread,
then
we
add
that
to
our
to
the
library.
F
So
these
are.
These
are
the
ones
that
are
in
there
now
and
I
think
the
most
ambitious
one
here
is
that
the
club
has
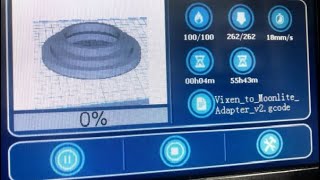
this
vixen
140
and
I
wanted
to
remove
the
stock
focuser
and
use
the
moonlight
focusers
that
I
have
so
I
can
autofocus,
but
this
is
a
petzaval
design.
So
there's
a
there's
a
rear.
This
black
piece
here
that
I'm
holding
is
a
is
a
rear
lens
cell.
F
So
there's
a
lens
inside
that
and
it
that
has
to
you
know,
go
down
inside
the
focuser,
so
this
adapter
had
to
have
three
threads
on
it.
You
know
one
for
the
ota
itself,
one
for
the
the
focuser
would
be
here
on
the
right
and
then
this
internal
one
for
the
rear
lens
cell,
and
you
can
see
here
that
that
was
a
55-hour
print,
because
I
printed
it
in
solid
plastic
in
the
in
the
nylon
fiber.
F
So
that
was
a
a
multi-day
print
and
that's
assuming
that
you
didn't
have
any
errors.
So
I
think
I
think
it
was
maybe
four
tries
before
I
got
through
the
whole
55
hours,
but
okay,
so
some
other
things.
I
made
a
beam
splitter
for
spectroscopy
so
that
I
could
you
know,
have
a
a
camera
on
there
for
plate
solving
and
then
the
majority
of
the
light
would
go
through
to
the
to
the
spectroscopy
camera,
and
then
it
occurred
to
me.
F
Well,
that's
pretty
much
the
same
as
as
a
on-axis
guider
that
uses
a
cold
mirror
instead
of
a
beam
splitter.
So
I
did
a
bunch
of
experiments,
semi
successfully.
I'd
say
with
with
the
cold
mirror
and
that's
where
the
visible
light
comes
in
and
hits
the
mirror
and
goes
up
to
your
imaging
camera.
But
the
infrared
light
goes
through
the
mirror
to
your
guide
camera
here.
So
that's
an
example
of
what
that
looks
like
and
that
way
you
get
the
the
full
frame
guiding
of
you
know.
F
The
full
frame
is
available
for
the
guide
camera
and
then
also
there's
a
interesting
side
effect,
which
you
can
use.
There's
astigmatism
because
you're
going
through
at
this
45
degree
angle,
and
you
can
actually
use
the
shape
of
the
stars
with
that
astigmatism
to
build
a
an
autofocuser
based
on
that.
So
there's
a
innovations,
foresight,
onag
is
the
commercial
version
and
and
there's
software
available
from
him
that
that
does
that
autofocus
real
time
autofocus
as
you
go
through
the
night,
some
other
mechanical
stuff
is
for
the
planetary.
F
I
had
a
flip
mirror
that
I
wanted
to
automate
from
from
inside
the
house,
and
it's
maybe
a
little
confusing
here
what's
going
on,
but
the
the
the
flip
mirror
has
a
has
a
knob
on
the
side
of
it
that
you
would
normally
turn,
and
so
I
was
gluing
that
to
to
this
motor
here
and
then
I
actually
use
the
the
pointer
on
the
knob.
That's
part
of
the
the
flip
mirror
to
hit
these
little
micro
switches
here
and
tell
me
which
position
it
was
in.
F
So
that's
what
that
was
about,
and
here's
a
before
deciding
to
switch
to
the
to
the
moonlight
on
that
vixen.
This
is
the
vixen
stock
focuser
and
I
did
some
experiments
trying
to
automate
that
focuser.
But
I
wasn't
happy
with
that.
But
this
is
a
3d
printed
clamp
here
that
mounts
a
inexpensive,
stepper
motor
and
you
have
the
the
union
there
to
the
to
the
stock
focuser.
F
F
F
Some
other
things
so
here's
my
version
of
the
the
camera
lens
focuser
that
that
we
saw
so
the
the
stepper
motor
mount
on
the
on
the
small
rig
here
is,
is
3d
printed
and
the
gears
are
3d
printed
and,
and
this
material
here
is
that
soft
tpu.
So
it's
kind
of
a
little
bit
like
a
rubber
band.
So
you
stretch
it
over
the
over
the
lens
and
then
it
just
friction
fits
and
so
that's
how
I
was
doing
that
and
then
later
this.
F
So
this
hole
all
everything
here
rotates
around
the
back
of
the
the
back
of
the
telescope
and
the
3d
case
here
for
the
electronics,
it's
arduino
and
the
solenoid
driver
and
all
that
is
3d
printed
as
well
and
then
going
back.
This
is
this
scope
here
on
the
bottom
right.
This
was
the
the
first
scope
that
I
had
you
know
it's
a
department
store,
kind
of
for
mail
order,
type
scope,
it's
a
matte
cavs,
actually
still
good
for
for
planetary
f13.
F
But
you
know
it
has
this
this
knob
that
just
refuses
to
to.
I
can't
figure
out
how
to
get
that
thing
off
of
there
and
it's
nestled
in
amongst
this
plastic
housing
to
where
you
can't
easily
attach
anything
to
it.
And
if
you
try
to
adjust
this
thing
when
you're
visually
observing
by
hand
as
soon
as
you
touch
that
everything
wiggles
around
and
you
can't
tell
if
you're
getting
in
focus
or
not
so
this
was
my
first
focuser
attempt.
So
this
is
actually
just
a
dc
motor.
F
In
this
case,
and
again,
the
the
tpu
material
forms
a
rubber
band
type
belt
that
that
friction
fits
very
thinly
in
the
thin
gap
between
this
cowling
and
the
knob,
and
so
that
worked
and
then
there's
three
of
these
rings,
two
of
them
to
mount
the
scope
and
one
of
them
that's
flipped
around
to
mount
the
the
solenoid
or
sorry
dc
motor
case
on.
So
that
was
a
lot
of
cluege
on
that
one.
F
F
Maybe
you
don't
want
it
to
go
further
than
that
for
for
aligning
things
or,
and
here's
an
example
of
a
strain
relief
or
wire
guide,
and
it
also,
I
put
sort
of
degree
markings
on
it
and
glued
these
levels
on
it.
So
in
this
case
you
know,
if
the
sgp
tells
me
to
rotate,
you
know
60
degrees
or
something
I
can
go
out
there
and
see
what
I'm
doing.
F
What
else
oh
for
bruce
for
his
raza,
I
printed
some
some
transparent
storage
boxes
for
the
the
two
inch
filters
that
go
in
the
tray
filter
system
for
the
raza
and
then
sort
of
on
a
completely
different
note.
Here
I
was
trying
to
experiment
with
various
3d
things,
3d
printing
being
one
of
them
of
you
know
showing
astrophotos
so
so
this
is
something
called
a
lithopain
and
it's
designed
to
to
show
light
through,
and
so
this
is.
F
This
is
my
tadpoles
image
here,
and
this
is
what
the
litho
pane
looks
like,
and
then
I
put
a
transparent
image
of
the
the
tadpoles
behind
it
to
get
the
get
the
color
and
that
that's
what
it
that's
what
it
looks
like.
So
it
was
a
okay
experiment.
I
guess
what
else?
Oh,
so
that's
that's
pretty
much
it
for
me
yeah.
So.
A
A
F
A
G
B
Yeah,
so
the
one
which
I
showed
you
pla,
okay,
so
paulo
doesn't
like
pla
that
much,
but
it
really
is,
first
of
all
the
simplest
and
probably
also
the
the
cheapest
material
and
fully
biodegradable.
That's
why
I
like
it
so
a
five
kilogram
spool
of
that
cost
me
ninety
dollars,
okay,
so
five
kilograms!
You
can
print
a
lot
with
got
it.
C
C
F
Got
it,
and
and
some
of
this
you
know
your
prototyping
right,
so
you
you
might
make
something
and
then
later
replace
it
with
something
in
metal
but
for
durability.
Or
what
have
you,
but
you
know,
you're,
experimenting
and
you're
trying
things
so
that
gives
you
that
capability
or,
if
you're,
desperate,
to
hook
this
thing
to
that
thing,
and
you
know
the
stores
are
closed
or
whatever
right
you
can.
You
can
build
something
in
an
hour
or
so,
or
a
couple
hours.
C
Yeah
part
of
the
of
the
learning
curve
that
help
a
lot
the
the
junk
pile
is
the
fact
that
normally
the
the
circle
or
better
the
cylinder
or
the
hole,
the
cylindrical
hole
are
different
from
the
nominal
size.
Because
you
have
to
think
that,
at
the
end
of
the
story,
the
the
the
the
3d
printer
head
is
moving
in
a
rectangular
way.
G
C
C
F
C
F
C
C
F
F
Yeah
that
I
was
going
to
build
a
jig
yeah,
but
that
that
also
could
get
into
you
know,
there's
things
you
can
buy
if
you're
trying
to
do
arty
stuff,
that's
different
colors,
there's
different
ways
to
to
try
to
get
the
different
color
filaments,
either
to
splice
them
all
together
at
the
appropriate
point
and
have
a
single
print
head
or
to
have.
You
know
multiple,
multiple
extruders,
multiple
nozzles,
doing
the
different
colors,
plastics
and
stuff,
and
that
all
involves
trying
to-
or
some
of
that
involves
you
know,
splicing
the
material
together
but
yeah.
B
Yeah,
but
for
for
most
people,
actually
I
don't
think
well,
or
rather
I
think
that
the
activation
hurdle
to
overcome
to
get
a
3d
printer
just
for
astrophotography
is
a
little
high
okay.
So
what
I
would
say
is
you
should
really
take
a
step
back
and
ask
yourself:
what
can
I
do
with
the
3d
printer
and
how
much
are
they
costing
so
the
baseline
bottom
line
is
a
really
good
one.
B
You
know
you,
you
can
just
design
your
own
replacement
parts
and
fix
them.
You
don't
have
to
go
out
drive
around.
You
save
a
lot
of
time
doing
this
and
you
save
a
lot
of
money.
So
I've
calculated
up
the
parts
which
I've
printed
so
far
in
order
to
keep
things
going
here
in
the
house
pool,
I
have
the
pool
pump
going.
I
have
pool
light
installed
because
the
old
one
was
broken,
etc
pieces
for
my
car.
B
When
I
add
all
of
this
up,
I
have
calculated
that
I
probably
saved
about
four
thousand
dollars
in
the
meantime
in
the
last
two
years,
simply
on
on
parts
which
I've
3d
printed
myself.
Okay,
so
that's
what
I
would
consider
first
right
this.
This
thing
is
just
like,
as
I
said
in
an
inkjet
printer,
it's
a
very
clunky
one.
It
prints
one
layer,
then
the
printhead
moves
instead
of
spitting
out
the
paper.
B
Now
the
printhead
simply
moves
0.2
millimeters
in
the
c-axis
and
prints
the
next
layer
on
top
of
it
and
they're
just
fusing
together,
that's
the
entire
principle
of
it.
So
it's
not
really
a
incredibly
complex
thing,
which
you
have
to
worry
about,
it's
very
easy
to
get
into
and
you
can
very
quickly
actually
get
the
hang
of
it.
G
I
haven't
it
looks
messy.
Yes,
I
have
I've
been
I've
been
eyeing.
I
like
the
resolution,
at
least
from
what
I've
seen
online,
but
yes,
there's
a
whole
cleanup
process
and
then
you
have
to
cure
again
with
uv
afterwards
just
run
from
the
park.
But
that's
I
mean
that's
all
I've
just
seen
online.
So
I
I
don't
have
any
first
time
experience.
F
B
B
C
H
D
C
F
No,
but
you
might
you
know
if
you're,
maybe
you're
prototyping,
something
that
you're
gonna
get
a
precise
parts
for
or
something
so
you
might
have
your
camera
and
filter
wheel
and
everything
hanging.
But
you
know
you
put
some
string
or
something
so
that
if
you
have
a
catastrophic
failure,
it
won't,
you
know,
fall
off
the
way
to
the
concrete
or
something.
But
you
know
I've.
I've
learned
you
know,
like
I
said
I
was
doing
things
kind
of
in
in
solid
plastic,
but
and
and
paulo's
doing
the
the
thick
ribs.
F
You
know,
I
think,
we've
learned
you
know,
there's
there's
a
couple
different
ways
that
these
parts
can
fail,
and
you
know
one
is-
is
making
sure
that
the
the
finish
diameter
outside
diameter
of
the
threads
or
inside
diameter,
depending
on
male
or
female
is
actually
correct.
Is
is
one
because
right
if
it's
slightly
too
small,
then
it
then
it
could
strip
out
right
and
and
the
other
one
is
just
making
the
whole
thing
strong
enough,
so
that
so
that
it
doesn't
fail.
F
You
know
if
you
have
a
big
3d
printed
part
and
you
can
squeeze
it
in
here.
Hear
kind
of
a
crackling
noise,
you
know
that's
the
the
infill
failing
right
as
and
so
if
you've
got
that,
then
that's
that's
a
sign
that
you
know
it
could
it
could
fail,
so
I've
switched
to
printing
and
it's
a
trade-off
between
print
speed
and
and
strength
right.
But
so
the
parts
I'm
really
worried
about.
I
print
in
solid
nylon,
fiber,
so
yeah
it
might
have
taken
55
hours.
C
Also
another
another,
let's
say
trick-
is
to
have
an
enclosure,
because
the
enclosures
create
a
warm
environment
and
the
filament
has
more
time
to
stick
to
the
previous
layer,
because
one
other
problem
is
the
determination
of
layer.
You
have
this
all
this
layer
and
at
a
certain
moment
you
have
a
a
crack
in
the
middle
of
the
layer,
because
the
layers
are
not
sticking
together
enough
and
that's
the
the
the
enclosure
is
important.
I
made,
for
instance,
a
it's,
a
a
plastic
enclosure.
G
So
that's
using
temperature
when
you're
printing
to
help
with
adhesion
of
the
layers
better
adhesion
of
the
layers.
What
about
after
the
fact
which
material
has
the
least
impact
on
and
from
temperature?
So
if
you're
in
a
very
old
environment,
does
it
impact
pla
different
versus
abs,
different
versus
usa
versus
I
mean?
Would
you
get
warping
in
any
of
these
plastics
or.
C
C
F
G
H
G
F
A
C
That's
the
reason
why
is
a
asa
is
better
than
abs
because
abs,
you
have
to
have
an
enclosure
and
possibly
you
have
to
have
ventilation
to
outside,
because
the
the
melted
plastic
is
smelly.
Let's
say-
and
I
don't
know
exactly
the
chemicals
that
are
in
that
smell
but
for
sure
are
not
good
for
your
lungs,
but
for
the
other,
instead
pla
pla
smell
of.
C
C
F
Yeah,
it
doesn't
have
a
doesn't
really
have
a
strong
odor,
but
I
imagine
you
want
to
think
about.
You
know
where
you
put
your
3d
printer
and
maybe
more
for
noise
than
than
smell.
You
know
if
it's
going
to
be
printing
overnight,
you
know
you
don't
want
it
next
to
your
next
to
your
bed,
it
it
can
kind
of
sound
like
people
having
a
conversation
in
another
room
or
something
where
you
just
can't
quite
figure
out
what
they're
saying.
B
B
Well,
I
mean
the
pla,
I'm
just
printing
inside
my
office.
You
know
it's
actually
not
really
noisy,
that
that
ender
3
basic
baseline
entry
model
printer
is
actually
pretty
fairly
quiet,
so
I
can
print
through
the
entire
day
and
still
work
on
my
computer
without
being
distracted
and
also
as
it's
a
basically
polylactic
acid
toxicity
of
that
is
very
low
if
it,
if
any.
B
And
it's
actually
the
cheapest.
I
mean
it's
the
cheapest
entry-level
material
and
works
for
most
things.
Yes,
I
mean
if
you're
gonna
expose
it
to
heat.
That
is
a
perhaps
some
issue,
but
it's
a
it's
probably
the
cheapest
material
and
for
prototyping
or
getting
into
this
and
trying
out.
You
know
what
you
can
actually
do.
B
C
For
all
the
boxes,
for
my
little
project
around
the
telescope
and
around
the
house,
and
of
course,
my
grandson
nine
years
old
is
using
the
pla
for
old
is
his
project
because,
let's
say
more
than
a
than
a
a
3d
printer
mine
is
a
condominium
part.
Mine
and
part
used
by
my
my
grandson
for
his
stuff
that
he
designed
with
a
tinkercad.
G
For
this
distance,
I
I
have
one
question,
but
that
can
probably
be
taken
offline
and
that's
regarding
on
the
electronics
side.
I
know
some
of
you
guys
are
using
motors
and
then
interfacing
them
with
controller
boards
and
then
making
them
talk
with
ecos
or
whichever
other
software.
I
guess
that
I
would
love
to
learn
more
about
at
a
later
point,
not
necessarily
right
now,
but
I
don't
know
who
to
start
with.
F
C
C
G
Yeah,
those
I'm
aware
of,
I
think
it
was
just
taking
it
further
right
so
going
beyond
just
the
board
and
what
you're,
putting
together
with
the
arduino,
but
now
it's
taking
it
further
and
saying.
How
do
I
interface
that,
with
you
know,
with
the
ecos
protocol
or
whatever
it
might
be?
How
do
you
connect
those
together
right?
I
think
those
are,
but
you
know,
conversation
related,
perhaps.
B
Well
from
what
I,
what
what
I
showed
the
the
drive
of
well,
the
sketch
for
the
arduino,
is
called
my
focus
of
bro,
there's
and
that's
freely
available,
and
that
is
has
a
driver
which
is
directly
built
into
ecos.
So
that
really
was
it's
no
issue
at
all.
You
know
you're
just
in
a
drop
down
menu
and
it
works
basically
out
of
the
box.
B
A
Okay
sounds
like
we're
we're
good
on
questions
for
the
3d
printing.
I
have
one
more
question.
It's
only
remotely
connected,
but
you
see
these.
You
know
this
house
was
3d
printed
like
what
does
that
mean?
I
mean
I
don't
understand
that
concept
and,
like
you
know,
is
there
some
kind
of
gigantic
3d
printer
with
a
hose
coming
out,
shooting
plastic
or
or
cement
cement?
F
I
think
it
can
mean
different
things
to
different
people
that
are
trying
to
make
a
point,
but
yeah
I
mean
so
for
for
rapid
construction
or
or
you
know,
constructing
things
out
of
moon,
regolith
or
something
right.
There
they're
experimenting
with
the
same
additive
manufacturing,
fdm
technology,
but
with
different
materials
like
cement
or
or
composited
regolith,
or
what
whatever
right.
A
Well,
my
last
question
sort
of
to
the
group
is
future
meetings
like
are
there
topics
that
I
mean?
I
guess
I
can
start
a
thread
on
the
imaging
mailing
list,
but
are
there
other
topics?
It
seemed
like
this
was
an
interesting
topic
for
folks.
A
lot
of
people
at
least
rsvp'd
and
many
showed
up,
are
there
think
about.
If
there
are
other
topics
feel
free
to
say
it
now
or
we
can
talk
about
it
on
email
or
where
we
have
panels
and
discuss
things.
Yeah.
G
I
I
know
I
brought
this
up
to
glenn
in
the
past,
but
you
know
I'd
like
to
bring
it
up
to
the
entire
panel,
I'm
new,
getting
into
astro
imaging
so
from
visual
to
now,
starting
to
dip.
My
toes
a
little
actually
now,
I'm
knee
deep
right,
then
yeah,
but
one
of
the
things
that
I'm
trying
to
figure
out
for
myself.
G
G
I
don't
know
if
we
have
any
documentation
that
you
know
different
folks
have
put
their
entire
workflow
down,
so
someone
could
learn
from
oh
okay.
So
let's
say
paulo.
Does
this
this
this
this
and
this
all
the
way
from
start
to
end?
You
know,
glenn!
Does
this
joe?
Does
this?
You
know-
and
I
think
that'll
be
very
useful
for
folks
just
starting
to
learn.
F
Yeah,
I
you
know,
that's
kind
of
how
I
started
out
on
my
my
youtube
channel
and
all
that
stuff
is
really
aging
now,
because
it's
you
know,
first
of
all,
it
was
dslr
and
things
have
changed
so
much
in
the
in
the
meantime,
from
about
2016
until
till
now,
but
yeah,
it's
it's
almost
that
there's
there's
so
many
choices
now
right
there.
You
know
it
used
to
be.
You
know,
backyard,
eos
and
sgp,
and
that
was
about
it.
But
now
you've
got
nina
and
you've
got.
F
F
If,
if
I
picked
a
workflow
to
to
explain,
then
you
know
somebody
else
would
say:
well,
I'm
using
nina
or
whatever
so
it
would
be.
It
would
be
different,
but
I
mean
the
basic
concepts
apply
across
all
of
them.
Right
I
mean
you
need
to
plate
solve.
You
need
to
come
to
focus
and
you
need
to
auto
guide
and
dither,
and
you
know
so.
Some
of
that
applies
but
yeah
one
one
challenge
would
be
now.
The
the
plethora
of
choices,
but
one
one
thing
I
thought
I'm
trying.
F
I
want
to
change
my
my
program
for
the
public.
You
know
I'm
tired
of
giving
the
same
old
lecture
that
I've
given
for
two
three
years
now,
every
every
month
and
I'd
I'd
like
to
you
know,
work
with
with
hi
on
a
on
a
ecos
presentation
and
francesco
on
a
nina
presentation,
and
you
know
I
can
do
sgp
and
so
that
that
kind
of
thing
sort
of
pre-produce
those
or
have
guest
lectures
or
whatever.
A
F
F
G
If
folks
are
willing,
I
can
maybe
try
to
connect
with
folks
separately
and
start
putting
some
just
at
least
workflow
listings
of
what
people
use,
and
you
know
that
might
be
a
good
library
but
he's
collecting
what
are
all
the
different
kinds
of
things
people
do
and
using
their
workflows.
That
might
be
helpful
to
someone.
I
know
it'll
be
helpful
to
me.
F
G
C
Another
one
other
possible
things
that
I
I
think
that
is
interesting
also
to
the
people
that
start.
These
kind
of
things
is
the
choice
of
the
hardware,
because
there
are
so
many
choices
in
the
hardware
and
everybody
each
one
of
us
had
made
mistake
and
tried
to
put
together
all
this
kind
of
mistake
in
let's
say
troubleshooting
or
faq,
or
something-
and
at
least
that
would
be.
A
All
right:
well,
I
tell
you
what
it's
been
an
hour
and
a
quarter,
and
I
said
I
was
gonna:
keep
it
to
an
hour
and
a
quarter
to
an
hour
and
a
half.
So
why
don't?
We
do
my
first
meeting
we'll
call
it
a
day
and
we'll
come
back
next
month
with
some
topic
and
I'll
start
a
email
thread
and
send
suggestions
or
I'll
come
up
with
something
like
the
way
bruce
always
did
if
not
and
thanks
every
especially
thanks
our
three
presenters,
our
three
panelists.
I
really
thought
that
was
an
amazing
presentation.