►
From YouTube: Development Team Meeting - October 17, 2017
Description
Results of the CNC Torch Table build, tractor development, WebGL. See corresponding date for notes at http://opensourceecology.org/wiki/Development_Team_Log
What you see here at Open Source Ecology is an ambitious program based on a volunteer effort. To help us reach the goals - please consider joining as an OSE Developer in 2017-
http://opensourceecology.org/wiki/OSE_Developers
Take a minute to subscribe to our email newsletter (updates, workshops, etc): http://bit.ly/1LtcM44
A
A
Okay,
there's
my
screen:
people,
salt
and
so
I'll.
Take
a
look
at
this.
This
is
our
latest
progress
here.
As
far
as
the
development
team
numbers
were
hovering
at
around
a
hundred
fifty
hundred
sixty
development
hours
per
week,
so
about
four
full-time
equivalent.
If
you
call
it
that
taking
a
40-hour
week
being
a
a
full-time
effort
on
one
one
person,
so
that
is
decent,
definitely
working
on
building
a
team.
A
Connie
is
in
a
background
where
were
recruiting
I
mean
we
want
to
build
up
a
an
HR
generalist
person
that
can
constantly
funnel
new
developers
and
subject
matter
experts
into
the
program.
So
that's
that's
where
you
where
we
are
on
that.
Otherwise,
no
new
developers
for
this
week
act
but
Jacque
man
is
gonna,
be
returning.
A
Things
like
you
know,
Lex
doing
some
of
the
the
platform
for
development
and
other
people
focused
on
specific
tasks
like
Michael
and
a
server
or
like,
for
example,
Christian
was
doing
the
ISO
and
things
like
that
so
moving
along,
let's
see,
if
so.
Well,
so,
let's
go
through
the
main
outcomes
of
the
week.
The
main
thing
was
the
CNC
torch
table
last
week,
so
that
workshop
was
quite
good.
A
This
is
the
final
product
we
got
so
we've
got
we've
gotten
to
the
point
of
motion.
We
mounted
everything.
We
had
two
axes
moving
and
the
z-axis
using
the
manual
Z
control,
pretty
good
I
mean
it
looks,
looks
pretty
impressive.
We
finished
up
the
bed,
it's
actually
ready
to
be
filled
with
water,
for
water,
cutting
for
water,
cooling
of
the
workpiece,
so
we
kind
of
refurbished
everything
there.
We
got
so
far
as
yeah
like
the
motion,
so
what
you're,
seeing
it
there
on
the
y-axis,
which
are
the
shorter
axes?
A
A
Resistance
is
significant,
like
say,
take
nominally
about
20
pounds
and
what
we
have
in
a
system
here
is
for
NEMA
17
motors
driving
it
which,
when
you
do
the
calculations
on
a
pulley
size
that
should
be
getting
us
60
pounds
of
force
on
the
short
axis,
which
is
the
which
carries
the
both
the
both
the
short
axis,
which
is
why
and
the
long
axis
the
x
axis.
So
that's
that's
the
heavy
axis
the
x
axis.
The
long
axis
has
no
problem
moving.
We
on
that.
A
So
at
present
the
the
issues
the
next
step
is
I
still
feel
that
it
appears
that
the
math
I
mean
we
got
a
shakedown
understand
what's
going
on,
because
if
we've
got
60
pounds
of
force
and
we've
got
20
pounds
of
resistance,
the
axis
should
not
be
skipping
and
we
measured
the
20
pounds
basically
by
putting
a
scale
and
pressing
with
a
scale
and
reading
the
measurement
off
the
scale.
So
we
reading
like
22
pounds
for
the
amount
of
force
to
move
the
the
y-axis
and
on
the
x-axis.
A
A
So
that's
that's
the
point
we
got
I
still
think
that,
with
the
proper
current
settings,
we're
going
to
be
good
here
now,
if
not
we're
gonna
go
to
a
larger,
larger
stepper.
Motor
I
could
do
probably
from
here.
Unless
this
is
working
just
go
to
oversize
it
go
to
like
NEMA
34
and
get
much
more
force
than
we
have
right
now
we
have
used
for
25
inch
ounce
motors
on
the
original
version
of
the
torch
table.
A
So
here,
while
we
have
a
total
of
280
from
280
inch
ounce
from
the
four
steppers,
a
single
NEMA
34
that
we
used
before
had
425,
so
that's,
like
you
know,
1.5
times
as
much
for
a
single
and
probably
three
times
as
much
for
two
of
those
motors.
If
we
do
one
on
each
side
so
going
to
a
bigger
motor
is
definitely
going
to
solve
it,
but
yeah
I
wish.
A
We
were
cutting
right
now,
we're
not,
which
means
that
that
affects
the
the
strategy
going
forward
on
a
on
the
tractor,
which
essentially
we
have
we
pretty
much
had
made
two
years
ago.
That
was
what
twenty
fourteen,
or
so
or
twenty
2014.
So
three
years,
they're
almost
three
years
ago
now
we
made
the
other
tractor,
so
we
have
all
those
tracks
intact.
A
In
fact,
we
have
a
set
of
tracks
that
we
haven't
even
used
from
the
last
build,
so
we
can
use
those
tracks
that
we
have,
which
are
exactly
like
drawn
out
and
the
pictures
in
our
in
our
CAD.
So
we
can
reuse
the
tracks
and
actually
make
it
easier
on
ourselves
to
build
the
whole
tractor.
So
I
think
that's
that's
what
we're
gonna
do
right
now
with
about
ten
days
left
to
the
event.
A
That's
that's
what
we
can
do
right
now.
Unless
we're
cutting
ourselves,
we
can
potentially
outsource
that
to
still
to
a
metal
shop,
but
I
mean
if
we
have
the
tracks
that
are
available
already.
That
means
dismounting
the
tracks
from
the
older
tractors
and
cleaning
them
up
as
opposed
to
starting
cutting
afresh
so
well.
Next
steps
are
to
make
this
work
make
the
CNC
torch
table
work
now
before
the
workshop.
A
Unless
somebody
qualified
it
can
actually
help
on
that
like
full-time
we're,
not
gonna,
get
that
torch
table
for
the
workshop
right
now,
the
priority
is
to
finish
up
the
CAD.
Do
all
the
work
on
all
the
missing
all
the
details
on
the
tractor,
the
micro
tractor
and
the
tractor.
So
that's
the
current
state.
A
A
I
looked
at
that
we
need
to
basically
bolt
on
an
air
inlet
pipe
going
from
the
gasifier
to
the
to
the
tractor.
So
so
that's
still
looking
pretty
exciting.
As
far
as
all
the
different
versions,
the
solar,
the
charcoal,
as
well
as
automated
versions,
looking
good,
let's
see
and
Roberto
so
on.
A
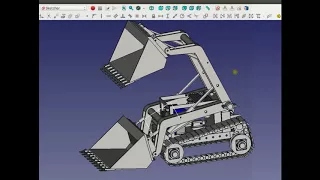
micro
tract
Roberto,
did
a
lot
of
work
on
the
actual
geometry
of
the
loaders.
A
So
that's
looking
quite
good
on
page
page
number,
six
looks
like
I
mean
as
far
as
the
as
I'm
concerned,
that
geometry
is
working,
and
this
is
what
we're
gonna
look
at
just
basically
now
source
the
correct
cylinders
and
make
it
happen
and
see.
If
there's
any
discrepancies
Roberto,
can
you
maybe
talk
a
little
bit?
Did
you
actually,
the
the
cylinders
that
you
draw
in
are
those
that
you
drew
in?
Are
those
actual
specs
of
surplus
centre,
or
did
you
just
make
up
a
length
that
worked
here.
A
And
and
I'm
seeing
that
Hall
far
back
there
like,
if
you
see
my
cursor
there,
the
whole
back
there,
that's
the
actual
mount
point,
yes
yeah.
So
if
we
hide
this,
look
at
that,
that's
that's
where
it's
at
looking
good!
So
those
appear
to
be.
What
are
those
are
those
like
18-inch,
cylinders
or
something.
A
B
A
A
B
B
A
Yeah
now
that
would
pretty
much
work
I'm.
Looking
at
that,
my
only
question
is
when
we
have
that
cylinder
there.
That
bucket
is
pulling
hard
on
that
cylinder
that
we
have
there.
It
could
work,
there's
basically
like
when
you
have
it
in
a
lowered
position
in
the
raised
arm
position.
That
angle
is
rather
small,
but
it
looks
like
it
will
still
have
the
force
and
you
went
through
some
of
the
forces
and
you
got.
You
actually
got
the
foresaid
that
lowered
position.
A
A
A
B
A
Yep
yep
and
that's
okay,
because
at
that
point
the
point
is
to
be
able
to
dump
it.
So
it's
actually
dumping
by
gravity.
So
we
actually
don't
even
need
any
force
to
dump
it
and
then,
when
we
retract
it,
if
it's
like
300
pounds
well
that
300
or
so
pounds
has
to
be
sufficient
to
pull
the
weight
of
the
bucket
and
300
pounds
is
probably
okay.
A
It's
probably
okay,
that
depends
on
a
weight
of
the
bucket.
Do
we
have
any
feeling
for
the
weight
of
the
bucket
right
now
now
it
would
be
around
I.
Would
imagine
that's
a
4-foot
wide
bucket
yeah
around
there
I
would
say
my
guess
is
like
250
pounds
or
something
or
so
yeah
yeah
no
I
mean
I.
Think
this
this
works.
We
should
try,
it
I
mean
the
idea
is
to
try
and
see
if
there
this
is
like
the
the
first
build
of
this
style
tractor.
A
So
what
you
do
is
you
build
rapidly
and
test
every
part
out
and
see
if
there
are
bigger
issues
that
we're
not
even
thinking
about
that
are
the
matter.
Otherwise,
we
can
make
slider
slight
Corrections
like,
for
example,
we're
using
only
a
1.5
inch
cylinder
right.
That's
that's!
1.5
inch,
diameter
cylinder,
Roberto.
B
A
The
bore
I
mean
that's
a
super
tiny
cylinder.
So
if,
if
the
1.5
inch
more
I
mean
that's
a
very
tiny
cylinder
think
about
1.5
inches,
that's
not
a
lot!
If
that
doesn't
work
week,
we
can
go
to
a
larger
bore
cylinder.
If
you
look
at
what
we
have
there,
there's
plenty
of
room
to
accept
a
thicker
cylinder.
We
just
went
with
a
small,
tiny
one
yeah
and
we
can
in
fact
it's
probably
given
those
results
that
we
have
right
now,
which
are
like
540
pounds
of
push
in
the
Rays
direction.
A
It
might
be
probably
worthwhile
to
go
to
like
2
or
2.5
inches
at
this
point,
given
those
results
that
we
have
right
now,
so
in
fact
that's
probably
what
I
would
do
I
would
really
go
to
really
really
make
sure
we're
sufficient
and
make
it
2.5
inches.
That's
that's
what
I
would
do
and
as
far
as
the
other
cylinder
I
believe
there
we
were
thinking
about
a
three
inch
cylinder.
Was
it
I'm,
not
I,
don't
recall
what
we
did,
but.
B
A
We
have
to
size
them
just
go
through
the
numbers
again
and
get
the
right
thickness
cylinder
and
it's
easy
to
once.
We
have
the
correct
geometry
for
the
length,
increasing
the
width
as
needed.
The
bore
of
the
cylinder-
that's
not
an
issue,
that's
easy,
because
the
the
key
is
the
mounting
points,
that's
the
critical
geometry
yeah.
So
that's
looking
good,
so
some
of
the
outstanding
pieces
there
I'm
seeing
that
there's
a
beginning
of
the
track,
tensioning,
which
is
awesome
so
so
basically
what
we
said
for
the
track.
Tensioning.
We
have
this.
A
B
B
B
B
A
Absolutely,
no,
that's
that's
correct
I
mean
we
don't
need
that
plate
on.
We
had
it
on
the
outside
of
the
tubing
here
before
it's
perfectly
fine.
Now
that
we've
got
that
structure
the
verticals
there
to
attach
to
we
can
attach
that
motor
plate
to
the
vertical.
So
the
idea
is
we
put
two
tensioners
so
something
like
a
one-inch
bolt
that
you
crank
up
and
down.
We
can
probably
put
given
the
geometry
here.
We
can
do
something
like
maybe
like
a
bar
on
top
or
no
even
you
know
what
I
see
here.
A
U-Shaped
bolt
around
this
arm
or
or
just
attach,
basically
a
threaded
like
a
one-inch
threaded
rod
to
this
vertical
rail
assembly,
so
that
we're
pulling
this.
Let's
see,
let's
click
on
it
that
whole
thing.
That's
our
vertical
rail
that
slides
on
top
of
those
arm
holders.
We
just
need
to
add
a
1-inch
rod
to
it.
Somehow,
in
fact,
I
would
see.
The
easiest
thing
to
do
is
to
put
a
clamp
like
a
clamp
collar
around
this
shaft
yeah
yeah
clamp
collar
around
the
shaft.
A
The
clamp
collar
has
the
bolt
attached
to
it
and
then
you're
turning
and
then
in
this
plate.
Here
would
have
two
bolt
holes
where
you
can,
where
there's
a
nut
on
the
other
side,
and
you
just
pull
you're
just
turning
a
bolt.
That's
like
right.
There
wait
no
you're
turning
a
bolt,
that's
underneath
yeah!
We
have
to
think
about
that,
but
yeah
just
a
basic
tensioning.
My
cousin
we've
got
this
space
here
we
can
put
a
a
threaded
rod
in
there
somewhere.
One
inch
one
inch
would
be
plenty.
A
One
inch
has
thousands
of
pounds,
it's
like
50,000
pounds
of
clamping
force,
or
so
it
sits
on
the
tens
of
thousands
range.
So
that's
plenty
to
do
right
here.
Yeah
excellent,
I'm
gonna
paste
that
in
to
show
this
detail.
This
is
an
important
detail.
That's
I
think
it
kind
of
worked
out
nicely
because
we
were
considering
well.
How
do
you
work
out
those
tensioners
and
these
tractors
were
before
we
had
them
underneath
and
they
were
somewhat
hard
to
work
with
you
kind
of
have
to
get
down
under
there.
A
A
I'd
like
to
hear
just
a
little
bit
about
the
annotation,
since
that's
documentation
is
a
big
piece
Roberta.
Would
you
mind
going
through
this
just
just
an
overview
of
the
annotation
macro,
just
for
everybody
to
hear
like?
Is
that
already
available
there
and
what
we
can
use
that
for
so?
Can
you
tell
us
a
little
bit.
B
B
A
C
B
A
Yeah
yeah
okay
sounds
like
we're
hungry
for
the
package
that
Michelle
is
working
on
I
guess
because
that's
probably
gonna
have
the
annotation
Michelle
dizzier.
How
does
yours
work
on
annotations
like
putting
labels
on?
Is
there
anything
like
that
in
what
you're,
working
with
on
the
on
a
tool
chain
there
and
Michelle?
If
you
just
just
review
for
everybody,
what
does
overall
status
is
that
for
somebody
who's
new
to
the
project,
let's
say:
can
you
do
that.
D
D
A
Okay
and
to
back
up
the
idea
here
is
so
the
tool
chain
is
we
take
a
free,
CAD
file?
We
then
export
it,
and
then
we
have
an
imported
into
blender.
What's
the
export
format
that
we
important,
so
we
export
into
OBJ's,
we
open
it
up
within
blender
and
what
happens
to
the
colors
are
the
colors.
You
said.
A
D
D
D
D
E
E
Numbers,
whereas
a
certain
part
number
40
we're
a
purchase,
part
number
and
then
you
know
ten
number
was
a
top
level
assembly.
You
might
have
a
sub
assembly
that
was
at
20,
so
mm-hmm
Oh.
Something
like
that.
You
know
you
don't
even
need
a
system,
you
just
need
a
spreadsheet
and
that
works
pretty
well.
Those.
A
The
idea
behind
a
master,
let's
see
the
master,
what
we
call
it
the
master
master
part
index
yeah.
We
should
use
that
we
should
maybe
add
it
as
some
of
those
features
to
our
master
spreadsheet.
That's
definitely
a
good
idea
and
from
that
yeah
and
that
spreadsheet
is
broken
down
to
the
very
tiniest
detail.
So
we
should
really
implement
it
and
a
thing
like
is
there
convention
within
CAD
world,
for,
like
you
said,
10
20,
or
all
that
announced.
E
A
E
A
Okay,
that's
good
Michelle.
If
you
can
basically
build
on
what
we've
already
said
before
regarding
this
topic,
that
would
be
good.
So
the
thing
that
we
have
talked
about
is
a
three-letter
code
like,
for
example,
we
were
using
LFX
for
Lyman,
filament,
extruder
or
like
CB
or
PC,
so
two
or
three
letter
code
to
begin
with
or
whatever
and
then
go
from.
A
There
know
what
we
should
do,
Michelle
when
you
have
a
proposition
for
exactly
the
the
whole
format
of
a
part,
number
of
a
part
name
bounce
it
to
everybody,
so
email
everybody,
and
we
can.
Let's
shoot
that
back
and
forth
until
we
agree
on
a
good
standard
that
everyone's
comfortable
with
now,
we
can
start
adapting
that
yeah
that'd
be
great.
D
E
If
you
make
part
number
specific
to
the
project,
it
can
be
a
little
confusing
then,
because
now
you're
using
alignment,
filament
extruder
part
and
the
micro
tract
you
know,
maybe
this
like
and
that's
a
lot
of
the
stuff
I
want
to
do
is
have
it
like
the
epochal
or
as
possible
yeah
it's.
You
know,
no
effects.
E
B
E
Really
confusing,
then
you
know:
do
it
rename
it
is
it
now
a
different
color,
oh
yeah,
I,
think
having
guys
like
at
least
from
my
experience.
It
was
just
like
as
soon
as
you
start
adding
a
bunch
of
designation.
He
doesn't
really
matter,
you
just
be
able
to
go.
Look
up
like.
Is
this
a
part
or
is
this
an
assembly,
and
then
you
would
search
in
your
spreadsheet?
That's
that's
what
I
found
to
be
helpful
for
their
naming
system,
but
well.
D
A
Yeah,
okay,
so
if
you
could
maybe
so
I
guess,
the
idea
would
be
to
get
a
whole
bunch
of
class
like
letter
classes
that
correspond
to
general
classes
of
part
types,
yeah,
yeah
yeah.
Do
that
that's!
This
is
not
an
easy
question.
We
should
all
just
just
declare
it
bounce
it
back
and
forth
a
little
bit
until
we
we
agree
and
yeah.
It's
gonna,
be
a
big
big
deal
like
cuz
that
that
could
affect
a
lot
down
up
down
the
project
down
the
line.
Yeah
yeah.
E
D
D
E
It'd
be
cool
if
it
was
built
in
there,
so,
instead
of
having
to
go
export
that
part
or
save
it
as
a
free
CAD
file,
it'd
be
nice.
If
you
could
just
go
and
say,
I
want
to
save
this
part
to
our
open
source,
ecology,
you
know
documentation,
library
or
something
right,
and
so
just
add
that
part
to
the
libraries.
You
know
again,
if
you're
trying
to
work
off
at
USB
or
something
might
not
even
after
that,
never
have
to
save
something
right.
You
could
just
back
and
forth
over
the
Internet.
A
C
A
A
A
A
A
A
That's
all
that
we
have
Lydia,
obviously
I
mic
apostille
back
from
2012
that
wrote
some
stuff
there
yeah
take
a
look
at
that
cat
standards.
2012
part
naming
not
much
there
so
yeah,
let's
that's
our
new
page,
OSC
part
naming
convention
to
make
history
happen
right
here.
So
let's
jot
our
notes
and
it's
this
is
good.
This
could
be
a
complex
document.
So,
let's,
let's
do
like
a
first
cut.
A
I
think
the
idea
would
be
to
you
know
start
start
testing
this,
because
you
know
we
can
come
up
with
an
elaborate
scheme,
but
then,
once
we
start
using
it,
you
can
find,
for
example,
that
nobody
wants
to
use
it
it's
hard
or
whatever.
So
what
we
got
to
do
is
declare
something
and
then
start
testing
it
with
a
project
and
then
see
how
we
can
do
that.
A
Ie
like
we
call
some
procedure
and
then
when
people
actually
start
using
it
and
when
it
becomes
a
norm,
then
then
we
can
say.
Yes,
this
is
actually
official
as
opposed
to.
We
just
declare
something
and
without
testing
which
wouldn't
work.
So
that's
the
idea,
okay,
so,
let's
so
so
Michel,
please
do
a
first
cut
of
that,
and
actually
anybody
please
can
contribute
to
that
page.
A
B
B
B
A
B
A
D
A
Just
one
background
note:
while
he's
getting
that
hydronic
stove
were
back
to
it,
so
you
can
see
the
welding
picture,
but
basically
a
2
by
3
foot
2
by
2
by
3
cubic
foot
structure
with
about
it's
about
10
or
20
and
forget
about
15,
or
so
it's
all
documented,
but
but
we've
got
a
heat
exchanger
in
there,
which
constitutes
the
heating
stove
or
the
CD
eco-home.
So
that's
a
nice
thing.
The
material
cost
in
it
is
about
500
dollars
compared
to
a
$5000
hydronic
stove
off
the
shelf.
E
E
A
E
A
No,
it's!
No!
It's
all
good
I'm,
just
saying
the
orientation
the
way
you
had
so
first,
so
let
to
explain
it
if
you
have
an
eccentric
weight
on
that
motor,
the
force
is
gonna,
be
left
and
right
in
your
picture.
In
other
words,
the
length
wise
of
the
quick
attach.
What
you
need
to
do
is
mount
that
on
the
forward
and
back
direction
so
that
when
the
eccentric
is
rotating
its
set
its
vibrating
back
and
forward
as
opposed
to
side
to
side,
so
every
other
parts
are
correct.
A
You
can
probably
see
in
the
trencher
pictures
that
are
online
where,
while
the
motors
are
typically
hidden,
but
you
can
infer
that
it's
mounted
on
the
side,
but
the
point
being
that
the
the
eccentric,
whichever
yeah,
whichever
way
the
eccentric
is
pointing
towards
from
the
shaft,
that's
gonna,
be
the
direction
of
the
motion
of
directional
vibration,
yeah.
So
that's
that's
one
thing
to
change
there,
but
yeah
you've
got
the
main
pieces
there.
A
I
would
I
would
still
suggest
the
easiest
way
to
do
it.
Instead
of
having
the
v-shape
yeah
I
mean
that
works,
it's
two
pieces
of
metal.
The
thing
we
have
done
before,
which
allows
you
to
put
a
point
on
on
a
shank
is
simply
using
a
one-inch
piece
of
metal
with
a
pipe
welding
behind
it,
and
the
pipe
would
have
to
be
kind
of
bent
backwards
to
allow
a
little
slight
curve
on
a
pipe
to
make
it
go
backwards.
What
we
want
to
do
is
probably
probably
want
to
come
up
with
a
concept.
A
Drawing,
let's
see,
we've
done
this.
Let's
see
have
we
documented
this
before
on
the
wiki
we
have,
we
haven't,
we
had
a
thing
called
the
keyline
plow
or
no,
oh
man.
We
did
this
trencher
keyline
plow,
let's
see
if
I
can
pull
it
up
to
see
what
we've
done.
What
we
did
simply
before
was
using
why
but
one
by
six
inch
shank
of
solid
steel.
So
that's
what
we
did
before
what
you
have
could
also
work.
Oh
yeah,
there
you
go.
A
That's
what
we
did.
We
have
this
machine
built.
We
build
this
for
the
nut
plant
out
and
it's
one
of
those
things
that
are
completely
undocumented.
Here.
We've
got
a
lot
of
video
from
that
we
gotta
put
together
video
when
we
planted
out
20
acres
of
the
hazelnuts
and
chestnuts.
We
use
this
as
the
shank
behind
which
we
were
planting
the
plants,
so
the
shank
basically
ripped
open
the
soil
and
we're
planting
in
that
little
furrow.
That's
a
similar
principle.
This
is
not
vibratory.
D
E
A
Yeah,
that's
all
it
was
okay.
You
know
what
I'm
thinking,
if
you
talk
about
minimal
carts,
count
design
trench
or
do
that
extend
the
shank
upwards
mount
the
motor
on
top
of
that,
except
that
the
concept
of
the
motor
is
you
need
to
have
to
supporting
bearings
so
yeah
we
got
a
mouth,
that's
somehow,
but
I'm
gonna
paste
that
into
the
existing
page.
A
A
So
I'll
come
up
with
a
I'll.
Do
a
concept
drawing
to
see
what
based
on
what
we've
done
before
yeah
yeah
yeah.
So
the
parts
are
there,
you
just
need
a
motor.
You
need
a
pipe.
You
need
a
shank.
The
pipe
wants
to
be
curved
backwards
so
that
when,
when
whatever
you're
sending
through
it
is
coming
out,
it
won't
snag
on.
We
won't
have
to
do
like
a
90-degree
turn.
A
E
A
E
A
You
actually
want
to
bend
that
it
probably
heated
with
a
torch
and
bend
it
slightly.
It
would
be
the
best
thing
because
you
want
to
you:
don't
want
to
have
any
sharp
corners,
you
can
you
can
break
your
wire
or
it
can
kink
people
say
pull
too
hard.
It
will
just
kink
a
90-degree.
You
want
to
have
it
a
smooth,
90
degree
turn
which
is
basically
heated
and
Bend.
It
probably
heated
with
a
torch
and
bend
it
or
pipe.
Bender
I
mean
pipe
benders
the
standard
tool
to
do
that.
A
A
For
the
eccentric
weight,
the
simple
suggestion
would
be
used
at
five
pound:
do
a
five
pound
hammer,
a
five
pound
eccentric,
so
yeah
along
aisle
concept
it
out
later
and
can
go
with
it?
Okay,
as
far
as
the
meeting
itself
we're
getting
towards
the
hour,
let's
see
what
else
do
we
have
as
far
as
any
reports
from
other
people,
anything
Oliver
or
anything?
A
A
Okay,
so
let's
talk
about
the
work
to
do
so.
The
priorities
I
mean
we're
pretty
much
got
10
days
to
go
on
the
on
the
tractor
workshop,
so
it's
all
out
on
the
documentation
there
and
and
refining
the
designs,
which
means
when
we
build
this
micro
tract.
We
want
to
have
a
second
power
cube
available.
That's
basically
a
cut-off
power
cube
which
doesn't
have
the
cooler
system,
so
it
can
make
a
very
tiny
one
and
just
hanging
on
the
back
of
the
back
of
the
tractor
here
somewhere.
A
A
Let's
see
I
mean
what
else
are
the
main
things
to
do
a
little
bit
of
detail
on
where
we
are
on
the
front.
This
pipe
here
could
be
just
simply
welded
to
this.
This
tube,
it's
a
2-inch
pipe
to
it,
not
not
a
pipe.
A
two
inch,
two
inch
solid
shaft
to
which
the
loader
arm
mounts.
So
we
probably
want
to
cut
off
the
end
of
the
the
cylinder
and
put
two
inch
a
two
inch
mounting
on
the
end
of
the
cylinder.
Here
so
little,
details
of
the
hydraulics
have
to
be
done.
A
A
A
Yeah
very
nice,
so
if
we
use
the
tracks
from
last
year,
we
have
the
tracks
already
in
this
in
this
micro
track,
the
tracks
are
I,
believe
nine
inches
wide.
Are
they
there
yeah?
There
are
about
nine
inches
in
the
tracks
that
we
have
last
from
last
year
are
ten
inches,
so
maybe
we
could
probably
make
the
10
inches
fit
on
an
exact
design.
Here,
it'll
just
be
a
little
closer
to
the
side.
A
A
B
B
B
B
A
B
A
A
A
Frane
yeah,
we
have
just
about
four
inches
of
tension
travel
here.
So
that's
not
a
lot
question
is:
is
that
4
inches
sufficient
to
tension
the
track
properly?
It's
not
bad.
We
might
need
a
little
more.
What
I
would
do
here
is
reduce
the
vertical
height
of
those
since
they're
yeah,
let's
reduce
the
height,
give
it
another.
A
A
What
would
have
to
happen
there
for
tensioning
you'd
have
to
get
under
yeah
you'd
have
to
be
tensioning
from
the
other
side,
in
which
case
what
we
need
to
do
here,
move
this
plate
here
this
front
plate,
move
it
to
the
other
side
of
this
top
plate
so
that
we
can
have
access
to
that
vault.
Underneath
this
this
plate
does
that
make
sense,
Roberto,
yeah
yep.
Let's
do
that
so
that
we
don't
have
to
reach
under
the
arms
to
do
the
tensioning,
because
the
power
cube
is
in
a
way
there.
A
So
do
that,
and
that
way,
when
you
put
a
bolt
through
that,
all
you
need
to
do
is
tension
a
nut
from
the
underside
of
this
plate,
and
this
entire
structure
will
move
up
not
his
pulling.
So
my
suggestion
is
simple
clamps.
So
basically,
we've
got
these
all
these
clamps,
like
these
ones
that
are
holding
the
loader
arms
in
place.
Put
one
of
those
on
this
shaft
here
and
just
weld
an
assembly.
A
Easiest
thing
would
be
to
actually
weld
a
nut,
a
one-inch
nut
to
it,
screw
the
thread
right
in
there
and
make
it
go
down
into
the
plate
so
that
you
can
basically
tension
tighten
than
that
and
I'm
wondering,
even
if
one
one
one
nut
one
one
tensioning
rod
is
good
enough.
I
think
it
would
be
so
I
would
say
just
go
with
one,
since
this
distance
here
is
pretty
tight,
it's
only
like
12,
inches
or
so
I
think
1:1
tensioning
threaded
rod
here
would
be
sufficient
to
pull
this
entire
structure.
A
As
I
said,
the
force
of
a
one-inch
bolt
the
clamping
force
on
that
is
on
the
order
of
tens
of
thousands
of
pounds.
So
that's
more
than
enough,
so
I
believe
that
a
single
threaded
rod
would
do
that
for
the
tensioning
here.
I
think
we
can.
We
can
definitely
do
that,
given
that
the
machine
itself
is
only
about
2,000
pounds
total,
we
will
be
fine
with
one
tensioning
rod
here,
so
use
the
collar
attention.
Rod
move
the
plate
this
plate
to
the
other
side
of
this,
and
we've
got
our
tensioning
mechanism
that
works
out
really.
A
A
Yeah
right
now
we
don't
we
have
to.
If
we
put
a
clamp
collar
on
what
we
can
do
is
is
not
even
do
a
clamp
collar.
What
we
can
do
is
just
put
a
tube
without
the
clamps,
so
we
put
it
on
before.
We
actually
insert
the
shaft
and
that
would
allow
you
not
to
even
use
the
clamps,
the
you
have
the
bolts
for
the
clamps.
That
would
be
okay,
because
if
we're
pulling
straight
up
and
down
you
don't
need
to
tension
to,
there
is
no
side-to-side
motion
on
that
that
tube.
A
That
would
be
there,
so
we
don't
need
the
clamps
on
it.
So,
let's
just
put
us
a
simple
tube
of
three
inch:
inner
diameter,
half
inch
wall
and
that's
what's
gonna,
pull
the
the
structure
very
easy,
yeah,
pretty
good
yeah
I
mean
this
is
this
is
quite
quite
good.
This
is
pretty
much
some
more
details
on
this,
but
largely
good
to
go
so
then,
maybe
I'll
focus
on
the
big
tractor
I'll
dole
out
any
parts
to
Achmed
and
to
Abe
and
then
we'll
see
where
Sherman
can
contribute
as
well.
B
A
B
A
B
A
Triangle
that
would
be
essentially
this
shape,
so
we
take
one
square
piece:
cut
it
in
half
and
make
those
two
triangles
one
for
each
side,
and
that
should
be.
That
should
be
pretty
good.
If
that's
half-inch
steel,
we
should
be
pretty
good.
We've
got
that
whole
weld
of
this
entire
length,
that's
a
very
strong
thing
and
to
prevent
it
from
moving
back
and
forth
that
gusset
there
would
help
now.
A
It
definitely
would
not
hurt
to
have
that
on
the
bottom,
but
if
we
do
that,
it
just
makes
it
harder
to
vault
on
the
motor,
maybe
just
keep
it
on
top
and
we'll
see.
If
that's,
that
should
be
plenty.
If
not,
we
can
readily
add
that
during
the
build,
this
is
actually
something
we're
CAE
analysis
would
be
very
useful.
It's
like
okay,
if
we're
pulling
something
with
up
to
say,
you
know
3,500
pounds,
which
is
what
each
track
does.
How
much
would
that
plate
Bend
when
we
have
this
whole
weld
and
that
gusset
on
top?
A
How
much
would
that
bottom
Bend
out,
that's
something
we
can
tell
from
CA
and
Cedric
is
by
the
way,
working
on
that
on
a
tutorial
on
that,
but
I
think
for
now.
Let's
do
one
one
reinforcement
on
the
top,
a
triangle
triangular
piece
which
would
be
good,
I'm,
also
noticing.
So
here,
oh
there's
an
artifact
that
plate
this
is
remaining
in
there.
That's
that's!
Not
there
anymore
right,
right,
mm-hmm,
that's
good!
All
right!
Well,
that's
that's
pretty
good!
Oh
and
I!
A
Guess
what
I
can
do
yeah?
Okay,
so
these
motors
are
not
the
identical
ones
that
I
have
here.
So
what
I'll
do
is
actually
measure
the
exact
motor
that
we
have,
because
it's
quite
similar
to
this,
but
I'll
measure
the
exact
dimensions.
Cuz,
that's
gonna
matter
like
exactly
where
we're
gonna
have
to
weld
it
there.
So
I'll
get
those
measurements
and
have
somebody
draw
that
up
from
the
exact
version,
because
this
is
quite
approximate.
It
looks
good
here
and
it's
close,
but
we
want
to
do
the
exact,
more
exact
dimensions,
including
the
location.
A
There's
there's
two
of
these
fittings
there's
also
a
third
small
fitting
on
it.
So
we
have
to
make
sure
that's
accessible
wherever
yeah
yeah,
so
after
this
yeah
I
mean
we've
got
all
of
a
lot
of
this.
The
details
that
can
see
missing
is
just
the
details
now,
as
far
as
with
how
we
wrap
the
hoses
starting
to
look
at
okay.
If
we
have
the
power
cube
like
this,
where
actually,
where
are
we
actually
running
all
the
hoses,
so
they
can
go
to
a
control
panel?
A
That's
gonna
be
hanging
off
somewhere
here
for
the
operator,
so
I
think
what's
happening
here
is
we
were
largely
done
with
the
mechanical
parts,
and
now
we
can
get
onto
the
hose
routing
and
I
got
to
pretty
much
buy
any
of
that
stuff
within
the
next
couple
of
days.
It
takes
about
four
days
to
ship
it
here.
So
next
few
days,
I
gotta
get
all
the
parts
out
for
all
the
hydraulics
and
the
fittings
and
hoses.
So
the
other
things
are
whatever
the
wherever
the
hydraulics
fittings
are.
A
A
Okay,
yeah:
we
should
do
that.
That
would
be
a
great
start
on
that.
So
we're
clear
about
where
the
beginning
and
end
points
of
various
hoses
are
yeah,
and
that
would
help
us
label
the
things
within
if
we
take
screenshots,
because
if
we
do
the
build
instructions
we
yeah
we
can
take.
For
example
screenshots
we
can
show
beginning
point
an
end
point,
and
then
you
say:
okay
connect
this
hose
from
this
beginning
to
end
point,
so
we
can
have
basic
instructions
on
how
to
do
that.
Yeah
I
think
that
sounds
good
mm-hmm
excellent.
A
All
right,
so
what
we'll
do
is
that
will
be
stripping
a
lot
of
these
parts
from
the
old
machines
which
is
good
because
that's
gonna
make
it
easier
and
it's
actually,
the
rapid
and
rapid
prototyping
we're
reusing
the
parts
as
much
as
we
can
for
the
tracks
themselves.
What
we
want
to
do
is
add,
and
I
don't
necessarily
want
to
do
it
here,
but
add
a
one
inch,
maybe
like
a
quarter
by
one
inch
bar
like
weld
it
to
everyone,
because
these
tracks
are
flat.
A
We
want
traction
on
them,
so
what
we
want
to
do
is
probably
weld
little
quarter
inch
by
1
inch
bars
on
every
and
that's
what
I
would
do
so
that
we
get
extra
traction
so
you'd
have.
If
these
are
I,
believe
half
inch
on
the
current
one.
You
would
have
a
little
tooth
or
a
little
cleat
or
yeah
more
traction.
So,
like
a
basically
the
whole
length,
we
would
weld
a
quarter
by
one
flat
to
the
end
of
each
track
piece
so
that
we
have
extra
traction.
A
A
A
All
right
well,
thank
you
very
much.
Then
everybody,
let's
continue
I'll,
be
in
touch
with
everybody,
let's
so
in
the
background,
we'll
work
on
a
part
naming
convention
and
then
just
cutting
up
more
of
this
tractor
and
getting
parts
getting
that
ready
for
this
event,
which
is
gonna,
be
a
nice
one.
So
if
anyone
wants
to
join
us
on
on
a
meeting
for
the
automation
part,
that's
happening
at
8:00
p.m.
tonight
on
the
same
channel.
So
thanks
a
lot
and
we'll
talk
to
you
next
week
again.