►
From YouTube: OSE Developer Meeting - August 23, 2017
Description
See http://opensourceecology.org/wiki/Development_Team_Log for the corresponding notes.
----
What you see here at Open Source Ecology is an ambitious program based on a volunteer effort. To help us reach the goals - please consider joining as an OSE Developer in 2017-
http://opensourceecology.org/wiki/OSE_Developers
Take a minute to subscribe to our email newsletter (updates, workshops, etc): http://bit.ly/1LtcM44
A
Starting
recording
welcome
everybody,
August
23rd,
meeting
development
team.
Primarily
topics
for
today
are
CNC
torch
table,
as
well
as
the
power
cube.
The
power
cube,
slash,
brick,
press
workshop
is
this
week,
so
that's
some
of
the
things
we
were
finishing
up
first
thing
is
welcome
to
some
new
developers
here
and
let
me
share
the
working
back
here.
You
don't
have
that
and
please
paste
any
of
your
results.
If
you
have
any
into
there,
can
everybody
hear
me
or
is
the
is
the
connection
decent?
A
A
Sharing,
okay-
let's
get
going
here
so
just
an
update
on
the
recent
velocity.
We
are
we're
continuing
time
time.
Hours
are
pretty
good
we're
about
10
people
contributing
per
week
and
about
23
230
hours
so
about
if,
if
a
workweek
is
40
hours,
Wow
23
is
like
five
full-time:
five,
six
full-time
equivalents:
six
times
44
a
40-hour
week.
That's
240
we're
about
240
here!
So
not
too
bad
you,
you
can
say
about
six
six
person
equivalent.
That's
good!
A
A
We've
got
him
joining
on
the
team,
he's
that
he's
it
he's
skilled
in
robotics.
So
possibly
we
can
get
the
autonomous
tractor
going
this
workshop.
So
let's
take
a
look
at
just
the
roadmap,
I
totally
slashed
and
burned
through
this
roadmap
here
to
make
updates.
So
main
thing
was
so
we
had
the
3d
printer
workshop.
That
was
good
built.
A
A
bunch
of
printers
got
some
started
on
some
of
the
PVC
frames
like
like
this
big
one
up
to
the
two
foot,
big
one,
but
actually,
when
we
took
take
a
look
at
the
critical
path,
I
mean
right
now
we
don't
have
anyone
here
continuing
that
development.
The
point
on
the
workshops,
if
you
want
to
talk
about
a
stable
workshop,
we're
gonna
do
another
one
on
a
30th
of
September,
which
is
3d
printer
filament
maker
workshop
Emmanuel
wasn't
ready
for
it
at
at,
and
we
talked
about
that.
A
He
basically
wants
to
do
a
wooden
frame
version.
Oh
he
still
wants
to
do
that,
but
he's
interested
in
making
some
developments,
which
would
delay
possible
workshop
there.
So
you
want
to
hold
a
small
one
or
or
a
decent
workshop
here
again,
just
to
continue
the
momentum
on
the
workshops.
We
definitely
found
a
few
missing
links
and
the
last
build
on
the
3d
printer.
If
we
talk
about
the
workshops
here
on
this
page,
the
several
issues
like
like
an
issue
on
just
just
minor
improvements
but
minor
that
minor
and
critical.
A
Of
course,
I
had
up
to
five
printers
running
for
printing
parts,
but
it
didn't
really
fail
until
like
recently
that
I
noticed
that
we
have
to
go
either
to
redesigning
the
mount
for
the
sensor
on
the
longest
long
neck,
extruder,
meaning
where
the
that
extruder
neck
were
where
the
nozzle
is
attached
to
some.
Some
of
the
extruders
have
that
as
a
long
one.
Some
of
it
have
very
short,
in
which
case
we
use
the
short
or
long
sensor
mount.
The
short
mount
really
works.
Well,
the
other
one
just
doesn't
so.
A
That
needs
to
be
fixed
and
I.
Think
we've
had
enough
issues
on,
and
people
of
course
have
pointed
this
out,
that
a
one-sided
Z
support
is
gonna.
Get
you
the
platform
to
platform
like
tilt
over
time,
and
it
does
like
over
time.
You
have
to
recalibrate
it
if
it
tilts
so
I.
Think
a
better
idea
is
to
do
two
z
axes
on
the
on
the
z
axis.
So
that's
a
actually
an
important
point,
because
in
a
print
cluster
I
had
a
six
printers
made
I
had
at
most
five
running
at
a
time.
A
It
was
just
enough
trouble,
like
you
know,
had
to
fix
the
thing
here
or
there
that
it
wasn't
really
suitable.
So,
at
this
point,
I'm
like
okay,
let's
get
the
print
cluster
mastered.
Let's
get
that
really
resilient.
So
once
you
set
it
up,
you
never
ever
have
to
touch
because
that
what
what
it
turns
out
is
once
you
have
so
many
printers
to
deal
with.
It's
like
any
little
thing
that
that
you
have
to
mess
with
will
take
up
your
time.
It's
just
not
feasible.
The
machine
has
to
be
you.
A
You
set
it
up,
you
let
it
go.
It
stays
there
for
like
a
year
without
you
having
to
touch
it.
Otherwise,
you're
messing
with
it
constantly
so
really
got
to
get
that
quality
control
up
so
yeah.
It
doubles
the
access
improve
the
sensor
holder
for
the
long
long
neck
extruders,
but
the
extruders
aren't
really
great.
They
get
stuck
I
mean
they're
good
entry-level,
but
they
get
stuck
sometimes
they're
hard
to
clean
out.
A
If
they
do
get
stuck,
we
definitely
want
to
go
to
the
lulzbot
mini
extruder
as
a
next
step,
next
major
improvement
and
then
also
one
of
the
other
things
that
happen.
That's
a
minute,
that's
catastrophic
or
just
not
acceptable.
Is
the
ramps
boards
burning
out
after
like
500
hours
of
operation
like
just
about
every
one
of
those
the
heat
bed
has
like
10
amps,
12,
amps
or
so
the
RAM
support
can't
handle
that
so
well
without
burning
out
the
connector.
Actually
after
some
time
and
I've
had
now
I
think
three
or
four
renters
do
that.
A
So
what
we're
doing
right
now
is
putting
an
external
bed
activator
external
bed
relay
that
we're
using
now
on
I've
got
that
installed
on
three
printers,
but
that
will
avoid
any
of
the
board's
burning
out.
So
you
can,
you
can
put
whatever
size
of
a
huge
bed
you
like,
and
it
was
burning
out
with
the
8
inch
bed.
A
So
if
you
want
to
go
to
12
inch
or
24
inch-
and
it
definitely
absolutely
can't
handle
that
so
the
external
relay
for
the
bed
activation
bed,
heating
activation,
which
is
10
or
20
amps
or
so
going
through
it
and
we're
gonna,
go
to
AC
on
that,
just
to
do
nichrome
for
the
bigger
beds,
the
off-the-shelf
feed
beds
get
very
expensive
or
you
can't
get
something
that's
two
by
two
feet
so
we'll
have
to
make
that
out
of
nichrome
and
and
and
electrical
insulation
for
nichrome
wire.
So
we'll
do
that
later.
It's
but.
A
Few
few
little
bugs
to
work
out
to
make
the
the
print
cluster
actually
absolutely
perfect
and
make
make
the
results
better.
So
that's
that's
definitely
up
for
next
time
we'll
make
some
of
these
fixes
so
that
Sun
of
workshops
continuing
the
workshops,
though
we've
got
the
power
cube
coming
up
this
week,
power
cube
brick
press
and
it's
pretty
good.
I'll
talk
more
about
that.
Now
more
the
longer-term
the
CNC
torch
table
workshop
hey.
We
didn't
really
do
that
great
on
the
torch
table
and
over
two
weeks
that
the
manual
was
here
we
didn't
get
far.
A
We
got
like
x-axis
working
up
to
y-axis,
but
turn
out.
One
of
the
main
challenges
was
that
the
y-axis,
because
it's
12
foot
long
I,
mean
those
those
shafts
were
very
heavy,
so
end
up,
distorting
the
structure
not
like.
We
can't
do
it,
but
it's
taking
longer
and
we're
gonna
have
to
return
back
to
that.
A
I
think
the
design
product
of
practice,
design
pattern
of
the
universal
axis
still
is
absolutely
sound,
but
we
just
have
to
have
beefy
metal
sandwiches
around
those
pieces
so
that
nothing
works
and
we
did
get
motion
on
a
12
feet,
but
also
it
probably
as
the
next
step
there.
We
want
to
go
probably
to
12
millimeter
belts,
I
mean
the
6
millimeter
belts
worked,
but
then
at
some
point
they
would
skip
so
not
enough
traction.
A
Basically,
the
motors
were
very
powerful,
actually
not
not
a
problem
with
the
stepper
motors
they're,
actually
fine
for
driving
the
the
the
torch
axes,
but
they
start
to
slip.
So
that's
what
we've
observed
so
a
solution.
There
is
go
to
bigger
belts.
You
can
also
go
to
bigger
police,
so
more
of
the
pulley
is
engaged,
so
those
two
things
will
definitely
want
to
be
done
for
the
torch
table,
but
it's
kind
of
like
almost
back
to
the
drawing
board
of
some
of
the
design.
While
I
mean
everything
still
stands,
the
promise
is
there.
A
We
just
haven't
gotten
as
far
as
we
like,
so
we
can
say
we're
like
two
weeks
behind
on
that
and
I'm
thinking.
A
good
thing
to
do
is
I
mean
that's
a
very
critical
important
tool,
definitely
important
for
the
tractor,
cutting
the
tractor
or
the
brick
press
or
anything
like
the
the
frames
for
the
3d
printer
anything
but
I'm
thinking
right
now.
It
would
be
good
to
do
a
workshop
on
that.
A
We
can
have
like
one
one
or
two
builds
that
people
actually
get
to
take
home,
which
would
be
very
cool,
but
that's
pending
us
getting
excellent
results
on
an
existing
torch
table.
Sure
I
don't
see
issues
with
how
that
would
not
happen.
Pending
just
being
careful
about
all
the
different
aspects
about
it,
but
torch
table
workshop
tentatively
for
October,
but
we
absolutely
need
that
before
the
tractor.
So
if
the
tractor
was
supposed
to
be
on
October,
15
I
think
we
got
to
move
the
tractor
like
two
weeks
and
do
the
torch
table
first.
A
So
do
the
tractor
workshop
October
30.
So
as
you
see
we're
pushing
stuff
back
and
back,
but
you
know
things
don't
go
always
as
planned.
Definitely,
but
we
just
got
to
keep
going
at
it
until
we
we
do
things
but
on
a
positive
note,
I
think
progress
on
the
printer
and
brick
press
power
cube.
It's
all
good
I
think
we're
getting
major
simplifications,
especially
on
a
I'm
gonna
talk
about
the
brick
press
right
now.
So
here
you
see
the
controller
and
slide
number
six.
This
is
what
we've
developed
last
year.
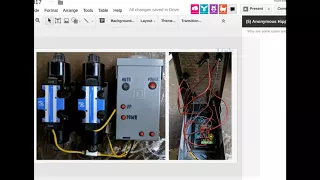
A
Very
simple
controller:
it's
got
our
OSC
controller
board,
pretty
simple,
just
a
few
wires
and
some
mosfet
drivers
for
the
solenoids
and
the
box
itself.
You
can
do
it
auto
mode
where
you
have
automated
pressing
or
up-down
left-right
for
manual
controls
very
simple.
You
can
see
that
I
think
you
can
understand
an
interface
turn
on
the
power
switch
from
auto
to
manual
mode
and
then
in
the
manual
mode,
drive
the
brick
press
by
moving
the
cylinders
up
and
down
left
and
right,
etc.
That's
that's
the
manual
control
or
otherwise
on
automatic.
A
The
brick
just
spits
out
your
X
bricks
per
minute
automatically
and
I
actually
reviewed
the
code
from
2010
and
what
I
noticed
is
that
when
we
get
to
the
auto
mode,
so
this
is
an
important
point
just
for
everyone.
Right
now,
the
auto
mode
runs
on
a
controller,
the
manual
mode.
While
it
looks
like
it's
connected
to
the
control
here,
it
is
absolutely
not
it.
It's
absolutely
non,
not
in
the
code
anymore.
A
So
we
just
do
these
buttons,
but
it's
not
in
the
control
code,
so
we're
separating
the
two,
because
you
don't
need
the
controller
to
control
the
manual
mode
and
in
fact
it's
kind
of
we
did
that
we
were
doing
that
for
the
last
few
years,
where
the
manual
code
were
you
pressing,
the
buttons
that
ran
through
the
controller?
Well,
that's
a
bad
idea
because
of
the
controller
burns
out
or
you
know,
there's
a
mistake
on
the
controller.
You
can't
run
your
brick
press,
whereas
when
you
separate
that
first
of
all,
the
code
becomes
grossly
simplified.
A
So
right
now,
I
looked
at
back
at
the
code
and
the
code
was
like
70
lines
back
in
2010,
where
we
just
had
automatic,
and
then
we
added
the
manual
controls,
but
we
added
manual
controls
through
the
controller,
so
we
blowed
it
to
about
400
lines
of
code
for
the
controller
and
now
I'm
gonna.
Take
that
back
down.
It's
just
ridiculous.
How
it
is
right
now
so
I'm
gonna
take
that
down
back
to
like
70
lines
or
so
just
simplify
it,
because
we
don't
need
it.
It's
it's.
A
The
code
for
the
controller
should
be
very,
very
simple:
it's
like
when
just
it's
basically
move
the
cylinder
move
the
cylinder
until
pressure
goes
high.
If
pressure
goes
high,
do
another
motion,
etc.
It's
a
very
simple
logic
and
there's
a
calibration
step.
Where
we
do.
We
basically
measure
the
time
that
something
moves,
that
one
of
the
cylinders
moves,
but
I'm
not
going
to
get
into
the
details
here,
but
basically
the
bottom
line
is
that
you
need
one
sensor
and
seventy
lines
of
code,
and
that
sensor
is
a
pressure
sensor.
A
We
used
to
do
position
based
sensors
to
position
based
sensors,
in
fact
yeah
to
position
based
sensing.
You
don't
need
position,
sensors,
it
totally
works
well
to
do
just
pressure,
it's
a
pressure
sensing.
So
you
know
when
you're,
at
the
limit
of
a
stroke
when
the
pressure
that
you're
sensing
went
high,
that's
it
so
one
sensor
70
lines
of
code,
two
solenoids,
so
yeah
we're
we're
gonna,
deploy
that
this
weekend
report
on
that.
How
that
goes,
but
yeah
definitely
simplifying
that.
A
Our
cube
version,
seventeen
point
zero,
eight
we're
working
on
a
part
library
right
now.
The
goal
is
to
get
as
many
of
those
parts
as
possible
for
a
very
simple
design.
The
conceptual
design
is
here
with
the
August
19
design,
sprint
and
we've
got
a
master
CAD
list
and
let's
see
how
we're
doing
on
that,
a
bunch
of
assignments,
master
CAD
checklist
is
basically
what
we're
doing.
I
think
a
good
model
to
fall
for
the
master.
A
Cad
checklist
is
the
Lyman
filament
extruder,
where
we
basically
got
all
the
parts
in
there
and-
and
it
was
great,
like
the
completion
was
marked
by
the
fact
that
we
had
the
CAD
file
for
every
single
part,
also
a
sourcing
link
for
every
single
part.
But
here
we
still
need
to
go
with
a
few
few
more
parts.
We
got
to
keep
doing
that.
So
what
I'm
gonna
do
is
assign
people
to
that
very
explicitly
on
this
this
meeting.
A
So
we
can
continue
on
that
and
finish
that
as
we
build
the
power
cube
this
weekend
now
we
won't
have.
The
complete
looks
like
we
may
not
have
the
complete
cata
me
and
the
workshop
is
this
Saturday,
but
we
should
I
mean,
let's
see
if
people
can
can
produce
more
of
these
parts
and
then
the
part
library
is
down
here.
We've
got
a
bunch
of
parts.
A
I
know,
I've
met
updated
some
of
the
the
parts
we've
got
the
engine
by
Josh
pomp,
more
parts,
more
parts,
but
let's
see
how
far
we
can
get
done
and
Jose's
not
Jose,
but
but
we've
got
Roberto
working
on
instructional
for
the
workflow
using
assembly,
workbench
of
how
we
put
all
these
parts
together.
So
we're
still
working
that
out.
There's
some
issues
apparently,
but
we're
we're
getting
them
resolved
how
to
use
a
very
efficient,
workflow
er.
Once
you
have
all
the
parts
you
just
put
them
in
readily
into
the
final
final
CAD
document.
A
We've
got
I'll,
just
open
it
up
for
reference,
but
basically
looks
like
looks
like
this
frame.
We
got
to
fit
the
engine
with
a
pump
in
it.
The
fan
fits
and
on
the
right
side,
but
if
we
use
a
24
inch
by
24
inch
frame,
then
then,
yes,
the
the
pump,
will
be
sticking
out
of
the
frame
a
little
bit.
I
think
that's
acceptable
for
now.
A
That's
that's
alright
and
we
might
want
to
just
increase
the
frame,
but
but
if
the
pump
is
sticking
out
about
everything
else
fits
I,
think
we'll
be
ok
for
now,
of
course,
the
file
for
the
the
frame
is
editable,
so
that
just
like
we
see
let's
look
at
here.
So
that's
the
frame
as
it
is
so
here
on
this
side
here
is
where
the
mounting
of
the
fan
is
gonna.
Be
on
this,
this
right
side,
where
you
see
that
the
fan
cooler
assembly
goes
into
those
two
bolt
holes.
A
So
this
is
the
hydraulics
wait,
I,
have
it
upside
down
actually
because
the
hydraulics
are
gonna,
be
on
the
right-hand
side
here.
So
the
engine
goes
into
this
compartment
here.
There's
there's
gonna
be
a
plate
here
on
a
base
that
mounts
the
engine.
So
the
the
engine
mounts
right
to
this
base
plate
which
put
this
part
of
the
bottom
frame
and
you've
got
the
suction,
so
you're
sucking
fluid
out
of
the
bottom
you're
returning
the
fluid
there.
A
The
fluid
filter
is
gonna,
be
there
and
then
the
frames
gonna
have
to
have
a
filler
breather,
breather
cap.
So
next
step
is
fit
the
engine
in
here
I
know
the
engines
been
updated
quite
a
bit.
We
got
pretty
decent
dimensions
for
the
engine,
so
we
can
keep
going
with
that
and
that's
pretty
good
now
when
we
do
the
actual
build.
What
we'll
do
is
I
was
thinking
about
this
and
it's
actually
a
very
lots.
Lots
of
cutting
here
away.
A
Actually,
here
what
I'm
noticing
here
after
met
is
these
these
holes
are,
if
these
are
to
the
right,
because
okay,
we're
looking
at
it,
the
engine
is
facing
us
here,
the
the
handle
of
the
engine,
the
pull
start
of
the
engine
is
facing
us
here
the
pump
is
towards
the
back.
The
pump
is
towards
the
back.
That
means
the
suction
should
be
towards
the
back
here
too,
but
that
means
the
holes
here
are
on
the
wrong
side.
There
should
be
up
for
the
fan
cooler.
A
The
fan
cooler
should
be
more
above
rather
than
below,
unless
it,
unless
it's
actually
better
below.
We
can't
really
see
without
opinion.
It
might
be
that
the
hoses
fit
better
when
the
fan
is
lower,
but
no
I,
don't
think
so.
Actually
we
got
to
move
the
holes
up
because
the
hoses
are
pointing
down,
so
you
have
to
make
the
hoses
run
down
and
turn.
So
probably
these
holes
need
to
go
up,
but
that's
good,
so
moving
on
just
some
other
topics
back
to
the
roadmap
critical
path.
A
Here,
let's
see
if
anyone
else
got
any
product
for
this
this
week,
please
paste
that
in
we
were
working
on
this
larger
food
frameless
and
just
one
of
the
other
products
we
did
during
the
work
aftermath
of
the
workshop.
But
one
last
thing
is
so
the
alignment
filament
extruder
once
again
that
still
remains
as
a
high
priority
item
by
all
means
it's
very
important
to
get
low-cost
filament
from
scrap
and
to
do
recycling
save
the
earth
while
you're
producing
useful
parts,
definite.
A
Definitely
good
idea
now,
so
we're
still
gonna
do
that
that
simple,
experimental
filament
maker
workshop
so
so
say
Saturday
would
be
the
3d
printer
build
on
octo
September
30,
and
then
we
do.
The
Sunday
would
be
the
film
at
maker.
So
but
for
that
I
got
the
filament
maker.
We
got
to
do
the
part
sourcing.
We
got
a
3d
printer
parts
inventory.
The
part
just
make
sure
the
motors
work
and
have
a
day
of
prototyping
that,
however
much
we
get
done
before
the
workshop,
so
that's
that's.
A
Coming
like
right
now,
basically
based
on
the
bill
of
materials,
I
mean
we're
pretty
good
to
essentially
get
those
parts,
maybe
substitute
some
from
Amazon
and
eBay
for
easier
sourcing,
but
we're
pretty
much
ready
that
cat
is
pretty
good
and
complete.
So
it's
actually,
the
filament
maker
turns
out
to
be
one
of
our
more
complete
exhaustive
designs
with
a
complete
master
master
list,
master
CAD
checklist,
so
tractor
team.
A
But
you
can
reveal
all
the
meetings
from
before,
but
now
we're
pretty
much
ready
to
do
just
Rea
to
design
design
the
real
thing
and
what
we
can
do
for
the
workshop
is
because
we're
modular
once
again
do
the
sixteen
sixteen
horsepower
and
sixty-four
horsepower
I
would
do
both
both
of
those.
So
we
get
four
power.
Cubes
built
during
the
workshops,
it
would
be
a
three-day
workshop,
build
four
power,
cubes
build
the
tractor
and
then
run
it
on
a
third
day.
So
that's
that's
October
30!
That's
that's!
A
Let's
see
CNC
torch,
as
I
mentioned,
we're
going
back
to
the
drawing
board
a
little
bit
a
little
bit
of
redesign
of
the
actual
carriage
pieces.
Well,
no,
we
still
could
do
it,
but
well,
we
ended
up
doing
with
a
torch
table
is
using
hollow
pipe
instead
of
solid
pipe
because
it's
much
lighter
for
the
gantry.
So
that's
one
of
the
things
we
actually
use
the
standard
steel
pipe.
We
buffed
it.
So
it's
smooth
and
then
use
that
okay.
So,
let's
see
let's
go
right
into.
A
C
A
C
C
A
D
B
E
D
C
A
A
C
D
A
A
A
A
C
A
C
A
C
A
A
C
A
C
C
C
C
A
C
Let's
continue
with
the
fourth
step,
add
a
single
constraint
between
1
and
assembler
part,
which
means
without
any
constraint
and
one
assembler
part,
which
is
which
means
fully
constrain
so,
for
example,
and
the
file
here
I
a
I
have
a
switch
as
you
can
see
it,
it
has
zero
constraints.
So
it's
it's
fully
an
assembler.
This
is
honest
and
an
assemble
parts.
Part.
C
C
E
C
D
C
The
next
step
is
to
select
the
unassembled
part
and
set
fixed
position
property
to
true
so
here
at
the
unassembled
part,
was
the
switch
I'm
going
to
select
the
switch
here.
Let
the
false
I
mean
the
fixed
position
property
to
true.
Now.
One
of
the
constraint
that
we
have
here
you
had
in
the
in
the
treeview
goes
automatically
with
when
inside
the
switch
part
so
was
moved
from
here
to
here
now.
The
next
step
is
do
the
same,
but
setting
the
the
fixed
position
property
to
false.
C
If
I'm
going
to
select
the
switch
and
return
the
fixed
position,
property
to
false
and
now
I
still
have
one
constraint
outside
the
parts.
The
simpler
part
so
I
have
to
solve
that
before
I
can
continue
with
assembly
in
other
parts.
To
do
that,
I'm
going
to
select
the
unassembled
part
I
mean
the
assemble
part
and
do
the
same
set
the
fixed
position
property
to
true-
and
you
see,
the
constraint
was
moved
automatically
from
outside
the
part
to
inside
the
the
partner
that
I
change
this
this
option.
A
C
C
D
A
B
A
You're
doing
so
maybe
save
this
for
the
instructional
yeah.
It's
just
like
a
few
seconds.
Delay
like
it
doesn't
really
show
says
Roberto's
having
connectivity
issues
so
maybe
maybe
save
that
for
the
instructional,
but
that's
good,
so
I
mean
the
bottom
line.
Is
that
what
happens
when
people
don't
know
how
things
go
together?
Well,
it
depends
on
a
problem
that
we
have.
If
it's
the
power
cube,
it's
make
everything
fit.
You
know.
A
So
you
look
at
your
design
problem
statement
like
make
all
the
parts
fit
in
this
frame
and
that's
how
you
know
where
you
can
put
things
and
then
we
might
have
to
shift
them
around
move
them
around.
So
the
point
is
of
the
cat
is
that
we
shift
things
around
within
the
cat
so
that
when
we
build
it,
it's
at
rebuildable.
That's
that's
the
idea
here
right,
but
so
you're
assuming
you're
Roberto
you're,
making
an
assumption
that
people
know
where
the
parts
go.
That's
correct,.
A
Course,
yeah
right
and
the
more
interesting
question
is
like:
how
do
we
establish
a
workflow?
When
say
we
created
a
library
of
parts
like
the
tractor,
and
then
people
have
to
figure
out
how
they
go
together?
Well,
a
lot
of
times,
it'll
be
very
logical,
and
the
point
of
design
of
the
parts
themselves
is
to
make
them
pretty
transparent
and
then,
of
course,
to
provide
design
guides.
Where
people
understand
that
okay,
this
part
fits
in
such-and-such.
So
that's
the
design
guide
part.
A
Once
you
write
a
design
guard
guide,
then
people
can
take
take
the
parts
and
make
various
different
modifications
of
them,
and
that's
something
we
would
want
to
do
like
I
was
looking
at
so
the
d3d.
We
can
probably
say
that
the
16
inch
version
is
good
as
it
is,
but,
for
example,
if
we
wanted
to
add
a
12
inch
bed
and
get
the
absolute
full
motion
out
of
that,
we
would
have
to
rearrange
axes
in
a
little
way.
A
One
thing
that
I
thought
about
is
maybe
the
next
iteration
of
frame
cutting
is
why
not
make
the
rods
go
through
tiny
holes
in
the
frame
so
that
the
rods
are
located
and
you
don't
even
need
to
the
magnetic
attachment
you
know.
So
that's
that's
one
thing
that
actually
emerged
from
the
latest
discoveries.
A
The
carriage
printed
like
the
printed
pieces
like
say:
you've
got
a
frame.
You
can
put
those
the
printed
pieces
actually
on
the
outside
of
the
frame
and
the
rods
actually
sticking
through
the
frame.
So
so
what
I'm
saying
is
that
we
can
play
with
various
modifications
of
the
existing
things
that
we
have
as
long
as
we
provide
design
guides
of
okay,
how
what
are
the
possible
or
acceptable
design
patterns?
A
What
I
just
said
to
you
would
be
important
for
the
nested
frames
like
there's
the
1613,
11
and
9-inch
frames.
Well,
once
you
get
to
the
smaller
frames,
it's
important.
It's
critical
that
you
have
all
the
space
that
you
need
and
that's
where
you
can
do
more,
if
you,
for
example,
put
those
the
rods
actually
through
the
metal
frame.
That
means
you're
actually
cutting
out
little
holes
with
CNC
and
the
frame
itself.
A
If
we
wanted
to
put
in
a
12
inch
bed,
then
it
actually
would
help
with
you
if
you
do
the
the
rods
through
the
frame
etc.
So
point
being
that
in
the
name
of
the
Construction
Set,
there's
so
many
variations
you
can
make
and
that's
where
the
the
workflow
of
assembly
would
allow
us
to
take
all
our
parts
and
make
reconfigurations
happen.
So
that's
good!
Well,
we
look
forward
to
your
instructional.
That's
that's
a
critical
thing
that
everyone
on
the
team
would
have
to
learn,
and
that
would
be
great
so
keep
going
at
it.
A
Please
let
me
see
the
final
final
script,
so
it's
like
if
there's
questions
to
the
uninitiated
since
I
haven't
worked
around
with
assembly
a
lot
now
I
can
ask
innocent
questions
about
it,
yeah.
So,
let's
move
on
to
the
last
step
and
go
back
to
the
power
cube
and
role
allocation
with
that.
We
do
know
that
just
to
go
on
slide.
Let
me
see.
Am
I
sharing
my
screen?
No,
let
me
share
my
screen.
A
Yes
far
as
the
module
breakdown,
it's
like,
we
definitely
have
the
frame
fan,
cooler,
assembly,
return,
line,
filter,
suction
line
to
pump
to
engine
that's
kind
of
stuff
you
fit
in
it's
kind
of
hard
to
draw.
The
mounting
mounting
I
mean
engine
mounting
is
part
of
the
engine,
so
engine
is
a
module,
so
engine
module
we
can
say
with.
A
A
A
A
So
we
can
put
in
under
green
the
ones
that
are
allocated
and
please
continue
those
as
as
we
get
new
information
like,
for
example,
on
the
frame
I
sent
a
comment
to
automatic
update,
I
mean
Ahmed
as
well
I
mean
you
can
take
to
finish
up
the
bottom
mounting.
You
can't
take
the
engine,
as
is
because
that's
been
corrected,
and
you
can
start
fitting
that
the
bolt
pattern
for
the
engine
mount
that's
one
of
the
main
things.
A
A
A
Includes
bolts
for
mounting,
like
wire
wire
place
holders,
basically
like
draw
like
a
little
little
placeholder,
color
coded
for
wire,
like
where
you
make
connections
to
the
battery
and
to
the.
What
else
is
there
battery
charging?
That's
it
wires
to
battery
charging
if
ur,
if
we're
in
this
engine,
we
actually
don't
have
the
electric
starts.
So
it's
just
wire
for
charging
the
battery
ok
frame,
I'm
gonna,
put
off
Madan
that
still.
A
A
F
A
B
A
Okay,
well,
if
you
got
this
little
trick
on
an
openness,
cat
I
mean
open.
Scat
is
good
to
get
into
because
a
lot
of
stuff,
a
lot
of
design
files
exist
and
openscad
like,
for
example,
the
sprocket
for
the
tractor.
That
I
did
an
open
SCAD.
So
it
is
useful
to
learn
it.
So
what
I
would
like
to
ask
you,
since
we're
all
about
developing
techniques,
developing
collaborative
workflows
after
you're
done
with
these?
Please
document
that
process
so
you're,
saying
that
it
gets
you
to
a
native
free
CAD
file.
Is
that
so.
A
F
A
F
A
F
A
Right
so,
if
I
open
up
your
file
here,
for
example,
with
the
cooler
yeah,
that
the
hydraulic
cooler-
that's
where
Achmed
can
say-
oh
I
got
the
cooler
bolt
pattern.
Now,
I
can
so
you
see
that
I
mean
the
bolt
pattern.
For
the
cooler
I
mean
the
cooler
is
very
simple.
The
bolt
pattern
is
simply
the
spacing
between
I
guess
for
Ahmed
is
used
here.
The
bolt
pattern
is
the
spacing
between
that
hole
there
and
the
other
hole
here,
because
that's
where
the
rubber
mounting
piece
goes
in
that
space
there.
A
F
A
F
F
F
F
A
A
Time
we
generated
that
at
24
inch
fan.
We
can
keep
that
for
a
larger,
well
I,
don't
know
if
there's
24
inch
fans
out
there,
but
but
keep
that
and
in
the
part
library
we
can
simply
so
say.
There's
the
plan
right
here
clicking
on
that
it's
got
one
file.
Just
please
upload
over
that
wait.
But
that's
okay.
That
says:
12
inch,
diameter
and
I
made
a
note
there.
In
this
you
upload
was
23
inches.
We
need
12
inches
so.
C
A
It
takes
up
the
whole
side,
it's
too
big,
because
that
fan
yeah,
that
fantex
have
the
whole
side.
That
fan
is
24
inches
the
ones
that
I'm
not
sure
if
they
make
I,
probably
do
make
24
inches,
but
the
one
we
were
you
wanting
is
the
12
inches,
because
that's
way
too
big
for
that
little
cooler
I
mean
we
don't
need
that
fan
for
that
little
cooler,
because
it
would
take
too
much
power.
But
this
is
good.
A
It's
pretty
good,
so
actually
yeah.
If
the
engine
is
sitting
with
a
shaft
going
to
the
back,
this
should
be
like
actually
upside
down,
maybe
like
the
cooler
should
be
on
the
back
side,
because
if
we
have
the
engine
yeah
just
like
the
engine
is
here,
while
the
engine
is
upside
down,
but
the
engine
should
be
front
face
here
and
the
filter
should
be
in
the
back
side,
because
the
pumps
gonna
be
on
the
back
side.
So
you
put
the
engine
wherever
the.
A
Closer
to
the
pump:
well,
that's
the
shaft
side
of
the
engine
we'll
have
the
hydraulic
pump.
So
therefore
you
need
to
put
the
cooler
like
the
return
housing
on
that
same
side,
so
it'll
be.
Does
that
make
sense
Roberto
since
you're
doing
that?
That's
good
I'm
gonna
put
you
on
that
bad
test
there.
So.
C
A
B
A
A
Well,
the
ultimate
part
is
I.
Think
the
d3d
part
library
is
where
we
should
have
a
master
CAD
file,
there's
a
step
in
the
overall
development
process,
which
is
like
review
like
product
review.
This
goes
back
to
Jose
what
you're
asking
goes
back
to
the
template
and
to
doing
all
the
steps
in
the
development
template
just
to
go
back
to
the
development.
A
Template
this
is
something
we
kind
of
we're
supposed
to
do
this.
This
this
whole
template.
We
should
have
for
every
project
like,
for
example,
d3d.
We
have
a
wiki
page.
That
is
one
item
of
the
development
template
like,
for
example,
the
review
of
how
it
worked.
Data,
build
pictures
bit
build
video,
build
data,
collection,
performance
data,
collection,
review,
bug
tracker,
that's
all
in
there.
In
theory,
those
all
exists,
they
don't,
but
we
should
have
a
page
on
the
wiki
that
says
d3d
review
between
e
buck
tracker.
So
that's
just
just
tons
of
gaps.
A
Ultimate
thing
would
be
that
where
so
all
of
us
are
so
savvy
that
we
have
a
placeholder
for
data
collection
like
we
have
a
placeholder
for
one
of
these
one
of
these
things,
development
template
that
should
be
up
for
every
project.
We
really
don't
have
that,
and
we
should
add
that
and
because
this
whole
method
is
so
overwhelming
to
people.
A
We
don't
have
that
yet
and
that's
where
the
process
manager
slash
like
like
what
kind
of
a
Joseph
is
trying
to
do
a
little
bit
in
terms
of
storing
stewarding
in
the
team
a
little
bit
like
getting
keeping
people
on
track.
That's
where
a
person
like
this
process
manager
would
say:
okay,
now
here's
our
table
spreadsheet
of
all
the
work
product
and
then
a
burned-down
has
to
be
attached
to
that.
So
it's
all
there
but
we're
getting
there.
We're
gonna,
get
there
like
right
now.
We're
really!
A
You
know
like
we're
kind
of
struggling
with
this
3d
CAD
and
just
getting
to
the
CAD
to
work
right
so
I
think
slowly
but
surely
we're
getting
there
we're
building
the
team
and
we're
building
capacity,
but
in
principle
the
the
super
performing
team
would
be
where,
like
Jose,
you
mentioned
Oh
where's
all
this
stuff,
it's
not
there!
Then
the
media,
you
say:
okay!
Well,
where
is
the
data
collection
build
review?
Where
is
it?
A
A
It's
like
I'm
kind
of
like
have
the
overview,
but
more
people
need
to
catch
on
that
for
this
to
ever
scale
beyond
beyond
the
knowledge
I
have
in
my
head
right,
so
you
just
got
to
keep
going
at
it
and
keep
formalizing
these
procedures
until
we
get
a
proper
burn
down.
But
the
thing
that
I've
noticed
over
the
history
of
the
project
is
that
yeah
I
mean
I've
seated
plenty
of
these
development
spreadsheets,
but
they
would
all
remain
unfilled,
so
I
give
I
give
up
well.
A
The
solution
to
that
is
you
have
to
be
enough
people
on
a
team
to
actually
meaningfully
put
those
different
steps
in
there.
Otherwise
we
try
to
document
that
as
best
we
can
on
a
mainly
treaty
development
page
like
we
do
have
a
d3d
page
that
exists.
But
it's
really
like
you
know.
Someone
really
needs
to
manage
that
page.
So,
Dean,
you
know,
take
a
look
at
d3d.
You
know.
We've
got
some
assets
there,
but
you
know.
A
Many
parts
are
missing
right,
so
there's
a
bunch
of
assets
on
that
page,
but
it
needs
like
every
pages,
should
be
updated
and
managed
actively
constantly
updated
and,
of
course,
that's
not
happening.
We
only
have
so
many
people
on
a
team.
People
have
only
so
much
time.
So
that's
where
we
are
that's
a
little
side
and
we're
wrapping,
but
to
continue
on
a
role
division
here
on
this.
A
A
Ones
that
are
unfilled,
expanded
steel
that
should
be
straightforward
from
the
work
document.
So
look
up.
What
expanded
steel
is
hose,
clamps
should
go
in
there.
The
hose
I
mean
I,
don't
know
how
we're
gonna
do
the
hose,
but
someone's
got
to
tackle
it.
Who
is
anyone
feeling
like
they
could
handle
the
actual
hose
once
we
once
we
have
the
drawing?
How
do
we
do
hose,
which
is
a
complex
three-dimensional,
shape?
A
A
A
Between,
like
you,
have
to
orient
yourself
between
the
part
library,
so
if
you
go
to
the
part
library
right
here,
you
see
this,
for
example,
this
hose
bar,
but
right
here
and
there's
a
there's,
a
comment
there.
This
is
3/4.
It
needs
to
be
one
inch.
So
I
put
a
note.
Their
initial
upload
is
3/4
bar.
We
need
one-inch
barb
for
17
point.
Oh
eight
I,
don't
think
we're
really
ever
gonna
use
3/4.
That's
too
small
for
a
lot
of
the
applications.
Well,
it
works
for
smaller
engines,
but
so
this
needs
to
be
updated.
A
A
B
A
A
B
A
Right
there
now
3/4
aunt,
returned
line,
filter
I,
think
that's
done
so
so
that
was
Israel.
Okay,
so
Israel
did
that
that's
good
I
made
a
little
update
to
it.
So
that's
in
there
yeah
we've
got
all
these
parts.
We
need
only
one
of
those
pumps
either
this
not
this
small
I
think
we
need
the
larger
one
there.
That's
the
log
splitter
one,
the
log
splitter
parched
yep,
go
ahead.
A
A
A
C
A
A
A
C
A
A
Thank
you
for
clarifying
that.
So
what
so,
the
redefinition
of
assemblies
means
that
when
you
are
making
those
assemblies
you're
downloading
the
master?
Okay,
that's
very
important.
Yeah
make
sure
we
cover
that
very
clearly
enough
in
your
instructional
video,
because
that's
okay,
that
I
think
that
clarifies
a
bunch
of
a
bunch
of
things
for
us.
So
you
can
assemble
them
as
separate
units
within
the
finalcad
or
you
can
assemble
actually
in
the
correct
location
in
the
master
cad.
A
C
A
Okay,
I'll
do
that
until
we
hear
more
from
you
on
the
master,
instructional
and
I'd
say
that
that's
good,
so
the
people
here
outlined
here
please
work
with
in
the
master
cat
assembly,
because
Roberto
said
so,
and
he
knows
freecad
better
than
I
on
assembly.
Workbench.
Okay
sounds
good
to
me
excellent.
So,
let's
see
if
we
got
some
missing,
some
people
are
missing
through
the
cracks
here.
Let's
see,
Joseph
and
Antonio.
A
A
A
C
A
B
A
A
Uh-Huh
yeah
they're
within
some
of
them
are
within
like
the
pump
mount
is
within
luck,
splitter
pump
and
a
coupler
is
also
within
flex,
Blair
pump,
so
they're
in
their
complicity.
Alright,
so,
let's
see,
are
we
missing
anyone
else?
Michelle,
mom,
Salaam,
okay,
you've
got
a
bunch
of
people
lined
up
for
all
these
different
things,
so
I'd
like
to
see
everybody
complete
their.
So
so
please
refer
to
this
master
CAD.
A
A
I'm
going
to
add
another
column
which
is
insert
column
right,
one
is
simply
import
into
master
CAD,
so
without
even
constrained
so
imported.
So
that
would
be
a
step
like
as
soon
as
you
have
something
why
not
import
it
now.
Okay,
let
me
ask
you
this
once
again:
Roberto
so
say
someone
does
a
first
draft
and
they
import
it
into
the
master.
Cad.
Is
that
doable.
A
A
Right,
if,
if
a
person
puts
in
an
early
version
of
a
file,
because
because
that's
what
I'm
trying
to
encourage,
is
that
as
soon
as
you
have
anything
it's
a
placeholder,
you
use
it
put
it
in
the
master.
Cad
like,
for
example,
for
the
engine
we
could
just
have
couldn't
just
have
a
cube
with
the
correct
dimensions
is
a
very
first
cut
which
would
still
allow
us
to
start
doing
some
design.
So
say
you
put
an
early
version
of
something
and
then
say
somebody
else
constrains
it
within
a
master,
CAD
and
then
of
another.
A
Then
import
file.
The
source
file
is
updated.
Another
document
and
Riaan
ported
once
you
reinforce
it,
it'll
change
and
get
constrained
as
needed.
Correct,
like
everything
like
all
the
operations
on
that,
since
the
master
CAD
file
was
updated,
will
be
propagated
on
to
that
newly
imported
part.
Is
that
correct.
C
A
E
C
E
C
The
first
step
is
to
update
to
update
the
source
file
path.
Sorry
I
forgot
those
important
that
important
step.
So
again
you
first
down
download
the
two
files,
or
maybe
you
have
already
one
of
those
those
files
into
your
your
computer.
So
the
point
is
that
you
have
to
file
the
master
cat
and
the
part
and
the
updated
part
by
oh
okay,
so
you
open
the
master
cat
and
update
into
the
assembly
to
workbench.
C
Don't
you
go
to
the
part
that
you
want
to
update
and
the
first
step
is
to
update
the
source
file
path
into
the
properties
into
the
property
panel
in
the
in
freaka.
So
you,
you
update
the
source
file
path
to
the
part
that
you
want
to.
That
is
already
updated.
You
saved
a
change
and
then
you,
you
click
on
the
update
imported
parts
into
the
assembly.
To
workbench
option
is
next
to
the
import
part
option.
C
C
A
A
A
Version
17
point:
oh
eight,
so
I'm
gonna
be
wrapping
up
here.
Talking
version
seventeen
point:
oh
eight,
there's
the
master
cap
checklist
take
a
look
at
what's
there,
so
there's
the
B
om,
but
we
have
got
the
master
cap
checklist
for
who
is
doing
every
single
part.
So
so
is
everyone
agreed
to
it
to
the
different
assignments
there?
A
We
can
make
those
updates
readily
according
to
Roberto's
procedure.
That's
gonna
be
documented,
so
in
this
in
this
table
then,
and
the
spreadsheet
I'll.
Just
let
us
know
if
you
have
any
questions
like
if
you've
got
any
questions
and
what
what's
required
there
or
you
know
like
required
details,
it's
one
of
the
columns
there.
Please
ask,
and
we
can
answer
that.
So
all
the
parts
go
into
the
final
document
and
what
I'll
do
is
I'll.
A
Do
a
quick
drawing
of
the
whole
hand
sketch
of
the
whole
thing
for
everybody's
reference
I'll
just
upload
to
that
like
right
now,
as
we
finish,
I'll
send
that
on
to
everybody,
so
with
that
I
think
we
can
wrap
up,
and
so
we'll
talk
again
then
next
week
on
Tuesday
at
1:00
p.m.
sorry
about
yesterday.
Actually
what
sorry
yeah
go
ahead.
I.
A
E
Was
getting
at
some
point
and
there
are
several
questions:
I
have
they're
pretty
simple
and
I.
Think
it's
better.
If
I
ask
him
would
to
crowd
around
oh,
maybe
they
can
throw
something
in
for
one
I
found
a
pretty
good
software,
that's
able
to
input
a
accustomed
best
of
environment,
so
if
there
are
any
wishes
Marshall
do
you
know
what
this
environment
is.
A
E
A
universal
of
course,
oh
so
there's
one
for
everyone
and
we
could,
for
example,
unity
is
kind
of
special
in
its
own
way
and,
for
example,
Acadia
right
LXDE
would
be
far
more
resource,
wouldn't
take
that
much
of
resources,
and
we
are
trying
a
thing
to
to
get
the
thing
to
run
on
as
many
computers
as
possible.
So
maybe
this
would
be
your
well
thought.
D
E
A
I
would
say,
probably
without
seeing
how
it
works
like
we
can
I,
don't
think
we
we
can
provide
any
input
unless
I,
don't
probably
just
do
the
one
you
think
that's
the
best,
unless
some
other
people
have
the
have
a
better
idea,
because
I
mean
God
be
lean,
it's
got
to
work,
I
think
it
eventually
will
be
like
the
adoption
of
how
people
like
like
it.
It
may
be
like
it.
E
E
D
E
A
Then
every
one
of
us
downloads
it
and
tests
it,
and
then
we
give
you
feedback
on
what
the
right
like.
We
can
go
through
all
the
different
settings
for
each
software
and
we
could
have
people
comment
on
okay.
This
is
the
best
setting
and
setup
for
everything
that
should
go
into
our
public
document,
so
the
document
that
we
have
so
so
we're
talking
about
the
osc
linux
here.
A
So
let's
go
to
that
page.
It
is
a
there's,
a
document
there
that
lists
all
the
software.
So
we
should
simply
add
to
that
spreadsheet.
Some
of
those
desired
settings
there's
a
comment
like
okay,
so
the
big
spreadsheet.
Where
is
that
right
right
here?
Software
list
on
an
oilseed
Linux
page
shows
all
our
software
Chris.
You
think
we
can
like
in
the
notes,
I
mean
notes.
We
can
put.
E
A
A
Well,
I
think
the
number
one
thing
first
is
so
the
ideas
and
just
to
follow
up
on
Christians
work
here,
so
we're
producing
a
new
version
of
Aussie
Linux
as
all
the
software
like,
for
example,
right
now
we're
getting
into
conflicts
like
between
free
cat
versions.
So
we
download
the
official
Linux
we
can
know
exactly
where
we
are
and
what
software
so
that
results
across
different
different
programs
can
be
absolutely
identical,
like,
for
example,
in
the
language,
agnostic,
instructionals
extraction
of
of
isometric
views.
A
My
views
look
different
than
Roberto's,
like
my
lines
were
like
thick,
why
we
have
like
reconcile
all
that,
so
that
we
get
consistent
results
throughout
the
whole
ecosystem
of
us
using
it.
So
first
step
is
to
everybody
download
and
test
it,
and
then
we
can
talk
about
okay,
let's,
let's
talk
about
customizations
and
an
optimal
setup
of
that,
but
it
would
be
good
that
everyone
downloads
it
and
actually
test
it.
So
this
is
gonna
be
ready
pretty
soon.
A
So
we
definitely
want
to
have
everybody
just
really
nail
this
out
for
cases
like
even
for
OSC
workshops,
people
just
also
download
the
Linux
and
they
have
their
kira
and
3d
printing
software,
or
even
the
brick,
control
software
etc
right
there.
So
that's
that's
the
idea,
but
we
got
to
test
it
within
a
team
first.
A
So
first
thing
is
to
roll
it
out,
and
us
first
step
is:
does
it
work
for
all
of
us,
like
all
of
us
should
be
able
to
go
through
a
turnkey
process
where
you
could
download
make
make
the
disk
and
it
works
so
I
think
there's
gonna
be
probably
going
to
be
issues
with
just
resolving
that
first
step,
so
I
think
I
think
we
got
to
take
it
step
by
step.
Yeah.
E
Just
don't
have
internet
in
that
virtual
box
and
I
can't
get
it
to
work,
and
that
means
that
I
can't
test
the
chromium
with
its
gypsy
head
on
I
can't
test
where
they
downloads
the
Gypsy,
because
it's
getting
no
internet,
it's
a
bit
of
a
problem,
but
it's
definitely
working
that
the
principles
working
and
very
confident
that
I
can
I
have
a
version
up
right
now.
So
we
can
use
that
one.
It's
just
missing
the
the
part
that
I
just
described
of
the
de
customization,
but.
A
A
E
A
A
With
the
robot
not
being
able
to
repeat
Roberto's
result
in
one
of
the
specific
things
on
language
and
that's
the
constructional
z'
or,
for
example,
like
my
explosions,
always
crashing
that
would
resolve
whether
it's
my
computer
or
whether
it's
different
versions
or
what
so
so.
This
will
definitely
help
everybody
learn
faster.
So
thanks
and
we'll
look
forward
to
your
publication,
yeah.
E
A
A
Let
everybody
know
where
it's
at
and
instructions
and
we
go
from
there
all
right,
okay,
excellent!
Thank
you.
So
I
think
that
we
haven't
want
to
wrap
up
here.
So
everybody
just
for
everybody
watching
this
right
now
and
the
recorded
version.
The
role
assignment
is
for
serious.
If
you
don't
do
it
after
for
next
week,
Joseph
is
gonna,
come
after
you,
so
that's
the
threat
of
punishment.
Okay!
Well
thanks
everybody
for
doing
this,
so
we're
gonna
have
an
exciting
weekend.
A
This
week,
building
a
next
iteration
of
the
brick
press
and
power
cube
much
simplified
versions
with
much
simplified
code.
So
we
really
look
forward
to
that
and
getting
a
machine.
That's
gonna
go
out
to
Utah
to
the
University
of
Utah
Utah.
They
have
a
sustainable
building
program
there
that
they're
building
houses
on
Native,
American
reservations
and
so
forth.
So
it's
gonna,
be
the
brick
press
gonna
be
going
out
into
the
field
pretty
soon
for
them,
but
yeah.
Thank
you
and
continue
on
a
power
cube,
please
and
then
next
meeting
on
Tuesday,
1:00
p.m.