►
From YouTube: How to Use OBI Library in Sweet Home 3D
Description
Take a minute to subscribe to our email newsletter (updates, workshops, etc): http://bit.ly/1LtcM44
A
Hello,
everyone
and
welcome
to
another
OPI
webinar.
My
name
is
Katerina
mota
and
I'm
the
founder
and
director
of
the
open
building
institute,
and
today
we
are
going
to
talk
about
how
to
use
the
OPI
library
in
sweet
home
3d.
I
hope
you
had
an
opportunity
to
install
sweet
home
city
because
it
might
take
a
little
bit
to
download
now
we're
going
to
be
using
it
a
lot.
A
A
Okay,
so
before
we
get
into
that,
I
just
wanted
to
show
you
a
little
bit
of
okay
I'm,
not
getting
the
full
screen
here,
talk
a
little
bit
about
what
we
mean
by
modularity,
so
the
open
building
Institute
this
modular
construction.
Normally,
when
you
hear
that
expression,
most
people
think
either
mobile
home
or
exactly
what
I'm
showing
here
in
this
image
in
which
a
house
is
prefabricated
at
the
factory
and
then
transported
in
so
called
modules
and
assembled
in
place
now,
this
is
here
this
wall.
A
Here
is
what
it's
typically
called:
the
module
it's
an
entire
wall
or
an
entire
section
of
a
rule
for
an
entire
section
of
a
floor.
Right
now,
when
we
say
magis,
we
actually
means
something
quite
different.
We
mean
this
image
that
you
see
here
on
the
right,
and
this
is
a
much
smaller
unit.
It's
like
almost
like
a
Lego
right.
You
can
combine
this
with
a
wall,
module
with
the
door,
module,
etc,
etc.
Instead
of
having
an
entire
wall
is
already
being
pre
designed
and
fabricated.
A
So
when
is
our
process
for
designing
these,
both
the
modules
in
with
the
modules?
So
here's
a
very
brief
overview
of
that.
Why
can't
I
get
full
screen?
Well,
I,
don't
understand
anyway.
It's
going
to
be
brief.
So
basically
we
start
by
designing
a
part
in
3d
and
I,
often
a
most
time,
I
do
that
in
sweet
home
3d.
Sometimes
I
use
other
applications
depending
on
the
needs,
then
that
part
becomes
a
library
of
part.
A
So
it's
every
parks,
I
aggressive,
I,
collect
them
and
gather
them
into
a
library
which
is
itself
a
single
file
that
contains
many
different
parts.
Then
I
use
this
library
of
parts
to
design
a
module,
and
this
is
one
module
and
it
designs
several
modules.
Then
I
gather
all
of
those
modules
again
into
a
library
which
again
is
one
single
file
that
contains
several
different
modules
and
then
I
use
that
library
to
design
a
building.
A
Now
one
of
the
things
that
I
found
it's
been
most
confusing
for
people,
is
it
as
part
of
this
library
as
part
of
the
files
that
we
make
available
online?
There
are
many
different
formats
and
each
format
represents
a
different
stage
of
the
design
and
that
can
get
really
confusing,
especially
because
each
one
of
those
files
is
treated
differently
in
use
differently.
So
hopefully
I
will
be
able
to
clarify
that
a
little
bit
and
explain
why
we
have
so
many
different
files,
and
when
do
you
do
when
do
you
need
each
one
of
them?
A
So
now
I'm
going
to
switch
here,
hopefully
to
sweet
home
3d.
So
this
is
what
the
application
looks
like
when
you
first
open
it.
So
hopefully
you
downloaded
and
installed
it,
and
this
is
what
it
looks
like.
We
have
four
panes
here.
This
thing
right
here
is
the
main
one.
This
is
your
canvas.
This
is
where
you're
going
to
be
drawing
your
house
or
your
module
whatever
it
is
that
you're
drawing
right
so
in
this
pain.
Right
here
is
the
library.
A
Let's
call
it
that
right,
so
it
contains
the
objects
that
you're
going
to
use
to
design
whatever
it
is
that
you're
designing,
now
sweet
home,
3d
I
forgot
to
mention
let's
just
adorable
is
an
open-source
software
for
interior
design,
so
the
application
was
not
created
to
design
houses,
but
we
liked
it
so
much
that
we
and
we
realized
that
the
functionality
was
so
flexible
that
we
decided
to
adopt.
It
has
one
of
the
main
platforms
for
iaido.
A
We
do
definitely
want
to
expand
to
blender
and
free
cat
as
well
so
I'm
going
to
walk
you
a
little
bit
through
how
sweet
home
3d
works
by
itself
before
we
even
get
into
how
to
use
it
for
OVI.
So
basically
because
it's
an
interior
design
application,
the
most
of
the
objects
you
have
on
this
library
at
pain
are
pieces
of
furniture
right
because
that's
what
you
do
in
interior
design.
A
So
the
way
this
works
is
you
basically
to
select
one
of
these
I'm,
just
selecting
some
random
armchair
I'm,
dragging
it
onto
my
canvas
on
to
my
plan
as
soon
as
I
drag
it
onto
here.
It
shows
up
on
this
other
pain,
and
this
is
a
3d
view,
pane
and
I'm,
just
manipulating
it
with
my
mom.
That's
it
right,
so
anything
that
I
dragged
onto
here.
Here's
another
chair
shows
up
here,
but
it
doesn't
just
show
up
here.
It
shows
up
on
this
pain
as
well.
A
So
this
fourth
pain
on
the
bottom
left
basically
contains
all
the
objects
that
you
are
using
on
your
plane.
If
I
can
list,
I
feel
Photoshop
or
illustrator
user.
You
may
be
familiar
with
this
system
right
where
you
have
layers
or
different
objects,
so
everything
that
I
will
put
here
shows
up
here
as
well,
which
is
all
going
to
be
very
useful
okay,
so
this
is
just
a
little
angel
now.
The
first
thing
we
want
to
do
is
configure
this.
A
In
a
way,
there
is
more
practical
for
designing
houses,
and
what
I
would
like
to
suggest
is
that
you
start
by
11
second,
by
opening
the
preferences.
This
is
a
panel
of
the
Preferences
panel
and
one
of
the
first
things
I
did
was
I
switched
my
units,
my
measuring
units
2
inch
inches,
and
the
reason
for
that
is
because
the
OB
I
modules
in
library
is
designed
using
this
system,
and
it's
just
going
to
be
easier
if
your,
if
your
application
is
set
up
to
handle
it.
A
A
It's
on
those
are
all
very
useful
and
I
don't
make
any
other
changes
and
I
just
say:
okay,
so
now,
basically,
what
I
see
here
is
I
no
longer
see
my
library
as
icons,
but
I
see
it
as
a
series
of
folders
in
which
one
of
these
folders
is
going
to
contain
a
certain
number
of
objects.
For
example
like
this
one
that
says
bathroom
bathroom
characters.
All
of
these
come
default
with
sweet
home
3d
right.
A
So
these
are
the
ones
that
come
with
the
application
layer
on
we're
going
to
add
our
own,
namely
the
OB
I
library
and
in
furniture
etc.
So
now,
let's
look
a
little
bit
more
into
the
basics,
now
see.
I.
Remember.
I,
drag
this
armchair
in
on
to
my
plan,
but
now
I
not
quite
happy
with
the
way
it
looks
or
whatever
you
know,
I
need
to
make
some
changes
to
it.
So
there
are
a
few
ways
to
do
that.
So
one
is
by
direct
manipulation.
A
So
you
see
that
when
I
highlighted
it
shows
me
just
a
little
bit
bigger.
So
you
can
see
better.
Okay
just
adjust
my
paint
here.
Okay,
so
it
shows
four
icons
each
or
in
each
corner,
okay.
So
this
one,
this
little
curved
arrow
here
is
a
rotation,
so
I
can
rotate
this
chair
around
like
so
okay,
this
one
here
will
make
it
will
will
determine
the
elevation
like
we're
on
my
plan
say
I
want
this
chair
way
up
here
for
some
reason
right.
A
A
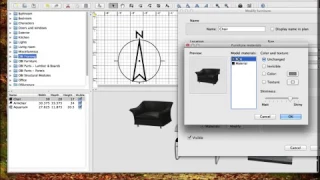
So
another
thing
that
you
may
have
noticed
on
your
plan
is
that
you
have
this
little
compass,
and
this
is
tells
you
that
it's
north-
this
is
actually
going
to
be
really
useful
when
you're
working
with
buildings,
because
you
do
want
to
know
the
location
of
each
one
of
your
element.
So
that's
quite
useful.
A
Alright,
so
that's
one
way
of
manipulating
objects.
Now
this
is
not
very
precise.
If
you're
designing
a
house,
you
need
a
certain
level
of
precision
that
the
direct
manipulation
does
not
offer.
So
my
preferred
method
for
manipulating
an
object
is
double
clicking
on
it,
which
opens
this
panel
right
here.
So
I'm
going
to
try-
and
let
me
see
if
I
can
align
this
panel
right
here
so
first
thing
the
name
you
can
change
the
name
of
this
object
and
I
can
just
call
it
share.
A
For
example,
right
you
can
select
to
display
the
name
on
the
pet
clan
or
not
I.
Usually
don't
do
it,
then
another
very
important
section
is
size,
so
you
saw
how
I
manipulated
I
changed
the
size
of
the
chair,
but
that
wasn't
like
say:
I
need
it
to
be
exactly
30
inches
wide.
So
why'd
we
refers
to
the
X
to
this
axis
right
here.
I
wanted
to
be
20,
inches
deep
and
depth
represents
this
one.
A
A
We
can
change
the
shininess
to
mad
or
shiny
I.
Rarely
use
this.
We
can
also
change
the
color
in
texture,
for
example,
my
chair-
actually
here
you
can
see,
has
a
couple
colors,
there's
black
and
there's
gray.
If
I
go
to
color
and
I'll
select
going
to
select
a
random
color
and
yellow,
for
example,
and
I
do
okay,
the
entire
chair
is
yellow.
Now
you
can
see
that
the
feeder
yellow
the
upholstery
is
yellow
everything
is
yellow,
so
maybe
I
didn't
really
want
to
do
that.
I!
Ok!
A
So
that's
what
ok
another
thing
we
can
do.
Okay,
I
could
sit
reach
to
and
change
here,
so
we
go
back
to
our
original
object
and
then
I'm
not
really
happy
with
the
color,
so
I'm
going
to
try
a
texture.
So
I
select
texture
and
I
click
on
this
right
here
and
sweet
home
3d
comes
with
a
library
of
lots
of
textures.
You
can
always
download
additional
ones
from
the
website
as
well
or
you
can
import
your
own.
A
You
can
create
your
own
textures
and
the
sweet
home
3d
website
provides
a
lot
of
information
on
that.
It's
very
easy.
Okay
now
say
I
want
to
you
know
it's
a
long
list.
You
can
scroll
through
it
or
you
can.
Just
you
know
what
you
want.
You
want
wood
right,
so
I
just
entered
wood
here
and
I
was
only
showing
me
textures
that
are
related
to
wood
and
I'm,
going
to
choose
popular
okay,
so
I
chose
poplar
now
my
chair
has
the
texture
of
wood.
A
Now
this
is
not
really
appropriate
for
a
chair,
but
you
get
the
gist
another
option
when
women
again
do
and
change
so
I'm
undoing
what
I
did.
Another
option
is
to
change
each
element
of
the
chair,
the
chest,
texture
or
color
individually
in
to
do
that.
You
go
click
on
materials.
You
click
on
modify
in
here.
You
have
the
planes
that
you're
the
areas
of
the
object
that
you're
allowed
to
change
so
say:
I
want
my
material
to
be
yellow.
Okay,
but
I
want
two
feet
to
be
black.
A
Ok,
so
now
I
have
a
yellow
chair
with
black
suit,
so
I
was
able
to
change
each
area
individually.
So
that's
the
first
thing
now
more
complicated
is
the
location
of
the
oh.
We're
on
your
plan
is
this
chair.
Now,
if
you're
just
doing
interior
design,
you
probably
don't
need
it
to
be
very
precisely
kind
of
once.
I'm
going
to
delete
this
other
one
string
here
so
they're
not
just
creating
wish
you
can
kind
of
like
yeah
I
want
to
kind
of
walk
on
this
corner.
A
You
can
see
0
here
and
0
here,
and
this
is
really
going
to
help
me
moving
on
to
be
able
to
calculate
the
position
of
all
other
objects
in
relationship
to
this
first
one.
Okay,
so
one
thing
I
can
do
is
I
can
just
say.
I
want
this
chair
on
point:
zero
of
the
x
0
point
0
of
the
y,
with
an
elevation
of
0
in
an
angle
of
0
right,
so
that
should
set
it
right
on
the
corner,
except
it
doesn't
right.
A
So
you
can
see
the
point
0
is
here:
00
is
here
and
the
reason
is
because
the
registration
point,
meaning
what
the
software
understands
has
the
reference
point
of
the
object
in
sweet
home
3d
is
the
middle
right.
So
this
is
actually
situated
on
the
zero
zero
point,
but
that
00
is
in
the
middle
and
I
want
it
to
be
on
this
corner.
So
to
do
that,
what
I'm
going
to
do
is
basically
divide
the
width
x,
2,
I'm
going
to
set
it
to
15,
divided
the
height
by
to
set
it
to
20.
Okay.
A
A
Now
we
can
barely
see
the
box
because
it's
blending
with
the
background,
so
I'm
going
to
show
you
another
important
part
which
is
we're
going
to
go
into
3d
view
and
we
are
going
to
open,
modify
3d
view
right.
So
this
is
basically
again
another
collection
of
settings
that
allows
you
to
configure
how
you
want
your
application
or
specifically
how
you
want
a
certain
file
to
look
so
I
have
one
a
box
for
ground,
so
I
can
change
the
color
of
the
ground.
To
you
know.
A
Rule,
for
example,
can
do
the
same
with
the
sky
to
black.
You
know-
and
this
is
what
I'm
going
to
end
up
with,
but
I
could
also
use
textures
right,
so
I
can
do
I
like
to
use
blue
for
both
I
just
like
the
way
it
looks,
such
as
my
think,
that's
it
so
I'm
just
choosing
blue
fibers
and
doing
okay,
and
this
is
what
I
end
up
to
it.
A
Okay,
now,
there's
another
there's
a
couple
other
things
important
here,
so
you
can
see
that
like
now,
I
have
aerial
view
selected
and
that
is
basically
a
bird's
eye
view
right.
So
I
can
see
the
object
from
any
angle
kind
of
like
from
the
outside,
but
always
from
the
outside.
Now
I
could
switch
over
here
to
virtual
visit
and
what
the
virtual
visit
does
is.
It
creates
this
little
character
here
which
you
can
manipulate
right
now,
if
you
look
at
it,
where
is
my
box?
A
It's
gone
and
the
reason
is
because
the
character
is
looking
away
from
the
box,
so
I
can
manipulate
this
character,
turn
it
around
and
what
whoops
I
still
don't
see
my
box
and
the
reason
is
because
I
level
is
too
high,
so
I
got
to
bring
my
character
down
using
this
manipulator
right
here.
So
basically,
the
character
has
four
points
of
manipulation,
can
move
it
around
in
space,
and
you
can
also
do
that
on
this
box
right
here
or
you
can
going
to
decrease
this.
A
You
can
change
the
AI
di
level
like
right
here
up
or
down
you
can
change
the
orientation
of
the
body,
the
body
angle
or
you
can
change.
The
head
angle
means
the
person.
Is
it
looking
up
for
them
right?
So
this
gives
become
real,
useful
once
you've
designed
the
house.
If
you
want
to
check
details
on
the
interior
that
the
bird's
eye
view
does
not
allow
you
to,
in
general
I
temp
to
work
first
on
aerial
view,
because
it's
the
you
know
the
brother
one
and
for
example
like
say
you
arrived.
A
A
A
Now,
there's
other
things
you
can
do
here.
None
of
them
is
really
quite
important
for
for
our
purposes
right
now,
so
I'm
just
going
to
leave
it
alone
and
switch
back
to
aerial
view.
Ok,
so
now,
first
thing
we're
going
to
do
is
once
again
make
sure
that
the
top
left
corner
or
far
I'm
going
to
rename
this
cold
square
and
make
sure
that
the
top
left
corner
of
my
object
is
on
the
zero
zero
point,
and
here
we
go
ok.
A
Now,
if
I
wanted
to
sit
higher
to
have
a
higher
elevation,
I
could
also
set
this
so
now.
Look
at
it
right.
It's
sitting
right
there,
I
click,
OK
and
boom.
It
goes
up.
Ok,
so
this
is
where
you
control
the
elevation,
meaning
the
position.
Now
the
elevation
works
differently
from
the
other
registration
point.
The
registration
point
for
the
elevation
is
the
bottom.
It's
right
here,
so
when
I
say
10
when
I
enter
a
number
10
for
the
elevation.
A
Ok,
so
actually
let
me
just
say
something
that
I
failed
to
say
in
the
beginning,
which
is
because
this
is
more
of
an
interactive
session.
Usually
we
do
like
a
straight
on
presentation
for
45
minutes
and
then
questions
at
the
end,
but
I
would
like
to
encourage
you
to
pose
your
questions
now
like
as
we
go
along
so
feel
free
to
interrupt
at
any
moment.
Ok,
all
right,
ok,
so
Oh
or
inkscape,
oh
I'm,
sorry
much
and
what
was
that
question?
A
A
Ok!
So
now
here's
another
object,
ok
smell!
He
is
the
next
thing.
The
next
challenge
is
I'm,
going
to
take
this
and
I'm
going
to
copy
this
subject.
Just
couldn't
you
know,
ctrl-c,
ctrl-v
and
I
have
to
object
now
say:
I
want
to
align
them
side
by
side,
and
that's
one
of
the
biggest
challenges
that
you're
going
to
have
when
designing
your
house
with
a
library
of
module
just
how
to
get
them
perfectly
aligned.
A
The
way
you
need
them
to
so
I'm,
going
to
change
the
dimensions
of
this
one
a
little
bit
just
to
make
it
more
challenging.
So
the
first
option
I
have
is
this
one
remember
we
put
it
right,
everyone,
it's
not
200
point
right
and
actually
I'm
going
to
make
an
identical
one
and
just
give
it
a
different
color
I'm
going
to
make
it
yellow.
Ok,
so
we
can
tell
them
apart
and
you
can
see
them
here,
they're
kind
of
like
they
are
not
aligned.
A
Now
you
can
do
this
manually,
but
it's
kind
of
hard
if
you
need
any
level
of
precision
but
there's
one
really
cool
thing
which
is
I.
Had
the
magnetism
turned
on
on
my
preferences,
which
means,
when
I
push
this
cube
against
the
next,
when
it
kind
of
like
snaps
right
where
this
one
is
so
we
know
that
it's
a
line
here,
but
is
it
a
line
here,
I'm,
not
sure
so
now,
I
have
a
few
options.
A
First
option
is
I
start
by
selecting
the
object,
that
is
perfectly
aligned,
the
one
that
I
aligned
and
then
I
select
the
second
object
and
I
go
to
furniture,
a
line
side
by
side
in
both
they're
perfectly
aligned.
Another
option
is
say:
this
subject
is
not
exactly
the
same
size.
So
if
I
do
a
line
side
by
side,
it's
kind
of
you
know,
centered
and
I
want
them
to
be
aligned
here.
A
So
I'm
going
to
do
is
we're
going
to
do
once
again
select
first,
the
one
that
you
want
to
use
as
a
reference
than
the
other
one
and
I'm
going
to
do
a
line
on
bottom
and
it's
aligned
here.
Ok,
so
there's
many
ways
to
align
and
I'm
going
to
use
a
few
different
ones.
Depending
on
the
situation.
You
know,
depending
on
how
the
objects
need
to
align
with
each
other
and
what
the
dimensions
of
the
objects
are.
A
Ok,
but
now
say:
I
have
a
bunch
of
these
cubes,
a
lot
of
them
and
they're
all
kind
of
doing
so
saying
and
now
I
want
to
manipulate
all
of
them
at
the
same
time.
So
I
can
go
here
either
you
can
select
them
here
or
you
can
select
them
all
here.
Ok,
so
I
selected
all
of
them
and
I
go
to
furniture
group.
Now
I
can
name
my
group
right,
so
I
created
a
group
they're
all
connected.
So
when
I
move
them,
they
move
as
a
group.
Ok,
but
I
can
do
more
than
that.
A
I
can
actually
change.
The
entire
position
of
the
group.
I
can
change
the
width
of
the
group,
so
basically
I
can
manipulate
a
group
of
objects.
I
can
change
the
color
of
all
the
elements
on
the
group
I
can.
I
can
manipulate
a
group
of
objects
as
if
it
was
one
it's
going
to
be
really
really
useful
later
on,
when
you
have
dozens
and
dozens
of
objects
in
your
plan,
and
you
definitely
do
not
want
to
make
changes
to
each
one
of
them
individually.
A
A
So
now,
let's
move
on
to
using
our
library,
so,
like
I
said,
the
first
thing
we
do
is
create
a
parse
and
then
the
library
of
parts
and
in
a
module
so
I'm
going
to
kind
of
like
do
this
from
the
beginning
and
we're
going
to
start
by
designing
in
module.
Now.
How
do
I
create
parts?
First
thing
is
I'm
going
to
use
this
box?
This
box
is
really
cool
because
it's
just
it's
just
a
geometric
shape.
Ok,
so
you're
magically
that
can
be
made
into
anything.
A
Ok,
so
now
see
my
cube
is
now
starting
to
look
a
lot
more
like
a
piece
of
lumber.
Ok
there
it
is,
but
it
still
doesn't
quite
look
like
a
piece
of
lumber,
so
I'm
going
to
give
it
a
texture
that
makes
it
look
more
like
what
I
want
it
to
be
and
I'm
going
to
once
again,
search
for
wood
and
I
like
to
use
this
one
I
like
this
section.
Ok,
so
now,
I
have
my
piece
of
wood.
A
Now
the
next
step
is
to
place
it
on
the
zero
zero
point,
and
I
am
going
to
do
once
again
once
again
by
dividing
the
by
dividing
the
width
by
in
half
that's
zero
point
75
in
dividing
the
depths
by
two
also
48.
Ok,
so
now
it's
a
200
point
where
I
want
it
to
be
now,
I
am
going
to
design
my
wall
module,
laying
down
as
if
it
was
laying
down
on
the
floor,
and
I
do
that
for
two
reasons.
A
One
is
because
I
find
it
easier
to
work
on
the
x
and
y
axis
is
just
easier
to
see
it
on
the
play
and
on
the
plan,
because
this
plane
is
two-dimensional.
If
I
build
in
a
height,
it
becomes
at
one
point
really
hard
to
see
all
the
parts
and
the
second
one
is
because
modules
wall
modules
are
typically
built
on
the
phone,
the
ground
so
I'm,
seeing
it
in
designing
it.
Has
it's
going
to
be
built?
So
that's
really
helpful.
Ok!
A
So
now
I
have
my
board
here
and
I'm
going
to
do
is
I'm
just
going
to
copy
and
paste
a
copy
of
this,
because
I
need
another
stud
on
this
module
and
I
know
that
the
the
spacing
between
studs
on
my
wall
modules
is
24
inches.
Ok,
so
now
I
could
go
here
in
Tower
to
go
to
x.
24
in
here,
I
maintain
the
48
right,
except
that
what
sweet
home
3d
diz
doing
here
is
that
it's
24
inches
from
this
point
to
the
middle
of
this
one.
A
But
what
I
actually
want
for
24
inch
on
center
building
is
for
24
inches
between
the
center
of
this
one
in
the
center
this
one.
So
what
I'm
going
to
do
is
I'm
going
to
add
three
quarters
of
an
inch
to
this
and
now
I
know
that
there
are
24.
Now,
let's,
let's
just
a
theory-
ok
so
I'm
going
to
get
my
measuring
tape
here,
which
is
this
one?
A
A
Now
I
need
a
third
stud
over
here
and
again.
I
know
that
it's
going
to
be
on
the
48,
for
the
y
and
for
the
x
I
know
that
it's
going
to
be
48,
inches
minus
three
quarters,
so
that's
47,
point
25
and
if
I
measure
again
from
the
center
of
this
one
to
the
center
of
this
one,
oh
no,
ok,
now
that's
correct,
because
I
want
the
total
length
of
what's
going
on,
so
my
measurements
are
probably
not
not
in
the
right
place.
So
let's
just
ignore
this.
A
What
I
really
want
for
this
modules?
I
want
my
model
to
be
a
total
of
forty-eight
inches.
So
that's
what
I
should
have
here
and
that's
what
I
have
here.
Ok,
because
this
is
this-
is
my
standard
module.
So
all
our
modules
are
typically
are.
Most
of
our
modules
are
48
inches
x,
96
inches,
so
that's
my
frame
and
this
one
is
kind
of
in
the
middle,
so
I
am
actually
going
to
change
this
back
to
24.
So
it's
an
exact
center.
Ok!
Now
I
need
for
this
module.
A
A
A
93,
ok!
So
now
let
me
just
so.
You
can
understand
what,
at
what
I'm
doing
this
I'm
going
to
copy
this
one.
Ok
I'm,
going
to
give
it
another
texture
and
I'm
going
to
do
pine.
It's
a
nice
one
and
I'm
going
to
once
again
copy
it
I'm
going
to
drag
it
over
here
to
the
bottom
and
see
because
the
magnitudes
make
it
just
snaps
onto
here.
Ok,
so
I
know
that
it's
a
flush
against
these,
but
I
don't
know
if
its
center.
So
now
I
have
two
options.
A
One
is
to
go
over
here
and
tell
it
to
go
to
x,
24
or
I
could
start
by
selecting
this
one
on
the
left,
selecting
the
one
that
I
wanna
line
and
the
furniture
align
on
left.
So
now
it
aligned
this
corner,
meaning.
I
know
this
is
all
going
to
be
good.
Ok!
So
now,
if
I
take
my
measuring
tape
again
here-
and
I
measure
from
this
point
to
this
point-
I
should
get
96
inches
in
here.
It
is
so
that's
the
those
are
the
final
measurements
of
my
lodging.
A
Ok-
and
you
can
see
it
right
here
now-
I
like
to
use
different
textures
for
the
stats
in
the
top
and
bottom
place,
just
because
it's
easier
to
see
it
when,
when
you're
doing
technical
design
is
just
easier
to
be
able
to
see
where
one
ends
in
the
next
one
begins
now
one
thing
I
didn't
do
they
should
have
done.
It
should
have
named
my
boxes,
so
I'm
going
to
say
that
this
is
a
2
by
6.
So
when
I
look
at
this,
I
know
that
all
of
these
are
two
by
sixes.
A
Ok,
so
that's
kind
of
just
a
housekeeping
thing.
Instead
of
just
seeing
box,
which
one
is
a
box
and
what
is
it
they
all
two
by
sixes
or
you
can
you
can
name
them
like
studs,
for
example?
So
you
know
that
these
are
studs,
so
this
is
just
kind
of
like
an
organization
thing.
Now
my
module
wouldn't
be
complete
without
a
panel
I,
so
walls
won't
have
a
frame,
but
I
also
have
panels
so
now
I
need
to
make
a
panel.
A
So
I'm
going
to
take
this
box
once
again
and
I'm
going
to
turn
this
into
something
that
looks
like
a
sheet
of
plywood.
So
I'm
sheet
of
plywood
is
typically
48,
inches
wide
96,
inches
high
and,
let's
say,
half
inch
thick,
okay
and
once
again
I'm
going
to
place
it
on
24
and
48.
So
it's
centered
on
my
module.
Now
you
can
see
it's
on
the
bottom
right,
but
I,
don't
really
but
I,
don't
know.
If
you
can
see
here.
You
can
see
here
see
this
line
right
here.
A
This
means
that
the
panel
is
actually
at
the
same
level
as
a
frame,
but
I
want
the
frame
above
the
panel.
Ok,
so
now
is
where
groups
come
in
handy
I'm,
going
to
take
all
of
these
bored,
so
I
selected,
all
of
them,
let's
see
if
I
can
show
you,
here's
to
see
older.
All
the
boards
are
selected,
but
the
panel
is
not
and
I'm
going
to
group
them.
Okay
and
now
I'm
going
to
say
that
I
want
this
to
be
at
an
elevation
of
0.5.
A
Now
you
see
the
panel
is
below
the
frame,
which
is
where
I
wanted
it,
and
I'm
going
to
call
this
plywood
okay,
and
now
I'm
going
to
copy
this
one
to
make
a
second
one
for
the
top
right.
So
here's
my
copy,
here's,
the
second
one,
but
I
actually
want
this
to
be
on
top
so
once
again
at
first
I'm
going
to
place
it
on
the
x
24
y
48
and
an
elevation
of
6,
and
how
did
I
get
to
six?
A
We
got
26
because
yeah
I
know
that
this
is
half
inch
and
this
is
five
and
a
half.
So
6
is
the
elevation
necessary
for
this
panel.
Now,
let's
make
it
look
a
little
bit
more
like
plywood
and
I'm
going
to
use
birch
because
it
kind
of
looks
like
it
a
little
bit
so
you
can
see
in
now
this.
Basically,
we
took
a
box
and
we
made
a
wall
module
out
of
it.
Okay.
A
Now,
when
you
are
this
this
now,
when
you
are
looking
see
you
analyzing
you're,
either
teaching
someone
or
you're
doing
an
instructional
or
you're,
just
basically
trying
to
figure
out
like
how
your
module
works.
Now
this
is
really
important
here.
This
information
shows
you
what
I'm
going
to
ungroup
this.
You
can
ungroup
it
okay.
A
I
can
just
turn
it
off,
like
you
would
in
Game
four
inkscape
as
much
instead,
so
I
can
turn
off
layers
on
and
off,
and
it
is
very,
very
useful,
especially
if
you
are
preparing
and
instructional
in
you
need
to
show
all
the
stages
of
how
it
was
built
right.
So
I
could
tell
someone:
okay,
you
stuck
with
one
stud
and
you
and
another
one
here.
Then
you
add
another
one.
Then
you
add
a
top
plate.
A
A
Okay
now
one
thing
I
could
do
is
I
could
just
select
all
of
these
in
group
them
and
call
this
walled,
module
right
and
then
I'm
going
to
create
they
create
another
sweet
home,
3d
file,
say
you
okay,
so
I
have
a
second
one
here
and
I
can
just
take
my
wall
module
from
here
copy
it
on
okay
copy
it
onto
this.
One
came
boom
there.
It
is
right
and
then
say,
I
want
another
one.
A
Working
this
way,
one
is
like
when
you're
building
a
house
you're
going
to
have
a
lot
a
lot
of
these
and
each
one
of
them
has
a
lot
of
files,
so
it
gets
really
really
heavy
and
the
other
one
is
a
limitation
of
sweet
home
3d
that,
hopefully,
will
change
in
the
future,
which
is
it
does
not
do
z,
axis
rotation,
meaning
if
I
wanted
to
rotate
this,
so
that
my
walls
are
vertical.
Instead
of
laying
on
the
floor,
I
can't
do
it
in
sweet
home
sweetie.
Not
not
here.
Not
this
way.
A
A
A
Ok,
this
case
I
do
want
all
of
them,
so
I'm
just
going
to
select
and
then
I'm
going
to
go
to
3d
view
export
to
obj
format,
and
what
this
is
going
to
do
is
it's
going
to
generate
a
new
file,
a
file
that
is
a
dumb
object?
It's
not
editable
anymore.
It's
just
you're!
All
you're
going
to
see
is
the
exterior
it's
going
to
be.
The
same
has
remember
that
chair
that
we
saw
earlier
or
I
don't
know.
Let
me
grab
another
one
from
here.
Ok,
we
got
an
apple
ipod.
Now,
that's
just
cool.
A
It's
just
a
single
object.
Let
me
find
one
a
crate.
Ok,
so
we
have
a
great
here
see
this
great
appears
here:
there's
no
layers
to
it.
This
is
a
single
object.
I
can't
see
what's
inside,
but
this
is
advantageous
when,
once
you
have
your
module,
you
may
not
want
to
see
inside
it
anymore.
You
just
want
to
use
it
to
design
a
house.
A
Ok,
let
me
to
new
folder
tutorial.
It
doesn't
get
too
confusing,
I'm
going
to
call
it
wall
module
in
and
now
this
is
very
important.
You
have
to
do
export
selection
instead
of
X
portal,
and
the
reason
is,
if
you
do,
export
all
the
ground
itself.
The
the
the
ground
plane
of
the
oath
of
your
file
is
going
to
be
exported
along
with
the
module,
so
you
can
have
an
extra
layer
that
you
don't
want.
So
do
export
selection.
Okay!
So
now
you
know,
I
have
a
new
file.
Let's,
let's
find
that
file.
A
Come
on
can
do
it
that
file
I
put
it
in
this
folder
called
tutorial
all
right
now.
I
exported
one
file,
but
I
actually
have
five
here
right.
So
the
obj
module,
the
obj
files,
as
you
see
here,
is
the
one
that
you
care
about.
This
is
the
one
that
contains
all
the
information
necessary.
What
the
other
ones
are
architecture
information
remember
so
MTL,
basically
is
a
map
of
textures.
A
It
tells
the
obj
how
to
apply
the
textures
to
the
object,
and
then
these
are
you
know,
image
just
basically
images
or
the
textures
themselves
that
the
MTL
applies
to
do
bj.
So
you
do
want
to
keep
all
of
these
files,
the
image
file,
PNG
or
JPEG,
and
the
MTL
file
in
the
same
level
as
the
object,
but
you're
not
going
to
care
about
them
anymore,
because
now
what
I'm
going
to
do
is
I'm
going
to
create
a
new
file
just
so
we
don't
get
confused
a
new,
a
new
sweet
home
3d
file.
A
Here
we
are,
and
I
am
going
to
import
that
object
and
I-
do
that
by
going
to
furniture
and
keep
in
mind
that
all
objects
in
sweet
home
3d
are
called
furniture,
whether
or
not
their
furniture,
and
that's
just
because
the
application
was
designed
for
interior
design,
so
I'm
going
to
select
import
furniture.
Okay,
so
that's
going
to
open
the
panel.
A
Sometimes
it
takes
a
little
bit
and
I'm
going
to
do
choose
model
and
my
model
is
actually
on
this
folder,
so
I'm
just
navigating
to
the
folder
where
I
placed-
and
you
can
see
that
all
the
other
files
are
grayed
out,
you
can
only
import
a
bj,
so
I'm
going
to
say:
ok,
this
is
the
file
that
I
won't
open
it.
So
here
it
is.
Ok,
ok,
that's
good!
That's
the
file
I
want,
so
you
can
change
the
model
if
imported
or
one
continue
so
now.
A
The
next
step
here
is
sweet
home
3d
allows
you
to
rotate
the
object
to
the
proposition
that
you
want
it
to
so
it
shows
you
that
perspective.
It
shows
you
the
top
view
left
view
in
front
of
you
and
then
you
can
use
these
arrows
to
change
it.
So
I
can
rotate
my
object
like
that.
Okay,
I
can
rotate
it
like
that
now.
This
is
exactly
what
I
want.
I
want
my
wall
to
be
vertical,
so
when
I
look
at
it
from
the
front,
it
looks
vertical.
A
A
Now,
actually
I
fail
to
do
something
important,
so
I'm
going
to
stop
this
and
go
back
when
you
import
an
object
again,
we
go
here
when
you
import
an
object.
You
can
select
you
kid.
If
you
have
this
one
selected,
if
you
have
the
library
pain
selected,
it's
going
to
import
the
object
into
the
library.
If
you
have
that
canvas
selected
or
the
plane,
the
plan
selected
it's
going
to
import
it
only
into
the
plan
and
not
into
the
library,
meaning
it's
not
going
to
be
permanently
associated
with
your
library.
Okay.
A
A
If
you
want-
or
you
can
just
import
it
into
it
later,
if
you
want
okay,
so
yeah
here
it
is
finished
tada
here
it
is
ok,
so
I'm
once
again
going
to
change
my
3d
view,
just
because
it's
hard
to
see
with
this
the
default
colors
and
just
so
you
can
see
it
ok!
So
now
we
have
a
wall
here
and,
as
you
can
see,
I
can
no
longer.
We
move
the
layers
of
this
world.
They
are
no
longer
visible,
they're,
just
an
object
right.
A
A
A
Yes,
ok,
yeah
I
mean
all
of
this
can
be
downloaded
from
our
website
right
now.
Ok,
now,
let's
say
that
you
already
have
a
library
and
I'll
show
you
the
very
last
thing
I'm
going
to
show
you
is
how
to
make
a
liar,
because
that
means
going
outside
of
Saddam
City
and
using
a
different
application
but
I
we
already
provided
you
with
the
library
and
you
don't
wanting
fortress
one
module
your
money
for
the
whole
library,
so
you
can
do
that
in
two
ways.
A
One
is
too
so
I
have
my
libraries
here
and
I'm
just
going
to
double
click
on
this
one
library
here
and
sweet
home
3d
recognizes
it
so
I
just
double-clicked
it
on
my.
You
know
Finder
window,
and
it
says
you
already
have
this
lab
or
do
you
want
to
replace
it
and
I'm
going
to
say,
yeah
sure
I
want
to
replace
it
and
it's
ok
and
now,
if
I
look
at
this
list,
here's
the
library
I
just
important.
A
So
it's
as
simple
as
that
or
you
can
do
it
directly
from
sweet
home
3d
and
you
go
to
furniture,
import,
furniture,
library
you
select,
which
one
you
want.
I'm
selecting
this
one
of
course
already
have.
It
too
is
asking
me
if
I
want
to
replace
it,
but
you
wouldn't
get
this
the
first
time
you
install
it.
We
place
boom
library
now
exists
here
and
it
contains
all
of
these
other
objects.
Ok,
and
I
can
just
once
again
drag
them
all
along
to
stage
whatever
you
know.
A
This
is
happening:
furniture
library
that
I
design
a
while
back-
and
you
have
all
of
these
other
things
here.
So
now
we
have
a
library
with
which
to
work,
I'm
just
going
to
delete
them.
The
modules
are
imported,
I'm
going
to
use
the
OPI
library
to
design
a
house,
so
it's
called
OB
I
structural
modules,
I'm,
assuming
that
you
already
imported
it
and
I'm
we're
going
to
start
designing
a
house
right
now.
So
the
first
thing
is
the
way.
A
The
way
we
name
our
margins
for
the
library,
so
the
first
one
tells
you
what
kind
the
first
verse
tells
you
it's
a
wall
tells
you
kind
of
like
a
subfamily.
It's
an
insulated
wall.
Can
then
the
third
tells
you
the
dimensions.
So
I
know
that
this
wall
is
four
feet
wide
by
8
feet,
high
by
six
and
a
half
sick.
So
I'm
going
to
start
with
that.
Don't
drag
it
over
here
and
once
again,
I'm
going
to
place
it
on
the.
A
Three-Point
2500
points,
so
I
got
my
wall
here
and
ugly
in
this
collar,
so
I'm
just
going
to
make
it
in
the
faller
like
I
service.
You
know
you
guys
are
just
right
now:
I
want
to
have
a
large
window
next
to
it.
So
I'm
just
going
to
drag
a
few,
I'm
going
to
kind
of
place,
it's
roughly
next
to
this
one
and
then
I
want
another
window.
Next
to
that
was
I
like
lots
of
all
those
and
then
I
want
another
role
here.
Okay,
all
right,
so
these
are
not
aligned
at
all.
A
But
how
do
I
do
it
so
if
I
want
to
have
a
perfectly
straight
wall,
I
start
by
selecting
the
first
one
to
always
talk
with
the
one.
That
is
all
right
in
the
position
that
you
want
it
and
then
I
select
the
remaining
ones,
and
I
go
to
hear
furniture
alliance
side
by
side.
Okay
and
now
I
got
my
first
wall,
we're
going
to
we're
going
to
design
a
very,
very
simple
structures,
just
as
a
small
one,
okay.
A
So
I'm
going
to
group
this
just
for
you
know
housekeeping
purposes
and
I'm
going
to
call
this
north
wall
right
and
I'm
gonna
tell
it
to
make
all
of
them.
Do
this
look
a
little
bit
well,
do
we
can
barely
see
one
changed?
Okay,
so
I
got
my
wall
right
here
now.
I
need
to
do
a
side
wall,
so
I
can,
for
example,
I
can't
I
going
to
take
another
wall
module
to
do
the
side,
wall
and
I'm
going
to
rotate
it
because
I
want
it
to
be
here.
A
Okay,
so
now
we
see
like
when
I
use
it
like
this
kind
of
like
snaps
to
the
other
one.
So
it's
fine
there,
but
I
need
to
align
it
on
the
left
side.
So
I'm
going
to
start
by
selecting
the
one
that
is
in
position
or
even
the
whole
group
and
then
selecting
this
one
and
do
a
line
on
left
in
do
now.
It's
perfectly
alight.
A
A
B
A
A
So
the
technical
modules
I'm
going
to
they're
not
publicly
available
yet
because
I'm
still
scratching
your
head
on
how
to
do
that
in
a
way
that
is
practical
for
everyone
else.
What
I
did
would
when
we
designed
the
house
that
we
built
in
November
is
like
I,
created
a
special
library
just
for
that
house.
It
had
all
the
technical
module
that
going
to
that
house
and
then
there's
another
issue,
which
is
the
the
module
design.
A
The
ones
that
are
offset
are
very,
very
difficult
to
use
in
home
3d
because
of
the
alignment
issue
because
of
the
offset.
So
what
I
did
was
I
faked
it
and
I
kept
two
families
of
modules,
ones
that
were
technically
correct
in
another
ones
that
I
use
just
for
the
design
in
sweet
home
3d.
So
that's
the
kind
of
thing
that
I
haven't
quite
figured
worked
out.
How
to
do
to
make
that
available,
but
I
can
show
you
a
little
bit
later
on
what
is
the
difference
between
them
in?
Why
is
problematic
and.
A
A
C
B
Everybody's
references:
there
is
a
very
big
difference
between
just
a
concept,
drawing
like
what
guttering
is
doing
in
something
that's
technically
correct,
because
when
you
go
out
there
into
the
field
and
we
build
the
house
every
little
tiny
bead
on
notch
and
the
spacing
has
to
be
corrected.
It's
very
important
right.
A
And
I'll
show
you
how
I
do
that
so
usually
actually
I
should
have
started
by
explaining
this
I'm.
Sorry
I
am
that
I
missed
it,
which
is
the
first
thing
I
do
at
least
and
I
think
that's
what
everyone
does
is
a
conceptual
design
which
is
kind
of
like
the
overall
shape
of
the
house,
its
kind
of
kind
of
get
like
a
feeling
for
it
right
then,
once
I'm
happy.
But
of
course
the
overall
shape
of
the
house
already
means
implies
that
you
have
some
technical
knowledge.
A
You
know
that
what
you're
designing
is
buildable
and
we
did
cover
that
on
the
previous
webinar.
So
when
I'm
doing
it
already
know
that
I
can't
have
a
real
fan
of
40
feet,
because
that's
just
going
to
be
really
really
hard
to
build.
But
at
that
point
I'm
not
really
worried
about
how
you
know
this
board
is
one
inch
off
or
something.
A
But
then,
once
I
get
to
designed,
then
we
sought
the
technical
design
and
that's
where
every
half-inch
or
quarter
inch
is
going
to
matter,
because
it
could
be
a
big
nightmare
if
you
of
five
and
a
quarter
inch
so
I'll
mention
that
a
little
bit
okay.
So
this
is
one
of
the
modules
I'm
going
to
remove
the
panel,
so
you
can
see
the
inside,
and
this
is
what
our
modules
that
we
use
recently
look
like.
A
So
you
have
a
top
plate,
a
bottom
plate,
stud
in
the
middle
24
inches
on
center,
and
then
you
have
another
stuff
that
is
offset
like
you
can
see
here
that
this
set
sticks
out
three-quarters
inch
and
the
reason
is
because
then,
when
I
have
a
second
module,
that
looks
exactly
like
this
one
here
on
the
left,
then
they're
going
to
interlock
they're
going
to
fit
nice,
I'm
just
basically
kind
of
like
the
lego
principle,
so
I
guess
notch
thing
some
way.
I
will
L
say
now.
A
The
problem
is,
if
I
take
this
module,
I'm
going
to
import
I'm
going
to
just
import
the
actually
I'm
not
going
for
so
now.
If
you
look
here,
I
have
one
folder
that
says
technical
and
that
contains
this
design
and
I
have
another
folder
that
says
design
right,
and
this
is
a
technically
correct
now,
if
I
switch
to
the
to
the
design.
What
you're
going
to
see
here
is
that,
instead
of
it
sticking
out,
I
have
just
a
three-quarters
inch
here
in
three-quarters
inch
here
and
the
reason.
A
Okay,
let
me
try
this
again,
so
I'm
going
to
make
a
copy,
I'm
going
to
turn
off
the
tech
and
go
back
to
the
technique,
I'm
going
to
make
a
copy
of
the
technical,
okay
right.
So
now,
I
have
to
have
two
side
by
side.
Now:
I
go
to
sweet
home,
3d
I,
select
it
like
I
showed
you
and
I
do
furniture
align
side
by
side.
A
What
happens
is
I
end
up
with
a
gap
here
because
sweet
home
3d
knows
that
my
module
ends
here
and
therefore
it's
not
going
to
know
that
it
needs
to
interlock.
Now
you
could
get
into
the
numbers
and
tell
this
one
and
move
this
one
right
here.
You
could
move
it
a
quarter
inch
to
two
to
the
left,
but
once
you
have
dozens
of
these,
it's
really
really
hard
to
do
right.
It's
much
easier
to
do
a
line
side
by
side
and
just
the
Masters
gets
crazy
and
spend
hours
on
it.
A
A
A
Then
that's
where
you
need.
We
need
a
lot
of
files
and
that's
one
of
the
challenges
that
we
run
into
with
the
interlocking
modules
that
they
either
s
symmetrical,
which
creates
challenges
not
only
in
terms
of
the
design
in
making
the
design
easier,
but
it
also
creates
challenges
in
terms
of
building
it,
because
suddenly,
your
module
has
a
site
right
as
a
left
side
and
a
top
and
a
bottom
in
the
right
side.
B
A
A
Can
actually
that
was
once
you
put
them
together?
They
represent
the
reality
and
I'll
show
you
that
later
yeah
so
I
mean
I
just
showed
you
here
actually
I
think
that
this
one
might
not
even
be
technically
correct,
because
this
looks
thinner
than
it
needs
to
be,
but
trust
me
that
that's
what
it's
supposed
to
look
like
right:
okay,
alright!
So
now
bike
back
to
the
conceptual
design,
so
I'm
going
to
get
my
wall.
A
First,
so
this
again
furniture
a
line
on
the
right
and
boom
it's
in
place
when
a
rename
it
west
wall
I'm
going
to
copy
in
my
north
wall
and
put
it
here
and
do
it
once
again,
furniture
a
line
on
left
and
boom.
Okay,
so
I
designed
this
really
quickly
and
that
that's
why
I
love
the
library
is
because
now
I
mean,
of
course,
I'm
missing
a
door.
Here,
you
know
houses
usually
have
doors
but
not
trying.
Okay.
Now,
the
next
step
is
to
put
a
second
story
on
it.
A
Four
by
six
and
a
half
and
I'm
going
to
have
to
change
the
dimensions
of
this
a
little
bit
too
sweet.
Ok!
So
now
I
have
oh
here.
It
is
you
guys,
can
see
it's
right,
so
we're
just
sitting
on
the
on
the
ground
there,
so
I'm
going
to
have
to
once
again
position
it
so
I'm
going
to
put
it
at
24
inches
and
then
it
10
1.5,
which
is
half
of
this,
and
now
I
wanted
to
fit
on
top
of
the
walls
not
on
the
floor
right.
A
So
I
know
that
my
walls
are
96
inches
tall,
so
I'm
going
to
tell
it
to
go
to
96
inches
and
I'm
going
to
change
the
color
just
so
you
can
see
it
better
and
actually
this
actually
needs
to
be
one
inch
well
205
and
just
needs
to
read.
Ok!
So
now
I
got
my
floor,
but
I
need
more
module,
so
I'm
just
going
to
copy
this.
A
A
So
this
is
just
the
first
story.
Now
I'm
going
to
just
going
to
do
really
quickly.
A
second
story,
so
I'm
going
to
do
the
drag
on
this
other
module.
That
is
just
like
a
little
wall.
It's
a
short
wall
and
I
want
it
to
be
once
again
on
the
zero
zero
point.
So
24,
3.5
and
I
want
the
elevation
of
this
one
to
be
the
height
of
the
wall,
plus
the
thickness
of
my
floor.
Now.
The
thickness
of
my
floor
I
forget
to
check.
A
A
Ok,
so
I'm
going
to
align
all
of
these
blind
side
by
side.
Oh
my
God,
my
front
wall
now
I
want
my
back
wall
to
be
told
because
I'm
gonna
put
them
and
I
I'm
going
to
do
a
roof.
Ok,
so
couldn't
do
24,
3
point
25
and
the
height
of
this
one.
What
did
I
say
was
10
2.5
yeah.
It
is
so
again
I'm
going
to
make
another
wall
wall
wall
line,
all
of
them.
A
Ok
right
so
now,
I
have
I
need
my
rootless
scooter
provide
me
with
my
roof
slope
right.
So
I
have
a
tall
wall
in
a
short
wall
and
I
gotta
get
a
roof
on
it.
Now
this
is
where
the
challenge
with
sweet
home
3d
comes
in,
which
is
normally
I,
would
just
put
a
roof
module
here
and
I
would
rotate
it
on
the
z
axis
until.
A
And
and
rotate
it
until
it
gave
me
the
angle
that
I
need
it
right
now.
Unfortunately,
I
can't
do
that
in
sweet
home
3d
I
have
to
do
that
in
blender.
Now
it's
already
five
pm
and
we're
still
a
little
bit
much
and
should
I
a
show.
The
blender
eat
food
blender.
What's
your
opinion
yeah
good,
blender?
Ok!
So
now
what
I'm
going
to
do
is
I'm
going
to
go
into
blender
and
blender
is
quite
tricky.
A
So
first
thing
I'm
going
to
do
is
delete
this
object
here.
This
is
blender
and
I
try
to
press
as
a
few
buttons
as
possible,
because
if
you
press
the
wrong
button,
you
get
lost
in
blender
and
I'm
going
to
import
a
knobby
obj.
Ok,
so
I
already
have
a
box
that
I
designed
and
I'm
gonna
go.
Look
for
my
modules,
library,
libraries,
object
and
I
am
going
to
select.
A
A
A
A
Okay,
here's
my
module,
so
what
I
did
is
like
I
did
view
left
right,
so
I'm
looking
at
it
from
the
left
angle,
I'm
going
to
do
rotate
and
I'm
going
to
rotate
this
roof
in
whatever
direction.
I
needed
to
go.
Okay-
and
you
can
answer
the
exact
angle
here,
but
of
course,
of
course
you
got
to
know
what
the
angle
of
your
rotation
is,
and
you
do
that
by
using
a
rafter
angle
calculator.
A
So
the
Raptor
angle
calculator
works
in
the
following
way.
So
I'm,
just
gonna,
bookmark
manager,
I'm
going
to
open
my
tools
here
and
go
to
tools
and
roof
pitch
calculator,
so
you
can
just
find
it
online.
It
is
just
someone's
real
I
know
that
arise,
which
is
the
difference
between
my
little
wall
in
my
top
pole
is
48
inches
and
that
the
run
means
meaning
the
space
between
the
between
the
walls
is
16
feet,
so
that's
190
to
calculate
and
I.
So
this
tells
me
that
my
angle
is
14
degrees.
Okay.
A
So
that's
what
I'm
going
to
do
here
on
Blender
I'm,
going
to
tell
her
to
go
to
14
degrees
and
there
now
I'm
going
to
re-export
it
as
obj
and
I'm
just
going
to
put
it
on
my
desktop
to
save
time
and
allow
I'll
just
leave
it
called
untitled.
Okay,
so
exported
my
object.
Now
going
back
to
sweet
home
3d,
going
to
select
the
put
this
this
plan
right
here
and
do
furniture
import
furniture.
So
I'm
going
to
import
the
subject.
A
A
Mean
ok,
so
here
it
is
see.
Ok,
now,
I
have
the
angle.
Well,
the
ones
in
the
current
library
only
accounts
for
a
rise
of
two
feet:
one
foot
and
two
feet,
so
I
will
have
to
include
modules
that
account
for
different
rises.
So
this
one
happens
to
be
four
feet.
Ok,
but
I
kept
it
this
way
because
I
wanted
to
show
you
you
know.
Actually
I
talked
to
Manuel
who
develops
sweet
home
3d,
and
hopefully
we
will
be
able
to
get
rotation
directly
in
the
program,
so
we
won't
have
to
go
through.
A
All
of
these
hopes.
Ok!
So
now
I'm
going
to
place
this
on
top
and
I
gotta,
once
again
figure
out.
What's
the
height
of
my
wall
now
the
one
I
want
right
here
is
the
lowest
one.
So
I'm
going
to
add
up.
I
know
that
the
bottom
wall
is
96
and
then
I
have
a
floor
than
is
6.5
and
then
I
have
another
48
inches.
So
that
tells
me
the
height
that
I
need
to
place
the
set
which
is
around
about
a
hundred
and
fifteen
point
five
and
twenty
four.
A
Well,
hey
much
a
little
short
alright,
because
I
imported
a
one
that
it
wasn't
long
enough,
so
I'm
just
gonna
just
going
to
fake
it
in
college
116
and
there's
my
roof
module.
Ok,
now
you
can
fiddle
with
it
or
get
the
rotation.
So
now
I
can
make
copies
and
so
forth
and
so
forth
and
basically,
when
it
won't
repeat
the
same
thing
once
again,
a
line
side
by
side,
yeah,
ok!
So
now
we
have
our
basic
health
shape.
Now
I'll
probably
want
this
to
be
longer
so
it
does
have.
A
A
But
basically
you
got
your
basic
health
shape
yeah
now,
since
we
are
running
out
of
time,
I
just
want
to
show
you
so
that
I
get
Lizzy
I'm
happy
with
it.
It's
not
technically
accurate,
but
it's
kind
of
the
shape
of
the
house
that
I
want
so
now.
I
have
to
move
on
to
the
technical
drawings,
and
at
that
point,
what
I
often
do
I'll
not
even
going
to
get
into
the
foundation
at
this
point
is
I,
go
back
to
my
modules
and
remember
we
had
these
modules
that
we
designed
it's
not
the
one.
A
Okay,
so
we
have
these
modules
that
we
designed
originally,
I
exported
them
with
the
ink
right
with
the
panels,
but
I
can
also
export
just
the
frame.
So
that's
what
I
did
I
exported
just
the
frame
and
then
I
designed
the
whole
house
with
just
the
frames,
and
the
reason
is
because
so
this
way
I
can
see
exactly
what
marching
what
they
were
saying
right.
So
I,
look
at
this
and
I
can
see
that
my
status
perfectly
aligned
with
with
the
floor
joists
that
everything
actually
fits.
A
This
is
the
next
step
that
I
do
is
do
a
model
of
the
house.
That
is
only
the
framing
okay.
Now
you
can
also
use
sweet
home
3d
to
design
your
foundation.
That's
what
I
did
here
so
I
use
that
remember
that
gray
box
I
use
it
to
create
the
shape
of
the
concrete
and
then
the
forms
that
go
around
it.
So
you
can
see
all
the
forms
I
here
so
I
basically
base
all
my
bill
of
materials
and
calculations
and
all
the
designs
on
knowing
that
these
forms
actually
fits.
A
A
So
then
I'm
looking
at
all
of
these
details
and
getting
all
of
these
measurements,
this
is
very
important
simulation
before
we
build
a
foundation,
we're
going
to
make
sure
that
it
really
fits,
so
it
really
matches
I
spent
several
days
just
on
this
one
along
alone,
even
though
it
looks
really
simple
and
then
you
know
you
keep
going
up,
can
add
your
walls
here
and
then
this
is
where
the
3d
view
virtual
visit
becomes
really
important.
It
allows
me
to
really
look.
Is
this
in
the
right
place?
A
A
B
Don't
believe
that
our
ability
is
really
robust,
I
mean
sketchup
uses,
uses
its
own
format
so
which
we're
kind
of
this
using
it,
because
we're
going
into
the
torque
the
first
tool,
change
from
sweet
home
to
blender
to
freak,
add
and
the
architecture
or
prevention
in
three
that
already
exists.
So
that's
why
we're
doing
that.
A
A
Okay,
well
just
for
good
measure
I'll
show
you
really
quickly
how
to
I
mean
dixit.
It's
like
any
cat
program.
It
takes
a
few
hours
to
really
feel
comfortable
with
it
and
to
figure
out.
What's
the
workflow
that
really
works
for
you,
the
technical
design
is
particularly
challenged,
challenging
as
it
is
in
any
platform,
but
I
will
just
give
you
one
last
part
4
piece
of
information
before
we
move
on
to
two
questions,
or
we
continue
with
questions
and
I'll
just
show
you
really
quickly.
A
Ok,
so
I
have
there's
another
piece
of
software
on
the
sweet
home
3d
website
and
it's
called
the
furniture
library
editor
and
I'm
just
going
to
open
it
up.
Remember
like
we
did,
I
can
design
that
module
and
then
I
created
an
obj
out
of
it
right
now.
I
can
actually
take
a
bunch
of
modules
that
I
create
that
way
and
create
a
library
with
it.
You
know,
I
use
it
using
this
piece
of
software
called
the
furniture
library
to
editors
bootstrap,
which
is
basically
just
a
java
applet.
A
So
the
thing
I'm
going
to
do
is
I'm
going
to
do.
I
want
a
new
library,
so
I
created
a
new
library
and
then
I
have
some
modules
are
already
designed
and
converted
into
herbs
objects
here.
So
I'm,
just
gonna
I,
don't
know
just
grab
something.
Oh
here's
one
object:
okay,
so
I'm
just
dragging
it
onto
this
this
this
application
and
it
takes
a
little
bit-
and
here
it
comes
and
it's
importing
it
involved
there.
It
is
now
I
can
double
click
it
and
I
can
manipulate
it
right
here.
Ok,
so
I'm,
manipulating
this
shape.
A
I
want
it
to
be
like
this.
You
give
it
a
name
right.
Whatever
wall
insulated,
it's
1
by
8
my
4.56
kind
of
a
weird
Wall
module,
but
then
he
is
very
important.
I'm
going
to
define
a
category
and
I'm
going
to
say
that
I
want
this
to
be
the
OB
I
test
library,
so
I
created
it
and
I'm
going
to
get
another
wall,
another
module
just
to
ask
for
good
measure.
It
could
be
this
one.
A
Ok,
so
that's
it
now,
I
go
back
to
sweet
home
cleaning
anywhere
and
I'm
going
to
do
furniture
import
front.
No
sorry!
So
this
lighting
today
furniture,
import
furniture,
library
and
where
is
the
library
I
just
created,
I
called
it
will
be
I
test
here.
It
is
I
just
created
this
file
and
I
open
it
in
a
test.
Tells
me
we
successfully
imported
right
now.
I
go
here.
Oh
in
here,
OB
I,
test
library-
and
here
are
the
modules
I
just
created.
I
just
added
to
this
library.
A
So
basically,
what
we
doing
is
we
using
this
other
applet,
just
basically
to
bundle
a
bunch
of
objects,
so
they're
easier
to
use
in
sweet
home
3d.
So
obviously
you
can
import
objects.
One
by
one
is
really
such
more
practical
for
you,
okay
ability
to
create
rendering,
in
2d
drawings,
from
open
source
design,
software.
B
A
B
A
clear
answer
to
that
one:
there's
rendering
basic
rendering
within
sweet
home
and
then
to
get
really
high
quality
renderings
you
can
export
into
blender
and
you
can
actually
look
up
on
the
osc
wiki.
The
architecture
tutorial
shows
some
examples.
It's
really
stunning.
You
can
do
really
well
on
that
to
eat
more
plants
come
out
of
free
cab
and
Katrina.
Can
you
say
how
you
do
some
floor
plans
out
of
this
okay.
A
So
now
here
I
want
a
floor
plan
out
of
this,
so
I'm
just
going
to
go
to
plan
here
and
export
to
SVG
format,
which
is
compatible
with
inkscape,
and
you
can
name
it
whatever.
So
I'm
just
going
to
export
it
as
framing,
which
is
the
name
of
this
thing
and
then
I'm
going
to
open
framing
in
inkscape,
and
you
can
see
the
floor
plan
I.
A
Guess
my
inkscape
is
a
little
slow
and
okay,
so
this
is
just
basically
showing
me
what
was
already
there.
So
it's
showing
me
that
this
is
not
a
good
example
actually,
because
this
is
a
better
example.
Okay,
so
I'm
going
to
export
this
one
plan
exports,
but
it
basically
generates
a
floor
plan
just
like
any
other
okay,
so
foundation
lecture
for
this
one,
and
here
it
is
okay.
So
she
this
a
pretty
standard
floor
plan
and
it
shows
all
of
my
measurements
as
well.
A
B
A
A
It's
basically
a
wrap
actually
I
struggle
with
that,
because
originally
I
wanted
to
make
the
walls
white
but
then
white
on
white,
we
just
wasn't
visible.
I
ended
up
making
them
all
black,
but
I.
Don't
think
you
can
change
the
icon.
/
say
at
this
point
not
using
any
of
the
software
that
I
have
at
least.
A
Okay,
so
well,
it
depends
on
on
your
level
what
we're
going
to
be
able
to
provide
I
got
to
figure
out
the
Technical
Library
issue,
but
what
you
can
do
is
you
can
use
our
library
to
use
that
to
do
that,
the
conceptual
design
and
to
really
get
comfortable
with
the
software
in
most
level
to
learn
how
to
design
houses.
That's
the
most
important
part.
It's
not
just
the
software's
like
what
makes
sense
right.
A
So
that's
where
the
previous!
That's.
Why
I
wanted
to
hold
this
webinar
on
the
same
day
as
a
previous
one,
because
they
really
go
together
and
then
at
that
point,
there's
two
options
that
we
we
found
a
way
to
make
a
Technical
Library
available,
which
I
really
want
to
do
or-
and
you
can
use
that
or
imagine
that
that
doesn't
work
for
you
anyway.
A
You
know
how
to
design
the
modules,
so
you
do
what
I
just
showed
you
in
the
beginning
of
this
webinar
and
you
design
your
own
technical
modules,
and
then
you
design
the
house
with
that.
So
none
of
this
is
prohibitive
or
extremely
difficult.
I
think,
as
a
challenging
part
really
is
once
you
get
your
hands
on
the
software,
this
is
so
much
easier
than
ketchup
or
any
of
the
other
applications.
I
find
it's
going
to
be
to
know
how
to
design
a
house.
A
B
B
A
It
is
the
alignment
issue
becomes
a
major
headache
if
I
did
try
to
design
with
them
as
they
were
in
at
one
point,
I
was
just
ready
to
sell
the
computer
out
the
window
because
alignment.
Ninety
percent
of
what
you're
going
to
be
doing
in
sweet
home
3d,
is
alignment
if
in
positioning,
because
that's
what
you're
doing
mine
is
the
shortest
anxious.
A
B
B
What
I'm
saying
is
that,
once
somebody
has
experience
of
so
just
experiencing
how
the
modules
are
built
in
real
life,
which
you
can
do
in
a
workshop
or
just
prototyping
it
yourself,
then,
when
you
actually
go
to
building
the
model,
say
a
complicated
model
in
sweet
home
you
make
once
one
module
fit
against
the
other.
Okay
good.
You
know
that's
correct
and
you
just
move
to
the
next
one.
I
think
the
trouble
comes
when
you
have
to
make
all
the
corrections,
because
you
didn't
get
it
right
in
the
first
place
right.
A
But
no
but
I
mean,
but
the
every
house
is
different,
so
we're
not
going
to
build
the
same
house
twice.
I
could
do
it
for
one
module
one
house,
but
every
house
is
different.
So
assuming
that
if
you
got
the
first
module
right,
everything
is
going
to
fall
into
place.
If
it's
just
not
very
good
approach.
The
prop
the
goal
of
prototype.
Doing
technical
prototyping
in
CAD
is
that
you
can
test
every
single
assumption
and
trust
me
when
I
say
that
those
kinds
of
assumptions
tend
to
backfire
like
I
made
a
few
like
it.
A
B
A
It's
not
a
well,
it
does
take
time.
Everything
takes
I
mean
any
any
any
cat
in
any
software
in
any
application
right.
So
the
time
is
more
into
the
figuring
out
where
things
go,
the
challenge
we're
doing
it
in
sweet
home
visit.
You
need
two
kinds
of
files,
one
that
are
technically
correct
and
others
that
are
technically
correct.
Only
once
assembled
I.
B
A
A
Okay
Blake
has
a
question
he's
asking
of
inkscape
in
blender
available
for
Windows
I'm,
pretty
sure
they
are
I
mean
actually
I'm
yeah.
Absolutely
yes,
yes,
they're
they're,
pretty
good
at
releasing
several
several
versions
or
four
different
platforms,
so
we
ruin
a
little
a
kind
of
late.
Any
more
questions,
I
mean,
that's
all
I'm
sure,
there's
a
lot
of
questions,
and
this
is
just
supposed
to
be
a
little
bit
of
an
intro,
but
both
of
these
topics
are
a
little
complex.
A
So
hopefully,
what
we'll
do
in
the
in
the
futures
like
will
hold
more
may
be
worth
groups
or
more
webinars,
where
we
all
work
together
and
instead
of
me
just
trying
to
dump
a
lot
of
information.
I
mean
you
still
need
to
have
this
introductory,
but
then
maybe
we'll
just
do
work
groups
where
we
just
try
and
do
something
together.
One
day,
yeah.