►
From YouTube: Seed Eco-Home Off-Grid Utilities
Description
Take a minute to subscribe to our email newsletter (updates, workshops, etc): http://bit.ly/1LtcM44
A
Okay,
welcome
hello.
Everybody
welcome
to
the
third
open
building
incision
art.
This
is
an
off-grid
utility
systems
for
the
seed
eco-home.
I'm
going
to
hide
myself
here
and
continue
going
so
open
building
institute
is
a
collaboration
between
the
hope
and
source
ecology,
open
building,
institute,
building
upon
the
hardware
machines
work
of
OSC,
with
an
application
to
off-grid
sustainable
housing
where
the
mission
of
open
building
Institute
the
mission
of
the
open
building
Institute
is
to
to
make
affordable
ecological
housing
widely
accessible.
A
So
that's
that's
the
name
of
the
game
here,
using
a
modular
construction
system,
building
upon
the
machines
of
OSC
and
building
upon
other
workshops
like
in
2015,
we
had
a
major
build
of
the
aquaponic
greenhouse
and
this
is
the
result
from
2016.
We
use
a
crowd
based
collaborative
method
where
a
large
team
of
people
swarms
on
a
build
in
parallel
to
to
accomplish
pretty
magnificent
seats
here.
A
This
is
a
house
of
12
of
actually
3g
about
1,300
square
feet,
those
built
in
a
period
of
five
days
and
the
greenhouse
here
was
built
in
another
in
another
five
days
as
well.
Now,
how
do
we
do
that?
We
first
come
up
with
a
plan.
This
is
our
very
basic
CD
go
home
concept
with
all
the
different
utilities
that
that
exist
on
the
CD
go
home,
so
starting
with
3000
watts
of
PD
panels.
A
A
We
also
have
hydronic
heating
subfloor,
that's
provided
by
the
hydronic
stove,
which
means
the
water
is
the
heat
exchange
medium
that
heats
the
house
rainwater
catchment
here.
We've
got
super
efficient
utilities
like
a
super
efficient
fridge,
which
is
a
top-loading
freezer
to
refrigerator
conversion
and
some
other
features.
So
that's
the
concept,
and
this
is
more
of
the
concept.
This
is
the
overhead
view
of
what
you've
seen
in
this
picture
here.
The
floor
plan
is
like
this,
so
how
do
we
do
the
water,
electricity
and
other
utilities?
A
Let's
start
with
the
water,
so
the
way
we're
approaching
the
utility
systems
arkham
pretty
much,
putting
all
the
utilities
except,
of
course,
the
PV,
which
is
on
the
roof
into
the
utility
room.
So
all
are
all
our
water
and
bio
digester.
Waste
systems
are
kind
of
pumping
through
there
and
essentially
located
to
concede
the
kitchen
and
baths.
As
you
see,
the
the
water
utilities
are
pretty
much
centered
around
one
side
of
the
house
where,
because
the
kitchen
is
there,
it's
close
to
the
utility
room
so
we're
not
running
pipes
or
electricity
all
over
the
place.
A
A
lot
of
that
is
centered
around
11
side
of
the
house,
so
we
have
a
3600
gallon
tilapia
pond.
You
might
have
seen
in
some
of
the
previous
webinars.
We
have
a
30,000
gallons
surface
pond
that
provides
the
water.
We
have
rainwater
catchment
from
the
roof,
so
the
sources
here
are
one
water
line
going
into
the
cistern
and
the
utility
room,
followed
by
rain
water
purification,
surface
water
purification
to
potable
up
to
actually
a
an
ozonator,
which
is
the
last
step
of
the
system.
A
The
bath
bathroom
waits
in
the
kitchen
ways
to
go
to
a
biodigester
which
is
right
here,
which
then
creates
gas
for
the
cooking
and
the
effluent.
The
fertilizer
from
that
goes
into
the
gray
water
drain.
We're
actually
also
collecting
urine
and
grain
water
effluent
soaks
back
into
the
ground.
That's
the
basic
basic
system,
the
bio
digester
bag
is
actually
outside
of
the
utility
room
and,
as
you
can
imagine,
for
the
risks
of
explosion,
there's
any
leak
that
gasps
safely
leaks
to
not
in
the
house
but
outside
the
house.
So
that's
a
safety
feature
right
there.
A
So,
let's
start
with
the
water,
the
roof,
roof
top
catches,
800
gallons,
because
of
all
the
surface
area
that
we
have
per
inch
of
rainfall.
So
that's
that's,
not
bad,
and
then
we
have
the
30
thousand
gallon
pond
water
from
the
pond.
They
both
go
into
our
utility
room,
which
is
back
there.
Now.
If
we
talk
about
the
roof
water,
we
have
two
long
gutters
and
they
go
through
a
first
flush
filter.
It's
a
it's
a
rain
water
diverter
which
flushes
the
first
part.
A
Now
the
dirty
water,
like
all
the
dust
and
bugs
whatever
you
have
that
gets
trapped.
It's
simply
a
a
chamber
that
gets
closed
off
once
it
gets
filled
up
and
the
rest
of
the
water
goes
where
it
should
to
the
utility
room.
So
here's
the
the
beginning
of
the
big
water
system-
storage
like,
for
example,
if
it
doesn't
rain
for
a
month
or
so
we
have
a
30
thousand
gallon
pit
here.
This
is
after
the
excavation
this
took
one
day
to
excavate
a
pond.
A
That's
that's
about
30,000,
gallons
and
we're
looking
actually
from
within
that
pond
right
now,
and
it
took
another
day
to
dig
all
the
trenches,
the
the
wastewater
trench,
the
water
feed
feed
line
to
the
to
the
house,
and
now
this
is
what
it
looks
like
after
a
minor
rain.
This
is
in
the
middle
of
winter.
A
Here
we
have,
you
can
see
the
power
lines
that
are
used
for
the
two
pumps
that
are
in
the
pond,
where
a
lot
of
the
pump,
the
pumping
in
the
pond
is
going
to
be
solar
with
also
electricity
from
our
grid
is
needed
and
there's
two
lines.
One
is
a
thinner
line
for
the
cistern
and
another
one
is
for
the
greaseproof
hydrant.
We
have
a
free
proof
Hydrans,
which
is
simply
a
hydrant
that
you
can
use
and
it
would,
in
a
winter,
doesn't
freeze
it's
below
the
frost
line.
A
It
has
a
little
weak
hole
at
the
bottom,
where,
after
you
turn
it
off
the
water
drains
down,
so
it
doesn't
freeze
in
the
middle
of
the
freezes
of
winter.
Here,
that's
the
installation
right
in
front
of
the
greenhouse
here's
a
little
bit
about
the
diverter.
You
need
about
10
to
50,
gallons
per
thousand
square
feet
of
roof
area.
The
way
it
works
is
the
dirty
water
comes
in
into
the
chamber.
It
lifts
a
ball
that
none
closes
the
chamber
hole
and
then
the
clean
water
keeps
flowing
into
we're
into
your
clean
water
container.
A
We
thought
about
using
an
8-inch
PVC
pipe
we're
looking
at
at
exactly
that.
It
turns
out.
Eight
inch
is
quite
effective,
18
gallons
per
seven
foot
sections,
so
we're
going
to
get
a
20-foot
section
and
actually
bend
it
around
either
that
or
six
inch
PVC,
depending
on
the
cost.
That
turns
out
that
either
eight
inch
or
six
inches
quite
affordable
to
do
this.
A
If
we
want
to
get,
we
will
trap
about
what
is
it
like,
30
or
50
gallons,
which
makes
that
10
to
50
gallon
matter
4,000
square
feet
as
minimum
like
12
hour
minimum
would
be
12
gallons
from
the
surface
area
of
the
roof
here,
so
six
inch
PVC
pipe
can
get
you
to
do
that.
So
then
you
go
to
the
utility
room.
That's
so
once
again,
an
overhead
here.
This
utility
room
looks
like
this.
That's
the
compressed
earth
block
floor,
sealed
with
some
stone.
A
A
The
rain
water
cistern
is
here
on
the
left
to
totes
IBC,
totes,
275
gallons,
each
so
about
two
cubic
metres
storage
of
water,
about
500,
gallons
or
so,
or
about
2,000
liters
and
then
for
cisterns
for
the
bio
digester.
So
the
idea
here
is
the
bio
digesters
inside,
because
the
vaio
digester
means
warmth
in
the
winter
that
needs
to
be
95
or
100
degrees,
fahrenheit
for
optimal
efficiency.
A
So
that's
inside
we're
trying
to
build
a
system,
that's
practical
for
an
average
home
or
your
call,
the
so
called
eco
home
that
can
be
replicated
widely
around
the
world.
Ibc
totes.
Allow
you
to
do
that.
Putting
it
on
inside
allows
you
to
address
the
freezing
temperatures
in
the
winter,
which
is
one
of
the
main
reasons
why
bio
digesters
may
not
be
so
popular
in
a
temperate
zone
as
much
as
in
the
tropics.
So
let's
talk
about
the
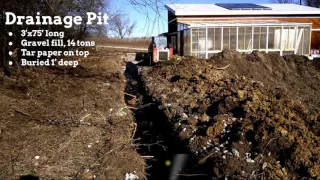
drainage.
A
So
after
you've
got
water
usage
from
the
sink
bathroom
kitchen,
you
have
overflow
to
this
gray
water
drain
a
long
pit-
and
this
is
what
it
looks
like
right
after
digging,
which
is
then
back
filled
with
gravel
about
14
tons
of
gravel.
But
the
idea
here
is:
we've
got
a
33
inch
pipe
for
gray,
water
and
bio
digester
effluent,
so
that's
essentially
fertilizer
with
a
clean-out,
so
that's
three
inch
and
then
draining
into
perforated
six
inch,
drainage
pipes,
which
I've
got
holes
and
that
reaches
out
over
75
feet
of
this.
A
This
3-foot
wide
trench
now
we're
also
collecting
gold
water
here.
So
that's
actually
our
urine
collection
system,
where
we
have
a
55-gallon
drum
a
pipe
from
the
separating
toilet
in
the
bathroom,
and
that
is
still
being
installed.
We're
working
on
that
so
that
you
can
store
all
this
fertilizer
for
agricultural
use.
What
you
would
do
is
pump
it
out
with
a
with
a
pump
sprayer
system
and
go
around
the
fields
like,
for
example,
polyculture
of
hazelnuts
and
chestnuts.
That
would
be
perfect
fertilizer
for
for
us
for
various
agricultural
operations.
A
First
in
the
world
people,
you
heard
it
here.
First,
we
don't
know
if
anybody
else
is
doing
that
in
our
so-called
our
kind
of
a
as
a
actual
real
utility,
that's
installed
integral
into
the
home.
It's
going
to
be
mainstreamed
in
a
few
years,
just
kidding
okay,
drainage
pit.
This
is
what
it
looks
like.
It's
got,
tar
paper
over
the
top
of
it,
so
that
the
soil
does
not
clog
up
the
holes
with
the
maghreb.
A
A
Like
the
pressure
tank,
the
good
thing
about
a
pressure
tank
is
while
this
pump
can
be
very
tiny
and
in
fact,
right
now
we're
using
a
one
gallon
per
minute
pump,
which
would
be
really
insufficient
for
a
lot
of
household
water
use.
Well
we're
using
a
pressure
tank
such
that
you
can
have
a
real,
powerful
spigot
coming
out
of
that
as
the
water
gets
pressurized
in
this.
In
this
44
gallon
pressurized
water
tank
now,
the
steps
here
in
a
typical,
Earthship
style
filter
include
a
500
mesh
filter
which
is
a
settling
filter.
A
Basically,
you
collect
the
debris
and
drain
it
once
in
a
while,
followed
by
a
thousand
mesh
filter,
followed
by
one
of
the
last
steps.
There
is
a
ceramic
filter
which
filters
down
to
one
micron,
which
gets
you
a
lot
of
the
microbes
and
bacteria
filtered
out,
but
we
have
a
step
after
that
which
is
an
ozonator
actually,
so
after
we
get
the
ceramics
go
through
the
ceramic
filter,
we
go
through
an
ozonator
and
we
have
a
little
design
of
an
open-source
ozonator
right
here
that
we'll
talk
about
before
going
into
this
earthship
style
filter.
A
We
have
a
sense
which
is
we're
pumping
from
the
the
pond
itself.
We
settle
out
a
lot
of
the
solids
here.
It's
the
general
word
on
sand
filters
is
that
gets
you
down
to
twenty
to
a
hundred
microns
in
terms
of
mesh
size.
Now,
I've
also
been
looking
at
some
of
this,
that
they
say
that
zeolites
and
so
other
filter
media,
more
fine
sand
or
more
high
performance
and
get
you
down
to
five
micron
or
glass,
so
read
about
glass
sand
filters
and
which
can
go
down
to
as
little
as
three
microns.
A
So
we're
going
to
explore
with
this.
How?
How
pure
do
we
have
the
water
after
the
sand
filter,
which
is
a
good
idea,
because
it's
actually
back
flushable
it
never
clogs
up.
You
can
back
flush
it
so
that
the
fan
filter
medium
in
there
is
used
for
life.
So
we
like
that
from
a
lifetime
design
perspective.
Now
here
we
have.
This
is
actual
parts
that
we
both
we
actually
bought.
These
in
this
document
will
be
online.
You
can
download
the
document
and
you
can
actually
click
on
the
links
here.
A
If
you
see
that
there's
a
link
there
that
takes
you,
for
example,
to
the
source
of
that
sand,
master
soft
side
above
ground
pool
sand,
filter
system,
etc.
So
all
these
parts
are
hyperlinked,
so
the
first
filter
is
at
500
mesh,
27
micron,
the
next
one
that
we're
using
is
a
thousand
mesh
or
13
microns
we're
also
using
a
couple
more
there's,
a
carbon
filter
in
the
system
and
a
ceramic
filter
at
the
end.
A
These
are
what
are
these
if
you
click
on
them,
their
carbon
block
filters
to
get
you
a
lot
of
the
chemicals
and
smells
out
of
the
water
we're
looking
at
using
two
of
those
and
more
and
more
so.
This
is
basically
we're
making
a
modular
filter
assembly
where
we
can
add
more
filters,
as
we
like,
depending
on
the
purity
of
the
water,
because
we're
really
experimenting
here.
All
of
our
work
is
experimental
to
push
the
limits,
and
if
we
find
that
the
system
doesn't
work,
we
can
hack
it.
We
can
perhaps
add
another
sand
filter.
A
One
thing
I
was
thinking
about
is
maybe
we
could
have
another
large.
This
one
is
about
five
gallons
volume.
We're
so
add
another
one
with
with
charcoal
medium
activated,
charcoal
medium
to
get
you
further
purification,
so
we're
going
to
explore,
which
really
works
so
that
we
can
get
to
the
final
step,
which
is
also
nation.
So
you
can
do
yourself
a
buy
yourself.
A
very
low
cost
of
the
major
system
can
get
one
for
under
100
bucks.
You
can
make
one
yourself
even
easier.
A
A
A
$14
air
pump
go
through
pump
that
air
through
the
ozonator
and
then
go
through
a
check
valve
into
your
clear
PVC
in
your
water
system
to
feed
that
gas
into
the
water
and
the
check
valve
is
used
so
that
you
don't
have
water
back
feeding
into
the
ozonator,
which
would
short
circuit
that
you
try
it.
So,
let's
talk
about
next
about
so
we
talked
about
purification.
Let's
talk
about
bio,
the
adjusters!
A
But
the
the
promise
is
actually
quite
grand
in
a
sense
that
Ted
leaders
of
mixed
organic
waste
can
get
you
up
to
1000
liters
for
24
hours
of
time
in
one
cubic
meter
of
space,
in
other
words
one
of
the
IBC
totes,
the
International
built
shipping,
those
containers
they
produce
their
own
volumes
and
gas.
If
you
let
them
if
you
have
ideal
conditions
of
the
right
temperature
and
right
feedstock,
so
that's
what
we're
aiming
for
now,
a
thousand
liters
gets
you
two
to
five
hours
of
cooking
time
per
day.
A
Now,
that's
enough
for
a
family,
or
you
can
even
run
a
1
kilowatt
generator
for
one
hour
per
day.
Now,
that's
pretty
outstanding,
so
it
pays
will
pay
back
if
we
can
get
the
system
to
work
out.
Now,
that's
a
theoretic
theoretical
optimum
from
a
1
cubic
meter
system.
Now
we
have
a
4
cubic
meter
system
because
we
want
to
be
robust
and
resilient
and
build
the
system
modularly.
So
if
one
part
fails,
we
can
use
another
container
and
so
forth.
So
our
basic
concept
designed
for
the
bio
digester.
A
Now,
unlike
the
solar
cities,
we
are
after
absolute
automation.
So
that
means
you
flush,
the
toilet.
You
run
the
insinkerator
or
macerator
pump
under
the
sink.
What
we're
using
is
macerator
lift
pumps
under
the
sink
and
under
the
toilet
that
then
feed
the
that's
the
inlet
that
that's
what
feeds
the
digester
through
a
check
valve.
So
you
don't
have
a
backup
that
goes
inside
the
digester
inside
the
digester.
A
We
have
a
little
pump,
basically
a
trash
pump
and
agitation
pump,
which
pumps
through
the
system
in
a
circle
and
agitates
the
solids
and
liquids
with
in
there.
You
also
need
heat,
and
this
is
where
hydronic
stove
comes
in.
So
having
hydronics
and
one
half
inch,
one
half
inch
pex
tubing
we're
sending
that
into
the
digester
to
heat
the
system,
with
the
goal
of
keeping
it
at
90
degrees
or
a
hundred
degrees.
A
All
year
round,
we're
going
to
insulate
the
totes
also
so
around
these
totes
will
put
styrofoam
insulation
to
keep
the
heat
in
and
so
forth.
This
is
the
basic
diagram.
There's
a
gas
outlet
to
the
gas
back,
so
I
mentioned
about
the
gas
bag.
I'll
go
back
here.
The
gas
bag
looks
like
this.
That's
an
actual
picture
of
that.
It's
a
big
three
cubic
meters
come
back.
A
It
has
a
fitting
with
a
barb
on
it
for
Inlet
and
after
for
the
digester,
so
that
by
the
digester
is
right
here.
In
this
diagram,
we
go
through
a
hydrogen
sulfide
scrubber,
which
is
a
household
filter,
filled
with
steel
wool
that
will
degrade
in
the
presence
of
hydrogen
sulfide.
So
some
hydrogen
sulfide
will
be
produced
in
a
robust
system.
If
you're
feeding
that
everything
that
system
everything
you're
going
to
need
to
clean
some
of
the
hydrogen
sulfide,
which
is
a
foul-smelling
gap,
the
corrodes
metal,
so
you
want
to
get
rid
of
that.
A
It's
also,
but,
however,
it's
a
you
might
not
want
to
get
rid
of
all
of
that,
because
it
provides
a
smell
so
that
you
know
when
the
gas
is
on.
In
the
house,
or
if
you
have
a
leak
just
like
in
regular
gas
appliances,
they
add
an
odor
to
the
gas.
The
gas
is
pretty
odors,
they
actually
add
an
odor
to
the
gas,
so
you
smell
when
there's
a
gas
leak.
A
So
we
have
that
by
default
here,
so
we're
going
through
some
some
clear
vinyl
tubing
into
the
digester
bag
and
the
digester
bag
will
be
in
a
treated
to
buy
for
wood
frame
with
one
quarter-inch
hardware
cloth
around
that
so
that
you
don't
get
Rodin's
chewing
up
your
gas
bag,
we're
going
to
put
a
weight,
such
as
a
2
by
12
or
something
or
piece
of
lumber,
on
top
of
the
gas
back
to
provide
the
pressure
to
empty
the
bag.
Once
gas
is
produced
in
there
so
that
gas
then
goes
back
through
the
system.
A
Before
you
go
to
the
stove
in
the
house,
we
will
go
through
another
steel
wool
filter
for
hydrogen
scrubbing
and
we're
also
going
to
put
in
clear
vinyl
manometer
to
basically
to
show
the
pressure
manometer
tube.
That
shows
the
pressure
that
you
have
so
in
this
system,
because
we
have
heating,
we've
got
automatic
feed
every
time,
the
the
toilet
or
the
sink
is
flushed.
We
have
an
automatic
agitation,
pretty
much
automatic
gas
collection.
A
This
system
runs
by
itself
the
effluent,
which
is
actually
tapped,
not
all
from
the
top
actually
a
little
bit
below
you
want
to
leave
the
top
surface,
which
probably
is
going
to
have
a
lot
of
grease
in
it.
You
want
to
leave
that
intact,
I
believe
because
Greece
as
far
as
the
numbers,
it's
by
far
the
highest
producer
of
biogas,
when
Greece
decomposes,
you
get
a
very
high
percentage
of
biogas.
That
comes
off
it.
So
you
don't
want
to
drain
that
into
your
into
your
system
into
your
gravel
pit.
A
You
want
to
keep
that
in
the
bio
digester
until
it
basically
turns
to
your
gas
and
carbon
dioxide,
so
we
have
a
means
to
to
flush
the
system
out
by
gravity
using
the
gravity
just
turning
the
valves
here
or
by
the
pump.
If
we
open
the
valve
to
the
exit.
This
is
an
outlet
for
forced
pump
out
or
by
gravity.
Ok.
Moving
on
here,
so
let's
talk
about
the
stove
here.
A
A
We
go
through
a
three-port
diverting
valve
and
into
our
appliance,
which
is
just
the
regular
appliance
you
don't
have
to
hack
the
appliance
just
need
to
connect
to,
and
here's
a
little
more
about,
the
manometer,
just
an
indicator
for
the
amount
gas
pressure
that
you
have.
So,
let's
move
on
to
the
hot
water
system,
which
is
which
is
based
around
the
hydronic
stove
with
heat
exchangers.
So
the
heat
exchanger
is
is
this.
So
this
is
a
picture
of
our
stove
in
it.
You
have
a
pipe
based
heat
exchanger.
A
The
heart
of
the
system
is
the
hydronic
stove
one-inch
pipe
heat
exchanger
with
water,
inlet
and
outlet,
so
so
cold
water
comes
in
one
side
and
hot
water
leaves
out
the
other
after
it
meanders
through
the
heat
heat
box
in
the
hot
flame.
So
this
is
our
open
source,
hydronic
stove
about
five
hundred
dollars
in
materials,
including
the
heat
exchanger.
So
that's
ridiculously
low
cost,
especially
because
the
nearest
competitor
will
cost
about
five
thousand
dollars
for
a
water
jacket
at
stove.
A
In
our
stove
we
have
a
nice
seal
gasket
or
so
you
keep
this
the
smoke
out.
It's
a
modular
design
where
the
heat
exchange
is
actually
a
separate
part
on
top
of
the
burn
chamber
and
the
bottom
piece.
The
ashtray
is
actually
a
separate
component
as
well.
So
that's
the
heart
of
the
heating
system,
all
open
source
and
connect
connected
to
the
open
source
hydronic
control
panel.
Now
this
stove,
what's
unique
about,
is
actually
a
dual
fuel
stove,
meaning
that
you
can
add
either
a
regular
fan
or
a
pellet
burner
module
to
it.
A
A
This
chute
ending
up
in
this
fire
chamber
and
air
will
be
coming
in
through
the
annular
surface
in
between
the
two
pipes,
so
air
will
be
coming
from
the
bottom
through
these
little
holes,
and
this
is
a
great
and
either
we
run
on
wood
or
we
just
just
lumber
just
firewood,
or
we
attach
this
this
pellet
burner,
which
can
be
controlled
automatically
for
on-demand
operation
or
automatic
operation.
Now
then,
we
connect
to
the
open-source
hydronic
panel.
If
you,
google,
that
we
are
known
for
developing
this,
it's
a
basic
system,
but
it
what's.
A
What
we
have
is
an
actually
fully
documented
version
with
all
the
bill
of
materials,
you
can
see
the
documentation
on
the
wiki.
We
started
with
this
kind
of
a
system
and
then
actually
simplified
it
in
the
next
iteration,
because
we
didn't
need
some
of
the
parts
like,
for
example,
because
we're
not
using
a
big
water
jacket
on
the
stove,
we're
just
using
half
inch
tubing
throughout.
We
find
that,
if
you
do
some
calculations,
you
see
that
the
tubing
expands
a
little
bit
and
just
enough
to
meet
the
thermal
expansion
of
water.
A
So
you
don't
need
a
pressure
expansion
tank.
We
also
instead
of
air
purge
valve.
We
have
a
very
simple
on/off
valve
and
instead
of
this,
this
a
mixing
valve
here
all
these,
which
components
cost
about
a
hundred
bucks,
each
we're
eliminating
that
you
can
see
the
details
on
the
wiki,
the
the
water
from
the
stove
comes
in
here
and
there.
This
is
our
2014
version
a
couple
of
well.
This
is
the
hydronic
control
panel
from
2014.
A
This
is
what
we
did
in
2015
and
we're
building
up
a
version,
much
similar
to
this
for
this
year
with
a
basic,
very
basic
system,
so
going
back
to
the
overview
of
the
hot
water
system.
There's
a
couple
of
nice
treats
in
there
as
well
there's
up
we're
going
to
put
also
a
hot
water
heater,
a
simple
heater,
just
like
everybody
uses
fueled
by
gas
or
electricity,
we're
just
going
to
put
that
on
top
of
the
stove.
A
So
we
don't
have
to
use
electricity
or
gas
to
heat
it,
which
is
going
to
get
the
heat
from
the
stove,
and
that
will
get
you
hot
water
in
a
winter,
but
also
we
have
an
on-demand
water
heater
which
in
a
winter
we
won't
have
to
use
because
we
have
hot
water
from
the
hot
water
heater
on
the
stove.
But
in
the
summer
of
the
stove
is
off.
We
will
use
the
on-demand
heater
here
and
then
eventually
develop
our
own
open-source,
on-demand
heater,
which
would
run
on
charcoal,
which
is
a
very
robust
fuel.
A
So
from
the
hot
water
heater
we
go
to
the
hot
water,
hot
hydraulic
control
panel
we
go
to.
One
of
the
avenues
for
the
hydraulic
system
is
the
bio,
digester
heating
and
the
rest
goes
to
the
house
heating
system.
So
two
major
parts,
the
household
under
the
floor,
hydronic
heating,
which
is
I'll
show
later
or
the
biodigester,
would
like
I
talked
about
which
needs
to
be
kept
at
a
high
temperature.
A
Those
are
two
separate
system
systems
now
here
too,
drawn
a
little
bit
and
accurately,
but
idea
is
that
the
heat
exchanger
water?
You
want
to
not
be
putting
oxygenated
water
into
the
heat
exchanger
or
it
will
rot
your
pipes
right
out
your
pipes
after
sometime.
So
what
you
want
to
do
is
have
that
as
a
closed
system,
so
that
oxygen,
oxidation
of
the
metal
pipes
is
minimized.
That's
why
typically
people
don't
want
to
have
a
heat
exchanger?
A
That's
also
feeding
water
to
the
house,
because
you'd
constantly
be
getting
water
with
oxygen
and
the
tubes
under
the
floor.
They're
called
actually
oxygen
barrier
pecs,
and
that
refers
to
the
fact
that
a
day
they
don't
allow
oxygen
to
go
through
those
pipes.
They
also
have
other
types
of
texts,
pipes
which
do
allow
some
oxygen
to
go
through
the
walls
of
those
pipes.
Okay.
Now
the
very
unique
thing
is
that
we
also
have
a
thermoelectric
unit
right,
I'm,
a
heat
exchanger.
So
on
top
of
the
stove,
we
are
laying
a
thermoelectric
generator.
A
I'll
show
that
which
traps
some
of
the
excess
heat
from
the
stove
and
converts
that
into
electricity,
and
that's
heated
convectively
by
water
from
the
well.
It's
actually
right
on
a
stove,
it's
not
even
convection.
It's
laying
right
on
the
stove
to
get
the
hot
side.
It
has
to
be
cooled
on
the
other
side
to
get
a
thermal
gradient,
and
that's
actually
pond
water
that
we're
sending
through
that.
That
will
actually,
once
it
flows
back
into
the
pond,
it
gets
warmed
up
a
little
bit.
A
So
we're
doing
multiple
things
there
I
want
so
I
talked
about
the
hydraulic
control
panel.
This
is
the
actual
hydraulic
tubing,
as
was
laid
under
the
floor
and
we're
also
using
a
hillbilly
heater.
What
we
call,
which
is
basically
solar,
gain
inside
the
greenhouse
this
system.
We
are
connecting
to
a
heat
exchanger,
basically
a
blower
fan
and
a
heater
like
radiators
in
a
car
which
will
blow
hot
water.
A
Well,
the
water
flows
through
the
heat
exchanger,
the
air,
the
air
fan
blows
air
through
the
heat
exchanger
to
heat
up
your
house
now
in
the
former
version
of
the
greenhouse,
which
is
the
2014
build
of
the
of
the
home
and
the
2015
build
of
the
greenhouse
that
there's
issues,
definitely
on
moisture
and
air,
because
the
greenhouse
is
very
humid
so
there's
times
during
the
year
like
in
the
spring
and
fall
where
the
greenhouse
is
really
humid
and
it
humidifies
your
entire
house.
So
you
want
to
separate
the
you.
A
Don't
want
to
be
blowing
that
air
directly
into
your
house.
It
works
quite
well
during
dry
times,
like
maybe
the
heat
of
the
summer,
where
you
don't
need
the
heat
or
like
the
dead
of
winter,
where
the
air
is
relatively
dryer,
that
air
in
the
house
is
relatively
dry,
so
moist
air
is
actually
useful,
but
in
general
we
want
to
isolate
the
greenhouse
air
from
the
house
there.
A
A
One
of
the
hot
pipe
one
pipe
is
going
to
rest
on
the
stove,
the
other
one
will
have
cold
water
pumped
through
it
from
the
pond
and
there's
thermoelectric
little
generator
modules
that
produce
electricity,
and
our
goal
is
to
produce
a
hundred
watts
for
nighttime
power
usage
when
the
PV
is
not
an
operation.
So
the
separating
toilet
is
a
mystery
here.
We
still
haven't
installed
it,
but
what
we're
doing
for
the
separating
toilet
is.
This
is
actual
pedestal
for
it.
A
What
we're
doing
is
simply
taking
a
stove
and
a
diamond
drill
bit
and
poking
a
hole
at
the
front
of
the
toilet
for
the
urine,
and
then
the
the
solid
waste
will
go
down
the
back
like
normal,
but
we're
hacking,
a
regular
toilet
and
then
3d
printing,
a
urine
catcher
that
will
/
catch
the
urine
that
goes
out
through
a
little
hole
at
the
front
of
the
of
the
toilet.
So
that's
our
idea
for
what
we
will
do
this
that's
currently
in
the
works
here,
we're
seeing
what
the
actual
macerator
lift
pump
looks
like.
A
So
here's
the
where
the
toilet
says
this
is
3-inch
pipe
like
standard
plumbing
under
a
toilet,
but
instead
of
going
down
down
the
drain
notice,
this
is
not
going
down
further
PVC.
This
is
getting
pumped
out
through
an
one
inch
outlet
and
goes
up
against
gravity
and
into
the
biodigester
system
in
the
next
room.
A
So
it's
actively
pumped
from
the
toilet
and
the
same
pump
like
this
will
be
under
the
sink
macerating
food
waste
from
the
sink
and
we're
sitting
the
toilet
on
a
frame
on
a
pedestal,
we're
doing
the
same
for
the
shower
such
that
these
units,
according
to
our
modular
building,
as
can
be
built
in
parallel
as
we're
turning
these
into
modules,
as
opposed
to
like
monolithic
built
in
place
things.
So
that's
part
of
our
modular
design,
which
allows
a
large
crew
of
people
to
work
in
parallel.
So
next
item
is
the
super
efficient
refrigerator.
A
That's
we're
proud
of
that.
Thanks
dark
mo
for
doing
this,
but
we
this
is
an
open
source
design.
It's
fully
documented.
It
comes
from
a
project
called
mount
best,
and
this
is
a
replica
of
that.
This
is
the
mount
best
freezer
to
a
refrigerator
conversion.
All
you're
doing
is
you're
taking
a
regular
chest,
freezer,
which
is
a
which
is
a
really
well
insulated
body,
as
well
as
the
door
opens
up
so
that
when
you,
whenever
you
open
it
all
the
cold,
doesn't
leak
out.
A
So
using
this,
the
system
where
what
you're
doing
is
you're
instead
of
letting
the
fridge
the
freezer
run
the
whole
time
you
just
time
the
the
pump
in
there,
the
compressor,
the
freezing
compressor
there,
you
cycle
it
on
and
off,
so
that
it's
on
only
a
part
of
the
time.
Therefore,
it
retains
a
temperature,
not
freezing,
but
above
freezing,
which
is
done
by
a
little
controller.
So
that's
a
little
Arduino
in
here,
a
little
brain
that
measures
the
temperature
inside
the
freezer
and
when
it
gets
to
keep
it
within
a
certain
temperature
range.
A
So
there's
a
probe
that
goes
into
the
freezer
inside
the
body
of
the
chest,
freezer
to
measure
the
temperature
very
nice
elegant
system,
like
this
whole
thing
and
the
parts,
including
Arduino
you
can
build
for
under
fifty
dollars.
So
it's
really
excellent
and
you
can
solder
that
by
hand.
So
actually
we've
got
the
plans
for
this.
We
encourage
you
to
copy
that
it
works
excellent
and
ideas.
Now
you
can
turning
the
power
from
an
average
of
a
hundred
watts
consumption
for
an
average
refrigerator
to
about
8
watts,
average
power
12
times
less
energy
usage.
A
That's
a
major
savings
if
you're
ever
considering
going
off
the
grid
and
living
with
a
minimum
energy
budget
or
trying
to
live
from
the
solar
solar
collection
during
the
day,
because
in
principle,
if
you
don't
open
this
up
at
night-
or
you
have
a
lot
of
say
ice
in,
there
are
a
lot
of
massive
well,
not
ice,
but
the
masses
that
refrigerator
is
filled.
It
can
probably
keep
its
cool
throughout
the
whole
nights.
We
might
not
even
need
to
run
it
at
all
during
the
night,
so
yeah,
maybe
a
little
more
about
the
utility
system.
A
Well,
is
this
part
of
our
utilities,
while
it
feeds
us
that
the
aquaponic
greenhouse
from
the
20,
what
is
it
2014-2015
build?
That's
the
2015
build
the
food
is
what
feeds
smm
goes
into
the
digester
and
so
forth.
So
this
this
is
going
to
convert
some
into
gas.
It's
part
of
our
bilities
and
also
food
for
the
humans.
This
is
actual
pictures
of
the
hydronic
control
panel
control
panel
for
acqua
Pazza
is
going
to
be
another
webinar
coming
up
next
month
about
the
hall
automation
of
the
house,
including
how
we're
watering
all
the
plants.
A
How
we're
making
all
the
systems
here
work
together
off
of
the
grid
automated
like?
We
don't
want
to
be
messing
with
the
watering
sequence
for
the
greenhouse.
We
want
our
stove
hydronic
stove
to
turn
on
automatically
and
everything
to
be
automatic
so
that
this
is
a
system
that
runs
by
itself
as
opposed
to
have
requiring
a
lot
of
maintenance.
So
here,
let's
take
you
to
the
open
source
pv
system
that
that's,
where
they'll
be
source
pv
system
as
well.
I
haven't
covered
the
TV
system,
yet
that's
one
of
the
last
things
here.
A
So
if
you
look
at
the
page
on
the
wiki
open
source
pv
system,
we
install
3000
watts
of
power
that
was
during
the
install.
We
mounted
the
frames
on
individual
rails,
like
you
see,
see
here
with
little
angle
brackets
welded
to
to
angle
frame.
So
each
of
these
panels
had
these
these
metal
frames
attached
to
them
and
then
see
we
built
all
of
that
in
the
workshop,
and
then
we
simply
carried
all
the
panels
up
there
and
just
screw
the
man
into
those
for
wood
beams
there
cedar
beams
on
the
on
the
roof.
A
So
we
did
all
the
wire
well,
not
the
wiring,
but
some
wiring
and
the
framing
of
the
panels
which
come
with
this
aluminum
frame.
We
put
the
the
structural
frame
around
them
so
that
we
can
simply
attach
them
on
the
roof.
So
that
knows
very
much
turnkey
and
as
far
as
the
PV
tap
panel,
we
hadn't
we
run
off
grid
power
tools
on
that
already
it
works
great
we're
minimizing
the
way
we're
designing
this
is
that
we're
using
only
so
if
you
go
into
maybe
this
document
I
can
show
some
of
the
system.
A
I
mean
the
system
consists
of
your
pv
panels.
You've
got
a
charge
controller,
which
is
a
maximum
power
point
tracking
charge
controller.
Let's
enter,
we
actually
have
three
of
those.
We
have
a
regular
breaker
box
that
operates
from
after
you
charge.
We
have
batteries
in
here,
eight
simply:
eight
motorcycle
batteries.
That's
really
minimal.
It's
about
a
hundred
sixty
dollars
worth
of
batteries,
not
a
lot.
They
are.
A
So
whenever
possible,
we
want
to
avoid
that
and
run
loads
during
the
day
like,
for
example,
pumping
the
entire
water
storage
system
during
the
day
as
many
loads,
all
the
pumps
and
the
aquaponics
fans
anything
possible
during
the
day,
so
that
we
should
have
everything
everything
off
at
night
time
as
much
as
possible.
But
the
figure
that
we're
working
with
is
how
much
energy
do
you
really
need
to
survive
and
thrive?
A
I'll
go
now,
I'll
tell
you
about
it,
but
I
just
want
to
tell
you
one
more
thing
here
that
these
these
PD
panels
they
cost
see
where
there's
a
cost
graph
here
so
here,
I
show
everything
about
a
standard.
Racking
system
would
actually
the
point
about
a
standard
racking
system,
so
we
just
hacked
it
by
using
lumber
on
top
of
the
roof,
which
was
very
easy
to
do,
but
the
professional
way
to
do
that
is
more
than
doubles.
The
cost
of
the
PV
itself,
these
racks
and
the
professional
unirac
speak.
A
They
would
be
about
sixteen
hundred
dollars
plus
shipping,
whereas
the
solar
panels
themselves
they're
about
1840.
So
a
pack
of
12
of
these
solar
panels
about
280
watts
each
cost
us
1840,
we
had
a
look.
We
did
this
low-cost
racking
system
as
I'm
describing
here
you
can
look
up
all
the
details
on
the
wiki,
with
what
we
did
for
the
fasteners
and
washers
whole
plan
is
here
now:
let's
talk
about
the
loads,
so
so
very
I
mean
look
at
this
very
inexpensive
for
so
1840
plus
the
control
panel.
A
You
get
yourself
3,000
watts
of
off-grid
power
and
also
such
that
I
mean
the
inverters
are
extremely
affordable
right
now
you
can
get
split
phase
2
4120
inverters
for
like,
like
500
bucks
or
four
hundred
bucks,
for
like
eight
kilowatts,
which
is
amazing.
So
actually
what
we're
doing
is
getting
one
of
those
inverters
and
so
that
when
we
do
future
builds
around
the
scene
eco-home
because
we're
going
to
add
to
it
create
workshops
around
it.
A
Typically,
the
systems
are
designed
to
to
go
through
the
charge
cycle
and
through
batteries
through
inverters,
but
nonetheless
we're
trying
to
hack
it
how
we
can
have
as
many
loads
go
directly
from
the
panel's,
essentially
by
having
a
large
number
of
multiple
loads
connecting
one
or
two
of
them
each
per
panel.
So
that's
why
we
have
this
very
funky.
A
So
we
can
tap
all
the
loads
in
a
very,
very
flexible
way,
so
we
can
optimize
this
system
for
the
efficiency
of
running,
mostly
throughout
the
day,
without
going
through
the
charging
discharging
cycle
of
batteries
going
directly
from
the
PV
panels.
Now,
to
do
that,
we
have
to
understand
our
loads
very
much.
So
we've
got
a
collaboration
with
Michigan
Tech
University
there's
a
fellow
grad
student
who's
actually
doing
an
open
source
power
meter
which
measures
the
voltage
and
current,
in
other
words
power
at
all
the
different
loads
that
we
have
here.
A
So
we're
actually
going
to
install
that
it's
currently
work
in
progress,
we're
going
to
install
that
right
on
our
control
panel,
so
that
we
know
exactly
when
the
power
comes
in
when
it
comes
cuts
out
like
when
the
batteries
when
the
PD
panels
start
producing
power
during
the
day.
So
we're
going
to
log
that
and
graph
it.
So
we
understand
our
load
usage
exactly.
Therefore,
we
can
optimize
this
and
provide
a
very
low
cost
system.
That's
designed
for
flexibility.
A
We
have
number
nine
more
webinars
after
this
one,
so
stay
tuned,
but
yeah.
We
were
very
proud
of
this
build
and
we
look
forward
to
the
next
I
mean
this
year.
If
you're
interested
in
finding
out
more
about
this
we're
at
the
end
of
October
of
2017,
we
are
going
to
run
the
second
iteration
of
the
CD
go
home.
So
right
now
we're
finishing
all
the
utilities
documenting
everything.
A
Of
course,
it's
taking
a
long
time,
a
lot
of
highly
experimental
systems,
we're
going
to
report
on
the
full
automation
of
the
greenhouse
and
house
next
month,
but
yeah
we're
going
to
do
this
again.
Basically
take
all
the
learnings
from
here
build
on
the
structural
learnings
and
then
build
on
a
utility
learnings.
The
utility
learnings
are
huge
this
time,
because
there's
things
we've
never
tried
before,
like
the
bio
digester
or
the
thermoelectric
generator
or
the
pellet
stove
I
mean
a
lot
of
very
cool
features
in
here
that
we're
doing
so.