►
From YouTube: OSE Dev Team Meeting - Jul 11, 2017
Description
See meeting notes at http://opensourceecology.org/wiki/D3D_Log
------------
What you see here at Open Source Ecology is an ambitious program based on a volunteer effort. To help us reach the goals - please consider joining as an OSE Developer in 2017-
http://opensourceecology.org/wiki/OSE_Developers
Take a minute to subscribe to our email newsletter (updates, workshops, etc): http://bit.ly/1LtcM44
A
A
A
Our
numbers
are
hovering
about,
like
eight
eight
logged
contributions
per
week
from
the
official
developer
team
out
of
the
unofficial,
like
we've
got
like
18
people
on
an
official
team,
so
kind
of
got
to
get
those
numbers
and
sync,
but
we
do
have
two
new
developers,
Antonio
and
Alejandro.
So
two
people
will
be
joining
the
team,
so
timeline
progress,
report,
critical
path
in
progress
reports
during
this
meeting.
So
this
is
where
we
are
right
now
you
can
click
a
link
for
that
critical
path
right
now.
A
The
one
thing
that
we're
going
to
add
to
the
to
the
development.
These
are
all
the
things
are
actually
going
on
in
the
background
on
different
things,
but
we
do
want
to
add
a
tractor
team
that
there
will
be
a
big
big
new
new
thing.
We
haven't
done
work
on
the
tractor
this
this
year
so
far,
but
there's
the
new
people
as
well
as
some
of
the
people
from
Saudi
Arabia,
as
well
as
some
old
developers,
we're
going
to
do
that
because
a
September
we
are
planning
on
building
in
the
next
iteration
of
the
tractor.
A
As
far
as
this,
this
critical
path
right
here
only
goes
up
to
the
brick
press
workshop,
which
is
August
25th.
So
that's
the
last
last
part
right
here.
Cd
power
cube
build
workshop;
okay,
that's
the
25th!
We're
going
to
get
that
announcement
out
pretty
soon
so
workshops.
Announcements
are
here,
3d
printer
announcement
that
we
have
to
get
out
by
this
Saturday.
So
the
the
workshop
will
be
August
12,
that's
right
here,
factory
farm,
and
that
means
from
this
Saturday.
That's
exactly
four
weeks
to
that
workshop.
A
So
that's
that's
the
kind
of
timing
we
want
to
give
people
for
weeks
to
sign
up
for
the
workshop,
so
I'm
developing
the
production
capacity
go
to
slide
four.
That's
that's!
The
recent
recent
work
from
on-site
right
here.
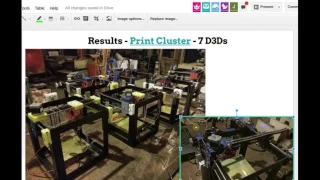
So
I've
got
a
total
of
seven
printers
built
at
this
point.
Two
of
them
have
been
tested:
five
more
have
to
get
all
the
testing
testing
on
them
and
all
that,
but
that's
late
last
night
print
cluster,
so
that
we
can
effectively
print
parts
for
the
next
workshop.
Like
last
time,
I
had
two
printers
going.
A
Those
were
the
loaves
about
minis
and
it
took
about
two
weeks
to
print
just
pretty
much
going
constantly
as
much
as
I
could
took
two
weeks
to
print
parts
for
twelve
printers.
In
the
last
workshop
now
we're
going
to
try
to
get
more
people
signed
up,
I
mean
the
gold
ideally
I'd
like
to
have
24
people
sign
up.
Then
we
need
a
little
more
production
power
so
that
we're
not
pressed
for
time
in
terms
of
printing.
So
it's
seven
3d
printers
that
should
be
I
mean
right
now.
A
Seven
I've
got
actually
three
more
frames
that
I
could
build
up,
but
parts
for
the
workshop,
as
well
as
for
the
CNC
torch
table,
which
get
to
be
much
bigger
parts.
So
so
we
need
this,
and
this
is
really
good
and
with
Christian
we
are
actually
going
to
meet
we're
planning
on
meeting
after
this
meeting
to
discuss
the
print
cluster
as
far
as
the
software,
the
Raspberry
Pi
getting
these
connected
so
that
one
single
computer
controls
it
through
a
Raspberry
Pi.
A
So
that
would
be
a
great
thing
and-
and
at
this
point
we
can
be
talking
about
you
know
actually
selling
parts
like
kits
for
the
3d
printers
or
or
the
CNC
circuit
mills
or
whatever
we
can
be
using
these
to
produce
more
more
parts
and
do
a
website.
I
mean
I'd
like
to
see
a
web
front
where
we
developed
the
whole
process,
the
whole.
Here's
how
you
build
your
printers,
here's,
how
you
run
the
software!
A
If
you
talk
about
house
building
so
I
mean
very
practical
and
making
parts
for
for
kids
for
for
more
printers,
so
getting
the
full
open
source
infrastructure
for
for
a
print
cluster,
including
things
like
people
can
actually
log
in
to
our
computer
and
use
our
printer
remotely
I
mean.
Is
that
possible?
Certainly
it
could
be
possible.
So,
for
example,
one
scenario
would
be
where
we,
where
we
just
keep
several
printers,
how
many
we
want,
possibly
with
a
video
camera,
and
you
just
order
print
time
and
we
can
perhaps
ship
the
parts
out
to
people.
A
Like
all
the
little
details
of
how
you
know
how
you
the
cable
routing
like,
for
example,
having
to
do
the
cable
routing
and
redoing
it
or
refitting
some
parts,
etc
that
took
the
time
but
right
now
the
machine
is
stands
at
seven
point:
five
or
seven
byte
8
inch,
build
platform
and
seven
point
five
inches
tall
and
that's
using
the
13
inch
frame.
So
that's
very
nice,
a
nice
big
build
volume,
heated
bed.
A
Everything
is
working
like
all
the
parts
here
that
you
see
have
been
printed
with
the
16
inch
3d
printer
that
I
built
here.
So
the
d
3d
16
inch
version
and
once
all
the
parts
are
assembled,
it's
really
nice,
like
a
good
production
line,
would
work
very,
very
well.
What
I
did
was
prepare
all
the
cold
printed
parts,
the
the
axes
put
the
motors
on
them,
so
XYZ
axes
prepared
the
whole
a
extruder
assembly,
that's
kind
of
like
a
big
job,
bunch
of
little
pieces
there
and
then
the
whole
printbed
assembly.
A
Then,
once
once
I
had
that,
once
once
I
started
putting
the
things
on
the
frames,
it
literally
took
like
two
hours
to
put
all
those
pieces
onto
to
make
like
from
from
finished
frames
and
from
finished
assemblies.
It
took
like
five
like
two
hours
about
to
assemble
five
of
these
printers,
so
that's
I
mean
it's
pretty
amazing.
I
think
the
workflow
could
work
really
well
where,
instead
of
each
person
doing
going
through
the
whole,
build
we
build
in
teams.
A
So
each
team
has
a
module
and
people
can
switch
between
teams,
but
that
workflow
kind
of
like
a
production
line
works
really
really
well
because
then,
at
the
end
you
assemble
it
very
very
rapidly,
and
once
again
the
trick
is
like
the
orientation
of
axes
like
how
the
belt
is
attached
and
I'll
go
to
the
next
slide.
Here
you
can
look
at
this
video
if
you
go
to
view
present
mode,
but
here
actually
Shane
who
did
we
did
the
CNC
circuit
mill,
which
is
what
you
see
here
with
a
spindle.
A
He
shows
how
to
tension
the
belt,
but
the
concept
is
whether
you
attach
the
belt
in
the
upper
or
bottom
hole
means
that
the
3d
printer,
the
axis,
would
be
moving
in
opposite
directions,
depending
on
where
you
attach
it.
So
that
kind
of
that
part
is
the
most
tricky
part
about
the
entire
process
like
when
you
build
the
entire
machine.
You
really
want
to
build
it
once
so
in
the
build
here.
I
had
the
one
machine
right
in
front
of
me
and
I
modeled
all
the
parts
of
orientations.
A
A
Orientations
are
rather
tricky
because
even
my
cell
phone
I
was
looking
at
you
know:
I'm,
making
five
acts,
there's
five
printers
I'm
making
five
axes,
and
you
have
to
pay
attention
to
a
few
details
like
which
side
is
the
motor
attached
to
which
side
is
the
belt
attached?
To
which
side
are
the
tops
of
the
bolts,
because
then
it
makes
it
easy
to
take
the
bolts
out,
etc.
A
So
you
don't
have
to
go
to
one
person,
then
another
person,
all
the
modules
are
right
there
and
you
can
look
at
one
and
then
you
can
look
at
all
of
them
to
see
if
they're
identical
and
that
way
you
know
you're
right,
so
that
kind
of
quality
control
would
be
much
much
simpler
to
do
because
you're
going
through
a
whole
set
of
the
modules
at
the
same
time.
So
that's
just
some
notes
on
the
build
okay
moving
on
here.
A
So
that's
the
the
current
work
on
the
on
a
CNC
circuit
mill
is
that
Shane
has
is
working
on
refining
the
circuit
mill
to
get
really
nice
circuit
milling.
So
we
can
make
our
own
circuits
for
everything
like
controllers
and
everything,
but
they're,
actually
considering
writing
a
small
paper
on
the
characterizing,
the
backlash
and
all
the
motion
characteristics
of
the
of
the
universal
access
system.
So
that's
it's
really
good.
A
This
stuff
is
spreading
to
other
places.
I
do
really
like
the
axis.
It's
very
flexible
I
do
think
it's
going
to
be
become
widely
used
in
various
contexts,
because
it's
a
construction
set.
Okay,
next
we'll
go
to
lineman,
filament
extruder.
So,
as
you
see
it,
it's
coming
together,
so
the
thing
is
about
3d,
printing,
the
most
expensive
part
is
filament,
so
we're
going
to
make
our
own
filament.
So
this
is
part
of
the
filament
extruder.
If
you
go
to
lineman
filament
extruder
page
on
the
wiki,
you
can
see
see
this
work.
A
This
is
the
part
library,
Thank
You
Roberto,
for
doing
that.
Dude
he's
assembling
a
lot
of
different
parts.
These
are
larger
a
lot
of
3d
printed
parts
or
some
metal
parts
here,
I'm,
seeing
that
Will's
doing
different
parts
here,
I'm
seeing
Roberto
doing
that
I'm
seeing
Abe
pulling
in
some
parts.
So
that's
really
good.
A
It's
coming
along
together,
so
so
quite
good
and
then
just
the
last
thing
on
updates
is
we're
working
on
a
new,
so
Joseph
is
whose
contact
at
you
we're
working
on
a
new
developer
invitation,
video
just
to
update
people
with
the
latest
progress
and
make
a
more
compelling
video
and
we're
looking
at
at
creating
a
the
application
process
would
be
a
video
cover
letter
instead
of
interview.
So
once
once
a
person,
the
interview
prior
to
the
freakin
exam,
it
would
be
a
video
cover
letter.
A
So
basically
answer
all
the
questions
that
are
in
the
interview
through
a
little
video
so
that
that
takes
there
will
be
much
less
work
on
our
part.
It
would
put
the
more
burden
on
the
applicant,
but
if
you
I'm
keeping
detailed
numbers
and
the
fact
right
now
is
it
takes
me
five
hours
to
get
one
person
on
the
team.
One
active
developer,
wow,
that's
a
lot
of
time.
Actually
so
I'm
kind
of
getting
tired
of
it,
I
really
need
help
and
I.
A
Think
part
of
the
part
of
this
can
be
simplified
by
a
simple
cover
letter
intro
like
video,
eliminating
the
interview
so
that
we
get
people
on
faster.
But
that's
the
facts.
I
mean
one
in
three
end
up
actually
doing
the
test,
so
I
send
up
spending
this
time
and
then
and
then
also
like
with
the
numbers
of
the
actual
numbers
on
the
active
development
side
like
when
you
look
at
the
numbers
say:
there's
like
eight
active
developers
right
now,
the
numbers
after
all,
is
said
and
done
about
five
hours
to
recruit
one
active
developer.
A
So
that's
that's
quite
a
bit
of
time
when
you
take
a
look
at
it,
so
I'm
glad
I'm,
taking
them
keeping
data
on
it
and
so
forth,
and
here's
our
overall
progress
but
I
want
to
see
this
definitely
go
up.
I
mean
we're
at
like
when
you
talk
about
150
hours
per
week,
that's
about
four
full-time
equivalent.
So
definitely
you
see
a
lot
of
room
for
that.
The
teams
can
be
bigger
and
we
can
actually
start
breaking
up
into
different
teams.
So
we
want
to
start
the
tractor
team.
A
A
So
what
I
need
to
do
is
prepare
a
document
where
we
have
basically
the
starting
of
a
working
document
presenting
all
the
work
from
before
I
mean
there's
a
lot
of
work.
We've
done
on
a
tractor.
If
you
go
to
a
tractor
genealogy
page
on
the
wiki
I
mean
you
can
go
through
copious
amounts
of
all
the
prototypes,
so
so
life
track.
Genealogy
starts
with
life
track,
one
with
articulated,
steering
four-wheel,
drive,
etc.
Up
to
the
more
bulldozer
like
devices
with
tracks
up
to
number
eight
track
tractor
of
2016.
So
you
can.
A
A
The
good
thing
about
hydraulics
is
that
even
a
one
solar
panel,
you
know,
take
one
solar
panel,
one
single
solar
panel.
You
can
drive
a
heavy
tractor
with
it
will
go
very
very
slowly.
You
have
what
you
have
is
a
very
tiny
power
unit
power
cube,
but
it
can
go
very
slowly
so
for
certain
devices.
That's
really
good,
like,
for
example,
if
you
want
to
do
weeding
the
real
application
that
we
want
to
do
here
is
actually
to
be
pulling
chicken
tractors.
So
that
means
cages
with
chickens.
A
So
you
can
span
a
whole
field
while
keeping
the
animal
safe,
because
everything
likes
to
eat
chickens.
So
you
keep
them
in
a
cage
that
just
moves
and
therefore,
instead
of
a
cage,
they
have
the
effective
area
of
say
like
an
acre
or
a
few
acres,
because
that
you're
pulling
this
cage
with
a
solar,
GPS
tractor,
that's
moving
very
very
slowly,
like
maybe
a
you
know
like
a
meter
a
minute
or
something
like
that.
A
Something
like
that.
So
that's
just
notes
on
the
tractor
team:
I'm
going
to
go
back
just
a
little
bit
to
the
the
critical
path
here
so
on
a
CB
press,
it's
actually
time.
So
the
workshop
is
coming
up
pretty
quickly.
I
mean
it's
the
next
month,
the
25th.
So
about
a
month.
Wow
I
mean
that's
like
a
month
and
seven
days
from
now,
which
means
in
practice
we
got
to
get
get
the
updated
design
and
also
the
CNC
torch
cutting.
A
So
so
as
soon
as
I
got
that
print
cluster
up
I
mean
I'm
going
to
be
working
on
it
today,
we're
going
to
work
on
it
with
Kristian,
as
far
as
installing
the
Raspberry
Pi
and
things
like
I'm,
going
to
start
printing
parts
for
the
the
torch
table
and
work
on
that,
because
I
mean
we're
talking
about
so
torched
part
torch
table.
Part
printing
is
right
here.
It's
supposed
to
be
happening
like
right
now.
The
green
line
here
is
where
we
are
currently
July
11.
So.
A
A
So
last
thing
is:
let's
maybe
go
to
the
follow
up
on
the
work
with
people
who
are
here
are
the
things
that
I
missed
right
now
that
we
need
to
update,
because
the
thing
I
think
we
definitely
want
to
get
going
is
if
I
have
the
print
cluster
going,
we
can
actually
start
prototyping
the
parts
for
the
filament
extruder,
and
that
would
be
the
filament
maker,
so
we
can
make
our
own
filament.
So
that's
that's
one
of
the
big
things
to
to
discuss.
I.
Think
a
lot
of
the
team
is
working
on
that.
A
Let's
see,
did
I
miss
anything
as
far
as
the
status
of
kind
of
updating
we've
got
a
lot
of
parts
being
put
into
place.
I
haven't
looked
into
that
in
detail.
I
think
Roberto
knows
quite
a
bit
he's
been
doing
the
final
final
assembly
here,
but
the
next
steps
would
be
to
yeah
I
mean
get
the
final
assembly
and
move
forward
to
to
ordering
the
Bill
of
Materials
parts
and
starting
the
actual
cutting
as
soon
as
we
we
know
from
the
final
design
that
everything
is
making
sense.
B
A
Yeah
yeah,
so
so,
for
example,
like
I've
seen
a
lot
of
different
simplified
parts,
but
definitely
you
want
to
do
it
simplified
versions,
because,
if
we're
going
to
put
together
the
entire
entire
machine
and
freecad
with
all
the
parts
in
there,
of
course
the
files
would
just
be
too
heavy
right.
So
yes
do
the
simplified
versions
for
the
STL
files.
Of
course
they
remain
complex
and
they
remain
and
then
then
we
print
them.
So
that's
what
we
would
do.
They
can
remain
the
original,
complex,
STL
files.
A
But
when
you
do
the
cad
model,
you
don't
use
those
full
files.
You
you
like
to
use
simplifications,
so
you
can
manage
the
whole
cad
very
easily
and
in
a
fast
way.
So
if
anyone's
like
drawing
parts,
there
are
too
complex,
you
don't
need
to
like
I'm.
Looking
at,
for
example,
I
mean
look
at
this
I
mean
that's
pretty
much.
What
we
need
power
supply,
just
representing
all
the
different
yeah
I
mean
this
is
a
very
simple,
simple
concept,
so
you're
representing
all
the
parts,
so
you
can
pretty
much
say,
label
them
and
say:
okay.
A
A
B
A
Right
right,
so,
on
that
point
we
should
mention
is
that
whenever
somebody's
drawn
up
the
parts
you
have
to
upload
all
the
files
so
make
sure
that
when
you
generate
a
part,
save
a
file
version
with
the
with
the
underlying
sketches.
So
you
can
edit
that
and
then,
if
you're
doing
the
final
CAD
like
the
the
overall
CAD
to
minimize
the
size,
you
can
simply
eliminate
all
the
other
details
and
in
and
so
just
upload
a
simple
if
even
simplified
version.
A
So
you
have
a
simplified
version
with
sketches
and
then
you
would
have
a
simplified
version.
We
just
eliminate
all
the
sketches
and
then
save
that
just
upload
that
to
the
wiki
as
a
new
version
of
the
file,
so
that
in
the
file
versioning
you
can
see.
Okay,
one
file
is
the
original.
It's
got
more
detail
or
or
more
of
the
underlying
sketches,
but
the
ones
you
actually
putting
into
the
assemblies
don't
have
that
they
don't
need
it.
A
You
know,
because,
when
you're
working
with
editing
the
assembly
or
the
parts
you're
always
going
into
the
individual
parts
and
then
merging
the
edited
part
into
the
more
complex
assembly,
you're,
not
editing
within
the
complex
assembly,
you
just
take
the
individual
part
edit
that
in
a
separate
document.
So
that's
the
that's
the
workflow
that
everyone
needs
to
understand,
but
you
do
need
to
have
a
version.
History
of
everything
like,
for
example,
file,
thermal
components.
A
A
For
the
full
assembly,
we
should
probably
have
just
the
without
just
to
save
memory,
so
it
really
loads
fast
and
is
easy
to
work
with.
So
we
should
have
the
multiple
versions
at
the
component
level
at
the
part
level.
Ok,
yeah,
that's
that's
an
important
point,
because
the
workflow
is
do
all
the
editing
on
the
individual
files
and
then
you're
just
merging,
in
other
words,
loading
that
file
into
the
final
document.
So
you
update
it
and
then
you
load
it
into
the
complex
assembly.
A
That's
the
preferred
workflow
so
that
it's
it's
just
simply
more
manageable,
because
then
the
final
assembly
is
just
as
simple
as
possible
and
it's
easier
to
work
work
with
it.
I
mean
definitely
it's
harder
to
to
work
with
in
a
document
where
there's
so
many
different
parts
and
you're
trying
to
edit
one
it's
like
just
navigating
through
that
whole
thing:
it's
if
it's
a
very
complex
thing
would
be
difficult.
So
you
just
eliminate
everything
you
you
have
just
just
the
single
part
file
work
on
that
it's
easy
and
fast
and
you
can't
mess
up.
A
You
can't
mess
up
it
or
if
you
mess
up
you're,
just
messing
up
one
part,
so
it's
just
a
preferred
workflow.
So
it
looks
like
from
this
page
here
that
we
have
so
this
is
a
lot
about
the
extruder
different
extruder
parts,
but
looks
like
we're
missing
now
the
filament
winding
aspects
so
Roberta.
Would
you
say
that
the
that
the
extruder
part
is
pretty
much
got
all
the
parts
in
it
or
is
there
a
bunch
of
parts
still
missing
like
there's
a
whole
load
of
them
missing.
C
D
Okay,
so
I
popped
on
the
fullmetal
them
and
half
of
it
polluted,
virtually
all
the
SEO
power
Baku
walk
on,
but
that
that's
out
there
that
still
have
a
steel
file
attached
to
them
and
the
higher
the
number
of
them
still
might
need
help
with
knowing
also
access
fee
at
the
above.
For
this
one
also
I
can
create
people
power
for
them.
A
D
A
A
Filament
winder,
for
example,
when
you
look
at
so.
If
you
look
at
my
screen
on
the
filament
winder
I
mean,
can
you
make
sense
from
that
a
lot
or
that
are
you
saying?
A
lot
of
detail
is
missing
beyond
what
you
would
have
with
what
you
would
need
like
when
you
look
at
this
it's
this
just
doesn't
do
it.
D
A
D
Looks
to
meet
all
the
way
I
understand.
It's
me
like
a
lot
of
the
component
that
we
can
see
in
the
pad
library
that
that
hidden
like
couples
in
you
can
see
them
from
that
image.
So
I
I,
really
I
really
count
how
to
like
label
that
go
into
that
image
to
show
where
the
different
components
book,
one
or
two
of
them
are
cleared.
I
can
see.
Forgive
me
and
I
can
tell
what
they
are.
The.
A
A
D
E
Think
it's
important
to
remember
that
some
of
these
photos
and
the
documents
they're
from
mr.
Lanham
as
PDFs
and
some
of
the
components
and
there
are
actually
deprecated
the
photos-
still
show
things
that
he
quit
using
and
also
some
of
the
most
everything
is
in
the
PDFs
I
think
one
way
or
another,
especially
in
those
diagrams,
so
go
back
to
the
PDF
and
the
diagrams.
If
you
can't
see
the
detail,
those
diagrams
are
pretty
good.
A
E
E
Modules
well
as
soon
as
share
all
the
parts
of
the
budget
line
up
trying
to
organize
some
of
the
stuff
in
the
sheets
and
stuff
to
modules,
because
it
seems
like
Louise
what
the
modules
to
match
how
the
system
might
be
assembled
in
real
life
or
in
a
workshop
situation.
So
I
don't
know
if
we've
got
all
that
exactly
in
that
matter.
But
it
looks
pretty
good.
E
Done
on
the
modules
I
see
a
lot
more
detail
and
I
see
a
button
switch
and
assembly
work
on
the
assembly
of
the
modules
did
too
surprised
by
that
I
did
notice.
I
was
was
working
on
a
switch
and
I
guess.
There's
some
overlap
between
the
spooler
and
the
extruder.
We
have
different
people
working
on
those
I.
Just
noticed,
I
was
working
on
a
switch
and
I
see
somebody
already
finished.
The
switch
with
the
spooler
so
probably
ended
up
with
some
redundant
work
there,
but
I
need
to
double
check
some
of
that
I.
A
E
That
that
maybe
yeah
I
guess
we
want
to
use
the
same
things
I
think
and
it
wouldn't
really
matter
other
than
that
the
plastic
heart
design
might
be
a
little
different,
I
mean
usually
that's
which
it
should
be
the
same.
Specs
I
mean.
Hopefully
we
can
just
buy
generic
half-inch
switches
and
they
should
fit,
which
is
what
it
looks
like
what
I
was
working
on,
but
because
the
switch
design
doesn't
matter
that
much
as
long
as
it
fits
in
the
plastic.
B
E
A
E
I
think
that
the
diagrams
are
more
up-to-date.
What
I
can
tell
there's
not
really
anything
displayed?
He
may
have
changed
some
external
things
that
aren't
shown
there
like
I.
Think
in
some
cases
he
end
up
using
some
of
the
rubber
tubing
is
displayed
knows
it
is
abusing
things
like
duct
tape.
You
know.
A
F
A
A
A
D
D
A
So
this
is
the
stuff
that's
missing
yeah
those
would
be,
and
those
look
like,
maybe
they're,
not
the
3d
printed
parts
so
with
all
those
three
printed
parts
of
it.
Let's
assume
those
are
all
pretty
printed
and
the
rest
are
not
yeah.
Yeah
I
mean
it
looks
like
this
yeah,
like
all
these
screws
and
everything
I
mean
see.
If
you
can,
let's
see
how
do
we
coordinate
that
one
diagram
with
the
part
library?
A
Basically,
just
label
just
take
just
about
everything
and
label
it
and
make
it
very
detailed,
but
but
at
the
same
time
like
Roberto,
maybe
you
can
feedback
on
this.
So
this
is
a
diagram.
That's
pretty
detailed,
but
but
I
mean
there's
so
many
little
other
pieces
that
are
missing
like,
for
example,
okay,
like
what
about
this
bolt
this
wire,
any
other
things
like.
Where
are
we
finally
reconciling
that
we
actually
have
all
the
parts
because
maybe
like
this
goes
from
13
parts,
maybe
up
to
like
50?
A
Do
you
guys
think
that
would
be
doable
and
maybe
even
like?
Go
to
here?
I
mean
I
like
this
like
this,
this
we
can
understand:
okay,
there's,
seven,
seven
main
parts
and
then
each
one
of
them
maybe
take
one
or
two
pages.
So
you
do
have
absolutely
every
single
number
attached
to
a
part
and
then
that
would
almost
arm
that
would
almost
supersede
the
part
library
like
where
we
should
probably
do
is
use
these
links
in
our
diagrams
to
make
everything
clear
like
that.
A
We're
not
missing
parts
like,
for
example,
here
that
we
label
absolutely
everything.
There's
a
little
bolt
here,
I
see
like
little
bolts.
There
I
see
bolts
there
I
see,
you
know
all
these
different
components,
so
we
can
visually,
observe
it
and
say:
okay.
This
actually
has
everything,
and
then
we
can
go
to
the
part
library
page
and
we
can
say:
okay,
that's
where
we're
just
storing
the
files
or
representing
the
individual
files
and
also
a
very
clear
way
like
say
you
wanna,
it
would
almost
be
redundant
like
the
part.
A
Library
is
almost
the
same
as
this
visual
index
except
the
part
library
is
more.
You
know
it's
just
a
list.
It
doesn't
really
get
you
to
understand
how
the
parts
fit
together,
but
they
will
also
like
if
you
want
to
see
like
in
this
sona's
diagram
in
this
visual
diagram,
you
don't
necessarily
see
all
the
parts
clearly.
A
We
can
do
that.
Definitely,
and
we
can
see
okay,
it
all
works.
So
that's
level
number
one
and
then
level
number
two
is
put
in
all
the
other
mechanical
components,
fasteners
motors
wires
and
everything
else.
But
what
would
really
be
make
it
effective
is
when
this
diagram
has
just
about
everything
so
that
you
don't
you
know
like
say,
I'm,
building
this
there's
somebody's
prototyping
it
actually
right.
A
Then
we
don't
see
ups,
we
don't
get
into
the
conditions
where
whoops
we
missed
parts
and
then
you
have
delays
like
you
know,
every
time
you
got
to
get
a
part,
it's
like
you
know
a
few
days
or
maybe
even
a
week,
delay
and
you
go
through
those
several
of
those
cycles
and
you
end
up
spend
a
lot
of
time
to
get
all
the
parts.
So
that's
why
this
visual
diagram
should
have
everything
so
can
I
propose
that
it
there
it
like
so
I
would
expect
seven
of
these
diagrams.
A
A
A
A
You
know
second,
one
would
be
hardware
and
the
third
one
would
be
wires
or
something
like
that,
because
each
one
of
them
is
pretty
extensive
able.
What
do
you
think
of
that
I
mean?
Does
that
make
sense
or
because
because
the
question
is,
how
do
you
make
sure
we
have
everything
in
our
diagrams,
and
so
when
we
actually
go
build
it,
we
can.
We
can,
from
this
diagram,
generate
a
complete
bill
of
materials.
That's
actually
accurate,
it's
not
like,
oh
this
part
may
or
may
not
be
there.
It's
for
real
hey.
Can
you
comment.
A
A
Yeah,
that's
that's
correct
in
a
sense
that
some
details
may
be
missing
in
other
places.
Maybe
he
tells
you
like
a
couple
of
different
ways
without
specifying
a
part
or
there
may
be
deprecated
parts,
that's
what
I
learned
from
parts
that
are
no
longer
used.
That's
what
I
learned
from
Abe
I
haven't
examined
the
document
and
so
much
detail
myself,
but
reading
through
it
I
can
see
it's
not
it's
not
an
exact
document.
It
might
be
a
little
general
like
it
will
not
give
you
an
actual
part.
So
that's
why
we
would
have
to.
B
A
Free
cat
is
useful,
yes,
because
then
we
can
generate
everything
else
from
freaking,
yeah,
yeah
and
first
and
the
first
answer
to
your
question
is
that
he
has
not
produced.
We
asked
him
for
the
cat,
but
he's
not.
He
hasn't,
provided
it
to
us.
So
that's
why
we're
rebuilding
everything
and
also
for
a
workflow
read
simplifying
parts.
So
we
actually
can
manage
and
work
with
this
very
effectively
within
cat,
so
we
can
go
through
all
the
other
different
assets
that
we
need
from
from
like,
for
example,
language,
agnostic,
instructionals.
A
Even
you
know,
fabrication
diagram
is
just
technical
drawings.
Everything
exploded,
part
animations.
We
can
do
everything
from
that.
So
but
that's
the
idea,
like
the
shirt,
the
shirt.
What
we're
after
here
is
that
we
generate
a
model
that
is
actually
complete
and
if
you
look
at
his
model
like,
for
example,
take
a
look
at
his
you
know.
Page
15,
like
is
his
model
complete.
A
A
E
Yeah
some
of
the
issues
would
be
the
PDFs,
and
things
like
that
are
they
can
be
a
little
confusing,
but
they
should
be
a
huge
problem.
I
think
that
all
the
parts
that
got
listed
so
far
or
things
that
aren't
difficut,
especially
in
the
in
the
sheet
list,
so
sometimes
those
are
a
good
reference
to
and
I
know,
there's
a
lot
of
different
files
to
reference
to
some
degree.
Event
number
we
haven't
ordered
so
far.
I
think
that
the
think
the
most
accurate
list
is
probably
to
split
those
master
part
indexes
to
some
degree.
E
As
far
as
the
part
sent
you
to
get
all
the
parts
into
sections,
with
the
modules
that
I
thought
they
belonged
in.
There
are
some
parts
that
are
kind
of
general,
the
bolts.
Obviously
they
just
go
all
over
the
place,
they're
listed
where
it
seemed
like
most
appropriate
or
just
in
a
general
area
but
themselves,
but
I
think
that
the
part
index
sheets
are
kind
of
broken
down
by
the
modules.
E
A
E
Starting
to
work
on
the
broader
assemblies,
instead,
besides
just
the
individual
parts,
which
is
good,
honest
it
if
there
are
certain
simply
stages,
they
seem
to
match
the
kind
of
like
the
photos,
which
is
good,
because
that's
kind
of
the
way
is
some
of
it.
Those
PDF
students
do
a
good
job
of
showing
how
he
you're
in
those
certain
some
close
link
for
the
wiring
on
the
electronics,
is
thinking
that
once
that
plastic
shell,
the
top,
is
a
symbol.
F
E
The
wiring
would
be
put
in
you
know
at
that
point,
so
some
of
those
things
get
them
assembled
in
in
certain
groups
and
then
we
can
add
some
of
the
detail
that
way
so
there's
probably
certain
ways
to
break
it
down,
maybe
more
modules
or
once
we
have
the
full
can.
Of
course
we
can
just
kind
of
hide
the
parts
we
don't
want
and
show
steps
to
assembly
that
one
as
well
obviously
yeah.
A
A
Then
we
have
things
like
this,
which
is
the
visual
diagram
for
each
module
and
I
would
also
call
out
for
okay,
let's
do
a
more
detail
for
the
bolts
and
wires
and
any
little
details.
So
we
detailed
this
out
more
and
then
once
we
have
that,
then
we
can
go
back
to
the
master
index
like
you
are
saying,
and
then
we
can
say:
okay
excellent
now
we
know
that
okay,
there's
exactly
like
you
know
like,
for
example,
for
the
extruder
electronics.
You've
got
12
parts
listed
well.
A
I
can
tell
you
right
there
that
there
are
missing
parts
like
screws
right
and
if
you
don't
have
that
screw
on
hand,
you're
not
going
to
be
able
to
build
that.
So
we
would
then
take
our
visual
diagrams
and
details
and
then
add
more
parts
to
basically
finish
all
these
master
indices
completely.
So
we
can
go
from
the
visual
to
the
master
index
and
then
from
the
master
index,
I'm
going
to
go
down
this
purchasing
link
and
buy
everything
and
get
it
get
it
shipped
or
go
to
the
store
or
whatever.
A
So
this
so
for
me,
the
end
product
is
this
column
right
here?
The
purchasing
link,
that
is
a
verified
list.
That's
been
passed
through
the
CAD
through
the
visual
diagrams
and
it
all
makes
sense
to
us.
So
that's
a
deal
but
I
also
say
you
know
like
wire
or
wire
connectors.
We
have
to
be
a
little
more
specific,
like,
for
example,
wire
connectors
female
Spain.
A
Well,
what
gauge
you
know
like,
for
example,
when
I
click
on
this
link,
which
one
am
I
going
to
choose,
so
that
should
be
detailed,
a
little
more
out.
Do
we
need
like
three
different
ones
like
there's
just
spades
or
there's
some
ring
or
whatever
just
just
a
little
more
details
so
that
when
we
do
it
it?
Actually,
you
know
it's
actually
working
it
we're
not
we're
not
like.
Oh,
we
didn't
get
the
right
one.
We
got
to
go
back
to
the
store
and
then
spend
a
week.
A
E
E
A
E
And
I
added
the
detail
to
the
power
supplies
of
some
of
the
ultra
components,
so
that
it
would
be
easier
to
lay
a
ball
and
maybe
show
some
connections
from
ironing
a
little
easier,
I
think
that
was
important.
We
might
need
to
add
a
little
more
detail,
some
of
the
electronics
that
should
be
hard
to
do
maybe
fasteners
from
the
fastener
workbench.
That
kind
of
thing
can
help
with
that.
No
no
I
just
chose
to
cruise
on
the
spades
or
wired
wiring
points.
E
A
E
I
know
that
that
probably
a
lot
of
that
probably
needs
to
be
left
out
of
the
larger
simplified
diagram.
A
kazoo
I,
don't
know
how
much
in
fact
they
don't
know
how
much
wiring
might
slow
down.
There
is
too
much
memory
in
that
and
the
larger
view,
of
course,
also
that's
inside
the
box.
So
if
you're,
just
looking
at
the
box,
I
think
that's
all
included
and
if
I
understand
it
freak
at
the
display
in
the
rendering
speed
should
be
based
on.
What's
what's
shown
on
the
screen.
A
Yeah
yeah,
that's
right,
but
that's
the
case
for,
like
you
know,
say
you
have
a
hundred
parts
in
a
document,
but
each
one
of
them
is
5k.
While
that
entire
document
is
500k,
that's
not
a
problem
at
all.
That's
I'm
saying!
As
long
as
we've
got
the
simple
individual
items,
we
should
not
run
into
any
issues
at
all
with
respect
to
being
able
to
render
that
and
work
with
it
effectively
the
CAD
so
yeah
does
that
make
sense.
It
looks
like
yeah
yeah,
it
does
okay.
So
so,
let's,
let's
just
discuss
this
refine
process.
A
So
this
is
what
we
talked
about
before
we're
talking
about
creating
the
full
CAD
and
see
Roberto
log
for
final
assembly
example.
Let's
see
final
assembly
example
right
there
yeah,
like
that's,
that's
what
we're
showing
today.
So
we
are
doing
that
and
now
we're
we're
looking
at
the
module.
So
basically,
let's
go.
A
Let's
kind
of
start
from
the
beginning,
as
far
as
what
we're
actually
doing
according
to
what
we
talked
about
today,
because
I
think
we're
getting
it,
but
it's
just
just
complex
because
it's
a
complex,
you
know
it's
quite
a
quite
a
complex
machine.
So
let's
say
okay,
so
we've
got
break
down
into
modules,
just
so.
Let's
just
document
this
whole
process,
so
everyone
is
clear,
so
break
down
into
modules,
which
is
page
2
I'm,
going
to
link
to
that
directly
here,
so
so
break
down
into
modules.
A
A
A
A
G
A
A
Which
is
obvious,
but
but
okay,
that's
looking
great,
but,
for
example
like
with
number
six,
we
need
to
detail
absolutely
everything
that
bolt
there
that
wire
there
etc.
You
know
what
that's
a
setter,
so
we
go
through
that.
So
I
think
that's
like
the
you
know,
these
two
things
so
probably
end
up
with
two
or
three
slides
for
each
module.
A
So
I'm
going
to
say
here
end
up
with
two
to
three
slides
for
each
module.
So
that's
that's
a
total
of
it.
There
are
seven,
so
that's
like
14
to
21,
slides
total
and
if
it's
easy,
just
use
one
slide,
I
mean
oh
now,
let's,
let's
call
it
about
two
slides
I
mean
some
of
them
are
going
to
be
much
easier
than
others.
A
A
So
I
mean
I
mean
before
we're
there
we're
doing
the
CAD
I
mean
do
the
simplified,
CAD
think
about
think
placeholders.
Basically,
so
we
don't
do
not
miss
anything
so
simply
enough
that
just
represented
as
a
placeholder
okay,
then
we
add
links
to
the
specific
part
ordering
sources.
Then
we
go
back
to
the
master
index
and
we
we
continue
filling
in
that
master
index
to
make
sure
all
the
parts
are
in
there.
A
And
part
library
have
the
same
links
and
that's
how
you
know
you're
part
library
is
correct,
because
you've
seen
it
like,
like
I,
look
at
the
visual
diagrams
as
like
the
ultimate
sense
making
documents
they
help
you
make
it
make
sure
that
you
don't
miss
anything.
So,
let's
say
the
visual
diagrams
are
used
as
the
sense
making
documents.
A
Our
our
source
I
mean
that's.
The
actual
yeah
I
mean
that's
from
there.
We
can
source
Ford
for
doing
any
further
work
on
this
project.
So
say
we
went
through
the
first
prototype.
We
need
to
change
things,
we
go
back
to
the
CAD
and
once
again
we
go
to
the
individual
part
files.
We
work
on
those
and
we
merge
those
into
the
final
assembly
dot
CAD
files.
So
so
that's
that
kind
of
the
basic
workflow
here.
A
A
B
A
I
mean
right,
I
mean
it's
like
email,
people,
I
would
suggest.
Yeah
I
mean
that's.
Why
that's
what
we're
not
using
the
slackers
I
mean
we
had
all
these
projects
and
it's
like
at
some
point.
You
just
lose
it.
You
know
just
lose
lose
coherence.
I
mean
you're,
welcome
to
try
with
people
who
who
are
going
to
do
it,
but
it
really
is
a
matter
of
what's
gonna.
Stick
work
that
people
actually
stick
with
I
would
say
continue
on
the
dev
group
and
just
email,
people
more.
You
know
like
email
to
coordinate
more.
A
Maybe
you
can
do
it.
I
mean
you're
still
welcome
to
start
the
slack,
but
I
mean
if
everyone
responds
to
you.
That
would
be
great,
but
we
kind
of
have
to
I
would
say
you
don't
possibly
do
it
as
an
experiment
and
see
if
people
actually
do
end
up
using
it.
But
but
we
do
have
the
the
network
which
is
supposed
to
be
used
for
that
purpose
and
then
emails.
We
can
email
people
on
a
developer
thread.
Like
I
said
we
have
that
email
thread
on
them
for
the
developers,
but
yeah
yeah
I
do
agree.
A
No
I
mean
everyone
has
access
to
that
email
group
we
can
follow
up
with
that
and
I
can
send
an
email
to
make
sure
everybody
has
the
contact.
There's
a
couple
of
new
people
but
yeah.
We
I
think
that
email
Fred
would
be
most
effective.
But
let's
do
that?
Okay,
let's
see,
but
let's
continue
so
Roberto.
Do
you
have
enough
clarity
to
go
on
for
now
or.
A
A
Right
I
mean
for
that
would
suppose
right.
So
so
we
have
a
list
so
the
way
it
works.
We
do
have
the
list
of
people
like
the
extruder.
We've
got
the
slide
number
eight.
As
far
as
the
work,
what
the
allocation
was
so
the
thing
there
should
be
click
on
their
log.
If
it
doesn't
exist
on
their
log.
That
means
you
should
take.
A
Take
it
if
they're
not
putting
things
immediately
on
their
log
they're,
not
following
procedure,
but
the
procedure
is
that
as
soon
as
you've
got
anything,
you
put
it
on
your
log,
so
you
can
verify
from
others
logs
whether
that
part
is
taken
already
or
not.
That
should
be
the
way
it
works.
I
mean
that's
the
only
way
it
can
work.
That's
why
we
emphasize
you
got
to
publish
on
your
log
as
soon
as
you've
got
anything
yeah
so
that
that
should
resolve
it.
I
mean
basically
click
on
click
on
their
logs.
B
A
Yeah,
but
that
mean
the
assumption,
is
if
nobody
else
answers
like
assume,
it's
not
done
so
one
is
assume
it's
not
done,
and
then
you
go
to
their
log.
If
it's
not
there,
it
doesn't
exist,
I
mean
really.
The
super
rule
here
is:
if
it's
not
on
a
wiki,
it
does
not
exist
in
the
youth
and
you're.
Welcome
to
take
it
I
mean
that's,
that's
the
culture
we
all
have
to
learn,
otherwise,
we'll
never
be
able
to
coordinate
more
than
a
few
people.
A
So
right
now,
we've
got
the
development
log
page
and
in
it
we've
got
the
you
know,
every
week's
agenda,
which
typically
has
the
work
breakdown
and
also
has
the
list
of
all
our
developers,
so
that
the
only
thing
you
can
say
is:
okay,
I
click
on
his
his
log
person's
log
and
like
I,
mean
that's
what
I
do
like
if
I
click
on
somebody's
log
and
it's
not
updated,
my
assumption
is
okay,
it's
not
done
period,
you
know,
that's
that's
all.
It
means
I
mean
that
and
that's
what
we
need.
A
That's
why
we
need
absolutely
need
to
log
all
our
work
as
soon
as
we
have
something.
Even
before
we
have
something
like
put
a
placeholder,
that's
you're
actually
working
on
something
you
know.
So
that's
the
that's
like
the
important
cultural
point
we
all
need
to
learn.
Maybe
we
should
emphasize
the
but
I
try
to
emphasize
that
all
the
time
like
if
it's
not
on
the
wiki,
it
does
not
exist
period.
A
Thank
you
very
fine,
yeah
yeah
yeah.
Absolutely
so
so.
Maybe
that's
something
I'm
learning
that
we
really
need
to
absolutely
clarify
to
everybody
and
we'll
get
better
at
this,
but
I
mean
the
vision
is
that
you
can
have
an
unlimited
number
of
people
and
the
project
still
doesn't
collapse.
So
you
know:
I've
been
on
this
project
for
a
decade
now
and
I've
seen
a
lot
of
how
this
stuff
works
like
how
you
can
have
people
starting
to
edit,
the
wiki.
A
It
goes
and
goes,
and
all
of
a
sudden
just
collapses,
just
total
collapse
and
the
page
becomes
a
mess.
You
know
that's
basically
the
state
of
our
entire
wiki
at
this
point,
because
we
don't
really
have
good
management,
you
need
to
have
people
who
understand
the
process
and
actually
people
who
manage
but
part
of
that
big
part
of
that
is
the
culture
which
says
that
publish
early
and
often-
and
if
it's
not
in
the
wiki,
it
doesn't
exist.
A
That
kind
of
thing
and,
of
course,
there's
a
lot
to
be
done
as
far
as
formal
processes
like
if
we
develop
a
process-
and
we
say
okay,
this
is
exactly
the
protocol
that
we
use
with
everybody.
Only
by
such
standards
can
you
get
large
numbers
of
people
to
work
on
it.
Otherwise
people
will
be
doing
things
differently
and
it'll
be
hard
for
things
to
be
coordinated,
but
that's
that's
kind
of
like
the
lesson
on
on
how
to
collaborate
here.
A
So
right
now
and
it's
like
you
know,
the
thing
that
that
may
get
in
a
way
too
is
like
if
a
person
doesn't
do
their
work
right,
like
you're
like
well,
what's
going
on
is
where's
that
work
you're
guessing
is
it?
Is
it
done
or
is
it?
Is
it
not
done
and
the
default
answer
just
simply
has
to
be?
No,
it's
not
done
because
it's
not
on
a
lock.
So
we
have
to.
We
have
to
do
that
as
a
team,
okay,
but
let's
see
so,
who
else?
So?
A
A
A
Kasi
in
Israel
I'm
not
sure,
because
they're,
not
here,
we'll
I,
think
we'll
continue.
I
think
you've
been
I've,
seen
parts
coming
from
you,
so
that's
good
and
Abe,
that's
good
good,
but
but
yeah
as
soon
as
we
get
to
the
complete
visual
diagrams,
and
then
we
refine
the
master
index
to
verify
between
the
master
index
and
a
visual
diagram,
we're
ready
to
print
and
we're
ready
to
buy
parts.
A
So
it
seems
like
we
may
be,
like
you
know,
a
couple
of
weeks
away
from
that,
but
it's
I
mean
it's
definitely
moving
forward,
like
you
know,
like
slide
number
seven
right
here,
you
know:
that's
that's
a
lot
and
I
think
just
get
those
little
missing.
Details
like
like,
for
example,
those
bolt
holes
like
after
we
do
this.
Then
we
do
want
another
file.
A
That's
got
even
more
detail
so
that
in
free
can,
for
example,
when
we,
when
we
end
up
doing
the
final,
for
example,
exploded,
part
diagram,
so
you
ever
see
how
like
in
some
product
they
have.
This
really
really
complex
diagram
with
like
a
hundred
arrows.
Well,
we
should
be
able
to
do
that
with
our
complete
models.
That's
the
end
goal
because
that
will
be
like
say
say:
this
is
a
final
product
and
it's
a
real
finished
release
and
it's
the
official
version.
A
Then
people
can
go,
for
example,
to
the
full
explode
part
diagram
and
see
how
every
single
thing
works
if
they
want
to
buy
like
a
little
part
or
make
it
that
the
explode
part
diagram
can
refer
them
to
to
all
the
different
parts.
So
for
us,
like
the
eventual
explode
part
diagrams
would
definitely
be
hyperlinked
where
we
have
links
to
files
or
to
sources
and
so
forth.
A
So
those
all
those
assets
will
be
generated
down
the
road
and
maybe
not
exactly
right
now,
but
but
we
do
need
the
absolute
full
complete
CAD
to
make
that
possible.
So
that's
kind
of
a
long
of
it.
Okay,
so
I
think
that's.
We've
got
a
lot
to
work
on
on
a
filament
extruder,
let's
see
just
to
finish
up
with
anyone
else,
who's
on
it
on
the
meeting
today.
H
I
had
some
idea
of
maybe
how
to
make
the
wiki
page
part
live
three
bit
more
understandable.
Would
it
be
okay?
This
week,
I
got
a
replica
page
or
just
added
in
the
page,
to
discount
some
some
different
ideas
on
the
wiki
bit
more
pull
and
like
just
simple
things
like
in
the
free
code.
Maybe
we
can
color
codings,
for
instance,
let's
make
all
shell
parts
yellow
before
exporting
them
all
3d
printing,
for
example,
yeah.
A
H
A
H
A
A
B
A
C
C
A
C
F
C
Stuff
and
but
it's
good
for
visualizing
things
and
I
wrote
a
program
which
can
get
the
data
from
the
PCB
over
USB
ports
and
make
some
some
curved
diagrams
yeah,
and
you
can
see
they
are
very
straight
going
up
and
down
according
to
what
happens
on
the
or
what
movements
are
happening
on
the
test
rig
now
in
this
setup.
It
is
that
the
pastor
II
is
moved
by
an
external
controller,
which
is
the
old
manual
THC
controller
I
wrote
the
firmware
which
moves
it
continually
forward.
C
A
network
and
the
new
PCB
is
only
doing
so
far.
The
measuring
and
I
think
the
results.
Look
good
relatively
good.
They
are
has
some
quirks
or
irregularities
where
I
am
wondering
about
I
mean
last
Nia
was
exploring
the
stuff
and
getting
trying
to
get
a
feeling
of.
What's
going
on.
There
are
small
things
which
irritates
me,
for
example,
I
was
watching
out
his
there's
me
little
drift
or
something
but
not
really.
C
I
made
a
test
where
I
left
it
in
one
position
overnight
and
on
the
next
day
it
was
nearly
showing
the
same
value
so
who
drifts
there.
But
on
the
other
hand,
the
whole
system
is
quite
sensitive
against
any
influences
of
electromagnetic
fields.
For
example,
if
you
get
near
with
your
hand,
you
as
a
human
are
full
of
electric
signals
and
as
much
influences
and
so
on.
However,
one
discovery
I
made,
which
was
really.
F
C
A
great
thing
for
me
was
that
I
could
get
better
signal
when
I'm
doing
some
grounding,
but
grounding
means
in
this
case
not
connect
everything
to
the
normal
ground,
but
I
have
ever
there's
a
follow,
but
instead
to
the
shielding
I
mean
the
87,
7
or
7
process.
I
have
a
pin
which
is
related
to
use.
This
is
connected
with
the
surrounding
a
shield
on
the
coaxial
cable
mm-hmm,
for
example.
C
Fabric
using
wire
and
and
the
structure
of
the
author
of
the
text
break
that
made
the
signal
quite
quite
better,
but
I
also
had
found
that,
for
example,
if
I
then
change
the
position
of
where
I
connect.
My
my
shooting
crocodile
clamp
that
can
make
a
huge
difference
in
where
the
starting
level
of
the
author
of
the
measurement
range.
C
Where,
when
starts
one
time,
I
have
effect
that
it
made
a
difference
in
one
situation,
I
could
go
over
a
distance
of
three
centimeters
very
well
and
then
I
made
some
changes
and
then
suddenly
I
had
a
distance
or
distance
of
five
centimeters.
This
is
what
I
mean
as
a
kind
of
irregularities
which
I'm
still
exploring
and
I
think
what
what
is
may
be
still
easily
kind
of
calibration.
C
C
C
C
Uxr
and
some
Antley,
as
you
can
see
in
the
diagrams,
there
seem
to
be
a
reasonable
Sigma.
I
have
made
three
kind
of
experiments.
First
was
what
I
said
before
is
a
variation
along
one
centimeter
with
Europe
point
1
million
meter
steps,
which
was
accordingly
to
what
we
have
seen
last
week
in
the
in
the
video
of
this
guy
clémence
victor.
Is
it
or
what
the
name
was
you
remember
he
he
did
his
video
with
a
same
set
up.
C
So
that
was
the
reason
why
I
started
with
this
and
then
I
made
a
second
run
where
I
made
a
variation
along
five
centimeters
distance,
which
also
works
well
and
in
the
diagram,
is
your
broader
range
where
it
goes
over
and
then
I
made
a
search.
A
runt
experiment
run
where
I
moved
manually,
not
with
the
little
stepper
motor
app
I've,
switched
off
the
stepper
motor
and
moved
carriage
by
hand
along
my
my
my
marks,
which
I
have
painted
on
the
on
route
a
streak
in
one
centimeter
distances.
C
F
C
F
C
This,
where
I
variated
in
1
centimeter
why's
that
five
centimeters
in
total
forward
and
backward-
and
that
is
yeah-
but
you
can
see
from
this-
is
about
the
linearity.
The
thing
is
not
completely:
Linea
means
the
lowest
step
and
the
biggest
height,
and
if
you
go
upwards,
higher
higher
steps,
meaning
more
bigger
distance
and
then
and
the
range
is
getting
a
little
bit
other
this
air
case
height
is
getting
a
little
bit
smaller.
This
is
what
what
we
discussed
already
last
week
and.
H
C
Not
a
real
problem,
especially
since
we
are
probably
mostly
interested
in
the
mirror
and
now
or
maybe
not.
Maybe
we
know
I
think
we
don't
want
to
be
as
tight
as
possible
on
the
surface.
We
want
to
be
as
as
distance
from
it
because
of
the
metal
plate
is
hot
and
it's,
of
course
better.
If
you
can
move
22
to
centimeters
or
20
millimeters
above
the
surface
and
but
still
have
a
reasonable
signal
to
check
our
height
yeah
and
so
far
these
are
all
brand
new
experiments.
C
C
I
said
here
and
we've
shown
experiments,
the
tax
trick
was
moved
externally,
but
the
next
logical
step
is
to
make
a
marriage
between
the
cats
and
Xing
part
of
the
new
PCB
and,
of
course,
the
periphery,
which
was
the
drop
wheel
and
the
PD
six
zero-zero
driver,
and
my
next
step
will
be
to
put
all
these
modules
into
the
firmware
so
that
the
thing
can
control
itself
and
its
own
movements.
Yeah
I
mean
it's
interesting
to
see
if,
for
example,
stepper
motor
is
controlled
from
the
same
board.
C
F
C
Has
made
Fault
in
my
calculations,
not
I'm,
not
right,
it's
creepy
I
mean
the
other
guys
were
working
with
that
have
also
seen
that
the
signals
in
the
femtofarad
range
and
this
what-what-what-what
can
also
be
seen
under
on
the
monitor
or
program
where
I
always
have
in
the
right
corner,
showing
the
original
value.
As
it
came
from
the
kept
sending
born
from
the
mr
inverter,
the
film
are
small,
small
aremy
d
that
can
be
made
better.
I
think
there
is
not
an
issue
of
calibration.
A
Absolutely
so
your
range
sorry
yeah
as
a
capacitance
should
be
larger.
If
you
have
a
ring
like
like
the
typical
rings
that
I
see
or
maybe
like
like
I,
don't
know,
maybe
like
a
half
inch,
half
inch
wide
and
you've
got.
How
wide
is
your
ring
like
half
inch,
maybe
like
a
2
or
3
2
or
3
I
mean
like
say,
3.
C
C
The
ring
is
at
the
moment
of
42
millimeters
outer
diameter
meter
and
32
millimeters
in
a
diameter
that
gives
us
the
ring.
Broadness
is
5
millimeters
and
from
this
broadness
I
have
calculated
the
surface
area,
and
this
value
is
created
to
my
Zandro,
meaning.
If
I
would
take
a
bigger
diameter
ring,
then
I
would
get
another
layer,
but
I
have
take
into
account.
Surface
area
of
my
sandals
was
what's
float
into
the
formula
and
therefore
the
irregularities
layer,
meaning
with
a
bigger
diameter.
C
C
It
means
if
this
could
mean
is
that
the
case
that
would
mean
that,
in
fact,
the
AP
trip
sandals
people
value,
but
somehow
we
calculated
in
the
film
where
smaller
than
it
is
in
real
time.
What?
What
argues
for
that
is
that
the
single
is
sort
of
we
are
stable
or
strong
or,
however,
you
will
call
it
right
right,
I
mean
you
can
see
in
the
picture
of
years.
A
C
C
A
C
May
be
not
necessary
to
solve
this
problem,
that's
what
I
mean
mental
in
the
beginning,
when
I
said,
maybe
we
can
do
some
kind
of
relative
generation
miniature
like
in
the
beginning,
you
move
it
tied
to
the
surface
and
press
a
button
and
check
the
value,
and
that's
our
Bureau
value.
It's
the
home
position.
If
you
want
and
then
we
go
and
say
three
centimeters
upward
and
that's
our
position
or
whatever
like
this
and
set
set
an
example,
these
values
on
the
beginning
of
each
run,
and
then
he
knows
what
it
is.
A
C
C
Europe
when,
when
I
was
married
the
summer
when,
as
mixed
everything
in
one
firmware
and
have
this
complete
and
yeah,
then
I
I
will
I
will
try
here
from
there
try
to
develop
some
method
of
kind
of
relatively
calibration
or
whatever
you
know,
I
have
to
say,
of
course,
with
this
I'm
really
getting
on
the
borders
of
my
knowledge,
I
mean
and
biologists
and
know
physically
this
to
exist
in
me.
Yes,
I
do
my
best
and
yeah,
but
sometimes
there
are
practical
experiments.
Ten
replace
your
critical
knowledge,
yeah.
A
C
Pretty
good,
it
haven't,
read
it
as
long
as
it
is
stable.
We
can
work
with
this
and
the
only
concern
is.
It
is
really
in
that
very,
very
small
range
I
mean
we
are
talking
of
you
to
para
part,
that's
really
smart.
It
really
should
be
users
range.
Then
it
clear
that
is
quite
more
sensitive
against
other
influences
of
noise.
Then
it
would
be
in
a
higher
range,
but
if
it
really
operates
in
the
range,
the
truth
and.
C
C
No,
this
was
with
the
part
of
our
grounding
where
I
have
connected
to
sing
Auto,
but,
as
I
said,
the
grounding
are
doing.
Changes
with
the
grounding
has
much
influence
of
the
basic
level
where
well,
distinct,
where
things
start,
for
example,
I've
made
use
these
experiments
and
the
diagrams
you
can
see
a
range
from,
let's
say,
zero,
let's
say
120,
140
million,
so
for
us,
and
then
I
exchanged
the
PCT
and
took
one
of
the
other
PCBs
and
then
I
suddenly
was
in
the
range
between
zero
and
three
hundred
milli
central
Farhat.
C
But
when
I
made
the
movement
when
it
was
within
these
three
hundred
range
of
hundreds
there,
it
was
very
18.
So
it's
a
kind
of
continuity,
like
I,
said
I'm
still
playing
around
with
it
and
exploring
it
and
trying
to
getting
a
feeling
for
what
what
what
what
is
having
durable
enough
boards
instead
of
around
one
arc.
If
you
cleanse
the
the
shields
croco
diagrams
different
for
this
noise,
you
make
it
loose
and
clamp
it
on
the
same
position
that
can
make
a
shift
in
the
ground
level,
and
it
feels
a
bit
like
this.
C
If
by
this
actions
server,
indeed,
chip
is
maybe
public
or
our
influence,
or
something
like
this-
that
that's
that's
my
impression
if,
on
the
new
leather
and
I,
switch
the
board
off
and
switch
it
on
again,
then
it
fits
again
on
this
level.
Then
it
somehow
has
learns
that
never
or
Wassa
insignia,
but.
F
C
I'm
still
discovering
English
and
I
think
in
the
end
situation,
you
will
have
a
stable
set
up.
I
mean
my
test
break
is
also
quite
wobbly
or
little
bit
wobbly
because
I
just
fitted
on
my
table
and
can
move
if
I
push
it
a
little
bit
or
from
the
vibrations
of
the
stepper
motor,
for
example,
in
the
first
experiment,
where
I
made
the
one
centimeter
step
forward
backward
forward,
backward
I
have
made
a
run
where
I've
made
I
had
sampled
it
over
a
longer
period
and
I
was
seeing
that
the
thing
was
slightly
going
upwards.
C
Like
the
drift
like
it
was
drifting.
But
then
later,
I
I
found
that
when,
when
when
the
drift
was
getting
clearer
or
more
I
had
I
had
a
gap
between
the
arm
and
the
head
and
the
surface,
and
they
probably
from
the
vibrations
of
the
stepper
motor
that
the
ceiling
has
moved
a
little
bit.
So
I'm
I
have
Hume
that
this
is
not
a
really
drift
address
than
artifact
rewriting
from
my
wobbly
setup.
Okay,.
F
A
A
A
C
F
C
A
C
Means
that,
in
the
close,
a
distance
you
get
a
clearer
and
better
signal.
What
what
is
the
distance,
what
you
have
in
mind
or
what
you
think
by
experience,
maybe
what
is
appropriate,
of
which,
how
much
distance
should
we
at
least
have
between
sin,
go
ahead
and
the
surface
later
in
running
the
torch
table,
when
it's
getting
hot
at
you
and
any
value
5.
C
C
And
we
made
from
here
I
mean
I,
don't
know
how
much
electrical
noise
the
rest
of
the
table
table
is
producing,
but
here
from
my
set
up
women
we
can
step
up
model
next
to
it.
I
am
so
feeling
that
we
could
even
go
up
to
20
millimeters,
so
I
guess
five
millimeters
up
to
20
millimeters.
That
will
be
our
our.
G
C
C
A
No,
this
is
great,
looks,
looks
very
positive
for
initial
data,
we're
gonna
we're
going
to
work
this
out.
This
is
good
and
I'll
see
if
I
can
get
somebody
to
comment
on
this.
Some
of
them
might
be
in
a
know
about
capacitive,
sensors,
okay,
excellent
work,
man,
good
job
for
the
home
team,
another
score
against
global
oppression,
okay,
very
good.
So
we
can
I
think
we.
A
A
Okay,
we
should
get
you
going
on
like
immediately.
We
should
start
on
the
filament,
extruder,
stuff
and
I
know
how
much
you
you
understood
from
that,
but
maybe
we
can
follow
up.
So
maybe
we
can
let
everybody
go.
The
only
thing
is
I
want
to
follow
up
with
Christian
as
well
Christian
we're
talking
right
now
as
well
to
do
the
print
cluster
work,
because
I
need
like
half
hour
to
relax
for
a
second
and
them,
which
are
you
still
going
to
be
out
Christian,
no
problem.
A
Okay,
I'll
call
you
back
in
half
an
hour
and
as
far
as
as
far
as
the
meeting
up
I
just
want
to
Alejandro
that
maybe
we
can
talk
a
little,
but
otherwise,
let's,
let's
call
this
a
day
thanks
everybody
and
the
next
meeting
is
once
again
1:00
p.m.
Tuesday
of
next
week.
So
we'll
see
how
far
we
get
till
that
time,
and
otherwise
great
progress
we'll
see
you
at
that
time:
okay,
great,
okay,
Farkle,
excellent
Alejandro's!
Let
me
just
ask
you
for
a
little
bit.
A
C
A
A
A
B
A
You
know
what
Roberto,
if
you
want
to
get
together
with
Alejandro,
you
guys
speak
the
same
language.
So
maybe
maybe
you
can
fill
them
in
a
little
more
on
the
details
and
maybe
have
him.
Can
you
maybe
have
him
take
on
a
couple
of
simple
tasks
with
you
like
you
can
guide
them
through?
That
they'll
be
great.
G
A
So
I'll
introduce
you
to
like
I'll
email.
You
guys
right
now
and
you
can
then
guide
Alejandro
on
some
of
the
specific
tasks.
So
you
have
a
Roberto.
You
have
a
good
good
handle
on
what's
what's
going
on
there,
so
if
you
can
have
them
step
right
into
the
simple
task,
there's
a
lot
of
simple
tasks
to
be
done
there.
So
you
could
do
that
yep!